100WV 50A max 500W Active Load

rkosiorek

100 kW
Joined
Jan 18, 2007
Messages
1,770
Location
Belleville, Ontario Canada
I was looking for a load to connect my Battery packs to for testing. I was thinking of using some big power resistors but the price for those was prohibitive. Next I though of some heating elements made from resistance wire. Same problem. Next I thought of a big bank of 100W bulbs. Not bad but I live in a bachelor apartment. If my testing goes past my bedtime I won’t get any sleep with the lights on all of the time.

While cleaning out a drawer I found a bunch of really BIG HEATSINKS from old P4 CPU’s. and a 50A 50mV shunt for a panel meter. I got the idea for an active load.

I was thinking of something capable of 500W, 50A or 100V whichever came first. I also have a few IRFB4110 FETs.

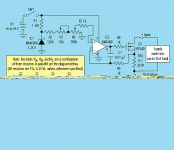
So I sketched up a basic idea. Using the 4 or 5 of the FETs in parallel on those heatsinks switching the current through that shunt resistor. Add a opamp or two in a feedback loop with a pot to control it and I might even be able to make the whole thing adjustable.

So I sketched up the idea. And here it is:

500W.jpg

The reason I have it here is so that I can get some input from the real engineers in the group. i have a few questions. Am I on the right track? Will the opamps be able to drive the FETs?

The idea is this. The FETs are driven by a comparator. One input of the comparator is tied to a pot used as a resistive divider. The output of the pot will be 0V to 0.5V. the FETs are in series with the 50A 50mV shunt resistor. The voltage across the shunt will go to a X10 prescaler so that when 50A is going through the shunt the output of the scaler will also be 0.5V and this is fed into the other input of the comparator. if the scaled voltage across the shunt is higher than the control voltage drive to the FETs will be turned off. since this is an analog approach i figure the FETs will burn the majority of the power.

This way the comparator will try to keep the voltage across the shunt equal to the control voltage from the pot. since the contol circuit is very low power it could be powered by a 9V battery.

While I was drawing it I also included the vales for the prescaler so that a 75mV shunt could also be used.

I figured as long as I am using the shunt I could also use the meter that it came with to directly measure the current. At the same time I could use another meter to measure the voltage across the pot to preset my target current.

But his does not have any safety features yet. I think that it could use some. The maximum load this could present would be limited by how much power the FET/Heatsink combo could dissipate before the FETs go bye-bye. So although the FETs can handle a maximum of 100V with the 500W limit they could only handle the full amps up to 10V. the current limit would then decline to 5A @ 100V. any idea how to design this kind of voltage controlled limit?

i say 500W because I think that the FETS in a TO220 package will only handle 80 to 120W each depending on how good the heatsink is. so 4 of them should be able to handle 500W. Could this circuit drive more FETs.

Or does some one have a better alternative? Suggestions?

Rick
 

Attachments

  • 500W.pdf
    21.6 KB · Views: 1,561
Three months ago I'd not have had a clue what you're talking about.
Now the reason for it fizzes though the details are way beyond me.

Fan, thermostat and timer might be safety features to consider.

I'm watching this thread to see what the collective genius of this site comes up with.
 
Looks very similar to a design I saw in Electronic Design. The schematic is below, and for the whole article:

http://electronicdesign.com/Articles/Index.cfm?AD=1&ArticleID=4056

This uses a single FET for 10 amps, but you could scale that with as many FETs as desired. Of course, you'll have the same issue with heatsinks and cooling - a fan would help a lot.
 

Attachments

  • constant_current_load.gif
    constant_current_load.gif
    21.6 KB · Views: 15,392
I think it'd nice to have some super-caps we could discharge into. That way the energy can be recycled.

(I'm actually looking into doing automated battery testing and am trying to come up with a feasible schematic. It appears I might go with hall sensors for current sensing, an AVR's A/D for voltage testing, an AVR+my programming for the logic and rewiring heating wire for the load. The mosfets are likely to be chained together into groups to allow more granular control of the current while allowing the R_on resistance levels to be achieved.)
 
go to the flea store, or even the hardware store an look for a heater fan, or such and use the nichrome element out of it, assuming it's winter where you live. 25 bucks new, but at goodwill, should be at least half that.
 
My 500W active load :
To limit the dissipation of transistors, I insert bulbs automobiles (3S2P H3) ... L1 in schématic
H3 power is 110W with 12V

p1060862it7.jpg
 
swbluto said:
I think it'd nice to have some super-caps we could discharge into. That way the energy can be recycled.

(I'm actually looking into doing automated battery testing and am trying to come up with a feasible schematic. It appears I might go with hall sensors for current sensing, an AVR's A/D for voltage testing, an AVR+my programming for the logic and rewiring heating wire for the load. The mosfets are likely to be chained together into groups to allow more granular control of the current while allowing the R_on resistance levels to be achieved.)

Super caps might be good but you'll need lots of them, plus their voltage changes with energy content much faster than with chemical cells. I was thinking of doing something like you are talking about, but I was reflecting on using a bi-diretional PWM setup to transfer energy both ways between a larger, higher voltage battery and the cell(s) under test. I did a basic PWM setup like this that actually worked well, about two years ago. This works because a PWM step-up circuit is a step-down when viewed from the other side. What determines which way the current flows is the voltage ratio vs the set duty cycle. You also have to be using a synchronized PWM circuit for this to work (top and bottom FETs switching actively).

With this type of setup and using something like an allegro hall sensor as you mentioned, you could set the charge/discharge currents to whatever you like using your micro, limited by max FET current and the battery C rates only.
 
Hi Rick,

You are on the right track - to do any serious testing you need a controllable load, and that probably means an active one. I went through the same thought processes myself - drawing up designs, etc.

One idea I had was a big lamp or big R, and using a DC-DC converter to make it controllable - but I then decided there must be commercial instruments available.

Some people on here are using the CBA, but that is IMHO not much more than a toy (I will probably get flamed for that).

After some looking around I found one of these on ebay

EL750B.jpeg
750 W Electronic load - 55 V / 150 A (not at the same time)

Nick
 
silicium said:
My 500W active load :
To limit the dissipation of transistors, I insert bulbs automobiles (3S2P H3) ... L1 in schématic
H3 power is 110W with 12V

p1060862it7.jpg

NIce and simple desing too Silicium!

What desing software do you use for making your schematics? (the one in the PDF)

Doc
 
dogman said:
go to the flea store, or even the hardware store an look for a heater fan, or such and use the nichrome element out of it, assuming it's winter where you live. 25 bucks new, but at goodwill, should be at least half that.

i had thought of that as well. was at the Sally Ann Thrift shop yesterday and saw a couple. but once i got started on the idea i decided that i would like to have an adjustable load. that would mean some way of controling the heater - back to the same issue with some electronics to control it. on the plus side i could get a heater that can handle a couple of thousand wats pretty cheap. not fun in the summer though.

silicium said:
My 500W active load :
To limit the dissipation of transistors, I insert bulbs automobiles (3S2P H3) ... L1 in schématic
H3 power is 110W with 12V

i see some merit here. but a whack of H3 bulbs and bases would still cost a bunch. but maybe not as much as a big ass heatsink would. still leaves the issue of that unwanted byproduct - light. i think that the fan is a good idea though.

Patrick said:
Looks very similar to a design I saw in Electronic Design. The schematic is below, and for the whole article:

http://electronicdesign.com/Articles/Index.cfm?AD=1&ArticleID=4056

This uses a single FET for 10 amps, but you could scale that with as many FETs as desired. Of course, you'll have the same issue with heatsinks and cooling - a fan would help a lot.

i saw that one as well. i priced a 0.1R 1% 20W resistor and it cost more than a shunt resistor for an ammeter. so i just figured i would go for the shunt instead. and it can also be used for an inline ammeter.

since most shunts are in the range of 1mR to 1.5mR i wanted to add an opamp to magnify its range a bit and improve the granularity.

i guess whati would really want is something like the unit that Tiberius bought on eBay. so i think that it is back to the drawing board with a couple of new ideas.

rick
 
silicium wrote:My 500W active load :
To limit the dissipation of transistors, I insert bulbs automobiles (3S2P H3) ... L1 in schématic
H3 power is 110W with 12V


i see some merit here. but a whack of H3 bulbs and bases would still cost a bunch. but maybe not as much as a big ass heatsink would. still leaves the issue of that unwanted byproduct - light. i think that the fan is a good idea though.

Cost H3 bulb: 2$ for 2... (sold)
 
Well i looked at all of the suggestions. i also found a schematic for a nice active load in the February 2002 Elektor magazine. It had some nice features including a power limiter.

theirs was limited to 20A and 100W. so i modified the schematic to what i think will work for what i need.
750W.jpg
View attachment 750W.pdf

the 750W rating is very conservative. I think that as long as the heatsink is adequate i should be able to increase that to over 1000W but only testing will tell. i got a big heatsink for it but i will also have a cpu fan blowing on it as long as it turned on. i have ordered the parts from Digikey and i should be assemblng it in the next few days.

if it works as planned i'm going to add a couple of Voltmeters to the circuit. one will measure the voltage from the wiper of R3 which is used to set the Current. i'll just shift the decimal point on the meter so that i can use it to preset the current setting. every 10mV out of R3 coresponds to 1A load.

the second one will be attached across R1 which is a 0.010 ohm shunt. again the current will be 10mV per Amp. and will be the actual current.

for R3 i am using a 10 turn 10K panel mount pot. this pot has a clock face that shows its postion in %. so i will be able to use that initially to roughly set the current. i got it on ebay and it is a real KEWL item called a Knob-Pot.

bu11_13knobpot3600.jpg

the majority of the circuit will be built on a piece of perf board. since i am only planning on making one.

i'll post picturea as work progresses.

rick
 
That is excellent!! I am interested to build it since every of my active load (incorporated in cell discharger like CBA or Megapower can't go higher than 50V... so your desing is very interesting!

Let me know if it work ! I have like 50% of the components.. almost 75% but some are not in perfect shape.. But heatsink, shunt resistor, lm324, resistors, caps.. lcd and led meter and wiper analog meter.. I have all that.. it's like i should just order some irf 4110...

BUt.. wait a minute..!!! I already have something that could work well!!! it would just take few mod on your desing i guess..

I have two complete TO-3 transistor rack with heatsink and shunt resistor on them!!.. Two nice rack of 10 To-3 thansistor!

250W each!!! :twisted: one is the PNP and the other is the NPN..

If i remember correctly they areMJ150024 and MJ 150025... but only one complete rail of 10 paralleled of them should work well.

it's like i could build a very powerfull audio amplifier with them.. but my HI Fi buzz already ended since few years... now i'm interested on EV !! :twisted:

Their SOA curve is nearly perfect!! so for a wire Current and voltage opeeration it is perfect!!

But I know they would need a powerfull driver...

So what do you think i should mod to operate them..?? Can you give me some help?

Doc
 

Attachments

  • P1070205_1024x768.jpg
    P1070205_1024x768.jpg
    101.7 KB · Views: 7,062
WOWZERS!!! that must have been a hell of an amp at one time.

though no where as big i also have a big linear output section i could have used. almost but not quite as big as yours.

001.jpg

Too bad my design skills are NOT good enough to design an output stage and drivers like those. I wish that they were.

on the other hand FET's have a few big advantages. #1 would be the voltage drop. Bipolar transistors would have a much higher internal voltage drop. add to that the loss through the .5R series resistor on each transistor and it's drop... well, pretty sure that it could only be used to a min Vin of 20V. with the FETs i'm pretty sure that the load will be useful down to 2V or less. definitetly could not say the same for the Bipolar.

#2 my low voltage supply for the driver is only a few mA. nothing big needed. if i had too i could run it off of a couple of 9V batteries. with Bipolar we'd likely need a few amps. that means a bigger low voltage supply. and a bigger transistor driver circuit.

#3 expense, add up the costs of the driver stage, the bigger power supply and all of the support parts, cheaper to buy a few FETs. clincher was the fact that i would not need a forklift to move the finished circuit, or build a special bench strong enoug to support the weight. (that was an attempt at sarchasm.)

that and that i did not have the confidence to design a bipolar output that would not melt the first time i tried it was why i took the easy road out.

but maybe some of the better designers like fechter or randomly could help out if they are reading this.

rick
 
Nice heatsink Doc,

It would actually be easier to remove the bipolar transistors and replace them with FETs.
My guess is the board is configured for complimentary output, so that would need some serious reconfiguring

To use bipolar transistors in parallel, it is usually necessary to have a separate resistor in series with each emitter to prevent current hogging and thermal runaway.

Does the board have big resistors on it?

To drive the bipoar transistors, the datasheet indicates you get a current gain of about 10 at high currents, so for a 50 amp load, you'd need 5 amps of drive.

In addition to a constant current, you could easily use one op-amp section as a low voltage cutoff to disconnect the load at a predetermined voltage. Similarly, you could make in interface for an external LVC, like on a BMS circuit.

I'll have to think about what it would take to drive something like that. If you kept it in the complementary configuration, it might be possible to use both NPN and PNP sections in series to spread out the dissipation.
 
fechter said:
Nice heatsink Doc,

<snip>

To drive the bipoar transistors, the datasheet indicates you get a current gain of about 10 at high currents, so for a 50 amp load, you'd need 5 amps of drive.

i guess that that would require a low voltage power supply capable of at least 5 or 6A just to power the drivers for the big power transistors? sounds like the drivers would be pretty hefty themselves.

fechter said:
In addition to a constant current, you could easily use one op-amp section as a low voltage cutoff to disconnect the load at a predetermined voltage. Similarly, you could make in interface for an external LVC, like on a BMS circuit.

<snip>

in my circuit U1b and U1c are used a voltage controlled power limiter. up to 15V full current (as set by U1d, R17) will be allowed. 15V @ 50A = 750W. over 15V D3 should start to operate in it's linear region and start to conduct. U1b will buffer that and feed it into the amplifier U1c. U1c subtracts the forward voltage of a diode from the output of U1b inverts and amplifies that difference by 10. the result of all this (i hope) is that the output measured at input of U1d will depend on the input voltage. it will stay at 0.5V until the input voltage increases to 15V (allowing the full 50A max). as the input voltage increases over 15V this voltage will ramp down to 0.075V at an input voltage of 100V. U1d is a second current sensor. except that it sets the current limit based n the input voltage. it does this overiding the set voltage on U1a. the output of U1d also has 2 LEDs. one is green for normal operation, the other is red and shows when the limiter is operating.

verbalising this made me realise that i may have to play with the gain of U1c to make sure that 7A load is still available at 100V

rick
 
for concerns for end user safety, do not want someone starting a fire as this thing can glow at high loads. Sorry for the removal of the approach.

Linear
 
i love the Mcgyver things. especially ones that really work. you must have a helluva junk drawer to find parts like those. (envy talking there)

could you post a schematic?

rick
 
also more info on the resistance characterisitics of the mig wire?

rick
 
rkosiorek said:
i'll post picturea as work progresses.

rick


I would like to see those pics! :D

Searching in my lab electronic stock i realized that i should have enough component to build like 2 or 3 like it!! (750W) :shock:

-Lm324 .. 30 of them

-10k pot 10 turn 5 of them

-4148 I've stop counting

-7815 I've stop counting

-TL431, probably 4 or 5 in my spare powqer supply or ac-dc switching adaptor

-caps, I've stop counting

-heatsink.. .. 20kg of them

-digital meter.. around 8-9 fro 2mV to 2V input 3 1/2 digit... + bunch of great retro analog wiper!

-Switch, .. conector.. box

well... what am i waiting to begin!! :|

... the 4110!!

Doc
 
linear said:
for concerns for end user safety, do not want someone starting a fire as this thing can glow at high loads. Sorry for the removal of the approach.

Linear

argggggggg...........

Why do I have to miss the good stuff?!!! :mrgreen:
 
rkosiorek, do you think the quad op amp LM324 can handle more than 6 IRFB4110 fets?

I plan on using 10 fets and making a 1000W 100A version..

RRRR :twisted: I want to be able to discharge an A123 to 50C ! :shock:

Doc
 
For those considering using the IRFB4110 MOSFET as a load, see its SOA graph below...

IRFB4110 SOA Graph.gif

Be very careful to derate the MOSFET to match the voltage of the cells/packs you'll be discharging (DC plot line).
While you can go up to about 50A at 7V, when used as a load, each is limited to 10A at 9V and only 1A at about 17V!!!

The IRFB4110 is a great MOSFET for switching applications but is severely limited when biased in its linear region, i.e., is used as a load. :(
But, at 10A each for your load Doc, you'll have zero problems up to 2S. :D
 
Back
Top