making 4mm bullet busbar 4 paralleling. With videos pg2

Joined
Jun 19, 2011
Messages
1,164
Location
Cheshire, UK
In an effort to create safer and quality connectors I have been toying with the idea of ganging together some 4mm bullets with the plastic cases into a parallelogram formation and connecting up all the +ve together and all the -ves together with a single rod of copper.

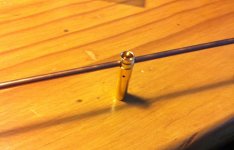
here is the first piece in the puzzle
IMG_0549.JPG
4mm female with a 2.5mm hole drilled through inserted 2.4mm copper welding rod apparently 98% copper. Gonna parallel through the balance taps too but this should make for a more even strain on the cells. I can then more easily break the sub packs down for para charging too using a similar idea.

wish i had a plastic printer cause id make some really nice custom plastic covers for them, as it is i will make do with binding together the red plastic jackets they have.

a bonus to making the sheathing would be that the cost would come right down and the build time.

Nechaus fancy having a go?

The reason I am not just clipping the connector on the batteries is to maintain warranty and help reduce loss on resale value.

when I've done a full connector I'll post it, but I've got to finish my thesis first so could be a couple of weeks
 
first full 4p connector complete.

Here is build progress pictorially, starting with an almost finished article

IMG_0564_zps29a75fd2.jpg


IMG_0563_zps2d32f318.jpg


IMG_0562_zps96462f57.jpg

IMG_0561_zpsd367c8e3.jpg

IMG_0560_zps1b4bfe6f.jpg

IMG_0559_zpsbad34220.jpg

IMG_0558_zpsf6ee058c.jpg

IMG_0557_zps9bb02846.jpg

IMG_0556_zpsd4a369a7.jpg

IMG_0555_zpscfa5238c.jpg

IMG_0554_zpsc47b5d6b.jpg


progress is a bit back to front here, basically the steps are.

1. drill hole through with 2.5 mm bit (last pic in the vice)
2. make a jig using the connector sheath as a guide (drill four holes in piece of wood to stand up the bullets)
3. thread the connectors onto your 2.4mm diameter copper welding rod
4. start soldering the connectors on from the end and work your way down. You may want to keep checking the alignment
5. hacksaw and file off the rod left after the last bullet
6. melt or drill hole in the plastic casings at the bottom of the finger grip.
7. cut with a hot blade down to this 2.5 mm hole
8. tap the casings on one by one using a round file to sink into the hole you made
9. put cable ties around to secure the ends
10. use some silicon or potting material to secure the ends.
DONE!
3.
 
Nice work :)
I also use a wood fixture with holes drilled in it for production.

What is your plan for insulating the bus bar?
~KF 8)
 
maybe a silicon potting or a glue gun. I don't think the connnectors should get hot.

I really want to make the plastic housings on a plastic printer as the whole process would be lots quicker and look more pro at the end. however its not like they will be on display so maybe it does not matter.

Thanks for the encouragement KF, i've liked you two wheel conversion and rust proofing threads.
 
Might want to experiment with Liquid Tape or equivalent.

41lWbxfBeFL._SL500_AA300_.jpg

Amazon: Plastic Dip Intl. LET14Z01 Liquid Electrical Tape

Toxic Warning: Must apply this outdoors; very stinky.

There are two ways to wire up battery packs - and I went the other direction where the batteries are assembled as series first, then paralleled. However for my next ride (whenever I get to it) the plan is to go prarallel first then series to facilitate better BMS management. Bus bar ideas like yours would work exceptionally well within that design. :wink:

Best, KF
 
This is exactly what I am doing, by paralleling 3 cells, then joining them as 23S, 26650's. I just dug out the 10Ga. wire for joining the cells in Series. I will skin some 8Ga. copper wire to use as the buss, then spread it with a punch or whatever, insert the female half and solder them in. Then, cover between the socket with the insulation I take off the wire and glue it on.

Drilling the sockets might be a better idea. Nice thread. Thanks
 
ive thought about this but cleanly pulling it off is another thing. If ther was a way to pot it or something it would be awesome i think. Drilling nylon blocks would work pretty good and make 4P blocks. You could even make 4S blocks. Wish i had R&D funds to make prototypes.
 
ah thanks for the plastic dip suggestion.

about the parallel first series after. I completely agree. I used to have 2x 9s2p, paralleling at the 9s level and on all the balance taps. I used to run 18s on a hua tong controller.


. This time i will parallel at all 3s chunks though main charge leads. Charging might eventually be practical at 3s (loads of p) level. though ive got a hyperion1420i. eventually im gonna splash again on 4x 2s packs to bump my 12s up to 14s so i still have a one plug charge but perfect Voltage for my gm controller.
 
just ordered the rest of my 4mm bullets from giant shark in the UK, hobby king would have been cheaper but were on back order.

I reasoned that for a 4x 3s4p pack and a 2s4p to build my 14s4p pack i would need 25 pairs of connectors. I had already built one which you have seen in earlier in the thread so that means i need 20 more pairs. I had 5 red plastic housings but only 2 male bullets and 4 female bullets (how? i don't know) so I ordered 2 packs of 10 of the 4mm futian bullets with the housing at £10.96 and 1 pack of the tauco 4mm housingless bullets at £2.45.

Total priced for this purchase is approximately £17 delivered.

welding rods the other day cost £5.19 for 3, 30cm lengths.

if I factor in my 5 bullets from before too. the that is £5 more.

2.4mm drill bits x 2 £4

total so far £31

Its proving to be an expensive experiment. Not even counting the time in building.

this is for a 14s4p pack made from 3s lipo
 
That liquid tape is not the same thing as Plasti-dip. Liquid tape will eventually harden as a real tough covering. It's nearly impossible to remove once cured. Since moving here, I have had repeat problems with phone line corrosion, outside the house. They use a 4 screw block for connecting the street line to the house line. Every3-4 months I had to get the phone guy to come out. Finally, I had him use the Liquid Tape. Has not been back, since I gave him a bottle, 2 years ago.

Plasti-dip, as I remember it, stays somewhat soft and can be removed with some effort.
 
H in CR : so which is the thing KF put a link to? cause it says both things in link plastic dip and liquid tape. probably gonna just use a glue gun but would be nice to know the alternatives
 
whereswally606 said:
H in CR : so which is the thing KF put a link to? cause it says both things in link plastic dip and liquid tape. probably gonna just use a glue gun but would be nice to know the alternatives
I used "Liquid Tape/Cinta Líquida" made by Dorman; I can't remember if I got it from Amazon or from my local.

liquid-tape-1.jpg

My specific product packaging looks like the one on the far left.

However - it dries to very hard waxy-like, and is best if applied in mosdestly thin coats - allowed to dry, then re-applied to cover exposed areas. It stinks like hell and will give you a headache if used indoors. On a good warm day at or above room temp, a layer will dry in about 10-15 minutes. Full cure is about 48 hours. It does not tolerate flexible connections well.

Outside, in the wind, wearing a filter mask... KF :)
 
Thanks KF. When for the uber cheap option. glue gun glue. managed to get 2x 27 sticks for £4 from my local hardware highstreet odds and ends type shop. Finish is rather functional rather than aesthetic but tbh nobody is gonna see them doing their job. I only using a gm 48v controller limited to 50a peak and 30a continuous so i cant see them getting hot enough to melt the glue. Plus it was quick and non toxic which is a bonus after the amount of solder i will be exposed to doing the bus bar bit.

If it isn't up to the job it can be drilled out easy enough.
 
Just didn't want someone to use "Plastic Dip". That stuff is used by sissies to dip plier handles and such into, so they don't get their battery charged when touching charged electrical stuff. :lol:

The liquid tape has been around for many years, especially in the boating industry. Only thing is, the bottle dries out after a while, so, need to check it and see if a new one is needed for stand by.
 
just received the 4mm bullets from giant shark formerly giant cod. ordered 1st class post was delivered 10am next day.

anyway really like the quality of the housed bullets by futian however my gamble on the tauco bullets was a poor one. I have better bullets on the ends of previously made adapter wires which will be desoldered to complete this project.

The tauco 4mm bullets will be used to make smaller gauge wires for something else.
 
Just did a enough connectors for my 12s4p pack i am going to build. infact did enough for 14s4p when i get to purchase the 2s lipo packs. Anyway did a few videos and here is are the connectors.

IMG_0574.jpg

all the finished (almost) connectors

[youtube]b2BoqfyGfrU[/youtube]

Drilling the first bullet connector

[youtube]8pmM6t4aHB0[/youtube]
Drilling half of the rest (you may want to skip through lots of this.

[youtube]YuoUld6jUCQ[/youtube]
Soldering the bullets

I didn't film the burning of a hole through the bullets or fitting as i was running out of time.

Hope these videos inspired some more DIYers
 
A new advance I made today to go along with my bus bar parallel connectors.

It is JST-XH balance tap parallel connectors, beefed up the traces on some strip board with two strands of copper wire. will insulate the backs with foam and hot glue but here is a photo to show what im talking about.

IMG_0580_zps5e7ca153.jpg


there is 4 here, so enough to wire up my 12s4p lipo zippy flightmax 40c pack. might get to run the bike soon.
 
Mikal, glad you got inspired.

those balance tap connectors arent finished yet. they need insulating on the backs so i dont short the packs

I didnt incorporate bullets onto pcb for the same reason. I want something that has a near 0 chance of shorting. I think the red casings when properly fixed together and filled in with a bit of hot glue does this.

I will take some pictures of the final battery build. its going into a manrose B&Q pvc ducting. 4 3s lipo fit side by side like a glove. so 9 packs under the downtube and 3 above it. Both types of parallel adapters don't take too long once you get a rhythm going.
 
I haven't had so much time recently and I've been away from the forums, but I have a 3D printer and could prototype some connectors. It's unclear to me if you've moved away from your original design (it seems like you might have.) so I don't know how much help that will be.

However, the nice thing is that you can prototype a bunch of ones out of plastic, and then eventually I can print a bunch of molds. In the long-term, you sort of need a method other than 3D printing, because it's rather slow.


The other trick is that I'll still be away from my printer until the fourth, but I could make simple STL files if you had an idea as to what you wanted it to look like. I'm still a pretty bad CAD modeler, but I'm getting slightly better.
 
Hey kin thanks for the offer. I have moved away from the idea of plastic printing the casing. I figure I can do a better job with a punch and card and acetate. My dad owns a printing/photocopying business in Stockport near Manchester, England. The new method will be faster to produce, less expensive and it will most likely end up with a professional finish with a bit of advertising to boot. I hope to do a production run after Christmas. One thing is i could do with some customers.


who wants parallel connectors name your subpack size. and how many connectors.

for me the ones i've done already were for 4p which meant having 5 bullet pairs in each connector.
 
That's an incredibly nice buss-bar setup there.^ I forgot about his build thread. I need to go through that again.
 
Spinning magnet: thanks for tenchs link, I massively admired the work he does. Pretty sure I could also replicate the series parallel battery switch too as well as the subpack connectors. I will have to make some samples to convince peeps but I promise they will look better than the prototype.
 
Back
Top