Electric Jeepster - New(ish)member new build

Obiwan007

1 kW
Joined
Dec 16, 2012
Messages
332
Location
Northern California
Hi to all,
image.jpg
image.jpg
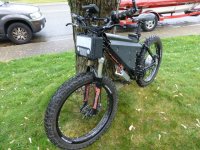
I feel like in some ways I know many of you from lurking and learning for some time now. Let me start by saying thanks so much for all of the amazing information and for inspiring in me the desire to begin a build of my own. By way of introduction, he is my story. I was bitten by the e-bike bug when I found a really nice (tame) e-moto at a garage sale for cheap. I have ridden almost every day since. I have now gotten two more (tame) beach cruiser bikes and now go on tame rides with my wife and kids. Now,..I'm done with tame. You on ES have inspired me to do something more. So this is my goal: I am building a full suspension, electrified, fat bike. I envision a sort of "jeep" of the e-bike world. We often vacation where there is either sand or snow and I thought it would be really unique to combine the capability of e-biking in those environments with our normal road e-biking that my wife and I do together now. Plus I'm a sucker for trying something no one else has managed yet (or at least few). That said I began with an arbitrary goal of an e-bike that was capable of 30 mph on the flat roadway with 25 miles of range. I also decided to build this first project on an unmodified stock frame and get as close to the fat tire feel as I could without modifications. Thinking that this would be a learning project that could become a hand-me down bike to the wife when I do a second build with true fat tires (again, arbitrarily, I define that as 3.5 inches wide or greater). So I began to read and research incessantly on the sphere and elsewhere. I began actively gathering resources a month ago when, after looking at many donor bikes, I bought a really great Kona manomano DS bike with lots of the features I thought I should be looking for. Since then I have gotten a motor, decided on a really unique wheel build design, acquired all the parts for that and sent them off to JRH the wheel man for custom assembly, and purchased a Lyen controller. So, well on my way. While the mechanical stuff is being readied, I am now turning to the electrical end. One of the parameters i really wanted to stay within is to put all or most of my batteries in or below the triangle. After lots of research and reading, I plan to use a system that has a form factor that allows that but is also open-ended for expansion. Thus I plan to go, initially with 4 of the 6s 1p 8000maH lipos from HK if they ever go off backorder. If I have this right, I will hook them up in a 12s2p configuration for 44.4V and 16aH. These four batts will fit either in the triangle or below the down tube. If I later want to up the power on this bike I would feel pretty comfortable putting two more on a seat post rack for 18s2p and would then only have about an extra 6 or 7 lbs above or at the level of the top tube. Looking back, I see I have really gone on a bit. At this point I don,t feel like I have the charging process completely figured out yet and I am just now formulating a wiring diagram in my head. I do plan to us a CA on this bike and I would like to wire it in a fashion that would allow on-board charging except for when I do a full balance/maintenance charge. Now please feel free to poke holes wherever you think necessary. I really do want the advice and realize that I still have much to learn. I have a long history of various types of fabrication in many types of media and have an excellently equipped shop that includes a machinist’s mill and lathe. Also, a well equipped wood shop with many tools that I have built myself including a 2” X 72” Belt grinder (I love that thing). I guess what I am saying is that I am not completely unskilled nor under equipped. So I hope that I am well suited to take a ride down the slippery slope of EV biking. So let this be my introduction and the beginning of a thread on my build.
 

Attachments

  • image.jpg
    image.jpg
    98.1 KB · Views: 6,714
Go for it. My version of the same thing has been crazy fun. Not a true fattie, but I managed to cram a 2.5" rear knobby into the frame, and run 2.3 in front. In the deep sand, I just use the power to float the front tire good enough, while the fat rear tire gets acceptable float in dry sugar sand up to 6" deep. Rides even better in 3" deep sand, which is about average here.

If the batts won't carry in the frame, carry them saddlebag fasion close but not too close to the head set on the top tube. That's worked ok for me with my cheapo Y frame bike.

Look at Icecube 57's wiring harnesses in for sale new. Buy it or copy it.
 
Thanks dogman, it's already been lots of fun and I really have only been in the design and acquisition stages so far. So here is the wheel set I am going for. These are the rims I'm using:
http://www.tremx.com/Moose_Racing_Aluminum_Rims_p/moose_racing_aluminum_rims.htm
image.jpg

And here are the tires:
http://www.motorcycle-superstore.com/2/29/393/15034/ITEM/Shinko-244-Dual-Sport-Front---Rear-Tire.aspx
image.jpg

I'm putting this tire in a 19” (motorcycle number) rim that is 1.85" wide. This tire comes in both 2.75" and 3" width. It looks like a 3" tire would fit in my frame but the tolerance would be so close that I chickened out and got the 2.75"er. I figured that there were so many factors that could offset the tire from the rim just slightly that I would be slightly conservative. But even at this it will be wider than almost any other tire I could find. The bike currently has 26" rims and 2.5" MTB tires and I like the overall look of it. But at the advice of others I have decided to go with a slightly smaller overall diameter on the wheel for two reasons. First is the leverage issue; with these heavier wheels I thought I could use the extra advantage. Second, this puts the fattest part of the tire into a slightly wider part of the frame and increases the chance I can make them fit. BTW, anybody know of any real problem with grinding the brake mounts (upper) off of front shocks? I may have to do this. Anyway the rims motor and hubs are in the hands of JRH now and he is going to use whatever black spokes will work best for the build and nipple size that is required. I'll report back later on the outcome of this wheel build attempt and any issues I run into. Dogman, as for the wiring harnesses, I just spoke with icecube57 yesterday and he really got me on the right track for the wiring and turned me on to his youtube videos that clear up a lot of my blind spots. I will likely buy harnesses from him for the batteries and then build the rest custom to the bike. I am keen on mounting the controller to the head tube after replacing my current forks with dual crowns. It seems like the perfect little space for it. Protected by the fork tubes and exposed to plenty of cooling air. For stealth I will likely put it behind a small perforated screen. I plan to do the triangle similar to the Stink-E with a different method of battery mounting inside. Pics when I am doing it. Having trouble getting my hands on the battery I want. The 6s 8000mah zippy lipos have been on backorder since I first saw them. I really like the extra aH on this batt and plan to initially go with four of them and add two more later after I evaluate the performance. Anybody know where some of these batteries are in stock?
 
OK, update time. HK finally got my batteries off back order and the first four are on the way. Had to order them off the "global" side but the price difference was almost negligable including shipping. Heard back from JRH today he has all the parts in hand to complete the wheel build. The lightweight moto rims I got had nipple holes a bit too big for the spokes/nipples he wanted to use so he searched around and found just the right washers and then used a sacrificial nipple in a die he hand made and coned all of them to be perfect custom fits. The rims are anodized black and he is putting black spokes in and leaving the stainless nipples shiny so they will pop. I think it is going to look fantastic. I ordered the tires today (shinko 244s 19 X 2.75) too so they should all arrive about the same time. Icecube57 has been getting me all lined out on wiring harnesses and I will soon be making a final diagram for him to do his magic. In his kind way he has agreed to do all of the heavy lifting on the harnesses but leave the terminations to me. I will wait to get the wheel to decide how extensive of a wiring upgrade I want to do on it but I have been sourcing and acquiring some pieces of Teflon wire for the project if necessary. As soon as the PE foam gets here, I will begin getting the triangle sorted out and ready to recieve the batteries. The arrangement is going to be similar to the Stink-E but I will be using Stiff closed cell foam in the triangle instead of aluminum bracketing. Almost to the point where I can start getting my hands dirty...can't wait.
 
Ok made some progress today. Got the PE foam I ordered today and began getting it cut to use in the triangle. It's nice stiff stuff in 1 1/2" thickness this allowed me to cut some angles before bonding it together to provide a nice v groove on the top section that grips the top tube to provide side to side stabilization. Here are some pics of the process:
image.jpg

Laid my little worm drive over at 45 and cut most of the way through.
Then cut at a 90 on both pieces to make the flat bottomed v groove. Bonded it together with spray adhesive and pinned on the template.
image.jpg
image.jpg
image.jpg
Then zipped it out on the band saw.
image.jpg

A bit of trimming and voila a nice tight fitting triangle plug of dense PE foam.
image.jpg


The bottom will be held in place with some thin aluminum channel bolted to the water bottle lugs. Wen I get the batts I'll cut out holes for them in the foam and slip them in with wire pathways and air channels for cooling. Both sides will be skinned with black, textured ABS that is heat bent to blend into the frame ala the Stink-E. finally building,...feels good.
 
Go back, use the edit button, and you can remove those duplicate pics by backspacing over the exess ones.

Looking good!
 
Thanks for the tip dogman. Wow! Adding photos is incredibly non-intuitive or maybe I'm just dense. Anyway, it is edited now and looks much better.

Incidentally, I have gotten an excellent education in e-bikes, electronics, soldering, controller theory and other stuff by reading the posts here on the sphere and I just want to say thanks to all of you. In particular a few members have taken me under their wing and steered me through aspects that I had difficulty wrapping my head around (thanks dogman, ypedal, JRH, and icecube57). Some of their PM posts were very enlightening to me and I may include them as I go along on this build so that they may help other too. My education certainly is not at "the beginning of the end" but only "the end of the beginning" and I hope they, and all the rest of you will continue to be so generous with your knowledge.

So at some point not too far away I will need to do some heat bending of plastic panels. In a former life as a plastic fabricator I did tons of it. Thus the process is no mystery to me and is quite easy...if you have a heat bending table. I will be building a simplified one and had a question for the sphere. I will be using a hot wire type set up that heats up via resistance heating and uses a spring in-line to keep the extending wire tight. So to power this hot wire, do I need to rectify the current or can I just put a potentiometer in-line and run it directly off AC?
 
Got my batteries today and found them to be incredibly well balanced. These are the 6s1p 8000maH 30C lipos from HK. After getting confused initially about how to prolly test these out of the box, I found this cool site that will help any noob understand much about how batteries are hooked up and tested. It's interactive and animated (sort of) and self explanatory. Check it out:

http://scriptasylum.com/rc_speed/lipo.html

Any way here are the results of the battery testing total voltage on both the main leads and the balance leads: 23.2V individual cell voltage: 3.87V...on every cell. That's every cell in all four batteries. 24 cells exactly the same. With no experience to go on except what I have read here on ES that seems extraordinary. Is this an appropriate storage voltage for these packs? since i don't have a charger just yet should i be concerned about leaving them as-is for a couple of weeks? I did find that one cell appeared to have taken a side hit on shipping. On the end of the cell opposite the wires the stacked cells appeared to have been shifted sideways like a deck of cards and the heat shrink was split on the end (but not extending to any of the sides). It was not very much and it did not look like the sides of the cells were squished at all. Do any of you think this could be a problem down the line? Another plus is that the cells are also a little more compact than listed. The site says 165 X 69 X 52. These are more like 169 (including the wires) X 66 X 45. Tis will give me a few precious mm in the triangle to fit batteries especially in one spot where I will be placing two batteries with the wire ends facing each other so the extra 5mm of wire length on the long dimension will cancel out when they nest together. Got to work on a few other things this morning but I should be able to start working on final placement in the foam triangle plug later today. I promise pictures of that.
 
Worked on the triangle mount this afternoon had some 2 5/8" thin-wall aluminum channel laying around which should be perfect for mounting to the water bottle bosses. Notched the ends and bent a tab up to contain the force of the weight at the bottom corner of the triangle. Here is how it looks:
image.jpg

This will serve as the base or pocket for the PE foam to sit in and provide lateral stabilization for the bottom half. Here is the foam and the placement of the batteries within it:
image.jpg

I have decided to put all four of the batteries inside the triangle. Now that I have them in hand I can see for sure that together they will only be about 4" wide total after the abs shields go on the outside. This will mean that I won't have to mount one of the batteries under the down tube and it will look cleaner. When I get my final two batteries I will then have the option of mounting them below the down tube if I feel like a seat post rack will cause balance issues. Cross that bridge when I get there.
 
i think you're going to like those wheels! don't forget to buy tubes!

Obiwan007 said:
The lightweight moto rims I got had nipple holes a bit too big for the spokes/nipples he wanted to use so he searched around and found just the right washers and then used a sacrificial nipple in a die he hand made and coned all of them to be perfect custom fits.
sacrificial nipple in a die? lost me there! is he using the oversized nipples + washers?

can't wait to see pics of those. what front hub did you use? a 20mm dh hub? that takes up to 13g spokes? i'd love to have a front like my rear! good luck finding any other tire to fit that wheel tho, esp a street only tire...

44v 8ah? methinks you'll be upping that pretty quickly. :twisted:
 
Thanks for the nice thoughts. According to JRH the oversized nipples were still too small for the holes but just barely so he got S/S washers and Made a die that mirrors the shape of the nipple that is just enough bigger so that he could slip a washer onto a sacrificial nipple and then pound or press it into the die. Thus forming perfectly conforming washer to fit the holes. This accomplishes a couple of things; first it allows the use of these rims without abandoning the existing holes and drilling new ones (an outcome that I always knew was possible), second it allows the use of bicycle spokes rather than moto spokes which might have necessitated drilling the hub motor and front hub weakening it. Third since the washers will already be conforming to the inner surface of the holes (in the case of moto rims, indented and angled) the spoke wont need to be tightened and re tightened for several cycles as break-in period to conform the washers to the holes.

If this sound like I know what I'm talking about it is only because JRH has been educating me as I go along. As for the front hub, I sent JRH the shimano hub that came off my Kona and he said it would work fine. I am keen to see these too since I have yet to lay eyes on either the motor, rims, or spokes. JRH has been under the weather but claims that he may have them ready to go on Monday and promised to send pictures. He has them mostly built and in his correspondence he sound pretty damn proud of how they turned out. As for finding other tires to fit this rim, that is one of the reasons I went this way. Have you seen the HUGE selection of tire designs, sizes, widths offered by Shinko and others? Granted they are either moto or moped tires but some are quite small roadie looking. I am certainly not sure these tires are going to be the best choice for my needs buts other reason for going with these tire is the PRICE. These, and most of the Shinko line are in the neighborhood 25-30$ each. For that kind of money I thought it worth while to blaze a new trail and see where it leads. I agree I will likely go to at least 66V. I will be at 16aH on these first four batteries so when I get it all together I will evaluate both the power and range and decide just exactly where/how I want to add the extra watts.

Been getting the bracket for the PE foam prepared today and cut out to make room for the batts. Will likely see how it all mounts up later today.
 
One is always a bit skeptical when dealing with someone for the first time but from what I read here by others I felt pretty confident. He has since grown in my esteem since then with great communication and very obvious deep experience and knowledge. At this point I have no worries and can't wait to see what the wheels will look like on the bike.
 
Got the triangle mostly worked out tonight. Here is the bottom bracket on the bike without the PE foam showing the cut-outs for the batts.
image.jpg

Drilled a starter hole in each of the cut-outs. Turns out a forstner bit turning at pretty high speed does a nice job on this stuff. Used a coping saw to thread into the holes and then cut out the openings for the batteries. Turned out like this:
image.jpg

The cut-outs made this whole thing just flexible enough to be able to squeeze it into place. Then to test fit the batteries. The idea here is to push one battery in from each side with a little piece of 1/4" PE foam in between:
image.jpg

The batteries sit about 1/2" proud of the surface of the foam and my starter holes serve to add some space for the wires.
View attachment 1


I plan to rout out some wire paths for everything once I get my harnesses together. The plan is to have another 1/2" of foam that will be bonded to the inside of the ABS side covers. This foam will also have cut-out for the batteries which should allow the sides to index onto the inner foam just right every time with no fishing around for the right alignment. There will be three or four tortion tubes through the the main body of the foam that will allow flat headed tortion bolts inset into the ABS to tighten everything in place snug and secure. Hope it turns out the way I see it in my mind.
 
got to spend the day working on my project and made good progress.

-Sliced up some 1/2" PE foam and cut it to shape for the cover padding.
-Drilled the holes for the torsion tubes (1/2" pvc).
-Cut the torsion tubes to length.
-Marked and cut out the ABS side covers.
-slapped together a rough-and-tumble thermo-forming rig.
-Thermo-formed indents on the sides of the covers to allow the torsion bolts to sit flush (just used a heat gun to get it up to forming temp).
-Drilled the through holes in the indents.
-Made some final adjustments to the foam shape to allow for wire paths.
-Cut the all-thread torsion bolts to length.
-Slapped it all together for a trial fit prior to heat bending the top and bottom folds of the side covers.

Tomorrow I will try to get the heat bending done so I can consider the triangle finished for now. Heard from JRH who finished the wheels and shipped them today. Sure hope they fit. Apparently Icecube57 is putting the finishing touches on my harness. I'll try to get some photos together tomorrow of the progress. Oh, almost forgot to mention that I got a meanwell power supply in the mail. Found a 320W 24V one on ebay for $30.00. Should be adequate for a NOOB..for now.
 
Hi 999'

As for charging, this is one area that I still have lots to learn. For that reason I have decided to go with an option that has some built-in safeguard. So, going to use the I-charger 306B. I thought this model would provide not only some "smart charger" protection and also some capacity for later expansion if (when) I go there. I will start out with the ice cube style of wiring that uses a series harness for discharging and a parallel harness for charging. I will monitor regularly with a cell log or battery medic and balance charge as needed. All that sound about appropriate? What is bulk charging and what is its benefit?

Been fiddling around with some methods for heat bending these covers. Since I am only making four bends total I would sure like to avoid spending a bunch of money and time for an elaborate array. Have some ideas.
 
Here are some pics i promised.

This is one of the termo-formed indents for the torsion bolts:
P1080845.JPG

Put together a shade tree heat bending rig. Used strips of 1/8" ply clamped together top and bottom as heat shields with a gap between and used the heat gun to get it up to bending temp. Like this:
P1080834.JPG

Kept the heat gun moving until it got flexible and then bent it to the angle of a little gauge I made.
P1080836.jpg
P1080839.jpg

I was very happy with how they turned out and extremely glad i did not fork over $75.00 for one of those bending tapes. Here it is hot off the bender:
P1080837.jpg
View attachment 3

And on the bike:
P1080843.jpg
P1080842.JPG
P1080841.JPG

If you noticed that the bottom corner of the ABS cover is all jacked up in my chainring, well...that makes one of us :oops: Fortunately i did not damage anything before i noticed it too. Got it all taken care of though and I am quite happy with how it looks. Thanks to Dogman who encouraged me to sit the batts side-by-side and fit them all into the triangle. My origional plan was to put three in the triangle and one under the down tube. This way I got all four into the triangle and when I add the other two batts (probably sooner rather than later) I have more options. I am considering the possibility of Kiwis fork-mount since I am planning to put the controller up there anyway. Two of these batts is around six pounds so I am thinking that the small weight addition over the front wont be so bad, even if it is high. I may put them under the down tube but then I woud have to re-do the side covers and the look certainly would not be as stealthy. One additional benefit is the channel that has been created between the side covers and the down tube. It will be perfect for a wire chase and there is a surprising amount of room on both sides, a little on the top too. Incidentally the overall width of the triangle arrangement is right at 4".

Started looking at the torque arm situation. I have been inspired by Kiwis drop out adapters for the Giant DH comp and may do something similar. I have generally been pretty happy with the design features of this bike but the drop outs are a disgrace. It looks like if I lowered the drop out ala Kiwi I would have chain line problems though. Extending it backward as a conversion to horizontal is tempting but then they would have to hold leverage loads as well as rotational and I don't know if there is enough real estate to acommodate that kind of stress. Now that I think about it though, these are simple verticle drop-outs as opposed to the clamp style like the Giant DH comp. So I could use a similar design that only lowers the axel about a half inch from its current position and still get the top half of the current drop-out hole for an indexing pin. Hmmm... Well I don't think I will do any thing until I have the motor and wheel in hand so I can get an idea of how the chain line will be affected. Was reading GCin DCs saga with his moto wheel that is going to be almost identical to my wheels. He just about got me in a panic when he explained that the rim measurement on moto wheels goes from the in side bead seat width. I have been making some careful measurements today and I think I am still going to be good. If I had known that in advance though I probably would have gone with the 1.6" rather than the 1.85" rims. If these fit like I think they are going to though it is going to look epic. GCinDC has me alredy thinking about my next build though. Man! that Giant DH comp sure has a lot of sexy, sexy triangle space. I could put at least 6 of these fatty batteries in there, possibly 8.
 
Thanks DC, by the way I think I owe you an apology. Back when you first commented on this thread about the wheels and tires I chose I went into a long winded explanation about their benefits. Since that time I have been working through your threads. Imagine my embarrassment when I got to the part where you have been running the exact same wheel for a long time now. I have gotten amazing insight from your posts. Thanks a lot. As for the plastic stuff, I spent some time as a plastic fabricator years ago before I got into the fire service. It's all comming back to me now. The triangle arrangement with the PE foam appears to be really firm and secure. Hope it's not too hot in there. I can add some ventilation paths if I need to but I am going to try it like this for now, maybe with a heat sensor for good measure. I'm almost caught up with your saga (that's right, read through several hundred pages of posts...what of it) to present time. I'm pretty sure the Giant DH comp will be the bike for my next build.
 
Obiwan007 said:
Thanks DC, by the way I think I owe you an apology.
no worries! haha

not sure if you saw the other thread, but i was asking jrh about any new MC wheels... :mrgreen: so are these yours?
file.php

file.php

since you explained his process in detail, i'm just repeating it here... i usually panic if i see a big block of text w/o images in it, so here they are together. :mrgreen:
Obiwan007 said:
...According to JRH the oversized nipples were still too small for the holes but just barely so he got S/S washers and Made a die that mirrors the shape of the nipple that is just enough bigger so that he could slip a washer onto a sacrificial nipple and then pound or press it into the die. Thus forming perfectly conforming washer to fit the holes. This accomplishes a couple of things; first it allows the use of these rims without abandoning the existing holes and drilling new ones (an outcome that I always knew was possible), second it allows the use of bicycle spokes rather than moto spokes which might have necessitated drilling the hub motor and front hub weakening it. Third since the washers will already be conforming to the inner surface of the holes (in the case of moto rims, indented and angled) the spoke wont need to be tightened and re tightened for several cycles as break-in period to conform the washers to the holes.

If this sound like I know what I'm talking about it is only because JRH has been educating me as I go along. As for the front hub, I sent JRH the shimano hub that came off my Kona and he said it would work fine. I am keen to see these too since I have yet to lay eyes on either the motor, rims, or spokes. JRH has been under the weather but claims that he may have them ready to go on Monday and promised to send pictures. He has them mostly built and in his correspondence he sound pretty damn proud of how they turned out....

As for finding other tires to fit this rim, that is one of the reasons I went this way. Have you seen the HUGE selection of tire designs, sizes, widths offered by Shinko and others?
i'm not trying to bum you out, but i've search high and low for 19" MC tires less than 3" to fit in bicycle frame and have only found the shinko 244 and 241! if you've seen others, please send links!

good news is the shinko 244 19x2.75 is an awesome tire. for a long time (maybe 6mo), the tire made the bike rumble when it hit 26/27mph, but then it disappears above that speed. and i've had trouble making it slide in dirt. but its great on the street. feels very solid. i'd love to have one on the front. you may be shocked at how much they weigh! and you may need more than a 408, but nevermind that now! btw, you may have noticed a vids my thread/channel about this wheel. :wink:

i'm surprised you've read the whole thread. wow. :lol:
 
ps/fyi... going from bike to motorcycles, tire dimensions are totally different, as i'm sure you've found out...

most motorcycle tires are coded as such:
TireSpecsMetric.gif


i'm not sure why some like the shinko dual sport are measured 19 x 2.75.. but according to this code, that would be more like:
70 / 90? - 19 ....

when looking for 19" tires, i see tons of 100/90 tires... but since 100mm = 3.93", those are primarily rear tires, and nevermind getting them in a bike!

the shinko 244 has only one tire in the 19" size, but many in the 18"... so if someone wants tire variety, they're better off getting an 18 or 17" mc rim...

edit: i just found another... 70/90-19 SUPER KNIGHT motorcycle tire

or if you need more tread. :twisted:
19" MAXXIS 70/90-19 MAXXCROSS IT front tire

pardon me if this is too much info... i'm doing it as much for myself... :wink:
 
Wow! I think those are my wheels. JRH said he was going to send me pics when they were done but never did (he has been under the weather though). This is the first look I have had of them. I'll have to inspect in Greater detail later. Please don't worry about giving me too much information. I am soaking it up like a sponge. Man, I wish I had read some of this information before jumping into these wheels and tires. But at some point a guy has to jump into the pool or you end up with paralysis from analysis. I still think these wheels and tires are going to fit and I am sure I will love them if they do. And since I know for sure that I will be doing another project after this one I will have some real world experience to apply to that. I will see how this motor works for me but yah, I know I will likely move up to something bigger. Living and learning. Nice to be involved in an activity where the learning part is nearly as fun as the living part. So I am assuming that section width is the actual tire section and not the bead width on the wheel right? A bit of grey area there I think since the section of the tire would presumably change slightly from a narrower to a wider rim. And the aspect ratio is the height to width ratio right? So a 90 would 90% as wide as it is high? Or the other way around, 90% as high as it is wide?
 
Back
Top