My 500w Cyclone

gerlewis

10 W
Joined
Sep 15, 2009
Messages
84
Hi guys thought Id post my build so far.

I have gone for the 24v 500w cyclone setup, and am waiting for my 24v 20ah PING Lifepo4 to arrive.

here is a pic of the build so far:


Im having a few niggles with the build, namely the chain ring not being in line with the motor, and also the mounting bracket has squashed my downtube, and the bolts arnt even that tight!

I must rush, but will post more as I progress.

Ger
 
Guys, I have mounted my motor on the supplied bracket and the motor seems very heavy to be mounted on just two bolts at one end, as per my picture.


Does anyone have any advice/experience on how to mount the motor more securely?

Thanks

Ger
 
gerlewis said:
Guys, I have mounted my motor on the supplied bracket and the motor seems very heavy to be mounted on just two bolts at one end, as per my picture.


Does anyone have any advice/experience on how to mount the motor more securely?

Thanks

Ger

I have 2 bikes running the 360x Cyclone moters but they are mounted under the crank in place of the kickstand but I had the same problem you are. On my wife's bike the bracket kept comming loose and I finally saw the problem. i too was crushing the the tube. I think the supplied bracket are good for quick mounting but need to be larger to spread the clamping load. As for only 2 bolts that isn't a problem. 2 bolt will do fine the real problem is what you alread know. Your going to continue to crush the tube. I would look at modifing the bracket to 1) spread the clamping load, 2) use a peace of rubber under the clamping device to reduce the slipage or 3) consider drilling 2 1/8" holes through the bracket into the tube and pin the clamping devise in place. This will reduce the need to be so tight. These small holes located on the top of the tube will do less damage then the crushing anyday.
 
dumbass said:
consider drilling 2 1/8" holes through the bracket into the tube and pin the clamping devise in place. This will reduce the need to be so tight. These small holes located on the top of the tube will do less damage then the crushing anyday.


Exactly what i would be doing, maybe check up Burties thread here on ES he did a neat instal using a 1200watt cyclone pretty sure they use the same mounting hardware dont they? Hes a pretty cluey fella im sure he came up with something to stop the issues your having...

Best of luck does look sweet in the first pic just need to sort out the niggles and your awaaaaaay :)

KiM
 
Thanks for your replies both.

Dumbass, in your point (3) about drilling holes, which aluminium part would you drill holes in? there are already grub screw holes in the top 2 aluminium scetions, and I have screwed one into the bottle boss mount. There are also two in the bottom aluminium plate, and ive screwed them (pinch tight) into the bottom of the downtube.

I could drill into the tube in these 3 spots, just to allow the grub screws to bite a bit better,

Also, I could cover the downtube in old innertube before fitting the kit, if you think a rubber interface would help?

Maybe I will give these things a go. Im not sure yet (as I dont have a battery) what kind of forces this is going to exert on the clamp/frame. I guess if I accelerate up to a reasonable speed, then add trottle, the torque effects on the bracket/frame will be kept to a low level.

Ger
 
Dumbass, do you think something simple like threadlock would have sorted your problem?
 
What probably is happening is the torque of the motor is pushing into the tubes under acceleration
squashing the tube and/or flattening out the brackets, the nuts aren't coming loose the tube/bracket diameter is becoming smaller thus the clamping pressure less... If this is the case thread lock aint going to to jack.

To stop the assembly twisitng a 2 bolts right through the whole lot, top bracket frame tube and bottom bracket ... something in the vicinity of 8-10mmhigh tensile steel bolt would do the trick...

KiM
 
Just my experience, for what its worth.

I am not much for Mechanical challenges, but have had significant time working on Cyclones and on 6061-T6 AL tubing.

First I got a torque wrench that worked on low values, since 6061 AL does start to deform at a much lower value than Cro-molly, other things being similar. Talking ~ 15 ft lbs. This was crucial. I was amazed at how easy this tubing crimped compared to even cheap steel.

Then I triple butted my 6061 where possible by sleeving inside and out. You cannot do this due to no end tube access, but you could at least use load spreading along a larger surface area. Take a ~3" section of cro-molly tubing a little smaller diameter as your down tube, cut it in half length wise, and put this under the cyclone clamps. this would serve as spreading the load over a much larger surface area. use good thick steel. Kind of like the best custom formed washers.

And yes, the motor wants to rotate under use. Triangulated Centering bolts with no whole slop were what I ended up with.

Dont know if this is of much help, but maybe a little.

d
 
I agree with deardancer3 on the load being concentrated at the tiny contact points of the U-bolts. I'm fairly certain the U-bolt roundness doesnt match the curve of your aluminum frame tubing cross-section.

Flip the bike upside down and angled so the part of the frame tube you are mounting to is level. Then attach the half-tube section deardancer3 suggests with a small amount of JB-Weld (epoxy) inbetween the steel and aluminum. after it hardens, this should spread the load out. You might even consider attaching a similar piece on the motor bracket side...
 

Attachments

  • cycloneMount1.jpg
    cycloneMount1.jpg
    3.9 KB · Views: 3,491
this is useful info, the only problem is my downtube becomes wider in diameter as it nears the bottom bracket!

Id estimate going from 48mm dia at the top U-bracket to about 52mm at the bottom U-bracket.

I have spent an hour tapping holes for the grub screws to go into and also fitting rubber (old inner tubes) between the metal to metal contacts.

I will take your advice on board and get my thinking cap on!

Ger
 
gerlewis said:
Thanks for your replies both.

Dumbass, in your point (3) about drilling holes, which aluminium part would you drill holes in? there are already grub screw holes in the top 2 aluminium scetions, and I have screwed one into the bottle boss mount. There are also two in the bottom aluminium plate, and ive screwed them (pinch tight) into the bottom of the downtube.

I could drill into the tube in these 3 spots, just to allow the grub screws to bite a bit better,

Also, I could cover the downtube in old innertube before fitting the kit, if you think a rubber interface would help?

Maybe I will give these things a go. Im not sure yet (as I dont have a battery) what kind of forces this is going to exert on the clamp/frame. I guess if I accelerate up to a reasonable speed, then add trottle, the torque effects on the bracket/frame will be kept to a low level.

Ger

I think your on the right track. You need to spread the load of the bracket. Can you a PVC pipe that is aproximately the same size ID as the OD of your tube you could try slitting the PVC pipe and placing it under the mouning clamp. I say PVS because you may be able to heat it and form it the your tube a little better. I would also use rubber under the PVC and then reinstall your screws all the way throught the tube. This would reduce the crushing effect on your down tube because it would first have to distort the PVC.
 
My experience is that the 500w does not need huge force to connect it to the frame or the motor to the mount. They hold up, I have put alot of torque via a 1200w and without tightening the hell out if it still holds on fine. Just go easy and then tighten as the motor seats in. Overdue it on any of these parts and they will break. Most bike aluminum parts are not made to handle huge loads. Just enough is the rule of the day.

Good luck
 
Hi

I would like to post some pics for this post, but can't figure out how to add attachments.

Cheers
Allan
 
elation said:
Hi

I would like to post some pics for this post, but can't figure out how to add attachments.

Cheers
Allan

You need to first download your pics to a photo sharing site like http://photobucket.com/ Then you click on the "Img" icon on the posting It's located above where you are wqriting your post. After clicking on it this will appear and your curson will be flashing between to ][ . Copy the "Direct Link" to this location. If you want to attach more then click the "Img" icon again and again until you have them all attached. Good luck......
 
hi the 500watts troque not that big, ya it is true no need super tighten them. it is less half power to 900watts kit. there is 2 screw that is very important and need to used. the 2 screw is important and must be used, so it will hold the motor very well all the way. since i have fit it, no more need to adjust it again. since the 1st time i had fixed it, until today for least 3000km range, i don't bother to go and check.
 

Attachments

  • IMG_4781b.jpg
    IMG_4781b.jpg
    32.6 KB · Views: 3,498
elation said:
Hi I would like to post some pics for this post, but can't figure out how to add attachments .
A good way is to resize the images to 800px wide. Then add to posts as attachments (just like email attachments), like Kentlim26's post above.

Adding pix in this fashion ensures they will be easily seen and not expand the frame oversize.
 
Hi All

Thanks for advice in posting pictures. Decided on another approach, since i have website I might as well use it. This page is not shown in navigation of website and will be used only for showing info as required. It is not meant for general public consumption or for commercial gain please.

This link has pics and additional comments.

http://elationebikes.com.au/Hidden_Detail.htm

A big problem adding a chain drive system is the effective mounting of the equipment while not crushing the fragile bike tube, but still being able to control the twisting effect from torque.

IMO I don't think it is best to insert a 'barrier' between mounting parts. By this I mean rubber, tubing, pipe, etc. It can worsen the problem.

With the eLation system we approached this problem by using a number of methods that combine to offer a better assembly, alignment and torque control than other systems available. At least we believe so :)

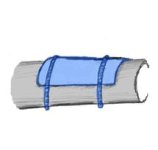
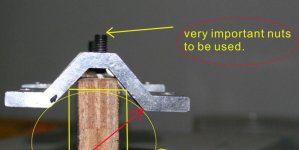
With eLation we decided on designing a mount system that would handle simple round tubes, right through to a few 'exotic' triangular tubes. Part of this was achieved by using 10mm chain with stainless threaded 'posts' at each end. ES users could use normal bolts with a hole drilled through the head and then the head filed down in one dimension to fit head into chain space. Refer to link above for pics.

With the current elliptical tubes, that change size and orientation as they approach the bottom bracket we have found our mount system to be great. We achieved this by having two plates. The bike plate attaches to the bike frame and has elongated holes to allow the chain clamps to hug the tube even if width changes down the tube. The second plate attaches the motor to the bike plate via a recess in the bike plate. This assists control torque while allowing for left/right alignment. See above link for pics.

The final part of torque control is the use of a barrel type turn-buckle. This is attached to the bike plate at one end and the bike seat post at the other end. By having it act under tension rather than compression, it does not have to be large.

Overall we feel we have overcome mounting and torque issues with this approach. Part of out testing involved a 800W motor and a one metre length of chain. One end of the chain was secured to the bench. The motor was powered at full power causing the chain to come to 'slamming stop' when it ran out of length. On a couple of occasions the chain broke :D

Using a Dial Indicator (and a few over test methods) we where able to see any deflection or twisting that occurred. The results were conclusive enough to show it works effectively.

Hope this helps some people see an alternate philosophy to controlling torque. Others may see it as a 'commercial', but is hard to show what we have achieved without taking pride in it.

Cheers
Allan

PS. Additional pictures are available here http://elationebikes.com.au/videos_and_pictures.htm
 
Thanks Allan for that interesting reply. Are your parts available?
I am most interested in replacing my U shaped plates with two of those chain/bolt pieces, as they would spread the load very evenly, and bite into the frame to stop slippage.

Once my battery arrives, I will give the current setup a go for a trial period, and if it wont stay in place, I will look into your ideas further.

Ger
 
Still waiting for my Ping battery to arrive! According to the tracker, it is in its 3rd Shanghai sorting office!

I have stripped down and installed the cyclone setup several times, fine tuning and tweaking, moving washers, spacers etc.
The weak link may yet prove to be the mounting to the Aluminium frame, but Im gonna cross that bridge when I come to it.

Just playing the waiting game now...
 
Right, a quick question.

My battery has arrived. but before I fix the connections, I would like to cover my wires together in a sheath (the same as the thick black one that comes out of the cyclone, to protect them from the elements.

Whats this stuff called? and is it available in a local hardware store?

Thanks
Ger
 
Hi Ger

Heat shrink, from electronics stores.

Dick Smith, Farnell, etc.

Cheers
Allan
 
Here is a link to an alternative sheathing. It comes in other sizes. I like this stuff because it is reusable and easy to put on.

Harbor Freight sells heat shrink tubing too.

Bubba
 
i have been searching for the pictures but i can no longer find them. many a year ago i faced the same problem. my solution was to drill a few holes in the frame tubes and installed a few "RIV-NUTS". i then bolted the mount directly to these instead of using the clamps.

aeimage.giffh_drawing.gifFlash.jpg


they can be easily installed using a bolt, a nut and a washer as an installation tool.

rick
 
AussieJester said:
elation SuperCheap Autos sell it comes in various sizes...

Hi Kim

Yeah, they are always good for bits and pieces, I forgot about them. RS Components is another.

I buy a couple of sizes in 100m rolls direct and so forget a lot of the nifty retail outlets.

Ger

You can use a hair dryer to shrink this. For a 'nice' finish I suggest you skrink it with cable straight and allow to cool. Then you can bend to shape. I have learnt from experience that if bent prior to shrink it can show ripples. Not a big thing, just about a good finish.

Cheers
Allan
 
Back
Top