recumpence
1 GW
Hey Guys,
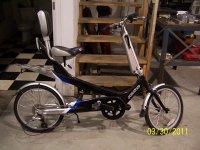
Some of you may remember I asked about an ideal platform to build my wife a basic mountainbike. Well, after some research, I decided, instead, to electrify her Giant Revive. I decided this for a few reasons;
#1 We already have the bike. No need to purchase something else that will take up garage space.
#2 She LOVES the Revive!
#3 The only downside to that bike is poor hill climbing. That is easily taken care of with a drive.")
The only reason I did not want to move in that direct previously was based on difficulty mounting a drive. I wanted something I could just bolt one of my reductions to and color it done. But, I decided to weld together a simple sub-frame that would bolt to the Revive swingarm to hold the drive. This is the simplest and most elegent solution.
Now, my wife just left (5 minutes ago) to take her mother back to Minnesota. She took the kids and will be back Friday night or Saturday. So, with that in mind, I am taking the Revive to the shop to build it as a surprise to her when she returns.
Here is the spec list;
2006 (I think) Giant Revive
Astro 3210 10 turn
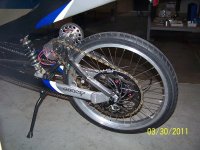
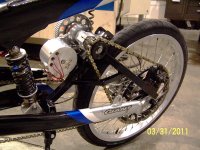
V3 reduction with torque limiter (this will be mounted in front of the rear wheel on the swingarm)
HV160 (what else?)
Magura twist grip throttle
4 Turnigy 6S packs (12S2P) mounted in a couple of my CNC machined battery boxes
Watts-Up meter
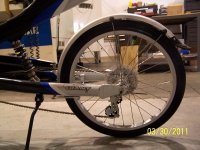
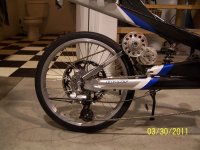
36 spoke, 2 inch wide rear rim laced to a disc brake hub for left side drive purposes
Rear 203mm disc brake
The labor list is a bit heavy for such a short build;
I need to weld together a swingarm subframe, lace together and true a rear wheel, machine a caliper to fit with the rear sprocket, fab a caliper mount, fabricate a chain guide, mount battery boxes and misc electrical items, and do all other basic stuff like move the shifter to the left bar to make room for the throttle, etc.
The cool thing is, I have every single item on hand other than 2 of the 4 packs. So, I will merely set it up, innitially, at 5ah to get everything running well, then order the other 2 packs.
I decided to add a rear disc brake to aid in stopping with the additional speed this setup will deliver versus he normal pedaling speed. A rear disc is best rather than a front because the Revive is a very rear weight heavy bike with precious little weight on the front wheel. So, adding braking power is best done at the rear on this bike. Plus, I can add the caliper mount to the subframe I am welding together.
Now, I only have 4 days for this (after work). I will take tomorrow off to put a solid 10 hours or so into the bike. But, it will still be tough to meet my time frame. But, what I plan to do is build up all the mechanicals first, and do the wiring at home at the very end. It is really too cold to ride anyway. So, as long as it looks complete, I can present it to her when she comes home.
One cool thing about this build is, I plan to built it street legal. This is a first for me. :wink: In fact, I think 15mph would be plenty for her. But, the reduction I have here and the motor I will be using puts it right at about 20mph. I doubt she will want to go any faster than that to begin with, though that may change later on.
I will post pictures as I have them.
Matt
Some of you may remember I asked about an ideal platform to build my wife a basic mountainbike. Well, after some research, I decided, instead, to electrify her Giant Revive. I decided this for a few reasons;
#1 We already have the bike. No need to purchase something else that will take up garage space.
#2 She LOVES the Revive!
#3 The only downside to that bike is poor hill climbing. That is easily taken care of with a drive.
The only reason I did not want to move in that direct previously was based on difficulty mounting a drive. I wanted something I could just bolt one of my reductions to and color it done. But, I decided to weld together a simple sub-frame that would bolt to the Revive swingarm to hold the drive. This is the simplest and most elegent solution.
Now, my wife just left (5 minutes ago) to take her mother back to Minnesota. She took the kids and will be back Friday night or Saturday. So, with that in mind, I am taking the Revive to the shop to build it as a surprise to her when she returns.
Here is the spec list;
2006 (I think) Giant Revive
Astro 3210 10 turn
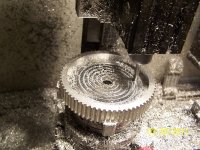
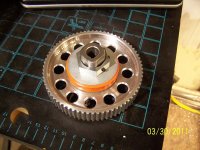
V3 reduction with torque limiter (this will be mounted in front of the rear wheel on the swingarm)
HV160 (what else?)
Magura twist grip throttle
4 Turnigy 6S packs (12S2P) mounted in a couple of my CNC machined battery boxes
Watts-Up meter
36 spoke, 2 inch wide rear rim laced to a disc brake hub for left side drive purposes
Rear 203mm disc brake
The labor list is a bit heavy for such a short build;
I need to weld together a swingarm subframe, lace together and true a rear wheel, machine a caliper to fit with the rear sprocket, fab a caliper mount, fabricate a chain guide, mount battery boxes and misc electrical items, and do all other basic stuff like move the shifter to the left bar to make room for the throttle, etc.
The cool thing is, I have every single item on hand other than 2 of the 4 packs. So, I will merely set it up, innitially, at 5ah to get everything running well, then order the other 2 packs.
I decided to add a rear disc brake to aid in stopping with the additional speed this setup will deliver versus he normal pedaling speed. A rear disc is best rather than a front because the Revive is a very rear weight heavy bike with precious little weight on the front wheel. So, adding braking power is best done at the rear on this bike. Plus, I can add the caliper mount to the subframe I am welding together.
Now, I only have 4 days for this (after work). I will take tomorrow off to put a solid 10 hours or so into the bike. But, it will still be tough to meet my time frame. But, what I plan to do is build up all the mechanicals first, and do the wiring at home at the very end. It is really too cold to ride anyway. So, as long as it looks complete, I can present it to her when she comes home.
One cool thing about this build is, I plan to built it street legal. This is a first for me. :wink:
I will post pictures as I have them.
Matt