New member, been lurking awhile, gathering intel.
Just wanted to put a quick post up announcing a my first e-bike project. I hope to post a detailed account of the build.
Context:
I have a mechanical engineering degree, and think anything that requires an imaginary number to perform calculations is probably dark magic. That said, I have enough knowledge of electricity to know when to ask questions and when I am out of my depth. My 13 year old son approached me with wanting to do an e-bike conversion as a summer project together. He wants something he can run down to the local towncenter on, have some fun, and have an easier time with the local hills. I had already been considering some ideas for my own projects. And thought his bike frame would be a good learning process for us both. So I started doing some serious online research and ended up here. After many articles, blogs, posts, links, online catalogs, etc, this is what I I've decided on:
I'm not a bike nut, but I used to commute with a hybrid (mountain bike frame, road tires and gearing) a few times a week, about 8 to 10 miles round trip. But got too tired of lugging my laptop backpack, and a sore butt.
Bike:
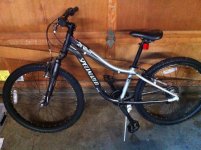
mid to low-end? specialized "Hot Rock" with front suspension (~$free. Available)
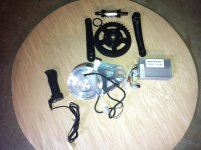
Motor Kit:
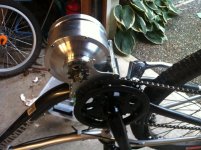
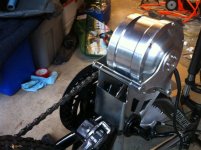
GNG Gen2 36V 350W mid-drive BB mount. (~$400. Didn't think my son needed more power than this. He's responsible and cautious, but no need to go crazy. Not trying to break speed records. Also the 36V batteries are generally cheaper than 48V.)
Immediate upgrade:
Mounting plates from lightingrod AKA Mike.
Battery:
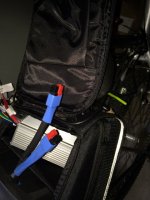
36V 12aH LifePO4 headways pack from EV-Assemble. (~$400. While heavier and more expensive than LiPo, they are better than SLA, and safer than LiPo. I have some experience with various rechargeable chemistries from time in the RC car hobby, but nothing this large. My son has very little experience with this kind of thing, and I wanted something safe.)
The motor kit came today, unpacked it a bit and it looks great. The battery is in transit.
For various reasons, I won't be able to start the project for about 2 more weeks. I'll try to get some pictures of the components together before then.
Thanks to all that have unwittingly provided me a starting point. More to come.
Just wanted to put a quick post up announcing a my first e-bike project. I hope to post a detailed account of the build.
Context:
I have a mechanical engineering degree, and think anything that requires an imaginary number to perform calculations is probably dark magic. That said, I have enough knowledge of electricity to know when to ask questions and when I am out of my depth. My 13 year old son approached me with wanting to do an e-bike conversion as a summer project together. He wants something he can run down to the local towncenter on, have some fun, and have an easier time with the local hills. I had already been considering some ideas for my own projects. And thought his bike frame would be a good learning process for us both. So I started doing some serious online research and ended up here. After many articles, blogs, posts, links, online catalogs, etc, this is what I I've decided on:
I'm not a bike nut, but I used to commute with a hybrid (mountain bike frame, road tires and gearing) a few times a week, about 8 to 10 miles round trip. But got too tired of lugging my laptop backpack, and a sore butt.
Bike:
mid to low-end? specialized "Hot Rock" with front suspension (~$free. Available)
Motor Kit:
GNG Gen2 36V 350W mid-drive BB mount. (~$400. Didn't think my son needed more power than this. He's responsible and cautious, but no need to go crazy. Not trying to break speed records. Also the 36V batteries are generally cheaper than 48V.)
Immediate upgrade:
Mounting plates from lightingrod AKA Mike.
Battery:
36V 12aH LifePO4 headways pack from EV-Assemble. (~$400. While heavier and more expensive than LiPo, they are better than SLA, and safer than LiPo. I have some experience with various rechargeable chemistries from time in the RC car hobby, but nothing this large. My son has very little experience with this kind of thing, and I wanted something safe.)
The motor kit came today, unpacked it a bit and it looks great. The battery is in transit.
For various reasons, I won't be able to start the project for about 2 more weeks. I'll try to get some pictures of the components together before then.
Thanks to all that have unwittingly provided me a starting point. More to come.
 not received the battery yet. And still waiting on the upgraded mounting plates from lightningrods. But had my son this evening so decided to use the stock mount for now and get some build time together.