X5305 RIP? Heavy cogging & burning smell [VIDEO & PICS]

ryan

10 kW
Joined
Dec 3, 2009
Messages
638
Location
California Bay Area
My Crystalyte 5305 is acting really crazy.

In the attached video you can see that it's cogging like mad, stops on a dime (when it should coast), and even slips speed. For the video I went straight to Full Trottle, but you can hear & see it slow down mid way as if I let down on the throttle.

View attachment 5305.mp4

What do you think? Fixable?

Other details:
* 2400 miles total on this motor.
* Bearings replaced at 1200 miles.

Context of the failure:
I was on a 12 mile loop with my son in tow (one I do several times a week). About half way (after a fairly aggressive 600ft climb), I noticed some vibration. I thought it was the trailer safety strap rubbing the hub in a strange way, so I secured it better and got on my way. I didn't notice it again. The rest of the trip is almost all downhill. In the last mile I started to notice some heavy vibration and cogging. Then it would go away. At first it was just when I was at full throttle and coasting, but now it's here all the time and even without any load, only gets up to about 20mph.
IMG_0967.jpg
 
check your hall sensors.
 
ryan said:
Arlo1 said:
check your hall sensors.

How does one do that, and what should I look for?

You need a Lyen ebike tester. A cheap little unit, that checks throttles, motor halls, motor phases, and controllers. It's easy to use...just clip it to your connections and it will tell you what and where the problem is. It's something every DIY ebiker should own.
 
Do you have a link? I looked at Lyen's site. Do you know which one on his list you're talking about?
http://www24.brinkster.com/lyen/beta/

Is it the "CA connector + Regen Jumper + USB connector $10.00"? Or the "USB-TTL programming adapter $15.00"? Or something else altogether?

Thanks John.


John in CR said:
ryan said:
Arlo1 said:
check your hall sensors.

How does one do that, and what should I look for?

You need a Lyen ebike tester. A cheap little unit, that checks throttles, motor halls, motor phases, and controllers. It's easy to use...just clip it to your connections and it will tell you what and where the problem is. It's something every DIY ebiker should own.
You can also just use a LED pluged into the back of the hall sensor conector you must test from the ground to hall signals one signal wire at a time, and spin the wheel the led should turn on and off as you spin it! And from positive to signals one at a time as well. All with the bike turned on and all the wires hooked up and spin it by hand!
 
I just checked Lyen's website and it is not listed. You may have to make a special request but it really looks like a handy gadget!
otherDoc
 
docnjoj said:
I just checked Lyen's website and it is not listed. You may have to make a special request but it really looks like a handy gadget!
otherDoc

I'm glad I scooped up a 2nd one then, for just in case something happens to the one I have, and I can just throw this one in my packpack with my multimeter for road trips. :mrgreen:
 
STOP!

Heavy cogging combined with a funny (like semi burnt electronic smell) means you have likely (seriously) in some way caused the PHASE (power) wires to short... since the insulation on those motors is rather excellent through the hub, my first guess would be some interior junction or passing point of the phase wires and the enamel has come off.

I am assuming you disconnected everything and tried to pedal a bit and still had the cogging issue?

-Mike
 
Do I need to disassemble the hub to determine this?

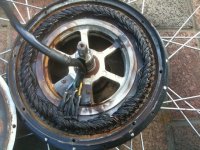
I do notice that the plastic ring between the hub and the dropout where the wires come out of the hub is cracked. I can also see that the first layer of insulation (the black shrink wrap holding all the wires) has worn on one side enough to see the yellow insulation of one of the inside wires. I can't see any cuts on the yellow wire.

Pedaling without power has alway cogged, but there is definitely more cogging now because the wheel stops almost instantly when I stop pushing it (by hand). Before it would coast at least a little bit.


mwkeefer said:
STOP!

Heavy cogging combined with a funny (like semi burnt electronic smell) means you have likely (seriously) in some way caused the PHASE (power) wires to short... since the insulation on those motors is rather excellent through the hub, my first guess would be some interior junction or passing point of the phase wires and the enamel has come off.

I am assuming you disconnected everything and tried to pedal a bit and still had the cogging issue?

-Mike
 
Awesome. I just got a private message from Lyen and will have one sent on Monday.

So in you're experience is this just a matter of replacing the hall sensors?

John in CR said:
docnjoj said:
I just checked Lyen's website and it is not listed. You may have to make a special request but it really looks like a handy gadget!
otherDoc

I'm glad I scooped up a 2nd one then, for just in case something happens to the one I have, and I can just throw this one in my packpack with my multimeter for road trips. :mrgreen:
 
At this point you need to test evey thing till you find the problem, I mentioned the hall sensors because Ive melted the solder off mine 2 times! The phase wire test is very easy as well just use a multi meter on the hom scale and look for shorts to ground on any of the 3 wires coming out of the wheel with the bike shut off and look for continuity between them as well. Should be ~1 ohm between each and open to ground!
 
Here's a photo of the worn wire insulation and cracked plastic ring. The visible yellow insulation doesn't appear to be affected.

This appears to be the only visible damage I can see. Also, the motor starts to smell even when cool and only run it for a few seconds.


I get Lyen's ebike tester tomorrow.
 
Hi Ryan,

You may want to test the motor first. There are two things to check.

First, lets perform the diagnostic from the easiest route first by checking the phase wires for shorts or cuts. Connect the motor phase wires from the motor with the alligator clips from the upper left of the tester without power on. Do no connect other wires yet. Spin the motor with it mounted on a bike upside down and tell me how many lights under "Motor Phase" you see are blinking. You should see all three LEDs blinks when you spin the wheel. If not, then the motor phase(s) and/or wire(s) is the issue. Please let us know your results and we will go from there. :)

Regards,
Lyen
 
Thanks Lyen. I just did as you said. But can you clarify how I should connect the wires?

Code:
       Tester
        | | |
        | | |
     |    |    |
   |      |      |
Red   Black  Blue
| | -- | |    ||            ]
| | -- | |    ||            ]
| | -- | |    ||            ]
----------------            ] Lame attempt at showing
----------------            ] the motor connector
 --------------              ] cable in ASCII
   ----------               ]
Yellow Black Blue           ]
     |   |   |
      |  |  |
       | | |
       | | |
       | | |
       Motor

Tester Power Off, Spinning Wheel = No lights when spinning.
Tester Power On, Spinning Wheel = Blinking Power (bottom row, middle), and blinking Throttle (bottom row, right) -- although throttle was less so

Lyen said:
Hi Ryan,

You may want to test the motor first. There are two things to check.

First, lets perform the diagnostic from the easiest route first by checking the phase wires for shorts or cuts. Connect the motor phase wires from the motor with the alligator clips from the upper left of the tester without power on. Do no connect other wires yet. Spin the motor with it mounted on a bike upside down and tell me how many lights under "Motor Phase" you see are blinking. You should see all three LEDs blinks when you spin the wheel. If not, then the motor phase(s) and/or wire(s) is the issue. Please let us know your results and we will go from there. :)

Regards,
Lyen
 
Hi Ryan,

I am sorry that I gave you incorrect information from my last post. It is actually the second set on alligator clips from the top left with clips colors > yellow, green, blue. It does not matter clips colors matching the motor phase sequence. The key is to see if you get all three LED blinks under the MOTOR PHASE to confirm for shorts or cuts. Please let me know again. :)

Thanks,
Lyen
 
ryan said:
Thanks Lyen. They all blink! What's next?

Hi Ryan,

It is good to know your motor is still good since at least your internal coil wires to the tester are still good. It also proof that there is no cuts or shorts. The next thing to test is the hall sensors inside the motor and the hall sensor wires from the motor. Now this part needs a lot of patient since it is quite challenge the first time you do it.

1. Unplugg the motor phase wires that you have connects previously

2. Remove the cover off the mini XLR connector, you then have access to the wires, mark or note all the wires with the pins on the connector. You may want to take a picture of it before you remove the wires from the connector.

3. Mark or note the the wires on the 5 wire hall sensor male connector. This is the middle connector on the top. You may want to take a picture of it before you remove it. Use a very small flat screw driver, pinch the tab of the pin (circled in red on the pictures below) and then pull it out. Repeat for the rest of the wires on the connector. See below:


4. You then connect the wires from red to red, black to black, yellow to yellow, green to green, blue to blue

5. Power on the test

6. Spin the wheel again and see if all the LEDs (Y, G, B) under the hall turn on and off as you slow spin the wheel

Please let me know the results and we will continue from there. :)

Regards,
Lyen
 
Dang it. I got your connector apart just fine, but I can't figure out the mini xlr to save my life. Any tips? I'm meeting with Peter from Hybridmojo (i think he's fitek here) tomorrow to help too.
 
It should be a piece of cake to remove. All you have to do is to unscrew the tiny screws circled in the picture. After that, simply hold the ends of the connector and twist it counter clockwise. It should get loose easily. If not, use a crimper or a piler to help. See picture below:


The white connector is called the molex 6 pin male connector. :)

Lyen
 
Thanks Lyen. I actually got that far. I just didn't want to have to re-solder the whole connector and couldn't get the tester wires to connect to the pins. I'll try again tomorrow. :oops:
 
Back
Top