Front Coroplast Cargo Fairing Build (New Pix 12/17)

LI-ghtcycle

10 MW
Joined
Aug 29, 2009
Messages
3,818
Location
Oregon City Oregon
This is a continuation of the rear fairing build, so instead of adding the front to the "rear" build post, I started this one.

After my first major miscalculation, I started with my original idea but with a twist, I made the cargo pods out of ABS instead of coroplast for strength.

I gotta say the coroplast has me spoiled! So much quicker and easier to cut the coro than ABS.
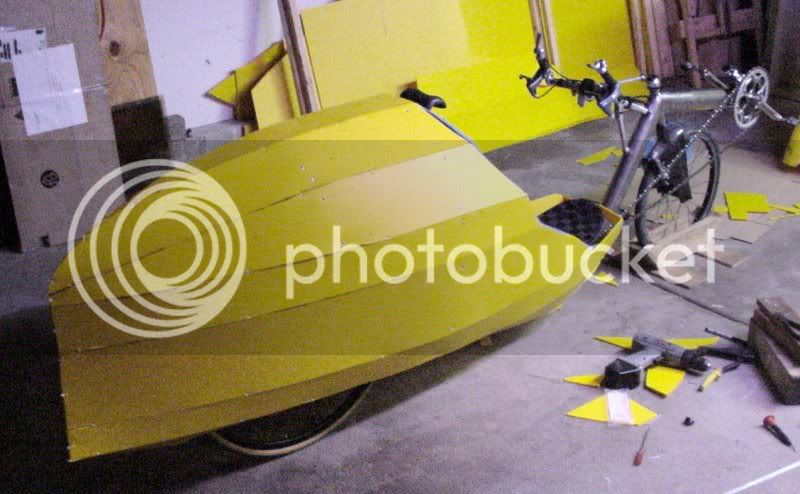
 :p

Pics:

38376254107_large.jpg


Don't worry this isn't how far out the pods will be, this is what they are until I "fold" them back and leave something about the same width as the rear.

38376254108_large.jpg


38376254109_large.jpg


I plan on just using the top 4 layers starting with the first flat piece short of the shaped pieces making the radius of the top, and then I will make my own design to finish the bottom and include coverage for the pedal area.
38376254110_large.jpg


38376254111_large.jpg


Pretty happy with how the arch turned out, but it's just a bit lop-sided (look closely on the left side it's got a flat spot where the right is rounded) so I took another hour or 2 fixing that.

Bending the shorter tabs on the front part proved a bigger challenge, as I had to clamp from the back side and heat the front, where normally I would heat something and bend it over a straight edge, the rear "straight edge" method was a success although not as pretty as it could have been, it will be covered in coro on the sides where the beginnings of a fairing will start and wrap around the front avoiding most of the conflicts with cables and such.

38376254112_large.jpg


38376254113_large.jpg


38376254114_large.jpg


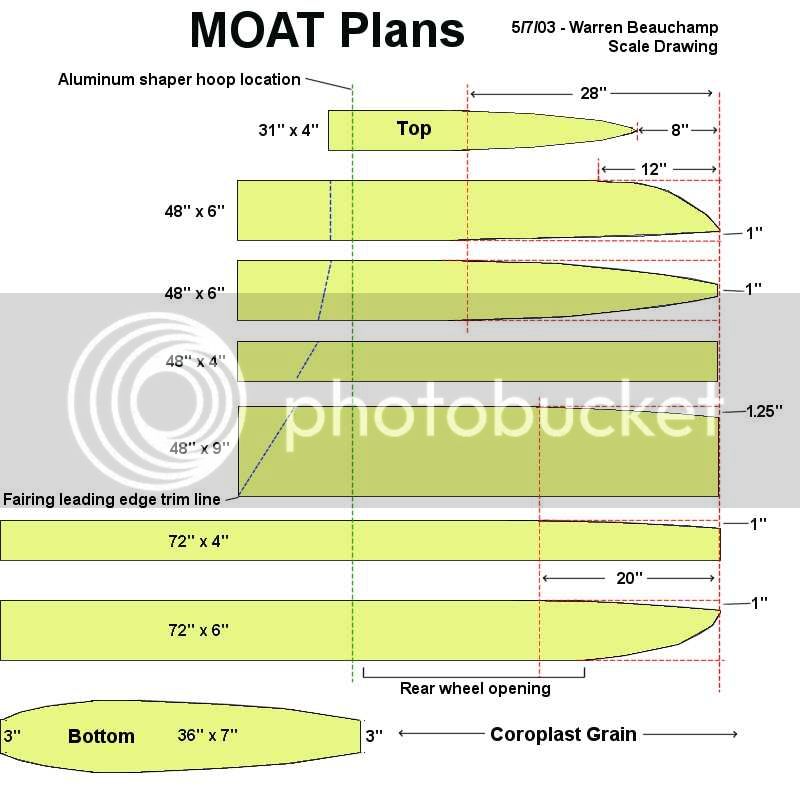
I have found a good set of plans on-line for a tail piece that i will use with some modifications for the front (mostly where some pieces are joined together at a seam I will just have one large piece creased and bent instead of separate pieces zip-tied together).


http://i278.photobucket.com/albums/kk95/terrystinnette/tailboxlayout.jpg
tailboxlayout.jpg


http://i278.photobucket.com/albums/kk95/terrystinnette/ticuda-tb5.jpg
ticuda-tb5.jpg
 
Ok! Some progress!

38376254120_large.jpg


38376254121_large.jpg


38376254122_large.jpg


38376254123_large.jpg


Just have it held there for pics with a bungie, soon I will have some rubber tube cushioning the bike followed by a layer of coroplast and then zip ties to hold it in place.

I need to let the glue dry before I can trim the extra plastic that I used to fill the gaps. I will line the bottom and side of the small cargo area with 10MM coroplast. This will be just for maps and other small light-weight cargo, unless I can figure out a good way to add something lower to hold more. This will mainly serve as a hard point for the mounting of the main fairing. I will probably have some kind of top support attached to the head tube and fairing upper for stability.
 
Nice construction!

On my bikes, my knees would hit something that close, and bleed.

-JD
 
Are you trying to replicate the 'i'm in a banana! ' look the recumbent has? hehe..
 
neptronix said:
Are you trying to replicate the 'i'm in a banana! ' look the recumbent has? hehe..

He he naw, I think I'll stick to the black and white and add in a little red when I cut my knees on the sharp edges. :wink:
 
oatnet said:
Nice construction!

On my bikes, my knees would hit something that close, and bleed.

-JD


Thanks! It's actually turning out better than I expected, I really didn't expect to be able to form such exacting bends in the ABS.

You would really be surprised, I actually have like 2-3 inches clearance for my knees, it's down low enough that it really isn't an issue, but I thought the same thing when I saw that other guy's build with similar dimensions of the front cargo pods.

Now the real challenge will be to attach the lower half in such a way that it's not in the way when I get off and on the bike yet still offer some aero for the pedal area.
 
Not much progress today, drilled some holes to mount the cargo pod, and I am waiting for the ABS pipe glue to cure, I think I put it on too thick or the glue is getting old, either way it's taking forever to cure. Might have to wait over-night! :roll:
 
More pics coming later tonight, I have the first structural support attached to the cargo pod so now I just have to decide how to make the shape of the fairing!

Looks like I am going to have to throw-out the reverse "tail box" design since I need to have coverage for my hands in a more streamlined version of a "vetter" type fairing, but I will borrow some of that basic design.
 
Pics!

38376254128_large.jpg


38376254127_large.jpg


38376254126_large.jpg


38376254125_large.jpg


38376254124_large.jpg


I'm going to try and see if I can bend a single piece into the general shape that I want and include some underside coverage which will require me to heat and shape the square sides of the cargo pods to match. Not sure if that will work yet, hopefully that will be done tomorrow and I will have something to ride soon!

Killing me to be just working on the fairing and not be able to ride.
 
If that pointed front is going to be structural, meaning that if it split apart at that point it would cause problems with the fairing, then you will want to put a metal strip over the pointy arch end, either inside the arch or outside (outside would give more resistance to splitting).

Otherwise in my experiences with plastics, the spirally sway that will happen as you ride (which you may not even notice) will eventually split that point, and the two pieces will spring apart. :( If the arch was passing loads back and forth that without it cause greater sway, vibration, or whatever in the coroplast fairing, it may begin to break other parts of the supports, over time. Since it's inside, you probably won't notice it, either, till something gives way during a shock load sometime (big bump or pothole, probably).

The metal strip should be bolted or riveted thru the arch at at least two points along it's length on each side, so it can't swing out of position like a knight's helmet visor going up and down. :) It can be just 2-3 inches long on each side, with a rivet or bolt a very short way from each end of the strip, and another an inch or two forward of that one.

Other than that, I'm intrigued by what shape this may end up with. :)
 
Good call, thanks! I will use a piece of plumber's tape and some rivets. :)
 
A pointy block of wood could reinforce the tip too. Really nice work! My crude attempt at a fairing for my race bike ended up making it slower, so I took it off. It was way too blunt.
 
Thanks DM! I'm actually thinking I might reinforce it with 1/4 inch plastic heat formed over the tip. My other challenge is to have some support that goes from the front to over and just behind the handlebars attached to the front cargo pod, it might end up being some light steel rod since it's easy to form, strong and retains it's shape well.

I'm strongly considering having a 2-3 ft wide sheet starting on the bottom, wrapping over the front tip and making more of a Ducati 999 fairing.

Ducati_999_Montage_1024.jpg
 
Well, been down for most of the week, got a cold or flu, so not much progress, but today I should have the supports for the top of the front fairing built. I thought of a way to use plumbers tape
plumbers-tape.jpg
http://www.diyanswerguy.com/diy-answers/materials/do-it-yourself-supplies/ to reinforce the triangular supports that will give the front fairing it's upward angle where the windscreen will be attached. Pictures will be coming to make this clearer.

I have cut back the front point to a more manageable distance so the fairing won't stick out further than the front wheel by adding a platform on top and cutting back the plastic from the point about 6 inches or so, pics to follow later today hopefully.
 
Wow, it's been better than a month since my last post, I have been promising some of you more pics, and I have some, but first I wanted to show you my up-dated inspiration.

I like the look of the Ducati's fairing, but it wouldn't approach the coverage of the handlebars I need, so I found a new design to emulate.

The Buell 1125 R

buell-1125r_1600x0w.jpg


I will of course have to make a lame imitation that is much boxier and larger to give me the protection from the elements I want, but I did find a pre-made and affordable wind screen: (they call it a steering fairing)

Steering_Column_Shield.jpg


I bought the clear version here http://mandmperformance.com/cart/gokartaccessories.html for $24.95 + Shipping

Well, with out further ado, here are the pics of my progress:

38943924030_large.jpg


38943924029_large.jpg


38943924028_large.jpg


38943924027_large.jpg


38943924026_large.jpg


38943924025_large.jpg


38943924024_large.jpg


38943924023_large.jpg


38943924022_large.jpg


38943924021_large.jpg


38943924020_large.jpg


38943924019_large.jpg


38943924018_large.jpg


38943924017_large.jpg


38943924016_large.jpg


38943924015_large.jpg


38943924014_large.jpg


38943924013_large.jpg


38943924012_large.jpg


38943924011_large.jpg


38943924010_large.jpg


Some of you are wondering what happened to the fancy good deal windscreen is. I attempted to mount it and noticed it was as warped as a dog's hind leg! So first thing monday I will be returning it. You will notice how off the trace of the windscreen is in relation to the headlight shield, and that is how warped my steering fairing (windshield) is.

Ok, back to work! Gotta build an aluminum frame for the windshield area and finish covering the bottom portion of the fairing to protect my feet.
 
More pics, finally something that looks ALMOST like a front fairing, not just a flying box :roll: :lol:

38943924031_large.jpg


38943924032_large.jpg


38943924033_large.jpg


38943924034_large.jpg


38943924035_large.jpg


38943924036_large.jpg


And now some decent pics of the front with a light (not the Magic Shine, gotta finish the fairing before the electrics) showing about how it will look with the head light.

38943924037_large.jpg


38943924038_large.jpg
 
Ureka! I just realized a way to use the current steering fairing as a windshield that will make it look nice even though the bottom end isn't even. I will have pics that will make more sense, but I would have to make a coroplast boarder around it anyway to match it to the fairing (just one inch showing) and it should look just fine.

Gonna have to really step-up production, I want to finish all the electrics too and take it to the meet n greet in Portland next Sunday.
 
Ok! I took the plunge, made a border to the windshield (that hides any imperfection and also make a nice strong attachment to the fairing) and installed it, and whew! It actually looks pretty decent.

38943924045_large.jpg


If you look close you will see two aluminum rods making the top bowed towards the handlebars. I wasn't really happy about this, but wasn't sure how else to do it.

38943924044_large.jpg


38943924043_large.jpg


Had another moment of "Ureka!" and realized that I didn't need those rods at top to attach the windshield, and that I could actually have it structural with the windscreen it's self stiffening things up!

38943924042_large.jpg


38943924041_large.jpg


38943924040_large.jpg


38943924039_large.jpg


Don't worry about the plumber's tape between the two sides of the fairing, it's now just holding the two sides evenly as the JB weld sets over-night.

I discovered further that I could use those two rods as vertical structural supports to hold the fairing back towards the bars.

Hope you all enjoyed these pics, I am really getting excited now that some of the major challenges are past! Now I just need to add finishing touches and then the electrics! :twisted: :twisted: :twisted: :D :D :D :mrgreen: :mrgreen: :mrgreen:
 
Nice so far!

Sounds like you're actually getting some stuff done tonight. Here's some motivational music to help you:

[youtube]9D-QD_HIfjA[/youtube]
 
neptronix said:
Nice so far!

Sounds like you're actually getting some stuff done tonight. Here's some motivational music to help you:

[youtube]9D-QD_HIfjA[/youtube]

Hehe kewl thx! ATM, I'm trying to slow down and soon get some sleep, pulled an all-nighter on the week-end and tried to keep going on 3 hrs of sleep ... FAIL! I'm getting old I guess! :oops: :shock: :roll: :lol:
 
AussieJester said:
"Ducati" inspired fairing in cloroplast LOVE IT haha..well done mate
hope it works as well as your hoping it will...

KiM

Thanks! I really know it's still going to be a flying brick aero-wise, but as long as it keeps the wind off and almost but not quite looks like a flying brick, then I consider it a success. The main draw-back is road-side repairs. It's going to be a serious pain to try and change tires/tubes until I figure out a better solution. I like my current chain-stay mounted kick stand, but it really doesn't allow for my front wheel to be removed, and if I want to change the rear, short of unloading my gear, not sure how that would work even with one of the crow cycle adjustable center stands.

Next I will be adding a support from the down tube to the fender and skinning the space behind the front tire with one last layer connecting to the nose and continuing down to the bottom. I really am disappointed with the plastic POM rivets however, they fail to open up completely and totally fail about every 10th rivet, but I'm not able to use much else joining plastic to plastic, zip-ties do well, but rivets look a lot more clean.

Well, off to sleep! More pix tomorrow. 8)
 
Ok, ok, I'm late with the pix, but here they are! The last bit "seemed" easy, but it turned out to be one of the hardest parts yet, getting the spacing between the front wheel and my toes with some plastic to keep the elements off required almost 1/2 inch of shimming on the left side! :shock: :roll:

At least now I can show you the results of the last 3 day's of head-scratching and buying new shoes that would fit both my feet better and give me more space! :lol:

38943924052_large.jpg


38943924051_large.jpg


38943924050_large.jpg


38943924049_large.jpg


38943924048_large.jpg


You really can't see the gap between the toe of the shoe and the fairing, but it's about 1/8th inch! :shock: :oops: It hasn't caused any trouble riding around near the house this way (this is with me rotating the shoe to find the closest possible point it can with a weird angle of the shoe, so it's really not going to be anywhere near this close when I am pedaling, my feet won't be pointed up) so I don't anticipate any problems, this additional plate has strengthened up things considerably, can't wait to start putting on the electrics tomorrow! (or late tonight if I am up to it) :mrgreen: :mrgreen: :mrgreen: :twisted: :twisted: :twisted:

38943924047_large.jpg


38943924046_large.jpg
 
Well, it just dawned on me that I never gave you all a good pic of the bike as a whole, so today I did!

38943924055_large.jpg


38943924056_large.jpg


38943924057_large.jpg


38943924058_large.jpg


38943924059_large.jpg


38943924060_large.jpg


Now I'm going to see if I can finish the electrics tonight and tomorrow for the meet'n'greet at PSU Sunday, back to work! :wink:
 
Well, no power today, but I am sure my really annoying motorcycle alarm siren got some people's attention at the meet-n-greet! :mrgreen:

I could feel the really close clearance between my right knee and my front fairing's cargo area on the way to Portland today, but I had already got a late start and didn't want to loose any more time, so I kept on going.

I got home tonight, and discovered I had a minor scrape on my shin just below my knee, so I went to work and removed another 3/4 inch of the top of the cargo area's back panel.

38943924061_large.jpg


Here I have just made the cut (and managed to make a nice scratch with my oscillating saw in the frame! :oops: but that's ok, I made another almost identical scratch on the opposite side with a handsaw when I thought I was being extra careful :shock: :lol: )
 
Back
Top