First Build

Joined
Jan 27, 2013
Messages
19
Location
Christchurch, New Zealand
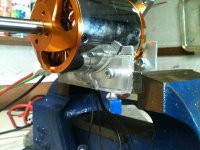
This is my first electric bike. I've had lots of motorbikes over the years and briefly considered adding an electric motor to a motorcycle, but came to the conclusion that I really didn't want to cart a weighty frame and batteries around and end up with average performance. My inspiration for this bike comes from 50cc 1960's/70s Grand Prix bikes like Jamathis and Kreidlers. The design philosophy emphasizing power-to-weight ratio of these miniature racers seems particularly comparable to many of the electric bicycles on this forum. So here is where I'm at... a Giant trance frame, disk hubs with 20" rims, a c80100 motor with an infineon controller and 20s Lipos.
electricbike01.jpg
View attachment 8
electricbike02.jpg
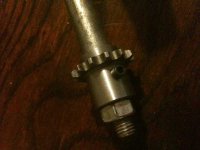
In an attempt to minimize power loss and keep things simple, I am using a single stage reduction using #219 chain and reduce the initial stress on the engine by employing a centrifugal clutch.
IMG_0732.JPG
IMG_0731.JPG
IMG_0748.JPG
IMG_0758.JPG
IMG_0754a.jpg
IMG_0761a.jpg
 

Attachments

  • IMG_0761a.jpg
    IMG_0761a.jpg
    67.2 KB · Views: 2,346
What have I forgotten to mention?....
I've decided against having pedals and am I'm intending to fit clip-on style handlebars to the fork uprights.

The motor setup is working tho I need to beef up the controller.
 
nice ideas, im waiting to build my 80/100 build with burties optical sensors instead of halls. also like the idea of the 24inch wheel to give some clearance to the motor. Where are you based?
 
Very nice!

I was about to mention pedal strike, but you got that fixed. If they make you put pedals back on, get some short cranks from a kid bike.

You had me going with that photoshop, I thought you had the fairing on it! Is the frame steel? If so it will be easier to weld on that seat.

Don't let the cops get pissed at you, depending on your local laws regarding the pedals.
 
Untitled-1.jpg
Thanks for your comments! I live in Christchurch, New Zealand where the requirements for a power-assisted pedal cycle are maximum power output not exceeding 300 watts and not over 50km/h. It must also have pedals. There is also a moped class and the legislation states:

moped means a motor vehicle running on 2 or 3 wheels that is fitted with a motor having a power output not exceeding 2 kilowatts and is designed to be ridden at a speed not exceeding 50 kilometres per hour under normal conditions of use.

Mopeds cost less than half as much as motorcycles to register, but would require indicators, brake lights and a horn which shouldn't be too difficult to fit. (You would assume "moped" meant having a motor and pedals but i cant see it mentioned.)

The stock infineon controller is rated at 1500W and I would only go over 50km/h under abnormal conditions :wink:

The frame is aluminium but it shouldn't matter too much as I'm planning on bolting on the subframe. I cut the alloy today and hopefully can get it welded tomorrow :D

I also picked up some aerobars for NZ$6 that i chopped up to use as clip-on handlebars. I need to lengthen them slightly but they fit perfectly to the fork uprights and amazingly the brake levers fit also.
View attachment 2

The 20" rims that i cannibalized from a $20 bmx and laced to the disk hubs will need to be replaced, as the motor seems scary fast even with the controller unmodded. and I found these sunringle rims/maxxis tyres $50 the set plus postage.View attachment 1
 
I attached the clip-ons today and I'm super happy with them though I need to find a better way to stop them hitting the frame at full lock.IMG_0766a.jpg
I temporarily attached the subframe but realize I need to shorten it at both ends and add a seat stem to alter the angle.
IMG_0767a.jpg
 
I spotted these containers while at the mall with the mrs.

View attachment 2
With a bit of modification I now have the battery container/tank almost finished.

aIMG_0784.jpg

I had this motorcycle fairings in the shed and thought I'd sit it on the bike but it is way too big. I might have a go at modifying it, and if it doesn't work out I'll try vacuum forming one. I've made a windscreen for my Honda ns250r but never a full fairing, so that should be fun.
aIMG_0791.jpg
 
Coming along real nice there, even if it gets ridden with no fairing.
 
Thanks Dogman, I'm keen to eventually have a fairing but I know it's not really necessary:)

I feel like I've been neglecting the motor/drivetrain a bit. I guess it's good to have a whole bunch of things that need doing so I can't get too annoyed when parts take a while to source. I have been trying to figure out whether the max-torque clutch that my friend gave me could be modified easily, or if I should just buy a new clutch. I've found a few options and am still waiting for freight quotes, so here are my options so far:

1) A Comer k80 12T clutch for US$329 + freight..... probably a bit too expensive
http://www.cometkartsales.com/store/clutches/comer.htm

2) The Noram GE series 15 tooth 219 pitch go kart clutch is quite a bit cheaper.... and freight should be less also, since supplied by our Aussie neighbors.
http://www.smallengineperformance.com.au/index.php?page=shop.product_details&flypage=vmj_ace.tpl&product_id=273&category_id=3&option=com_virtuemart&Itemid=12&vmcchk=1&Itemid=12

3) A more robust noram clutch 15T-#219, also from Australia. If the price is right I think I may go for this one.
http://www.aussiespeed.com/index.php?page=shop.product_details&flypage=vmj_ace.tpl&product_id=405&category_id=40&option=com_virtuemart&Itemid=23&vmcchk=1&Itemid=23

If anyone can think of a reasonably priced clutch between 13T and 15T It be keen to know about it.
 
I caught myself thinking about my bike project in a meeting the other day... I think this means I'm not devoting enough time to it.

219 89T sprocket attached2.jpg

My uncle turned up this disk to attach the #219 89T sprocket to the splined hub. I may have to make better spacers but the nylon rings from between the original sprockets will do for the time being.

battery tank plug.jpg

I found that I couldn't get a good enough finish on the plastic tank so used it instead to make this plug. With a bit more finishing hopefully I'll be able to vacuum form some PET or Acrylic over it.

I've been thinking also that putting the motor on top of the lower swingarm behind the seatpost just isn't going to allow enough room. I really need to be able to slide the mount back and forth to tension the chain. There are two options that I can think of. Firstly, welding on horizontal dropout things to give more room and allow chain tensioning at the axle... like this guy did
http://www.endless-sphere.com/forums/viewtopic.php?f=28&t=34451&hilit=aluxx&start=25
It's a really useful thread for me as the frames are almost identical.

The option that I am currently favoring atm is attaching the motor mount on the upper part of the rear fork.
ground off cable clips.jpg

Looking at the way the swingarm moves, I don't think the motor will get thrown about too much when the suspension contracts.
Lastly, I bought a go-kart clutch...and after much reading I think I'll see if I can get away without using it. If I don't need it I guess I can resell it.
 
I made some progress on the motor mount today.
IMG_0823a.jpg
IMG_0824a.jpg
I have still to bore out the bearing clamp holes to 37mm and get them welded to either end of a base plate.
My uncle kindly press-fit a piece of steel into the 13T sprocket hole and drilled it out to 12mm fitting the motor perfectly. He added a grub screw as well, so another piece to the puzzle complete. Well almost... he suggested getting the sprocket welded to the 12mm sleeve, so I'll do that at some point.
 

Attachments

  • IMG_0821a.jpg
    IMG_0821a.jpg
    49.1 KB · Views: 2,293
Do you feel there may be too much leverage from the seat mount pulling up on the front of the bike. The gas bike that your current design is fashioned after of course has a similar weight balance way back over the rear axle but the weight of the rider is supported more by the old school coil springs supported by the rear swing arm. With you using a modern suspension and then trying to fit in this seat assembly being leveraged the way it its I wonder if the combination of having all the weight that far back in the frame along with the pulling up of the front end by your seat mount things may handle a bit funny.
 
Hi Wayne, I must admit I can't be sure how it will handle at any great speed. I did have a bit of trouble with the spokes being too long and so until I ground them back I couldn't really test the riding position. The tires are now inflated and I have achieved back yard scooting velocity. I think it will be okay to ride....with the short forks on the front and the low handlebars my center of gravity is a lot further forward than a traditional bike with a more vertical riding style. With longer forks and a normal seatpost, a riders weight could be back even further....maybe. One of the benefits of lowering the seat is that the tendency to wheelie should be reduced. I have only been making back-of-the-napkin type calculations, and since you've drawn my attention to it, I will have a proper look at it. I should also post a picture of the bike with me on it eh?

A related concern that I have is that the box tube might not handle my weight, especially at the pivot point where it has been weakened by the hole. It does hold my weight but with the roads like they are around here atm a pothole could leave me sitting on the back wheel! My strategy of if it breaks, rebuild it stronger, might take less precedence than my make it strong and avoid bodily harm strategy.
 
Here are some pics of the motor mount and rear fork plate/clamp thing that I've all but completed over Easter weekend. I've taken the day off work tomorrow and hopefully I may even get some power to the back wheel tomorrow!

I decided to mount the motor on the upper part of the rear fork to give myself a bit more room to adjust chain slack and such. I couldn't find a thread about clamping a mount to the frame with resin, but If there is one I'd love to read about it. I really wanted to avoid ruining the tempered alloy frame through welding and I figured a straight clamp would deform the tubes. I'm hoping that by wrapping the tubes with fiberglass should help maintain the shape of the tube and spread the load. I quickly discovered that working with Fiberglass can get out of control pretty rapidly if you've never used it before, and so the end product looks not a bit like my original sketch. A few areas required filing off and reworking and I've yet to slip the frame onto the left and pour a bit more resin, but I think it should be strong enough. I will fire a few bolts through the plates to make sure it doesn't slip before bolting on the motor mount.
View attachment 4
IMG_0848s.jpg
IMG_0828s.jpg
IMG_0829s.jpg
IMG_0838s.jpg

As you can see I'll need to cut a chunk of the plate away so the chain doesn't hit it but that shouldn't be a problem.
There seems to be plenty of room for a secondary chain and pedals and so... I'm very tempted to follow dogmans suggestion and fit some kids cranks... or chop the old ones down.

dope.... I just saw some guy with an ebike on telly getting hassled by cops....
 
View attachment 1

I can't believe it but the motor was running backwards.... Could I have connected something the wrong way around? ... no... Anyways, I sorted it out but swapping 2 of the phase wires and going thru a few sensor wire combinations. Whew

So the drive train is complete, unless I decide that the gearing is way too high... which it probably is, since I left the centrifugal clutch off.
IMG_0857s.jpg

Next I think I need to reduce the resistance of the shunt in the controller. I've read a few threads on this but I've yet to remove the case and have a look inside.
Also, I should attempt to convert the motor from delta to wye. Again, I have yet to open that can of worms.
 
Finally... I have my motor successfully converted to wye configuration. I had a lapse in concentration and connected one phase the wrong way around.... I feel almost like i should give that evil configuration a name..... it made a hell of a racket and blew my controller. <Despair>

I opened the controller up and the damage didn't LOOK too bad... well not much soot and only 1 mosfet broken, so i ordered 40 new IRFB4115PBF through digikey. (spending over $125 to get free freight was too good a bargain since freight was $39). I tried to source some locally but the guy wasn't at all helpful and they didn't have anything close to what I thought I needed. Businesses failing to compete with online stores, so having to pay low wages to unhappy people who then give poor customer service, seems all too common these days.
ANYWAYS... after converting my unorthodox wind to wye, I then replaced the broken fet along with the others on that phase and fired it up. I heard a click accompanied by a 4 blink error code Grrrrr so I tested the fets as best I could on the board and replaced 3 from the next phase that didn't seem to be quite right. And Then WOOO HOOO IT'S ALIVE! If anyone else has this problem with the Hua Tong 1500W controller, 4 blinks and a click (at least in my experience) was solved by replacing fets.

I'm going to see if my friend can bring his oscilliscope over, and get the halls positioned perfectly before I put everything back on the bike.

So that's where I'm at... sort of where I was at before, but with a wye wound motor and a controller half fitted out with much better fets (I'll do the other seven soon). I'm hoping the wye wind and the scope tuning might help with the cutting out issue I was having with the controller when it was delta wound. Would it be reasonable to assume a wye wind would have around twice the inductance?
 
" I feel almost like i should give that evil configuration a name..."

How about :oops: " Fork in Toaster". ..... sorry about that, I could not resist!
 
haha yeah well I had another fork in the toaster moment today. I went racing around the back yard with the front wheel almost lifting, parked it up to go get my girlfriend to watch and no sooner had I lent it against the house I saw sparks and heard 3 pops..... I opened it up and I can see 4 of the original fets fried! There is a lesson to be learnt here for me... don't half do a job. Hopefully It's just the fets again.
 
She Rips and do those little wheels ever shrink it down in size looks like a pocket bike now ! (love the fairing)
 
Back
Top