First build, so many questions

bikeonfire

10 mW
Joined
Jul 15, 2014
Messages
34
Location
Victoria BC
Hi,

I was on here until a month or so ago when I ordered my parts from BMS. I'll post separately about that experience :shock:

I ordered a Bafang BPM2 48v 500w 328rpm. I got a code 12. From what I understand it's rated to 250rpm at 36v so would be 333 rpm at 48v? It's black with no big bafang logo, but I think I actually got what I ordered with this wheel. Imagine that.

I ordered an S12S (500w) and an S12SH (800w) controller. I'm not sure which one to keep as the spare. Probably the 500w.

A 48v 10Ah LiFeP04 pack in the 07 case with a charger.

A left side half twist, a right side thumb throttle, the cut off brakes, the "hidden" in line brake cable, a 10 and a 12 pole PAS, a wheel speed sensor and oh shit I just realized there's no display. After all that time reading and learning and planning my order I went and forgot to add the display on the last list I put together. Holy crap I'm not a fan of me right now. Now ordering the LCD3... here's to the end of summer.

I was going to ask about how to put on the torque washer when the wire coming out of the motor has connectors on there that make it impossible to install said washers but now:

Can I run this without a display? I'm looking at weeks till I get it, knowing these clowns.
 
Ok I got the connector off, but now when I put the axle in my dropouts I see there's nothing there on the drive side to go against the inside of the dropout. It's just the bare axle protruding from where I screwed on the freewheel. Am I missing parts or what's the deal?
http://youtu.be/y1wL4vzGUTY
 
If your problem is that the freewheel is binding you can put a washer on the axle between the freewheel hub and the bike frame . Most rear axles are 14 mm
I had a similar problem and by placing the washer in it gave clearance so the freewheel spins freely
 
There's a good 3/4" of metal missing to tighten the hub into the frame. I think a part is missing from my order. I'm emailing with bmsbattery about it right now. Though I'm not holding my breath.
 
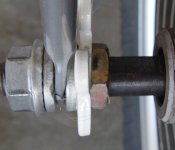
I don't know how they handle it, but there's usually a long sleeve that goes on the axle of the freewheel side and then a washer to go between it and the inside dropout. If it wasn't with the kit, then you can use a jam nut on the inside of the dropout to keep the freewheel away from the frame. Like this, but on your freewheel side.
lnut3.JPG
 
I wish your video had gone just a little farther, as in closer to the frame so we could see parallel to the frame. Are you saying the freewheel sprockets bind against the frame? It doesn't look that way from the video, but it's hard to see because I can't quite see the gap between the smallest sprocket and the frame.

Did you find the sleeve that wesnewell is talking about anywhere in your kit? It should have come on the axle already.
 
I think the motor is missing the big nut that threads on the shaft and resides inside the free wheel.
That's the way my Ezee motors came(with nuts on the inside of the drop outs on both sides).
 
Hi thanks for all the replies. Was a long weekend here so not much time on the bike. Yeah that sleeve is exactly what I'd need and it wasn't there. I put the two washers that came with it on the one side and I thought it might work but then when I tightened the nuts it's a no go. I went looking for the right washer (11mm inner diameter I think) but all I found was 10mm and 12mm. Even tried a fastener specialty store. Trying to limit the grinding here. I could try using the little bit larger washers or grind down the smaller ones. Any issue them being a little large on the ID?
I'm going to play with the fit now...
 
If you don't have a spacer, you'll break the axle. Then you'll wish you had installed the spacer, because replacing the axle in a hub motor is a huge hassle that no normal bike shop will do for you.

The spacer transmits chain tension forces to the stronger bearing-supported part of the axle. Even if you never pedal, the spacer also transmits forces from your weight and shock loads to the stronger part of the axle. Without it, you're asking the skinny, threaded part of the axle to do the lion's share.
 
The only purpose the long spacer is to keep the frame out far enough for freewheel clearance to the dropouts and to keep the chain from rubbing the frame. It provides no support for the freewheel at all. Find a jam nut or another method of keeping the dropouts far enough from the frame that the chain doesn't hit it and you're good to go. If you look at my photo, there used to be a longer spacer there before I crushed it. The inside jam nut replaced the spacer. the spacer has no load bearing. It's just there to provide something to tighten the axle nut to. A jam nut does a better job anyway if you have the clearance to put one on. Mine been on for over 3 years and the axle nut has never come loose. And being on steel dropouts, I've never used a torque arm/plate.
 
No washers are supplied with the kit, but with 6 speed, you shouldn't need them. There should be one or two sleeves and a nut on the axle like shown in the photo above. Assuming that you have those, but your freewheel is too long, you need washers with 12mm inside diameter and 20mm outside diameter. A standard 12mm washer is 12mm and 24mm. You can usually find ones the correct size, but if not, you can drill out the hole in a standard 10mm washer. BMSB supply all the washers, anti-rotation washers, nuts, etc in a separate bag somewhere in the box.
 
I believe the issue is that his kit appears to have come without the sleeve that goes on the axle inside of the freewheel to give it the proper spacing from the frame. An obvious oversight on the part of BMSbattery. He could contact them, but they'll probably say "we can send you the sleeve in your next order..."
 
Yeah the sleeve is missing. I forgot to order the lcd3 display (facepalm-$55 shipping) and told them to send the sleeve with that order. The useless support has no idea what I'm talking about and asks me for a link to the part. Derp.

I figured it was just a spacer but wasn't sure. I found some 10mm I'm going to grind. Or these some little bit larger ID washers that shouldn't float since they'll be pinched. But I figure I might wait for the sleeve to arrive (if they can get their shit together) when the display arrives.

Can I run this without the display? Throttle only?
 
I think this may be what you do to get the controller to work without a display, short 1,2 and also short 3,5 on the LCD display line from the controller.

There's something about the controller shutting down after a period without a speed sensor too as I recall.

file.php
 
Thanks for that pic Jonathan. My kit came with zero instructions. I'm sure I would've muddled through the wiring but this is way easier.
 
Wow tech support at BMSBATTERY is REAL helpful. I don't know else how to tell them what part is missing. Would anyone happen to have one they could take a photo of?I know it's a longshot.
 
bikeonfire said:
Wow tech support at BMSBATTERY is REAL helpful. I don't know else how to tell them what part is missing. Would anyone happen to have one they could take a photo of?I know it's a longshot.

not the same motor (mine's a Q100) because my under-the-bed inventory is a little low right now.

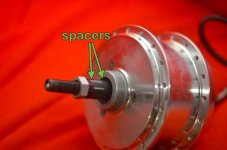
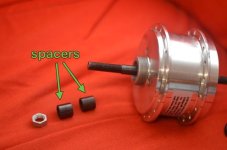
This motor has two spacers, some have one long one. That's what you need though.

If BMSbattery gives you trouble, I can try to help. I've made so many orders there that I'm actually pretty good friends with them now. I know about the tea from Bin's hometown…
DSC_0817.jpg
DSC_0819.jpg
 
Now that I think about it, I don't believe that the BPM comes with spacers. Instead, it doesn't need them because it has a stepped axle, so nothing is missing. You just need a couple of washers. Here's a photo of how it should look:

8FBCEX_CNNCQ.jpg


although this one of a BPM2 shows what should be provided. There's a solver spacer bottom right:

ADCEN2_G4QXW.jpg
 
Ok I went with some washers I found and mounted the wheel. There wasn't room for the torque arm on the drive side (hitting derailleur) so I used the two torque nuts on that side. One on the inside of the dropout and one on the outside. It's a steel frame so I imagine this is fine. I don't think I have the torque arm in the optimal position, but hose clamped down I think it's fine.

Next I tightened all the spokes twice around because they were so loose. Then I redished the wheel to center it. Then corrected for wiggle and hop. Good to go.

Ran rim tape and new continental CityRIDE 1.75" tires withMr Tuffy liners. I'm hoping I don't regret not going with a wider tire. I'm used to 1.5" but I'm realizing now how much more this bike is going to weigh.

Next I put back on the fender and then fooled with the rack till I got the order of operations right. Instructions would have been nice.


**Now I put in the battery then attempt to mount my panniers (desole, monsieur) and hurray there's no room for the clips on top. WTF bmsbattery? **

Anyone found a solution to this problem?

I tried sliding the battery all the way to one side to at least get one bag on their. I want to keep my unwieldy controller in there. But alas, it is not to be.

I have a size 15.5 frame with a somewhat dropped top tube, so space is hard to come by.
 
I don't think you said what type of battery you have or how it's mounted. Perhaps a photo would help us understand what your problem is.
 
It's a BMSbattery aluminum shell battery on their 07 rack. I'm hunting old school panniers with metal clips like my old Karrimors. Which were stolen with my Trek 420. Sigh.
 
bikeonfire said:
It's a BMSbattery aluminum shell battery on their 07 rack. I'm hunting old school panniers with metal clips like my old Karrimors. Which were stolen with my Trek 420. Sigh.

Oh I like that rack a lot. But yet, it's a tight fit with the battery so I can see how there might not be room for clips. Since it's a double decker, could you add a custom panel to the top so you've got a new rack surface with room for the clips? I'm not sure exactly how your panniers mount, so I can't picture exactly what would work for you.

These problems can be annoying, but I actually kind of like them as opportunities for creative problem solving. A chance to engineer a solution :)
 
A third layer on top would add way too much height. It's sky high as it is. A lot has pulled me away from this project but I'll be able to get back at it in the next few days. I've been hunting the right bags but to no avail. I might go for a super cheesy over the top saddlebag. I'm not working at the same job that had the commute with all the reason for an electric bike and the secure dry lockup so I'm having to rethink this thing. Not something I want to lock up say downtown. Bike is a bit less useful to me now...
 
Back
Top