Aluminium "555" chopped DH frame: 555WattHrs

Samd

10 MW
Joined
Jun 28, 2011
Messages
3,750
Location
Ballarat, AU
I wasn't happy with the to-ing and fro-ing on my tank for the dual drive plans in another thread, and whilst I was enjoying the whole duct tape ghetto thing, I decided it was time to join the chopped ranks with a custom 6160 tank.

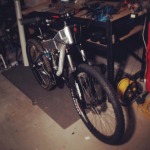
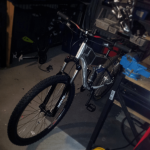
Here's the donor bike:
IMG_20130216_120141.jpg

I liked the way the bike handled even with the LiPo up high on the top tube as 15S2P on 5Ahr bricks. So I decided to keep the batteries up there in case I ever mount a GNG kit on the downtube.

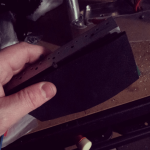
Despite the cheaper nature of the donor frame I was pleasantly surprised to find nice thick 4mm walls inside when the 4inch grinder came out to liberate the top tube.
IMG_20130620_221707.jpg
I was surprised at the rigidity of the frame with the top tube missing. The downtube is 50mm diameter, so that section is quite strong. The top tube/tank should be in compression only.

Given the nature of the frame I've actually bought the last remaining dozen of these frames to customise but more of that in a forsale thread of it's own later....

With a bit of CAD and cardboard design I managed to make up a design I was happy with that held 555 watt hours of Zippys. 86mm internal for the most width tapering back slightly at the seat join.
555b.jpg
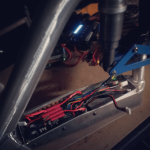
There is a door underneath that bolts into place, with about 25mm of clearance. I plan to hide a 12FET under there after removing it from it's casing and bolting the heatsink to the underdoor. I like the idea of the top being solid as we often get light rain where I live.

I found a local fabricator that TIGs dirtbike frame upgrades who is really easy to deal with. He also does a lot of 6061 Aluminium buggies and does not bother T6 treating them any more due to using slightly thicker walls. I've gone with his suggestions on internal gusseting and will ride the prototype to destruction, with some help of a few other local ES members. Nice to have spare frames in the shed if i can kill this one. :twisted:
 
Here are some sneak previews.

I intend to shotblast and powdercoat the final frame, in matt or satin black with some red highlights to suit the hardware. And maybe some custom laser rear shock links with variable lengths (thanks for the advice full-throttle).
20130626_211850(1).jpg

IMG_20130705_105825.jpg

IMG_20130705_172831.jpg
 
It'll be neat with the door in the bottom, but painful to get batteries in and out.
 
Actually, not so bad! 'll be running the HXT plugs etc beneath.

IMG_20130706_142108.jpg

Oh and there's space in the lower section of the top neck, as well as the seat gussets for things like din charging plugs...
20130708_131912.jpg
 
Looking great! Nice welding!
 
Thanks Whiplash! I am glad I found a good fabber who is experienced at two wheeled stuff. :mrgreen:
I've managed to have him sworn to secrecy - at least until all twelve frames are fabbed. 8)

Although three flat bar hybrid frames just arrived so I'm officially outta control. :D

I've been promised the full proto frame back this afternoon with the single piece under-door (an earlier design had seperate sections).
I removed my shunted 12FET from it's case and it looks like it should fit nice - only 26mm thick instead of the original 40mm. I'll prob fabricate or 3d print a weather proof cover for it, and bolt the heatsink bar to the under-door. That's the plan for now anyway.

If we knew what we were doing it wouldn't be research. :p
20130617_210224.jpg
555bb.jpg
 
Dibs on one of the frames - target pricing? Equipment level (ie BB, rear shock?)
 
Thats rad! Gimme a holler once fab is done. Im down in Geelong and would love to pop up to check them out!
Is there any modification happening to the swing arm? or will this be more aimed at mid drive?
 
Gday there,
whilst the frame is 6061, the rear swingarm is 4130 Crmo steel so it's probably fine for most large hubs, although I have asked the fabber to weld on some extra TA's each side to give about 6.8mm total width per side. On the current frame I did just affix normal TA's, by drilling and tapping with M6 bolts -as there is a pretty good surface area on the rear drops.

Dropout width is std 135 but the Crmo is able to be stretched as normal.

I've been running a geared Code 10 BPM in the rear so far on my dummy bike at 2100W (38 amps) no prob so far. The cheap 12FETs do have a slight ramp on the throttle though which would reduce the initial shock...

Heath, I'm hoping to keep blasting, fabbing and coating costs down to meet a sale price of about $850 per frame but that is for a seperate thread. The mods will be rightly onto me!
Proto finishing and testing first!
I guess the nice part is that I can throw in the spindle, seat/tube, coil shock, head cups and bearings etc and people can get rolling and upgrade later. The stock forks and discs I wouldn't bother, but it looks like these frames are rather good inside for the money. It's an interesting feeling hitting one with a 4 inch grinder and having no idea what you are going to find inside - I felt very relieved after, but not before!
 
All picked up on the prototype just in time for the weekend, with two options for the under-door depending on powdercoat thinkness and controller sizing.

I need to do a little cleanup on the corner welds so that the door drops right down flush with the 51mm tall lipos inside. It's just resting up high for now.
Lookign forward to getting it bolted up for a ride 8)
IMG_20130712_113737.jpg
 
That's looking ace mate!
Is that an extra gussett up near the headtube or was that already there ?
Now what you need is someone to test ride it hard. Know any mad Russians with suitable qualifications ? ;)

What's the eye-eye length of the stock shock ?
 
Ha, it's turned up alright eh! 8)

It's a couple of half gussets I guess you'd say - as the lipo can slide underneath. Advice was that you can overdo rigidity in some areas and that makes other areas flex more bringing on fatigue. As far as finding out goes...

Well I do know a certain Stig-like guy who tends to ride his share of vertical surfaces on group rides and have requested his expert demolition skills :mrgreen: He's such a good tweaker I'll prob get it back in an entirely different state though!
Just gotta get it bolted up for him in an initial state and ply him with some graft and corruption such as frothy pints and trained monkeys. :twisted:
There's a plan to get some footage if we can swing it...

I think the stock chinese coil shock is maybe 140mm but will check. I deliberately kept the undertray well clear in case people want to go longer. And I need to get the variable length rocker arm into CAD and get a laser cutting away.

Thanks for the kudos Hyena. I'd love to see how the backend handles one of your juiced-up frocks. :wink:
 
Samd said:
Thanks for the kudos Hyena. I'd love to see how the backend handles one of your juiced-up frocks. :wink:

You what?! ...oooh wait, you said "frock not cock" ok ok carry on... :mrgreen:

Nice work on the frame mods, curious why you went with top tube for batteries
rather than the downtube like others have done...Im thinking it might be a lil top heavy..

kiM
 
Gday Kim,
After riding the same setup in duct tape mode I just didn't find it toppy at all. Same as my aprilias albeit a much lighter bike here. If it was over a kWhr up there I'd rethink.
I wanted to keep the lower tube spaces free and maybe add a gng with the rear bpm sometime.

There's also a few creeks here where I go gold panning.I might flood a hub but I'd rather keep the lipo up high.

Cheers mate.
 
+1 on a modest amounts of lipo being fine on the top bar.
Most of my bikes over the years have had 18S2P (~5.5kg worth) strapped to the top bar without issue. I wouldn't like to have the bigger capacity that I have in my fighter suspended up high and be flicking it around offroad but for what this bike sets out to achieve I think it's fine.
I guess the sort of people who complain about the even 4kg of unsprung weight in a rear geared motor will technically not like it, but there's no pleasing those types :p

Samd said:
I'd love to see how the backend handles one of your juiced-up frocks. :wink:
I wonder what is the probability of us seeing this happen :wink:
That swing arm is a sitted for welding on beefy torque arms.
Or a whole replacement ( +/- stretched) like farfle had made for the cheap genesis bikes in the US
 
Yeah it's a standard headset which is nice for proper fork options. And the tube is a generous length for a cheaper donor bike. About 180mm from memory, so it should take a bit of belting.

I should update that I strode into the shed on Friday night ready for action, and started to fill the case with lipo. The lower door was pushed in a bit (which I asked for a tight seal so i could grind it flush), so I managed to ding the side wall a bit rushing to get it out with a priser. Thanks to the minus two degrees night I then commenced hacking up a lung and after trying to fit cables and things in I figured I should come back when I was in better shape.
Laid up in bed all weekend and a day off work today with the air too cold to even sneak out and think through the best wiring. Meh. :roll:

Feel like a kid in hospital for Xmas. :wink:

She's laying out on my bench like a dodgy alien autopsy, gizzards hanging out. :pancake:

And next time I'll add another3mm or so to the internal width. It's gonna fit, but there'll be swearing. Sorry neighbours. :twisted:

I guess it's an investment in time! Ha! :lol:
 
Finally got back in the shed after recovering from man flu :)

The trick to sliding the batteries in was to duct tape top and bottom layers a little, to pull each twin set of packs up nice and square. And to tape the leads flat so that you don't en up with a thick mess of wires.
I bought some parallel balance plugs and extensions, but the bulk extensions were only 14AWG. Think I will beef those up as I don't want the cables getting hot against the packs. Might wrap a temp sensor to the internal wiring to keep an eye on things for the first few rides.

View attachment 2

The lower tray still needs a bit of trimming up the seat end, and the flanges could've been higher closer to the stem, but I'll know for the next frame 8)
View attachment 1

Controller fits flush. Nice. I'll bolt the heatsink bar to the under-door and weather protect it all soon.
I need to shorten some leads and change power plugs next. Getting close though to being able to close it all up.

Leads should be nice and accessible for splitting underneath without opening her up, and charging as 5s parallel packs, then reconnecting and riding as 15s. :wink:
IMG_20130720_205714.jpg
 
Nice Job! great that you are bringing it to market, i would not worry about temperature of the lipos or wires, i would worry about shorts, silicone wire gets cut easily on sharp metal......what shock does the frame come with? ive got the duct tape 15s2p under the downtube of my SC bullit. and would love to cut and do a nice box there......COOL keep it up!
edit oh i see you meant temperature on the balance wire....14g should be plenty unless you have a bunk cell i would worry more about the connectors then
 
Samd said:
Leads should be nice and accessible for splitting underneath without opening her up, and charging as 5s parallel packs, then reconnecting and riding as 15s
That's a sitter for a 6 pin anderson block. This is how I always used to charge. In this case you'd probably wire the main -ve and +ve wire to the controller and use the plug in series anderson lead as a key of sorts to power it on

Eg. my V 1.1 bulk charging set up

parallel-charging.jpg
 
Hey that looks like a great way to go about it.

I did manage to get the controller all set up last night to sit in the right spot and bored a few more holes so the standard batt leads can come out of the case via the extensions and the JST plugs just connected in series. Controller now has compatible bullet connecteors soldered with 2" of leads so that it all sits up underneath nicely.

After losing a week to this damn cough I should've sent the frame off to the powdercoaters. Ah well, limited edition silver it is :D

Next steps are to drill and tap the side walls and under-cover door with M5 bolts and some nylocs, and secure the controller heatsink to the trapdoor. Then the bike's other fittings can be transplanted over quickly from the duct tape mule bike I built.

Thanks to the advice of full-throttle I purchased a budget crankset last week and they arrived yesterday - should look much nicer than the stock ones.
http://www.chainreactioncycles.com/Models.aspx?ModelID=105748
 
Its been a good night. Everything still needs fine tuning but the case is sealed and the bare bones are there. I'd better not forget a chain! :p
 

Attachments

  • ForumRunner_20130727_000743.png
    ForumRunner_20130727_000743.png
    220.8 KB · Views: 5,349
  • ForumRunner_20130727_000831.png
    ForumRunner_20130727_000831.png
    184.9 KB · Views: 5,349
  • ForumRunner_20130727_000853.png
    ForumRunner_20130727_000853.png
    228.9 KB · Views: 5,349
  • ForumRunner_20130727_000926.png
    ForumRunner_20130727_000926.png
    198.9 KB · Views: 5,349
Oh and the bike is currently configured as a 96er, with 29inch front wheel and 26 rear. I like this setup for descending stairs.

I'd better not ride it backwards. :wink:
 
Outside shot in a rare glimpse of winter sun.

I'd better get the chainline sorted. I need to remove the rear 7 speed and switch/space a small single freewheel cog.
Beef.jpg
 
Looking good.
How did you protect the battery leads etc where they pass throught the metal tray?
 
Back
Top