[update] kona stinky

Joined
Nov 13, 2013
Messages
702
Location
the alps - near italy, france, switzerland
This thread follows the mounting of the kit linked below, on a 2000 kona stinky:
(this is going to be my very first E-bike project, even if I have some e-scooter and E-skate experience)
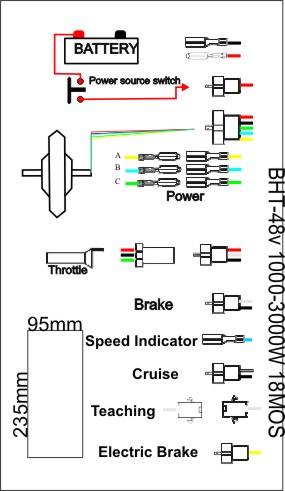
the kit

best-motor-50A-BAT.jpg


I got the complete kit as pictured above for 700Euros, it costs now 1400Euros.
the kit is rated 1000W but I wonder, it seems that the numbers do not match
(54.6V x 70A = 3822W)
the bike costed about 200Euros,
Target is to have a cheap yet powerfull EV for a 10kms commute - but with a 7kms long climb...

Here are some assembly tests pics :


There is hardly enought space between the shock absorber deported chamber and the battery,

can I turn it upside down or should this chamber be always at the top ?
 

made_in_the_alps_legacy said:
There is hardly enought space between the shock absorber deported chamber and the battery,

can I turn it upside down or should this chamber be always at the top ?
 
I would swap the position of the battery and controller, that way you can add more of a protective case to the battery and the controller wires/connectors will be inside the frame triangle instead.

Edit: provided there is enough clearance to the tire with the fork compressed
 
Then you could keep the battery inside the triangle frame/ controller under down tube as per your original setup and make a nice junction box to cover the controller connectors.
 
jateureka said:
Then you could keep the battery inside the triangle frame/ controller under down tube as per your original setup and make a nice junction box to cover the controller connectors.
agreed,
but the shock arrived without bushing on one side and I convinced myself that I would keep this "vintage" style of the bike itself (100% original components) -
so, I should move up a bit the plate holding the battery and move back a bit the actual shock (using the hole closer to the seat tube rather than the forward one as it is actually), hope to get enought space to avoid conflict...
then as u said, small JB, wire up and... keep on working on those torque arms... and get some better quality M14 nuts... and...

bah... this project is so heavy to work on compared to my e-skate... I have also been reading subject regarding how bad radial spokes hub motor wheels are... so, not too excited any longer...
 
Sell your bike then...
 
ahah... I think I will finish it first :wink: I progressed on the battery enclosure recently...
599172PC271734.jpg

and ordered a power analyser which will be usefull for my projects
111411.jpg
 
turned the shock upside down + finished my battery mount + "armor"


Did the wiring and hanged the bike in the air for a no load test :
It started at the first attempt
Noted 2 issues :
- the wheel had to be trued, did it.
- the last 25% of the throttle range does not lead to acceleration, it accelerates during the first 75% but then speed stays stable for the last 25%
(I had my 36V e- scooter throttle wired at that time, could it be the reason ? tried to connect the throttle from the kit but could not manage to get it working...)

Then went for a first load run :
- took less than 3 meters to shut down : 35A fuse on the battery wire blew up - I admit, I was high on power demand :wink:
(the battery was measured above 50V and since the controller is rated 50A, I wonder if this fuse make sens...)
(Haven't received the power analyser yet...)

I need to doublecheck the wiring i believe...

bht-brushless-controller-48v-18mos..jpg
 
Doublechecked the wiring as per "how to determine wiring of a brushless motor" topic,
...and haven't found much...
Did some no load test current measurement, about 0.2Aat the lowest rpm, rises up to about 5A at 75% throtte, then up to 15A at full throttle...
Could also measure Hz at each hall sensor
Went again for a load test, had the feeling to ride the 250W ebike of my mother... then the 35A fuse blew up again

Comments welcome
 
15 amps at no load is too much.
Check the phase wires and find a better running combination.
Most motors will be @ 2 amps at no load.

Good luck
 
Thanks a lot, I should also thank various people who contributed to many "how to" topics I found with the search function :
was self educationnal to troubleshoot this issue, I know I will forget many but at least "fetcher" and "dnumm"

I checked again the wiring,
and went through the 36 possible combination process to find the right one... (the 9th)
hall controller side / hall Motor side - Phase wires controller side / Phase wires Motor side
B/B - B/B
G/Y - G/Y
Y/G - Y/G
fixed some dirty stuff, (cable thighten on its insulation : no good)

If a noob like me read this, please note, when "they" say "noisy motor", it's like a "brrrrr..." or a "grrrr..."
when you get the right combination it would really make "wiiiizzzz..." :lol:

anyway, hooked the power meter, found the "wiiiizzzz..." combination, got less than 3A at full speed no load, went for a "uphill" ride, got a bit more than 40A, and a not too bad 1800Wp reading - I guess the battery can't deliver more than 40A, maybe I should plug my e-skate LiPo for a test

was happy to find those in a local shop :
barrette-de-connexion-suprem.jpg

used them for Throttle and hall sensors wires, then hooked them to the main cable with cable tie, so I won't have forces pulling on the connection themselves


Could store the "rat nest" in a saddle bag attached to the down tube, found a place for the power meter...


replaced the original fuse holder by an "AGU" style one, put a 40A fuse in there but I have some 60A too


next is tyre change, torque arms, speedmeter ...and it should be it :wink:

Edit : memo for me : topic regarding shunt mod
mounting turnigy power meter (remote shunt)
 
better do torque arms first. At 40 amps the motor will rotate in the dropouts and destroy the motor wires :cry:
 
... torque arms progressing slowly
I am being tickled by the "shunt mod" described above in my previous post,
But I seek for help if someone could comment if this mod would bring my battery at risk
know spec for this battery, says <70A for 5min ?
I know I have seen a very good table showing LiPo chemistry and performance on ES to compare with but can't find it with the search function...
 
I took the risk to test a 6s-22V/30C/5Ah LiPo pack in series of the 48V/2C/20Ah to supply the controller :

It did work very well : even if the power meter has been blicking since it's overvolted,
I could measure a peak power of 3kW and a very satisfactory top speed.

Would someone please advise me what risks I take from the batteries discharge point of view in this layout ? is there any ?

EDIT : just had a look to this topic
I don't get the point, I should monitor closely the voltage of the booster pack ? could I assume the first consumed "Ah" will be the ones from the booster pack ?
I could add a second LiPo Pack, so booster pack could be 2xLiPo22V/30C/5Ah parallel, going then in series of the 48V/2C/20Ah pack, would it better than one ? why?
 
Current doesn't give any favor to a special way it travels. In your case, as you put the two batteries in series, both of them see the very same load. If you see 40a at the amp meter, then it's 40a for the big pack, and the same for the booster pack.
To make a long story short: you pull 40a from the little 6s 5000mah pack. Which may be OK of it's an expensive nano lipo pack, but can be to much foot a cheap zippy.
That's why you should watch it closely. Of there is one single weak cell in the lipo it can be a problem.
 
Thxs Izeman,
I guess I need to be really concerned about the LiPo booster pack after 5Ah/45A=7min ride, is it?
Maybe I should try to parallel my 36V/2C/12Ah from my e-scooter instead...
 
made_in_the_alps_legacy said:
Thxs Izeman,
I guess I need to be really concerned about the LiPo booster pack after 5Ah/45A=7min ride, is it?
Maybe I should try to parallel my 36V/2C/12Ah from my e-scooter instead...
After 7 min latest it should be dead empty. But it most likely will be taking some serious damage at that point.
You should always put batteries of same capacity in series. So make that lipo pack 20ah as well and you'll be fine.
This scooter battery is totally useless for this purpose. You can't parallel that 36v battery with the lipo as the voltage differs. And y you can use it to put in series as it can't deliver 40a.
 
to make my last post clearer i will make a small calculation example:

first battery: 55V, 30A, 20Ah
second battery: 22V, 50A, 5Ah
third battery: 36V, 25A, 12Ah

those should be nominal contant values and not peak.

if you put all of them in series you get: 55+22+36= 113V with 25A current and 5Ah capacity.
so you see, you're wasting the high capacity of the first one and the high current of the second one.

what you are doing at the moment: first and second battery in series: 55+22 = 77V, 30A and 5Ah.
this is more or less the same as above. you loose 15Ah of the first battery.
if you only want to boost for 5min high load, then disconnect the battery and ride with the big pack only, then you should be fine, as you can use the remaining 15Ah of the big pack.

nethertheless i would add at least a second 5Ah lipo in parallel to the first one as this
a) reduces the stress on the pack by 50%
b) adds 100% range to the booster pack

i hope now everything is super clear :)
 
izeman said:
i hope now everything is super clear :)
Your explainations have been super clear
- my fault if I mentionned bringing the 36V/15Ah in parallel while actually thinking series.
Thanks a lot

the background is simple :
I know I have to climb a 7kms hill with about 500m altitude difference, as far as I could measure, the 48V/20Ah pack will hardly make it: I have to try, but I want to try with a back up, not to be stuck along this hill.
In addition, this daily commute includes a 3kms ride in town ...and I can't believe the 20Ah pack to be able to last back and forth.

Anyway, thanks for your contribution : I will get down that hill and cross the town with the booster pack(s) - reload the booster pack(s) over the day and maybe the 20Ah pack too.
Later on plug back the booster pack(s) to get back to the bottom of that hill, unplug the booster pack, then try to get up the hill with what's left in the 20Ah pack...

Will carry the "36V/12Ah" as "very last chance" in a back pack : will be used when the 20Ah pack becomes empty.
(side note : both 12Ah and 20Ah packs have BMS, so I feel safer using those than the LiPo bricks)
The good new for me is the controller unable to produce magic smoke while being overvolted
- the "less good" new is that the controller pulls not more than 45A - will see how it turns and if I move to a shunt mod or not.
 
For info,
here is the version with 2x6S-5Ah booster pack lodged in a saddle bag and reaching the controller with extension wires :


Side note :
tried to feed the controller with the 48V/20Ah and 36V/12Ah in SERIES - both "hot from the charger" @ 50V + 40V : 90V
FAILED -

luckily the controller survived this test, seems like it is "overvoltage protected" somewhere above 75V (since it works with 25V + 50V ) but below 90V
 
If a noob like me read this, please note, when "they" say "noisy motor", it's like a "brrrrr..." or a "grrrr..."
when you get the right combination it would really make "wiiiizzzz..." :lol:

what you mean exactly because my 9c motor started to make noise like brrrr or grrrr and sometimes when on hard load a metallic pin scratching noise.
 
Back
Top