Qulbix 76R build

sailah

1 W
Joined
Aug 13, 2010
Messages
52
Hi first timer. Figured I would add my build thread.

I'm new to ebikes but I've built some fully custom adventure motorcycles by taking street bike frames and engines and grafting on motocross suspension. I have a fully equipped home machine shop so that should come in handy.

2MkMT03.jpg


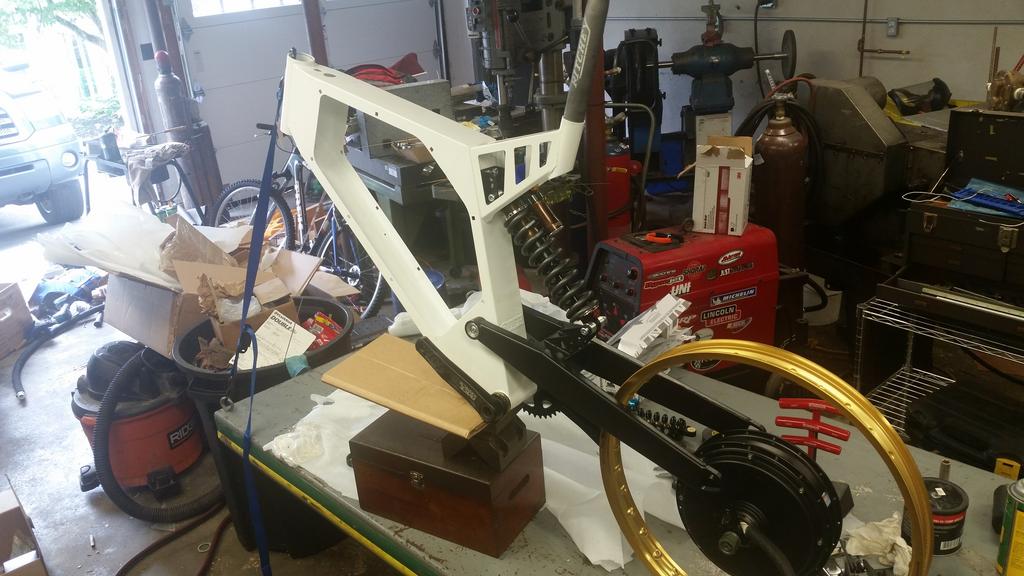
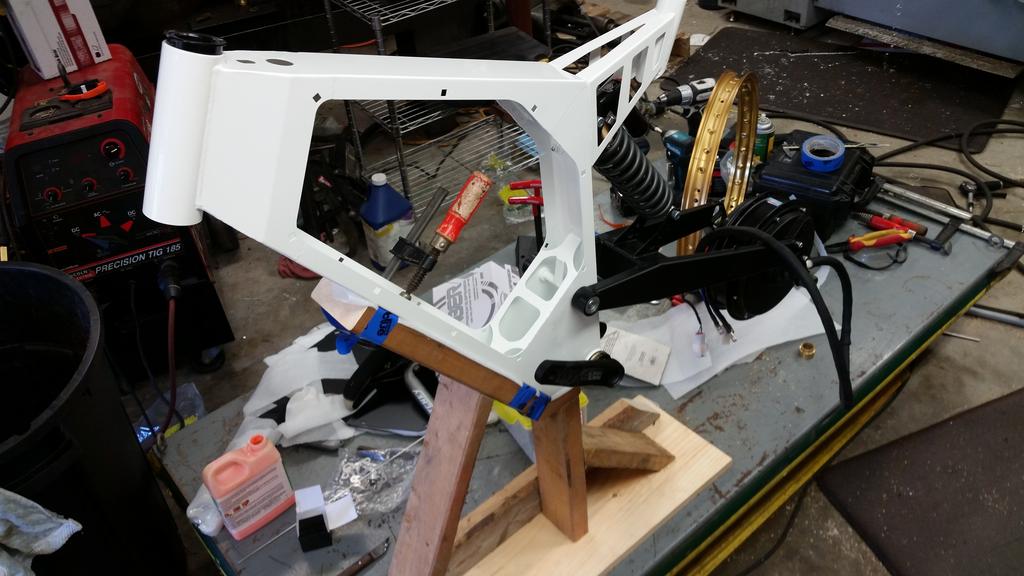
I quickly decided a frame jig would be helpful to hold the bike as it's quite unstable. I mounted it to one of my favorite tools, my Southworth hydraulic lift table.

0IrKpNT.jpg


Plan is to run moto rims and Shinko SR241 tires

I ran into my first issue and hoping I can get some advise

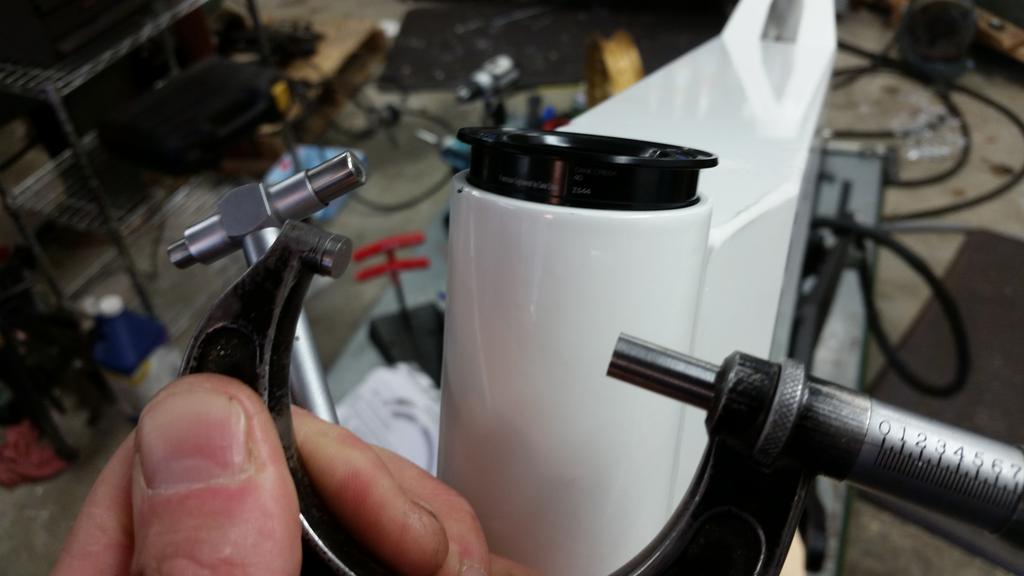
I received my Marzocchi 380 forks and went to mount the cane creek headset. I noticed it did not want to go in square, so I decided to measure things.
The headtube is severely out of round. I measured 1.718" (43.64mm) in the 12 & 6 o'clock position if you were sitting on bike, and 1.740" (44.2mm) at 3 & 9.

So the headset is tight fore and aft and rocks easily left to right. My first thought was to jig up the frame on my lathe and line bore it but I simply don't have enough material to do that. I could machine some cups and weld them to frame but now I will have wrecked the paint.

It's obvious the weld pulled the tube out of square, quite common. If I were doing this I would have left some material, welded it, and then bored it onsize.

I worry if I press in the cups, it'll simply deform the cups. Maybe I'm worrying too much but this seems out of tolerance. While I'm at it, the bottom bracket threads needed some serious help too.

Here's the cup resting in the frame. It'll easily rock back and forth left to right as the cup is being help fore and aft.

IPbMeZ8.jpg


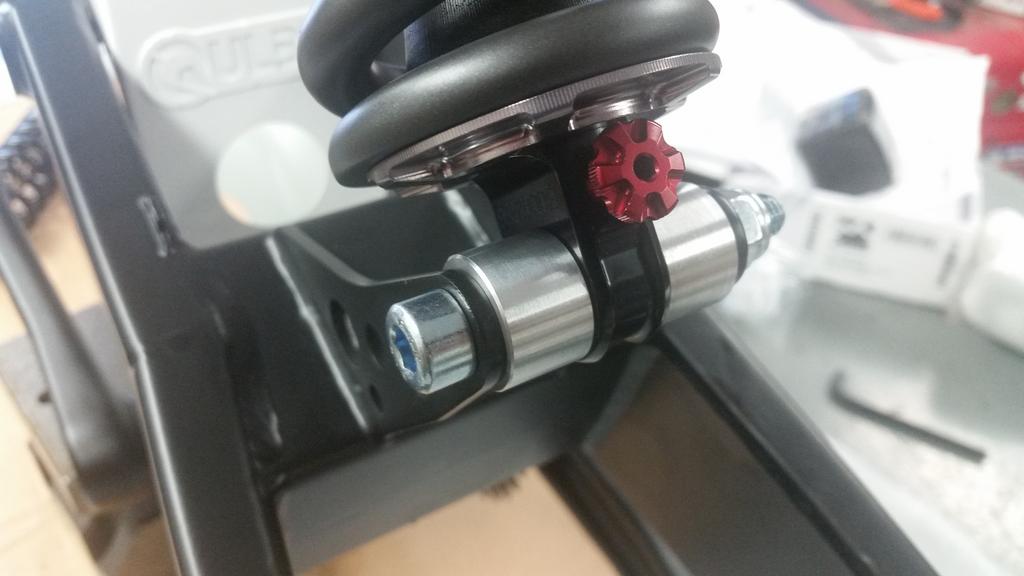
Made some shock spacers

2HKpqnU.jpg
 
That's unfortunate, I would definitely be following up with the manufacturer for such an obvious QA issue.

Regarding the fix, what about machining some tapered bushes and using a press to bring the tube back into round-ish? If done slowly with a bit of gentle heat you might get away without paint issues
 
That's a good idea. I could make some tapered cones with a reamed center guide hole to keep them aligned with a precision shaft. Press them on the hydraulic press. That'll probably work. Then ream it. Trying to find the park tool reamer local to me because I do want to face the paint off so the headset sits square.

The bottom bracket also has one side that the threads aren't good. It's galling up my new bottom bracket. The other side is perfect. I need to get the tap and chase the threads. I have to say these are quality issues that are easily checked, I'm a little surprised that they aren't. There is a lot of paint on machined or threaded surfaces anso easy to mask off.
 
Hey sailah, subbing.

I just received my own 76r in the mail today, and haven't had time to do ANY assembly yet.

Do you know what you're planning to do for a battery?

Nice shop!
 
sailah said:
I have to say these are quality issues that are easily checked, I'm a little surprised that they aren't.

The only way manufacturers will improve their game is by instigating a credit card chargeback for goods not as described/not fit for purpose.
It's totally ridiculous that you are expected to waste time, money and resources fixing their issues.
 
daygr said:
Hey sailah, subbing.

I just received my own 76r in the mail today, and haven't had time to do ANY assembly yet.

Do you know what you're planning to do for a battery?

Nice shop!

Hi, I'm doing a slow build so you may beat me. For the battery I'm using 240 Samsung 25R cells I just bought from nkon.nl

I don't know if it was the perfect battery but seemed like a good choice. There have been others like Rob in Sweden that have used this battery and I figured that's a good a recommendation as I can get.

For the controller I'm going to be using a Power Velocity 18F controller. Haven't bought that yet but soon.

Still unclear as to the direction I want to go with BMS. I don't understand what are the good options here for 20s BMS units.
 
NoFanBoiz said:
sailah said:
I have to say these are quality issues that are easily checked, I'm a little surprised that they aren't.

The only way manufacturers will improve their game is by instigating a credit card chargeback for goods not as described/not fit for purpose.
It's totally ridiculous that you are expected to waste time, money and resources fixing their issues.

I agree. I discussed it with Qulbix and they wanted the frame back to "install the headset" which I read as they were going to smash it in with a BFH. I have plenty of BFH and a 100 ton hydraulic press so that wasn't an issue :D They felt like I was being too nit picky I think, and maybe I am, but that's pretty far out of tolerance for a a tube that needs to accept a bearing as the tube would simply bend the tiny bearing. I was not interested in paying to ship the frame back on my dime, to have them shove the bearing in and then pay for shipping back to me so I told them I'll fix it myself. I don't think I'm on their Christmas card list lol

My fix was using one of our Wilton Bullet vises at work. First I used a wire wheel in a die grinder to clean all the powdercoat from the inside of the tube which they said wasn't there :roll: Then I put the squeeze on the frame with soft jaws and checked very carefully using telescoping gauges and a micrometer to make sure I was truly making it round. It was quite a bit of work but I got both too and bottom back round within 0.002". It was out by 0.025" from the factory. The end result was that the bearing races fit right with no rocking as before. Installed the fork, all is well. I did scuff the paint from the force of the vice which annoyed me but there was no way to protect it with the amount of squeeze I was putting on it. I used a 6' cheater pipe in the vise handle.
 
Here's the latest shot. I've always wanted a bike with gold rims like the Honda dirt bikes had. Running Shinko 19-2.75 241 tires. Rims are prowheel 19-1.4 36H moto rims. I'm planning on sending one of the rims and both the front Saint hub and the motor out to Buchanans to have them custom make the spokes. Im drilling out the Saint hub today and will send on Monday. Buchanans is just the best, I've used them for numerous motorcycle wheel projects and they do great work. Not cheap but worth it. I'll post spoke lengths if anyone wants to follow the recipe. I think the rear is 128mm and a known quantity but I'd rather have them measure the front and build to that.

Bought the Samsung batteries and will be studying up on pack building. I've been gleaning good tips by reading previous threads so thanks to those that have done tutorials. Any recommendations for BMS for 20S12P?
IMG_0359.JPEG

IMG_0360.JPEG
 
Got the front hub and set it up to drill out. It's a Shimano Saint hub I got for short money. I didn't think about the centerlock becoming and issue but it may for fitting larger spokes. I machined up a 20mm "axle" and mounted it in a V-block on my drill press table. Indicated it straight. I drilled out to fit 9ga spokes, matching the QS205 motor. On the non-rotor side I was able to chamfer the holes a bit, on the centerlock side it was harder to do. I'm hoping Buchanans can work their magic for me and gt me all set up. The plan is to ship them the motor, hub and one of the rimans and have them make up the spokes. I thought about trying to measure them myself, and I have the tools for it, but they are genius when it comes to how many crosses, head angles etc. Figured I'll get it right and just have to pay some UPS fees.

20170910_092051.jpg

20170910_111036.jpg

Also worked on the swingarm. From the factory the swingarm fits loosely to the frame, on mine it was 0.047" (1.2mm) gap per side. I suspect they want you to suck the swingarm in using the bolts but I didn't like that plan so I machined up some aluminum washers to take up the gap. Hand lapped them on a surface plate to get the tolerances where I wanted. Now there's no lateral movement and the swingarm isn't stressed. Better than too tight I suppose.

Got a new soldering iron (Hakko FX888d) and working on what I will use for a battery welder.

Thinking about Shimano Zee brakes as they aren't a budget buster and seem like they get good reviews.
 
Shimano ZEE brakes are a good choice (like Saint but cheaper).
Another good braking system might be the lately released Tektro Zurich. They come with an e-brake switch and longer (4-finger) levers if you prefer such (the zee Zee have 2-finger levers).

I wonder what spokes are you going to use as you drilled such large holes into the front hub?
When lacing moped rims into bicycle hubs, i normally use 13/14GA butted spokes because everything larger could tear the hub apart if you want to tension them properly. Thinner spokes are better.
 
How heavy are the wheel and rim together?

My build is going to be a swingarm / mid drive, so I won't need to worry about quite as much weight in the rear wheel, but I still haven't really settled on whether I want to go with 26" bicycle wheels with 3" tires, or 19" moto rims with something like the shinkos you've got there.
 
madin88 said:
Shimano ZEE brakes are a good choice (like Saint but cheaper).
Another good braking system might be the lately released Tektro Zurich. They come with an e-brake switch and longer (4-finger) levers if you prefer such (the zee Zee have 2-finger levers).

I wonder what spokes are you going to use as you drilled such large holes into the front hub?
When lacing moped rims into bicycle hubs, i normally use 13/14GA butted spokes because everything larger could tear the hub apart if you want to tension them properly. Thinner spokes are better.

Hi Madin, first off thanks for all your poss on battery building. I've been studying your builds and saved some pics for when I start my pack.

Regarding spokes, I just planned on letting Buchanans sort that out for me. I drilled the front hub the same size as the QS205 hub motor. I think that's 9 gauge spokes? It's probably too heavy but we'll see what happens. I paid $30 for the Saint hub so if Buchanans says there isn't enough meat, I'll scrap the idea and go with a bicycle spoke.

http://www.buchananspokes.com/

I've been using Buchanans for years now, they do an awesome job with custom spokes and are very high quality, everything made in house. I've had them lace up a bunch of adventure motorcycle rims and they've always come through.

If they say it can't work, I'll buy another $30 hub and start over with lighter spokes.
 
madin88 said:
I wonder what spokes are you going to use as you drilled such large holes into the front hub? When lacing moped rims into bicycle hubs, i normally use 13/14GA butted spokes because everything larger could tear the hub apart if you want to tension them properly. Thinner spokes are better.
+1. spoke holes are really big. those little holes need to take all braking force. people tend to use too thick spokes.
 
daygr said:
How heavy are the wheel and rim together?

My build is going to be a swingarm / mid drive, so I won't need to worry about quite as much weight in the rear wheel, but I still haven't really settled on whether I want to go with 26" bicycle wheels with 3" tires, or 19" moto rims with something like the shinkos you've got there.

I will have to weigh them. Not light I can tell you that. I chose moto rims because that's what I know. I've always had Excel rims on all my bikes, from custom stuff to stock KTM dirt bikes. They don't make one this narrow though so I went with Pro Wheel. I didn't really care for black or I probably would have gotten holmes rims. I think Pro Wheels are probably a bit better quality. The Shinkos were again chosen from my motorcycle background. For $35 you get a long wearing tire. Every thread I read up said with these large hub motors you really don't want to be on bike rims so that's why I chose the Pro Wheels and Shinkos.

But they are much heavier than a bicycle setup. Price wise probably more too. The rims were $176 but I got a pro deal on those. Hub was $30, tires were $75. Spoke will probably be $250 by the time I'm done since I need to ship the motor, rims and hub to CA and then have it shipped back once they finish. Usually a set of stainless spokes and nipples are $110 for 36.
 
izeman said:
madin88 said:
I wonder what spokes are you going to use as you drilled such large holes into the front hub? When lacing moped rims into bicycle hubs, i normally use 13/14GA butted spokes because everything larger could tear the hub apart if you want to tension them properly. Thinner spokes are better.
+1. spoke holes are really big. those little holes need to take all braking force. people tend to use too thick spokes.

Duly noted. Maybe I rethink the front end. Stinks to waste a hub but it wasn't a $200 DT Swiss or something. Thanks for chiming in
 
sailah said:
I will have to weigh them. Not light I can tell you that. I chose moto rims because that's what I know. I've always had Excel rims on all my bikes, from custom stuff to stock KTM dirt bikes. They don't make one this narrow though so I went with Pro Wheel. I didn't really care for black or I probably would have gotten holmes rims. I think Pro Wheels are probably a bit better quality. The Shinkos were again chosen from my motorcycle background. For $35 you get a long wearing tire. Every thread I read up said with these large hub motors you really don't want to be on bike rims so that's why I chose the Pro Wheels and Shinkos.

But they are much heavier than a bicycle setup. Price wise probably more too. The rims were $176 but I got a pro deal on those. Hub was $30, tires were $75. Spoke will probably be $250 by the time I'm done since I need to ship the motor, rims and hub to CA and then have it shipped back once they finish. Usually a set of stainless spokes and nipples are $110 for 36.

Great info. I think I'm going to -risk- bicycle rims to take advantage of the much lighter wheels I can build. If I end up needing to put moto rims on it in the future... meh, it's much cheaper than the dang battery :)

I love Shinkos, I used to run Shinkos on my Honda VFR, though I've been running Pirellis on my Ducati Multistrada. Off topic, though :p
 
daygr said:
sailah said:
I will have to weigh them. Not light I can tell you that. I chose moto rims because that's what I know. I've always had Excel rims on all my bikes, from custom stuff to stock KTM dirt bikes. They don't make one this narrow though so I went with Pro Wheel. I didn't really care for black or I probably would have gotten holmes rims. I think Pro Wheels are probably a bit better quality. The Shinkos were again chosen from my motorcycle background. For $35 you get a long wearing tire. Every thread I read up said with these large hub motors you really don't want to be on bike rims so that's why I chose the Pro Wheels and Shinkos.

But they are much heavier than a bicycle setup. Price wise probably more too. The rims were $176 but I got a pro deal on those. Hub was $30, tires were $75. Spoke will probably be $250 by the time I'm done since I need to ship the motor, rims and hub to CA and then have it shipped back once they finish. Usually a set of stainless spokes and nipples are $110 for 36.

Great info. I think I'm going to -risk- bicycle rims to take advantage of the much lighter wheels I can build. If I end up needing to put moto rims on it in the future... meh, it's much cheaper than the dang battery :)

I love Shinkos, I used to run Shinkos on my Honda VFR, though I've been running Pirellis on my Ducati Multistrada. Off topic, though :p

I def agree that bicycle rims would be lighter but the security of moto rims wins for me. I'm a pretty big guy and this bike is no lightweight either. Having a failure at speed of a bicycle spoke or rim is not something I'm keen to try. Maybe I'm off base but from all the other builds I have read, people that started with bike rims ended up recommending moto rims.

Plus who doesn't love gold rims ala 1990s Honda CR dirt bikes!?


So on advice of counsel, I abandoned the drilled out Saint hub. I bought a new Hope Pro4 front hub and am going to lace it with a cross 3 patterns using Sapim leader spokes. We will see how they look. I think I'll probably need dished washers for the nipples.

Ordered the rear spokes from Buchanans.
 
Got the rear spokes today from Buchanans, they do such a nice job worth the premium. Laced up the rear and did a preliminary truing. Had to see the rear tire on there.

Waiting on the front spokes so I can do that rim.

Lots of battery components ordered so that's the next big project.

View attachment 1

 
OK time for an update. Winter just got busy but I'm back on it.

Had to do quite a bit of machining on the Qulbix frame to get things back to my machinist idea of perfection.

Here's how it sits:

20180325_143545.jpg

Built the wheels up using 19 x 1.4 moto rims. Rear spoke were custom SS Buchanans to fit QS205 motor. Running a Shinko 2.75-19 trials tire. Zee brakes with 203mm rotor

Front was same rim with 12g Sapim spokes in custom length with a Hope Pro 4 hub. Hub need to be drilled out to accommodate 12g spokes. Zee brakes, 203mm rotor

Front fork is Marzocchi 380 with heavy spring, rear shock is Marzocchi with 550lb Rock Shox spring, Race Face crank, SPD platform pedals

Battery has been 90% spot welded using Malectric Arduino spot welder. Really nice unit.

20180325_124024.jpg

Here's where I'm stalled out and I would like some opinions.

I bought an 8kW controller from PowerVeloCity with bluetooth. And a 100A BMS from Supower. Compared to the phase wires coming from QS205 motor, the wiring looks rather small. I have invested quite a bit of time building battery and I don't want to wish I went in a different direction. Does anyone have an opinion on the controller and BMS? If the general consensus is that these are not matched well with my battery & motor I'd rather sell them and buy up. I've attached a pic showing wire size as a comparison to motor wires in my hand. Looks like BMS and controller are about the same gauge but much smaller than motor. Thoughts?


Battery specs: 20S 12P Samsung 25R. 84V, 30Ah, 2.52 kWh pack

Controller: http://powervelocity.com/index.php?id_product=48&controller=product

BMS: http://www.batterysupports.com/72v-84v-20s-100a-20x-36v-lithium-ion-liion-lipo-battery-bms-p-295.html
 
Not sure why other pic isn't working
 

Attachments

  • Capture.JPG
    Capture.JPG
    251 KB · Views: 4,234
I always beef up all wires I can. I use #10 for phase and battery. This is for a 2500W setup. 60A battery and 120A phase. If you don't want to open the controller you still can cut the wires close to the case and splice some thick wires into them. Voltage drop is linear to cable length. So the shorter the wire is the lower it is. I can't say how hot the thin wires will become though.
 
If it was mine, I'd run with what you have, albeit with some wiring upgrades, and I'd keep an eye on the BMS temp and charging behaviour. That way you can get a feel for what you want and how hard you want to push the power train. You have a very capable battery and you can always upgrade peripherals down the track.

There is nothing wrong with the PV controller so long as it meets your needs. If you want to look for more sophisticated and hence expensive controllers see brands like Mobipus, Emisso Drive, Pear, ASI and Sabvoton, several have reviews on ES and YouTube.

The BMS is manfactured to a price point. Some people choose to bypass the power stage. Like controllers there are better quality and more sophisticated options, some are right here on ES.
 
izeman said:
I always beef up all wires I can. I use #10 for phase and battery. This is for a 2500W setup. 60A battery and 120A phase. If you don't want to open the controller you still can cut the wires close to the case and splice some thick wires into them. Voltage drop is linear to cable length. So the shorter the wire is the lower it is. I can't say how hot the thin wires will become though.

OK, yes I could open things up. In reading more about others running a battery and motor like I am, they are all into higher class controllers. I think the best option may be to sell what I have unmodified and just go up to the next size controller.

I really like the PV esp the bluetooth display to your phone. They do have a 15kW version I think may be a better option

http://powervelocity.com/index.php?id_product=55&controller=product

Rube said:
If it was mine, I'd run with what you have, albeit with some wiring upgrades, and I'd keep an eye on the BMS temp and charging behaviour. That way you can get a feel for what you want and how hard you want to push the power train. You have a very capable battery and you can always upgrade peripherals down the track.

There is nothing wrong with the PV controller so long as it meets your needs. If you want to look for more sophisticated and hence expensive controllers see brands like Mobipus, Emisso Drive, Pear, ASI and Sabvoton, several have reviews on ES and YouTube.

The BMS is manfactured to a price point. Some people choose to bypass the power stage. Like controllers there are better quality and more sophisticated options, some are right here on ES.

I had a look around the Mobipus seems very hard or almost impossible to get, same with a few others. I contacted Sabvoton and got pricing on their 72150. From what I can tell these are what PowerVeloCity mods to make theirs? They certainly look to be almost identical from outside.

I'm a manufacturer and have things (1000 PCBs) made by contract manufacturers in China every month. While I have a great relationship with mine, dealing with problems for 1-2 things is just not worth their time or shipping. For that reason I'd prefer to deal with PV since he's in California and pretty responsive to emails.

RE BMS, this is the main concern for me. I'd rather trash a controller than the battery. You mentioned bypassing the power stage, this seems like not a bad option. The PV controller has LVC that you can set and I checked against my Fluke meter, it was pretty accurate.

It seems like the most need for BMS is during charging. Are there other options for monitoring during charging or some type of external BMS I could hook up and check while charging? I've never used a BMS before so I don't know the things I should be careful about. Seems that with such small wires it would be a matter of time before I break something and I don't want it to wipe out the pack and have a fire. Maybe this concern is unfounded.

My only experience with balance chargers was using them for lipos in RC stuff but I only briefly used them. As I recall you plugged the JST into RC charger and charged it up. They weren't used at all during discharge. Any reason to not take the same approach here? Wire up my BMS, bypass power stage and run that directly to controller. Hook up BMS to charge circuit instead. Use LVC on controller to limit getting too close to edge.

Ride bike to moderate battery levels until I have a better understanding of capabilities.

Good/bad plan?
 
Back
Top