HP ESP120 48V (51.4V) 57A 3KW Server Supply Thread

JoeG:
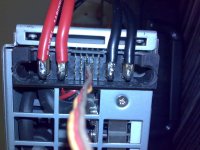
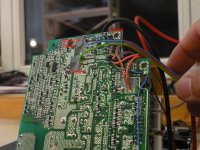
Can you show a detail of how you bolted the connectors onto the PSU's please. I luckily came apon quite a few of the actual counterpart (female??) connectors, but unfortunatly without the complete frame there are issues holding them in place... so no easy solution 8)
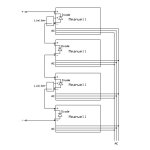
With only two PSU's I have been fine with only one diode in the output lead, with more than two supplies is it really nescessary to have them between each PSU??

...and whilst I am thinking on it I may as well pass on my thoughts on controlling the voltage.
In my case I only needed to control the voltage on one supply, which was nice and easy, so used the -ve terminal connected to the battery negative etc. as my arduino gnd, and the 12v off the same supply as +ve, with the PWM signal giving a nice clean rail to rail level through the unity gain buffer of 0-12v....
BUT for more than one supply there are two options that seem obvious to me:
1) Opto isolated PWM to the rest of the PWM->Voltage circuitry + an LM805 for each supply - Could be cleaner in terms of modularity.
2) Use ANOTHER I2C isolator and an I2C DAC with MAX232 to give -ve supply for that little extra top end voltage 8)
Much hubris, so would be interested to see what solution you come up with 8)

Note: Its a bad idea to use the same connector for low voltage signals and High voltage, but good to know an I2C isolator can protect from 100V short 8) I am sure you can guess what I did...
 
Hi folks, can anyone post some internal photos of this power supply? Just the top cover off would be nice.

Happy new year btw :mrgreen:
 
Happy New Year All !!!
Glad to see some interest on this thread again. I was busy with the Holidays and haven't done much with my project lately.
cts_casemod, for pictures of an open supply, look about half way down page 4 of this thread, I posted a few of mine. Also there are some on this thread over at Rcgroups forum, http://www.rcgroups.com/forums/showthread.php?t=1823759&page=3
Looks like you have been busy SpmP with your supplies. To answer your question about my connectors, I soldered copper bars into the existing power input, and output clips. To be more specific, I cut a 1 1/4" long pc of 3/4 copper plumbing pipe. Then I cut, using tin snips, down the center-line of the tube, bent it apart, pounded it flat, cut .40 wide strips, drilled a .203 diameter hole for a #10 screw, soldered it to the existing female connectors using a 250W soldering gun. I did this so I could use standard ring terminals for connection. As for the protection diodes, I found this how to example posted below, here at ES on another thread( ignore the limiters, that pertains to another PSU's mod). I found a similar diagram on the Meanwell factory website, so I believe it is the correct method to protect PSU's.
SpmP, I don't understand how you are using your board to control PSU output.
I am modifying the voltage adjust circuit,which is controlled by a pot I removed, and am using a hall effect current sensor for feedback to an Arduino which will adjust an AD5206 digital pot. I have tested most of my circuit on a breadboard , but not on the actual PSU's.
Could you describe in more detail, what you mod entails? Also, what part of the PSU's circuitry that you interface/hookup to with pictures if possible. I took a look at the diagram you posted, but I don't get how it works.
Thanks in advance for the info.
 

Attachments

  • PSU protection diode installation example.jpg
    PSU protection diode installation example.jpg
    21.3 KB · Views: 7,050
Thanks. I've seen them all, but what I need is a close shot up of the top.

I've got some of these http://www.ebay.co.uk/itm/HP-488603...omputing_PowerSupplies_EH&hash=item20eccc5312 on order, I'm curious if they share common bits.

Regarding current limit on the power supplies, for the DPS600 there is an easier way to operate in CC mode. This involves changing the primary PFC section current monitoring circuit by changing the current sensing resistor. This forces the PFC regulator to work in CC mode, dropping the input voltage, before the secondary over-current triggers. With a lower primary voltage the output voltage also drops. As long as the voltage is kept above 10V the supply works correctly. This may very well work for the 48V as well.
 
Success!
I charged my EV’s battery today using the bread-boarded charge controller and it worked. I charged at 34A for about an hour, which was 26A 240V AC continuous, about all my temporary 12Ga cord, and 30A garage circuit could handle. The pre-charge, Current control, and charge termination control cost more than the PSU’s together. I have two 20 Ohm 100W resistors bridging a 30A relay that is actuated with a 4 second delay by a LM555 timer to pre-charge the PSU’s input capacitors. I terminate the charge using my cellog based BMS, latching a relay, which opened 3 small control relays, opening the run enable pins on the three PSU’s. The current control is based on a LM358 op amp used as a comparator of the shunt/current sensor output to a max current equivalent voltage. The limited PSU, only one of the three, varies it’s voltage from high (49V) to low(24V) every half a millisecond to limit current. My scope only shows the voltage dropping only 3 volts(154V-151V), at the end of the charge, before raising again. It works out to be about 83% efficient. The PSU has a slight buzzing noise with the limiter working. The AC relay wiring got to 150F and the output diode got to 202F by the end of the charge.
Posted a video of it charging at http://youtu.be/-c7w-lLvFVo .
 
IC2 command for communicating with the ESP-120 3kW PSU

A great friend of mine found the IC2 command that can be sent to the power supply to play in the low level and that could be transmitted with a arduino or similar.... so you could probably readjust it according to your request... :mrgreen:

it was recovered with google cache..

Just unzip it and rename the file extension to htm :wink:

His plan is to use two of these in serie and readjusted to match the 116V to charge his new Zero S 2014 8)

Doc
 

Attachments

  • HPS3kW.zip
    10.5 KB · Views: 353
Here is the code C pour du arduino
and the link to the creator of the code (He is also practice radio amateur and his code name is TF3CY)

http://forum.arduino.cc/index.php?topic=219467


HPS3KW

This page is just some info on my expeiments with the HPS3KW module
link to the I2C datasheet HPS3KW.i2c.PDF
NOTE – there are two I2C commands in play – The blue is for HPS3KW – and the black are for the AA21970
So – if you have a original AA21970 – ordered directly from Meanwell/Astec – you must use those commands.
I used a I2C scanner program to find the addresses.
// --------------------------------------
// i2c_scanner
//
// Version 1
// This program (or code that looks like it)
// can be found in many places.
// For example on the Arduino.cc forum.
// The original author is not know.
// Version 2, Juni 2012, Using Arduino 1.0.1
// Adapted to be as simple as possible by Arduino.cc user Krodal
// Version 3, Feb 26 2013
// V3 by louarnold
// Version 4, March 3, 2013, Using Arduino 1.0.3
// by Arduino.cc user Krodal.
// Changes by louarnold removed.
// Scanning addresses changed from 0...127 to 1...119,
// according to the i2c scanner by Nick Gammon
// http://www.gammon.com.au/forum/?id=10896
// Version 5, March 28, 2013
// As version 4, but address scans now to 127.
// A sensor seems to use address 120.
//
//
// This sketch tests the standard 7-bit addresses
// Devices with higher bit address might not be seen properly.
//

#include <Wire.h>

void setup()
{
Wire.begin();

Serial.begin(9600);
Serial.println("\nI2C Scanner");
}

void loop()
{
byte error, address;
int nDevices;

Serial.println("Scanning...");

nDevices = 0;
for(address = 1; address < 127; address++ )
{
// The i2c_scanner uses the return value of
// the Write.endTransmisstion to see if
// a device did acknowledge to the address.
Wire.beginTransmission(address);
error = Wire.endTransmission();

if (error == 0)
{

Serial.print("I2C device found at address HEX:");
Serial.print(address,HEX);
Serial.print(" Decimal:");

Serial.print(address);
Serial.println(" !");

nDevices++;
}
else if (error==4)
{
Serial.print("Unknow error at address 0x");
if (address<16)
Serial.print("0");
Serial.println(address,HEX);
}
}
if (nDevices == 0)
Serial.println("No I2C devices found\n");
else
Serial.println("done\n");

delay(5000); // wait 5 seconds for next scan
}

Here is the power supply out of it’s long sleek box:
2014-03-26 20.23.31
The code below is probably not working – but will give some reference
This is the current test code – not working FYI!!
#include <Wire.h>
#include <SerialCommand.h>

#define PSU_ADDRESS 0x1F

#define CMD_SETCTRL 0x02
#define CMD_READCTRL 0x03
#define CMD_READAD 0x01
#define CMD_READFW 0x06

int PSUSTATUS=0;
#define PSU_ON (1 << 0)
#define PSU_PIN 10
#define CURRENT_PIN A0

SerialCommand sCmd;

int T1=0;
int T2=0; // temperature

// og 57
int ledState = LOW; // ledState used to set the LED
long previousMillis = 0;
long interval = 1000;
int i ;
int zero = 0;
uint8_t values[18];
byte o,error;

void setup() {
// Debugging output
Serial.begin(9600);

pinMode(PSU_PIN, OUTPUT);
digitalWrite(PSU_PIN, HIGH);

Wire.begin();

sCmd.addCommand("TEST", TEST );
sCmd.addCommand("FW", FIRMWARE );
sCmd.addCommand("STATUS", R_STATUS );

Serial.println("Ready");
}

void FIRMWARE()
{
Wire.beginTransmission(PSU_ADDRESS);
Wire.write(CMD_READFW);
Wire.endTransmission();

Wire.requestFrom(PSU_ADDRESS, 2);

Serial.print("Firmware version ");
Serial.print(Wire.read());
Serial.print(" / ");
Serial.println(Wire.read());

}

void R_STATUS()
{
int v;
Wire.beginTransmission(PSU_ADDRESS);
Wire.write(CMD_READCTRL);
Wire.endTransmission();

Wire.requestFrom(PSU_ADDRESS, 1);
v = Wire.read();
Serial.print("Status Register ");
Serial.print(v);
Serial.print(" ");
Serial.println(v,BIN);

}

void R_ANALOGUE()
{

Wire.beginTransmission(PSU_ADDRESS);
Wire.write(CMD_READAD);
Wire.endTransmission();

Wire.requestFrom(PSU_ADDRESS, 18);
uint8_t value;
int i=0;
while (Wire.available())
{
i++;
value = Wire.read();
values = value;

}

long a_current= 0;
int a_linevoltage = 0;

a_linevoltage = values[11];
a_linevoltage = a_linevoltage << 8;
a_linevoltage |= values[10];

a_current = values[3];
a_current = a_current << 8;
a_current |= values[2];
a_current = a_current << 8;
a_current |= values[1];

T1 = values[12];
T2 = values[15];

// Serial.print("Line Voltage: ");
// Serial.print(a_linevoltage,DEC);
// Serial.print(" Output current: ");
// Serial.println(a_current,DEC);

}

void TEST()
{

Wire.beginTransmission(PSU_ADDRESS);
Wire.write(CMD_READAD);
Wire.endTransmission();

Wire.requestFrom(PSU_ADDRESS, 18);
uint8_t value;
int i=0;
while (Wire.available())
{
i++;
value = Wire.read();
values = value;
Serial.print("value ");
Serial.print(i);
Serial.print(" is ");
Serial.print(value,DEC);
Serial.print(" and in hex: ");
Serial.println(value,HEX);
}

long a_current= 0;
int a_linevoltage = 0;

a_linevoltage = values[11];
a_linevoltage = a_linevoltage << 8;
a_linevoltage |= values[10];

a_current = values[3];
a_current = a_current << 8;
a_current |= values[2];
a_current = a_current << 8;
a_current |= values[1];

Serial.print("Line Voltage: ");
Serial.print(a_linevoltage,DEC);
Serial.print(" Output current: ");
Serial.println(a_current,DEC);

}

void task1s()
{
R_ANALOGUE();
//UPDATE_LCD1();

}

void loop()
{
sCmd.readSerial();
unsigned long currentMillis = millis();

if ( currentMillis - previousMillis > interval)
{
previousMillis = currentMillis;
Serial.print("!");
task1s();
}

}
 
Thanks Doc,
I had run across your friends work while searching for info on this PSU. After re-reading his Arduino forum posts and the HP info, I can see how you can get data from the PSU, and put it on standby remotely, but that is all I can find. I can't any reference to remote current adjustment. The remote standby drops voltage to zero, just like disconnecting the run enable pins. The voltage cutoff is instantaneous, however the PSU has about a 5 second delay to bring the voltage back up, after you connect the run enable pins. It seems that the delay would make it hard to pulse the run enable to control current, assuming that the remote enable works like the pins do. Do you have any other info from your friend besides the above links, zip file & code? It would be great to remotely control current, not just monitor it.
Joe
 
JoeG said:
Thanks Doc,
I had run across your friends work while searching for info on this PSU. After re-reading his Arduino forum posts and the HP info, I can see how you can get data from the PSU, and put it on standby remotely, but that is all I can find. I can't any reference to remote current adjustment. The remote standby drops voltage to zero, just like disconnecting the run enable pins. The voltage cutoff is instantaneous, however the PSU has about a 5 second delay to bring the voltage back up, after you connect the run enable pins. It seems that the delay would make it hard to pulse the run enable to control current, assuming that the remote enable works like the pins do. Do you have any other info from your friend besides the above links, zip file & code? It would be great to remotely control current, not just monitor it.
Joe


Not yet, That's all i have but i'm sure he will succed in his porject to use them for the Zero. Be sure that every more detail he share with me about that ESP120 i'll post that on E-S :wink:

Doc
 
Doctorbass said:
Here is more info: http://lists.contesting.com/archives//html/VHFcontesting/2010-11/msg00005.html

The trick to charge a Zero 2013+ will be to use two o fthese ESP120 in serie and to add a 12V 750W server power supply in serie to get the 116V for a full charge. Unless some hardware modification would be done, it look like impossible to get higher than 53V on the ESP120

Doc
No Doc You can go all the way to 63volts.

http://elweb.info/dokuwiki/doku.php?id=hp_3kw_netzteil_als_lader
 
Arlo1 said:
Doctorbass said:
Here is more info: http://lists.contesting.com/archives//html/VHFcontesting/2010-11/msg00005.html

The trick to charge a Zero 2013+ will be to use two o fthese ESP120 in serie and to add a 12V 750W server power supply in serie to get the 116V for a full charge. Unless some hardware modification would be done, it look like impossible to get higher than 53V on the ESP120

Doc
No Doc You can go all the way to 63volts.

http://elweb.info/dokuwiki/doku.php?id=hp_3kw_netzteil_als_lader

REALLY ?! :shock:

Wow that's an excellent new.

have you tried that yet?

Doc
 
Soon.... Very busy.
 
I've had mine up to 56V by applying -0.6 volts to the voltage adjust pot pad. At positive 6, it goes down to about 24V. You have to remove the voltage adjust pot to apply the voltages. See attached picture. This mod is based on the work of a German group at this link, http://translate.google.com/translate?h ... md%3Dimvns .They don't state what negative voltage is required to get to 63V, but most likely it will be less the -5V. The rear pot pad gets the voltage, the front goes to the PSU's DC negative. You connect your control voltage ground to that.
Joe
 

Attachments

  • voltage adjust pot location.jpg
    voltage adjust pot location.jpg
    62.4 KB · Views: 6,781
Attached is a schematic of my current control, and supply turn on/off circuit.
Joe
 

Attachments

  • psu charge control rev 3.bmp
    385.1 KB · Views: 2,726
Nice - you couldn't use the internal shunt?

I've gotten current control working using a differential shunt amplifier of fixed gain when the shunt is on the positive side.
 
Hey Heath,
Your clean mod of the DPS-600 inspired me to try the above mod on this supply.
I have very little experience in electronics, and doing this mod really stretched the brain. So far it has been great fun. I used a hall current sensor because it seemed like the path of least resistance at the time. To be honest, I wasn't sure if I would be able to use the supplies in series, as a charger for my car, but decided to give it a try anyway.
Other people have used the shunt, with different control circuitry. I found a picture of it somewhere online , see attached. I believe it is on the negative side, .002 ohm. To get to the back side of the board, you need to completely tear the supply down. After I have a working charger, I was thinking about getting another supply to attempt to use the on board shunt. It would also be nice to find negative voltage source on the board, so I could lose the DC to DC converter. I think I would just have to change the reference voltage value to the op-amp to get the shunt to work.
Joe
 

Attachments

  • shunt .002ohm.jpg
    shunt .002ohm.jpg
    96.5 KB · Views: 6,698
  • tapping shunt.JPG
    tapping shunt.JPG
    118 KB · Views: 6,698
View attachment hp 3kw datasheet-1.pdfArtur,
Attached is a data sheet for the PSU which has the info. The DC minus is at the upper right 2 tabs, DC plus is at the upper left 2 tabs. I soldered 1/4 x .032 copper blades to bolt ring terminals to. Some folks have soldered wires directly to the tabs also. The AC in is at the bottom, with 2 ground tabs in the center, and 2 load tabs at each side( 240V in the US, with 2 120V legs). In between the DC tabs are a bunch of .025 Square control pins. I short 2pins to a ground pin to take the supply from standby to on.
N N N N N
N N Y N N
N N Y N N
N N Y N N
The center "Y" pin is ground. I use a RC servo connector like the picture attached that I found on RCgroups forum.
Hope this helps.
 

Attachments

  • short 3 pins.jpg
    short 3 pins.jpg
    84.1 KB · Views: 4,091
JoeG said:
Attached is a schematic of my current control, and supply turn on/off circuit.
Joe

The bottom makes sense to me. Can you confirm that the -0.6 voltage is only necessary if voltages over ~50V are needed (0V would be acceptable otherwise)?

Can you provide some explanation of the top of the schematic (specifically relays and "cellog ground")?

Thanks!
 
The circuit I posted above does two things. First it controls the current output by varying the voltage of 1 of the three PSU's, preventing over-current shut down. Second, when it receives an alarm (ground) signal from my 6 cellog BMS , it switches the PSU's to standby mode, and stops the charge.
The PSU's voltage can be controlled 2 ways that I know of, and have tried. First is changing the resistance at the voltage adjust pot shown in an above post. That can give you from 53V to 41V with a 1M pot. The second is to apply DC voltage to the rear pot pad. I've had from 56V-24V on mine, and I've read 63V-5V is possible, but below about 24V you need a load on the supplies for them to work. With 0V & up, you only have a max voltage of 41V. You need to go negative to get above 41V. My circuit uses the voltage application method.
The current control circuit is setup for my 45S Calib LiFePo4 100Ah car pack with a charge termination voltage of 157.5V(45x3.5V). The concept is that if the PSU's voltage is the same or less than the pack voltage, no current will flow. If the voltage is greater, it will flow.I have 2 of the PSU's at their std max voltage of 53V+53V=106V. The third is modified to have a range of 24V-56V, so the 3 supplies voltage range is 130V-162V. When the pack is depleted, the voltage will be around 135V(3V per cell), and when it is full, 157.5V. The Op-Amp switches the output voltage from 130V to 162 very quickly to prevent over-current, which happens at 67A :shock: .
The upper part of the circuit has 3 relays that are each connected to a PSU's stand-by to on control pins(3A & 3C together, connected thru relay to 3B(Grnd)), see data sheet. These relays are switched on to start the charge. The power to these relays runs thru a relay that is wired as a latching relay. When any of the 6 cellogs monitoring my pack see's 3.5V it sends an alarm, which is just a connection to ground to the latching relay. That relay latches open, turning off the 3 PSU control relays, stopping the charge.
Hope this helps,
Joe
 
I have searched the web 30 minutes but can not find the weight from the HP ESP120.
Can someone here measure it for me ?
 
The supplies weigh 13lbs, not including any wires or connectors.
 
Back
Top