Bionx CanBus Battery Rebuild Options?

I don't know. I've never had access to one of the new ones to tear down and analyze. If you have a dead one laying around, I'll pay shipping...

In general, the answer should be "yes" - as long as you hook in between the BMS and the actual pack, it will charge the cells.

The question becomes, "How smart is the BMS, and how cranky is it?" A suitably dumb one won't care. It'll balance when it can, keep the cells within their voltage range, and not do much else. Unfortunately, BionX seems to have gone "very very smart" on their new packs, such that they're CANBus accessible over the internet, and there's a lot of remote diagnostics BionX can do to determine if a pack is warranty-replaceable or not (and if it is, they just brick it remotely and say, "Recycle it, we'll ship you a new one"). So it's entirely possible that it could detect a state-of-charge change without the current flowing through the BMS, and get really unhappy.

So, my answer, sadly, comes down to "I don't have enough information to know if you'll be able to get away with this or not."
 
Fortunately, none of mine are in warranty. The two older ones (one I2C and one CanBus) have simple battery bricks that I have tapped and use LIPO in parallel for extended range, or solar charging.

The two newer ones are 48V with a real BMS and all the 48V batteries are in pretty good shape so I am reluctant to experiment. I could always do the charge one with solar while riding the other one, but then I have to know what the battery does when the 26V input can source more (or less) current than expected. I suspect the 26V goes into a Boost converter that has both current and voltage limits which would make everything work out fine, but being wrong with Bionx components can get expensive QUICK.

Before I get accused of being CRAZY, two of the Bionx systems came on bikes at VERY good prices. and the other two were used and also VERY good prices. I bought them for spares and used one of them to upgrade the Terratrike Power Cruiser. So now I have one spare system and the old I2C is on a Mongoose Dolomite with fat tires for riding around the "ranch" on sand, dirt, grass and manure.
 
Hi Guys,

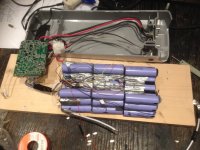
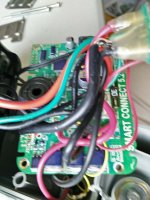
I am now rebuilding a 48V 6.6A rack type bionx battery (with canbus I suppose).

I changed all cells, but now while adding one of the last balance wires, suddenly the motherboard started smoking :(
I am quite sure all my wiring is ok, is there a specific order to follow when adding the balancing wires? My big red and black wire were not yet connected, I would solder them at the end on the pack, to avoid shot circuits.

Anyone advice on this? Are there replacement motherboards which you can buy?

I am sure Bionx will not sell them seperately...
 

Attachments

  • battery.jpg
    battery.jpg
    115.8 KB · Views: 2,962
Hi Tim VH.

The BionX battery PCB are strange animals. I am myself in the process of rebuilding a 48v canbus BionX. My problem is somewhat different than yours, my battery pack is OK but my BMS PCB is flat dead for no apparent reason...
One strange thing that I see on my battery is that there is more than 14 wires on the balance socket (I don't remember how many thought) but my guess is that some are dedicated to temperature sensors and not cell balancing, that might explain your issue.

One thing to know is that if your BMS PCB is dead (which is likely if it smoked, sorry for you) everything is not lost. I discovered during my progress that like I2C systems the CANBus ones can operate without the battery PCB as long as the console and the controller CPU are fed with proper voltage. Normaly it is the batyery pcb who do that through the battery socket. I'm my case it worked by feeding the red wire with +5.5V and the brown with 12V, I'm talking about the 6 small wires coming from the battery socket between the two thicker ones.

Obviously any informations coming from the battery are lost like battery voltage or state of charge but it is a small inconvenience compared to the price of a new battery.

I am waiting for somes pieces of electronics right now to continue my battery rebuild project but I will update my thread as soon as I will be able to restart working on it.

In case it can help, my thread is here :https://endless-sphere.com/forums/viewtopic.php?f=3&t=75347
 
Hi Crustulu,

There are indeed 4 temperature sensors inserted betwen the cells. One in each stack on the ends, and two in the middle stack.
I did not cut those sensors, so I installed them right back in the pack.

I might also have a BMS problem instead of a cell problem. Yesterday I discovered a problem with my multimeter, it is giving me 1.45V on a cell while these are new cells of 3.7V. :oops: This is probably why I measured 20V on my old pack, instead of 48V.

I will try to solder the other balance wires, and leave one of, to see what works/doesn't work.

BR,

Tim
 
I am most interested in this thread! I too, have a BionX 36V CANBus (is that the rear slide-in battery or the triangle shaped battery? - mine is the former) that I am attempting to rebuild. What I thought was a 9.6AH pack turned out to be a 6.4AH pack when I opened it up. 40 cells as opposed to 60, with one third the space taken up by foam pads! For a $3,000 bike I thought that was, well, let's not get into BionX-bashing. It's a good system overall and I'm grateful for its rugged reliability.

Now, however, the pack is over two years old and still charges but gives about half the range and power it once did (about 6 miles on a warm day if I do most of the pedaling). I want to replace it with sixty Panasonic or Samsung 3,000mahr cells for a complete 10S6P 18AH pack, which should give me triple the range while increasing the weight by only a few pounds.

My plan is to retain the original BionX three-wire PCB and temp sensors but add a 12-pin connector and charge it using a true 10S balancing charger, something like the iCharger 3010b should do nicely. I have the tools, electronic skills and power supply to do this work. The cells will be soldered rather than tabbed as that's easier for me, and I don't plan to use fuses on each cell as some DIY pack makers have done.

After much online research my unanswered questions are down to three:

1. Will the BionX PCB play nice with a BMS equipped charger charging the battery, or will it object?
2. What happens if you balance charge a pack made up of "protected" cells? I don't think I have the space for protected cells (they're slightly longer) but just so I know.
3. What cells do you recommend? I was going to use LG HG2s but they magically disappeared around X-mas and haven't been seen since.

Thanks! I'll be sure to post my results.

PS: The one time I communicated with BionX they suggested I ride the bike until the system shut down completely to reset the battery meter. This suggests that the PCB can detect when the battery voltage gets below 2.5V per cell to prevent damage to them caused by over-discharge. The bike got very wimpy and never did shut down making me think this protection circuitry wasn't working properly.
 
Kmpres said:
I am most interested in this thread! I too, have a BionX 36V CANBus (is that the rear slide-in battery or the triangle shaped battery? - mine is the former) that I am attempting to rebuild. What I thought was a 9.6AH pack turned out to be a 6.4AH pack when I opened it up. 40 cells as opposed to 60, with one third the space taken up by foam pads! For a $3,000 bike I thought that was, well, let's not get into BionX-bashing. It's a good system overall and I'm grateful for its rugged reliability.

There are multiple 36v BionX systems. I've heard rumors of the 40 cell packs - do you happen to have any teardown photos you could share? I'd like to see what they're doing.

Now, however, the pack is over two years old and still charges but gives about half the range and power it once did (about 6 miles on a warm day if I do most of the pedaling). I want to replace it with sixty Panasonic or Samsung 3,000mahr cells for a complete 10S6P 18AH pack, which should give me triple the range while increasing the weight by only a few pounds.

Seems reasonable. Yes, you should see much greater range.

My plan is to retain the original BionX three-wire PCB and temp sensors but add a 12-pin connector and charge it using a true 10S balancing charger, something like the iCharger 3010b should do nicely. I have the tools, electronic skills and power supply to do this work. The cells will be soldered rather than tabbed as that's easier for me, and I don't plan to use fuses on each cell as some DIY pack makers have done.

Don't solder the damned cells. Every 18650 spec sheet I've read clearly states not to solder them. Spot welding makes them slightly warm to the touch on the end after welding, soldering... I wouldn't want to touch it right after pulling the iron off. Heat is the enemy of cells. Don't solder the cells. </rant>

Otherwise, that sounds reasonable. Just be sure to waterproof the port if relevant.

1. Will the BionX PCB play nice with a BMS equipped charger charging the battery, or will it object?

It shouldn't care. I don't think they're really that smart.

2. What happens if you balance charge a pack made up of "protected" cells? I don't think I have the space for protected cells (they're slightly longer) but just so I know.

No idea, but probably nothing good. If you're going with a BMS, don't bother with protected cells. The BMS should handle the balancing and per region cutoff, though the BionX controller won't handle a badly balanced pack since it can only do bulk voltage cutoffs.

3. What cells do you recommend? I was going to use LG HG2s but they magically disappeared around X-mas and haven't been seen since.

Well, I rebuild with US18650V3s, since I just rebuild the pack as-is. :)
 
Take care with spot welding too!
I made myselve a spot welder from an old microwave (see YouTube), but I perforated one of my new cells. the outer shells of the batteries are not so thick...
 
Thank you for this advice.

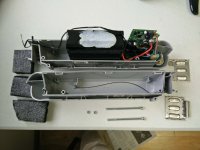
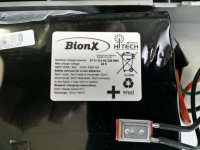
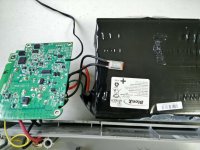
Here are some pictures of my battery pack. A 40-cell 10S4P pack. There does not appear to be a BMS anywhere suggesting that BionX relies on self-balancing cells, a low charge rate and temperature sensors to shut things down if they get too warm. The charger is rated at 41.5V at 2.0A, which when divided by four banks of cells equals a .5A charge rate. I plan to replace this with a 60-cell 10S6P pack, add intercell wires and output them via a 12-pin DIN style connector through an adapter cord to an iCharger 3010B balancing charger. If I'm lucky the connector will fit in the same hole where the original 4-pin DIN connector sits. If not then a little Dremel action may be required. The hard part will be shaping the pack for the odd 7-6-7 layering BionX does to fit them into plastic enclosure.

As for soldering the cells, I may build a CD welder if I can get the parts here in Seoul. If not then my old 100-watt soldering iron with the hammer shaped head will do the job. Before Lithium-ion became a "thing" I used to build 90-Amp sub-C NiMH inline packs for high-performance RC sailplanes by soldering them end-to-end without damaging them. When done properly the iron contacts the battery for no more than two seconds and is cool to the touch a second or so after the solder hardens. But that was twelve years ago and things have changed. I'm assuming that the nickel tabs can be soldered on as easily as wires as long as proper preparation is done with ScotchBright to rough up the surfaces and a good flux is used to remove oxidation. We shall see.
 

Attachments

  • BionX battery 2.jpg
    BionX battery 2.jpg
    205.1 KB · Views: 3,891
  • BionX Battery 3.jpg
    BionX Battery 3.jpg
    225.4 KB · Views: 3,891
  • BionX battery 4.jpg
    BionX battery 4.jpg
    291.9 KB · Views: 3,891
  • BionX battery 5.jpg
    BionX battery 5.jpg
    192.2 KB · Views: 3,891
Tim VH said:
Take care with spot welding too!
I made myselve a spot welder from an old microwave (see YouTube), but I perforated one of my new cells. the outer shells of the batteries are not so thick...

If you're working with batteries, buy a decent spot welder with some sort of controls on it so you don't blow holes in cells. If you're blowing holes in the occasional cell, you're almost certainly dumping way too much energy into the other cells.

Start from zero and work up until you get good welds. You shouldn't be blackening the cells or tabs at all, and if you are, turn down the power.

The Sunkko welders are a bit fiddly to get working, but I've been quite happy with mine (after I replaced the triac that blew up). Well worth the money if you're doing it regularly, and I've blown zero holes in cells.

Kmpres said:
Here are some pictures of my battery pack. A 40-cell 10S4P pack. There does not appear to be a BMS anywhere suggesting that BionX relies on self-balancing cells, a low charge rate and temperature sensors to shut things down if they get too warm.

That's correct. I hear their newer packs are better with a proper BMS, but for quite a long time, that's how they built their packs.

The hard part will be shaping the pack for the odd 7-6-7 layering BionX does to fit them into plastic enclosure.

Yup. Expect some custom nickel strip patterns. Good luck.

I'm assuming that the nickel tabs can be soldered on as easily as wires as long as proper preparation is done with ScotchBright to rough up the surfaces and a good flux is used to remove oxidation. We shall see.

Yes - soldering onto the nickel tabs is trivial with a bit of flux. I don't even rough up the surface - just flux, flow solder onto it so I've got a pool, and then reheat it and put the wire on. It doesn't conduct enough heat to the battery to be a problem.
 
It will take several weeks to gather tools and parts while this transplanted expat rebuilds his electronics bench in a new city, but I'll be making regular posts.

One thing I haven't asked yet:
Is there a small battery monitor/volt meter that can read the voltage of each cell in a 10S pack? The cheap ones on the net usually go no higher than 6 cells. I want to do this from the handlebars of my bike if possible. Carrying my charger everywhere I go just to read the cell voltage would be silly. Is it possible to split the voltage sense lines via an adapter cord from a 10S pack into two 5S lines, one measuring cells 1-5 and the other measuring cells 6-10?

Thanks.
 
Kmpres said:
Is it possible to split the voltage sense lines via an adapter cord from a 10S pack into two 5S lines, one measuring cells 1-5 and the other measuring cells 6-10?

A couple of jst-xh 5s extension cables (amazon or ebay) would make short work of breaking the 10s into 2 5s sets. Just patch them in to the balance wires (CAREFULLY) and you can have two 5s sockets for the standard little 1-8s balance checkers.

If you REALLY want to have it on the handlebars, just buy a couple more 5s extensions and lengthen them as required.

If you want to watch each cell in real time get a couple of these to attach to the extended jst-xh cables at your handlebars:

http://www.hobbyking.com/hobbyking/store/__52312__Turnigy_DLUX_LIPO_Battery_Cell_Display_and_Balancer_2S_6S_US_Warehouse_.html

I do NOT recommend leaving these active balance checkers hooked up for extended periods as they will unbalance your battery -- they appear to draw current only from the bottom 3 batteries after the active-balance function has terminated.
 
hey guys does anyone have that german manual? the link is broken now

im basically trying to fix a broken bionx display connector and dont know which wire goes where

Thanks!!
 
Hey guys (and gals?)

I have a Smart Bike with bionx system. 48v 8.7 ah 350 Watts w/G2 console. I recently unlocked the system and now have tons of controls. It feels like a completely different bike now. But, the battery is now dying quick. I want to rebuild. I don't have anymore room in the battery pack as it's built into the frame. Has anyone added another pack either through series or parellel connection? I was thinking. can just make a new plug with diodes or resistors inline for protection that goes to the controller? If it's the same voltage it would work right? The PCB doesn't know the capacity without completely discharging and re charging the packs. And will this be a problem. I was running rev 62. Now running rev 64. I don't want to get my system as the bike is brand new to me and I only have 400 miles on it. Sat for 5 years before I got it but it is in perfect condition. Even the battery.
 
Back
Top