2WD Electric Yuba Mundo Build

GMUseless said:
I've got 14mm axles. When I mentioned the alignment, it was in terms of the axle shifting from the top of the dropout...again caused be some looseness introduced by the regen. Definately not a safe situation.
Gotcha - makes sense.

I kind of thought you already had the links, but the info is spread around a bit, so they were more for new readers playing catch-up on the Mundo :wink:
 
Spreading the Frame

My Mundo rear dropouts are exactly 135mm - precisely the width of my BMC axle. Unfortunately, I need a couple of 1.5-2mm washers to prevent the shaft shoulders from sinking into the dropouts. The massive seat and chain stays make it hugely difficult to spring the frame to force in the wheel plus 3-4mm of washers. This was a miserable job before the disk brakes, but now it's close to impossible without dismounting the caliper - too hard to get the motor in square with the rotor aligned in the caliper and then work the wheel straight down the long dropout while keeping the stays sprung apart.

I twanged the disk rotor a few days ago remounting the wheel and decided it was time to spread the frame. I had looked at this during the initial build but had been deterred by the stoutness of the tubing along with the array of extra welded luggage rack stays. The Sheldon Brown 'lumber pry-bar' approach and other recommendations like car jacks or a threaded rod in the dropout seemed unlikely to succeed and very likely to twist the dropouts due to the unequal number, sizes, and angles of the many stays.

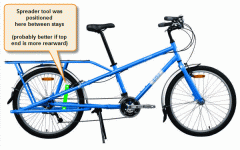
52_02_annotated.gif
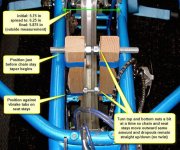
I opted to whip up a quickie spreader tool from a couple of pieces of oak with two threaded rods so I could apply different force to chain and seat stays as needed to keep the dropouts square vertically. The wood is 1.75" x 1.75" x 10" with 5/8" holes 8" apart. The rods are 1/2-13 x 6.75". The inside edges of the wood are rounded slightly and sections of old inner tube are taped down to protect the paint. The holes are oversize to allow the wood to be set at an angle (like an 'A'). This gave just barely enough play and it might have been good to elongate the hole openings somewhat by racking the drill bit the long way after the holes were drilled. A stick of 2x2 used for deck railing vertical kid-proofing bars would probably work pretty well as an alternative.

View attachment 2
The spreader was positioned as shown in the image below so the force was applied to the tubing and the dropout welds took little stress. The nuts were then run out as needed to get the desired spread while keeping the dropouts from twisting. As suspected, there was quite a bit of difference in the force required to deflect the chain and seat stays. The operation went quickly and easily and it spread just right on the first try, picking up 3-4mm. As shown in the first image, I probably could have positioned the spreader a bit better, but it worked out fine anyhow...

52-06_inSitu_annotated.jpg
The wheel just dropped in like the frame was made for it - what a difference! :) The rear derailleur needed no adjustment, but the BB7 caliper got a quick re-alignment.

I'm almost looking forward to pulling the wheel again!
 
Sir!

This thread is incredible! I wish to have the time/resources to accomplish such a piece of art like yours.
I would have to start looking in a thesaurus to add more amazing words to describe your project.

Well done!

Tommy L sends.... \\m//
 
Thanks, Tommy - very much appreciated!

Lots going on this summer - mostly revisions instead of new fabrication. I'm many posts behind and I'm thinking I'll just start catching up in no particular order. ...it's more fun to go riding, though... :D
 
Melted Fuse Holders - Don't Use These!

Earlier this summer I had a charging issue and discovered that my MaxiFuse holders had overheated and melted. The type I used had 8ga wire and used the familiar FastOn style terminal connections. The fuses/folders simply replaced a bus link in each of the two battery packs. There had been reports of issues with these on the forum but I thought that I could skate with only 50A max and a nice dry non-corroding environment in the battery boxes. ...well, not really...

I've probably had more than my share of shorted controllers with accompanying momentary huge current draw, but the 50A breaker always tripped before either 50A fuse blew. Fuse checks after these brief incidents showed everything fine and the fuses looking out-of-box new. I have taken to running the bike harder for more extended periods and it seems that the high connection resistance doomed these fuse holders to failure under the higher continuous current draw...

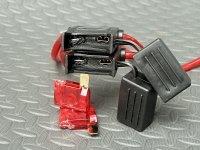
As shown in the image below, the failure was identical on both packs - one of the FastOn connectors in each holder overheated and melted the surrounding plastic as well as the fuse proper - they were actually melted together and the fuse leg was brittle and snapped off trying to extract the fuse.

60-02_meltedFuseHolder_iv350.jpg
Since the breaker is offering faster system protection anyway, I just replaced the fuse holders with Headway bus bars - back on the road again!

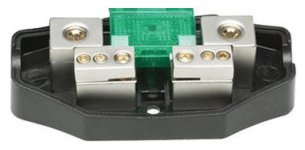
I would like to restore pack protection with internal fuses but haven't found a satisfying alternative yet - there are many discussions of this here on ES, but in spite of many opinions and suggestions, for me there seems no technically superior choice with workable cost and packaging attributes. ANL fuses look pretty good but are large, moderately expensive, and are not sourced locally. There are some off-the-shelf MaxiFuse holders available that use screw-down clamps, but they are pretty big and a bit costly.

60-04_KickerMaxiFuseHolder.jpg
My current thinking is to fabricate a pair of custom MaxiFuse holders from unclad FR-4 and some small slotted copper blocks with setscrews to lock in the fuse legs (similar to above). This should give a rigid and relatively small holder that accepts the inexpensive and readily available MaxiFuse devices. More on this later this winter... :)
 
I am totally speechless; I would just say that it was indeed food for the soul. Clean and neat simply awesome. You really inspired me man. Good luck and happy e-biking.

Are the single cell chargers automatic for HVC?

With great respect and kind regards
Naeem
 
Naeem, many thanks for the kind words, but frankly your own passionate and resourceful build has been an inspiration here on ES. :D

numberonebikeslover said:
Are the single cell chargers automatic for HVC?
The VoltPhreaks 2A chargers terminate charge at 3.65v with very good accuracy. They have a single bi-color LED that indicates green with no charge current or red when charge is underway - this means the indicator is green when the charger is either disconnected or the cell reaches end of charge.

Balance Charger Update

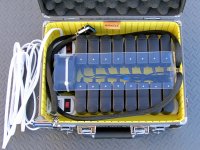
Unfortunately, I never got around to doing the temperature study since I expected to be rebuilding the battery enclosures and charger but other issues kept postponing the whole endeavor. I am still using the side-by-side power strip arrangement with fan (as shown in the pictures) on a 2p battery configuration and have about 140 cycles on the chargers. There have been no charger failures but the ambient room temp has never been above 80F - I'm not sure this configuration would be as successful at 100F.

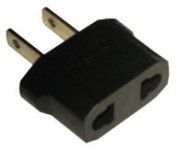
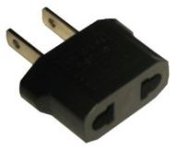
I was thinking that a simple off-the-shelf cooling solution might be to simply raise every other charger in the power strip using a Euro-to-US adapter (the kind that will optionally take flat blade US plugs in the 'Euro' side). These can be had for under $0.50 and would give a fairly compact no-BMS charger with no tools required. The added air channels would certainly expand the ambient temperature operating range for fan cooled assemblies and might make operation possible with only passive cooling.

euroToUsaAdapter.jpg
The price of the vPhreaks chargers has gone up a bit since I bought mine and there are more alternative charger choices than when I took this road, but these little guys have given me 3500 miles of flawless no-worries service.
 
Well, it's official - she lost her virginity last week in a bike vs asphalt episode with a pedal strike in a deep 30+ mph right turn. The bike faired pretty well - chewed up the right sideloader/battery box a bit, twanged the rear light cluster, broke a mirror, and scraped up a few other things that used to stick out. Surprisingly, none of the paintwork took a hit…

Lots of excellent support from local official folk - the EMTs patched me up and the police straightened out the bars, etc and escorted me home. Kudos to all.

Anyhow, replacement parts are already arriving in the mail so the bike should be squared away PDQ.

Gee, ...the ride was going so well up until then...
 
Ouch, dude!! Hope you're ok and that your bike survived in good shape. We all drop one eventually, glad you had support.
Lisa
 
Yea bud sorry to hear about that hope your body is doing ok.
Where you trying to pedal around the turn or should you have just had the reversed pedal in the up position ?

At least it's not worse. Your Yuba's about as pretty as they get so hope she's ok as well.
 
I'm doing fine, folks - thanks for the kind thoughts.

This is a turn after a straightaway near my home in a rural/suburban area that I take at the end of every ride. The shoulders on the straight are minimal so I always take the lane and run at around 35mph with the traffic and just brake and lean it pretty deep into the side street. This time I went in a little hot with a little deeper lean than usual, and when coming out dropped the inside pedal to begin pedaling just a whit too soon. This is my 100th time in this turn and familiarity just led to sloppy technique. My bad (Big Sigh).

I did end up in the hospital for a couple of days, but mostly for observation. The bike fared better than me so I'm not sharing any of my Percocets with it. :D
 
VoltPhreaks Cooling Upgrade

A couple posts back I was musing about using Euro-to-US AC power adapters (the kind that will optionally take flat blade US plugs in the 'Euro' side) as spacers to improve VoltPhreaks charger cooling (see overheating issue in original charger post).

64-02_euroToUsaAdapter.jpg
The lot prices are so cheap, I just ordered up a bunch and plugged them in, converting this original side-by-side configuration

64-04_basicFanCooled.jpg
to this height-staggered configuration with much improved cooling. Time to upgrade: less than five minutes.

View attachment 3
The bike and I aren't on the road just now to discharge the battery, so I only had one test charge cycle with the new setup. However, the chargers were much cooler to the touch. I will at least do some simple surface temp tests once the bike is running again, but this looks like a pretty nifty improvement for a few bucks and essentially no effort.

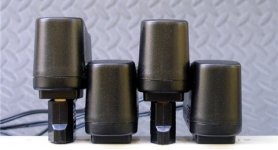
Here's a few edge-wise shots of the chargers in a power strip to show the added air channels. The shots with the open charger show the relative position of the heat-producing switching transistor relative to the cooling channels. As an added bonus, the chargers fit without the need to sand the sides as was necessary when squished together side-by-side.

64-08_impovedairchannels_2.jpg
View attachment 1
64-12_highunitheatsource_2.jpg
With no temperature data this revised scheme remains an unapproved configuration, but things are looking promising - at least for forced air cooling.
 
Well, that's how we learn.. and it could have been worse. Got me thinking on my early motorcycle riding years and all the road rash I avoided by wearing gloves alone. Better get back on that healthy habit.. Glad you and your one-of-a-kind Mundo are ok!
 
Sorry to hear about your scrape. Hope you are feeling better.

I wonder why a pedal strike caused a crash? I've had this happen many times and so far no real excitement from it. I had it happen years ago on a Schwinn varsity, an early 10 speed. That one was scary, it would have meant falling in front of oncoming traffic that wasn't too far away. But it didn't result in a crash.

More recently I have this problem with my GreyBorg. It happens from time to time when I forget, which is becoming more rare all the time. The smaller tires just don't allow a lot of clearance even though I have somewhat short cranks. Perhaps the heavier bike, and the suspension make a difference here.

What are you going to do? Change to shorter cranks? Would plastic pedals be better than metal?
 
Alan B said:
I wonder why a pedal strike caused a crash? .
Me too :). Everything between (<STRIKE!>, "Oh Shit...") and (sitting on curb, "Hey buddy, do you remember your name?") is lost in a puddle of homogenized memory chemicals.

Alan B said:
More recently I have this problem with my GreyBorg. ... The smaller tires just don't allow a lot of clearance even though I have somewhat short cranks. Perhaps the heavier bike, and the suspension make a difference here.
Boring into a corner at high speed in a deep lean with a butt-heavy 150lb cargo bike and no suspension is probably different than riding your GreyBorg. I've been upping the ante on this corner for a year and finally ran into the situation where Sunny Day Crazy Riding met with a reality check from a non-existent safety envelope. This was a simple case of operator error from pushing a bike to do things it couldn't do safely. Something went wrong and crap cascaded out of control because there was no design margin to forgive the transgression...

Alan B said:
What are you going to do? Change to shorter cranks? Would plastic pedals be better than metal?
This gets fixed first with an attitude adjustment (already done!), then with a new properly balanced FS build that can handle this kind of fun silliness. The Mundo is a great bike that handles well at sane speeds and is a complete blast to ride - nothing wrong with it the way it is - as I said: My Bad. Just too much 'WooHoo!" on the wrong kind of ride -- :mrgreen: .

I've patted the bike and apologized to it a few times this last week, drilled apart and rebuilt the light cluster, and started to repair the right sideloader/battery box. Pretty quick we'll both be good as new and ready for fun and safe Fall riding - just taken down a notch...
 
Tek, I hate to see you took a spill man. Good to hear you are allright, and the bike is readily repairable. I also hate that you weren't running a GoPro at the time. :D

I never really get my Yuba much over 20mph since my kids are usually on the back. I've often wondered what a crash would be like (without the kids hopefully) since there's so much mass in the back. And after my man Phil took endo'd on his flimsy fork, I've been riding really conservative on that one. 30mph must have been pretty violent.

I'm curious if the cops gave you the typical 'what is that machine you were riding' line of questions?

On the bright side, at least now you have some pretty good justification for another build!
 
GMU - thanks for the thoughts - appreciated.
GMUseless said:
I'm curious if the cops gave you the typical 'what is that machine you were riding' line of questions?
I read about Trouble with Evil Cops all the time on ES and have never been bothered at all, pedaling or not. In CT we have no special ebike speed limit and anything up to 3750W is good - there are a couple of minor lane/sidewalk restrictions that make perfect sense. The officer thought it was cool that it was electric and just set about straightening the bars and turn signals for me so that it was road-ready again. Super support from the local constabulary. :D
 
GMU mentioned not having GoPro footage above and I realized once again that I'm pretty far behind in posting - so...

Quickie Mundo Video Mount

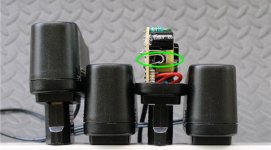
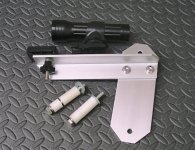
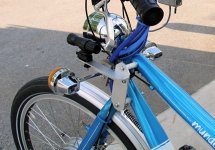
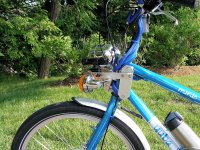
Some time ago (pre-ebike build) I purchased a cheapie flashlight-style solid state camcorder on eBay just for chuckles. It really didn't work too badly but the mounts were none too good and tended to shake about and it ended up in a drawer. With the coming of this build, I finally got around to cooking a mount sometime back in July when I had the Analogger hooked up. This was a hurry-up slap-together job that used the existing Mundo Bread Basket mounting bosses. The spacers and misc parts came from Ace Hardware. I used wide thick-walled nylon spacers to get a little rigidity and it worked out nice and solid. (I should have offset the top and bottom holes a bit so the vertical piece has the same angle as the head tube -- next one :wink: ).

50-02_parts_iv250.jpg
50-04_mountingPoints_iv250.jpg
50-06_sideview2_iv450.jpg

The mount works great and gives a workable camera angle that swings with the frame, not the bars or fork. If you want to shoot from a Mundo, something similar to this should serve you well with hardly any effort.

However, although the vids are interesting for me, I can tell you that cargo bike video is pretty low on excitement for general viewing. Also, the cheapie camera shoots with only VGA quality and has a strange pixel size that requires some conversion to allow subsequent processing with conventional tools - and each re-encoding detracts from the final vid quality. I worked to get some stuff together for the CA V3 with overlaid Analogger data, but when I uploaded it to YouTube (my first!) I discovered that YouTube re-encodes based on the dimensions of the image and these smaller vids get re-encoded into visual mush even though they have a high video rate that makes them look fair before YouTube works them over. The cheapie camera is just not up to the job - kind of disappointing.

So - it looks like the answer is to spring for a GoPro HD -- all the tools will work better and YouTube will be happier.

I can't say that I am a fan of PhotoBucket, but here's a non-YouTube sample video that has a higher video rate but the large size may make playback choppy (play a second time after it's all buffered - much smoother...). Anyhow, it will give an idea of the camera angle, etc. if you want to try a similar mounting technique.

From PhotoBucket - CA V3 Throttle Ramping Demo Video
 
teklektik said:
I worked to get some stuff together for the CA V3 with overlaid Analogger data, ....

I can't say that I am a fan of PhotoBucket, but here's a non-YouTube sample video that has a higher video rate but the large size may make playback choppy. Anyhow, it will give an idea of the camera angle, etc. if you want to try a similar mounting technique.

Still love this thread!!! 2WD hauls @ss!! :mrgreen:
Would you be so kind and explain what you did to have the CA analogger data overlay your video material? Very much appreciated!
 
hjns said:
Would you be so kind and explain what you did to have the CA Analogger data overlay your video material? Very much appreciated!
The clip was produced using Dashware which allows you to import data files containing trip data, devise custom gauge clusters, and hook the two together to overlay video produced by common cameras such as Contour or Hero. There are some sample gauge clusters, etc that come with the product but its potential power lies in the purported visual and video rendering customization. I say 'purported' because this is a versionless toy product by a toy company. Support is essentially non-existent and there are major sections of the product that don't work or were never implemented. Rifling through a forum I found mention of how the video configuration section had been de-activated because of issues - of course, it is still present in the GUI to confound you with mysterious errors. It is possible to do some unsupported hacking and manually copy/edit XML files to change some settings (this is the company's recommended procedure to customize video rendering!).

On the plus side, I think if you have one of the supported cameras and can live with the video encoding presets in unmodified form, you will get some nice results. Sadly, there are no means to do cuts/fades, adjust audio levels, or perform other trivial video editing/processing tasks, so you will need to run the output through another video editor to get a polished production - with the associated addition of re-rendering video degradation. Thankfully, the demo is not crippled and the product is cheap.

I typically take the Analogger data, dump it into Excel and apply some canned calculations to derive additional columns of derived data. This whole thing gets exported as a single CSV file that Dashware ingests to drive the gauges. For instance, as mentioned in the earlier Analogger posts, my bike logs the one/two motor switch as well as the LHM switch. This switch data is massaged by Excel to create a maximum power limit which Dashware then uses to create the green sector overlay of the center gauge that shows the available 0-to-xxx power sub-range of the total 3kW. Similarly, the Analogger ThI and ThO data is massaged and used to drive the two needles on the bottom Throttle gauge - the Rider and CA-generated throttle values respectively.

Hope this helps a bit - I like the product concept, but it's clearly not a 'general' video product as claimed, though it appears to work fine with select cameras as shown by the sample video on the Dashware site (I guess I need to buy one of those cameras...).
 
teklektik said:
Hope this helps a bit - I like the product concept, but it's clearly not a 'general' video product as claimed, though it appears to work fine with select cameras as shown by the sample video on the Dashware site (I guess I need to buy one of those cameras...).

Thanks for the extensive explanation. I may actually take a shot at programming it myself in PHP. One would still have to do the NLE stuff, but creating the video overlay in a user customizing way using whatever data into whatever gauge should not be that hard to program. Winterworks....
 
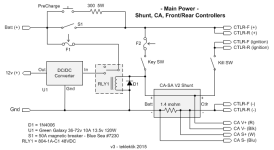
There's really not too much to the main power wiring for the bike, but I needed to sketch it out to communicate it in an email so I thought I'd just post it here since the image was in hand. The only noteworthy (or peculiar) point is the hookup for the CA V2 shunt which was discussed in this post. Parts are discussed here and here.

mainPower3.png
The CTLR connections on the right are paralleled to both controllers.
The four CA connections are the standard V2 SA dongle cable that runs up to the handlebars/CA. These would be four or the six wires of the standard CA-DP cable for V2.3/3.0.

EDIT - Revised shunt internal connections to be contemporary with later V2/V3 models (2015/06 - fixed location of shunt CA Gnd reference).
RLY1/D1 might be replaced with a single FET variation of these circuits.
More FET stuff here- may be untested.
 
Back
Top