BMC Super Trail MTB with rewound Xlyte H4060 motor

LOL
Not quite sure what you're asking exactly, my phase length is about 15 metres each, so I ran 8 straight lengths of 15.5m, twisted the ends at one end together, then spooled all 8 lengths in parallel onto a large bucket turned upside down, so I had effectively a 15.5m length of wire with 8 cores. I then wound all of phase C first, then repeated the process for B then A phases. So I spose I used 15.5x8x3=372 metres, that's a fair whack of copper and it definitely feels like a lot as you slowly make you way tooth after tooth. If it does burn up I'll cop it and redo it with thinner wire or wind it 6x10, as it was a marathon effort if I do say so myself. I just thought I'd take it to the extreme at least this once, even if it is my first wind.

Got a motor/hall/controller tester off ebay a couple of month or so ago, so this was the perfect time to try it out..
[youtube]UwvCoQSu17Q[/youtube]
You hook it up to the hall and phase wires, so it must measure the bemf from the phases i expect, and prob the same concept as lyens tester i imagine. Runs on a 9v battery. So looks like all systems are GO!
$21 delivered at http://www.ebay.com.au/itm/261043137276?ssPageName=STRK:MEWAX:IT&_trksid=p3984.m1438.l2649
I also got a hua tong controller with 4410 fets from them, was $35 but they've now put the price up to around $55 like all the other ebay sellers.
 
IF huatong controller is price USD55. I will suggest something much better deal price, i bought is the greentime controller + for a USD20 more, I have bought this greentime controller is using 18- fets 4110, 48v~ 90V. 60amps , has 3 speed mode. I have 3 huatong for 60v controller the caps is 75v, and 48v is caps 63v 42amps. They are so expensive and i think is not a good deal and I won't go for huatong anymore.
 
Didn't quite finish getting everything hooked up on Monday.
Could be a blessing as I received a job yesterday on the other side of the city just a few doors down from where I bought the copper wire.
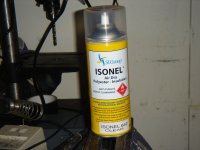
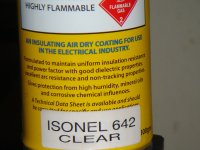
So I popped in to buy some varnish to do it myself and allay my fears.
isonel642.jpg
isonel642B.jpg
Pulled the motor apart again and covered it's nakedness.
It's class H 180c rated and takes 3-4 days for a full air cure, so ready for this weekend.
 
Yeah, it's great!
Took it for a few rides last weekend with some video which I'll upload after a bit of editing, just a bit busy atm.
You started on yours yet?
 
oldhaq said:
Yeah, it's great!
Took it for a few rides last weekend with some video which I'll upload after a bit of editing, just a bit busy atm.
You started on yours yet?
No. I just got the nomex paper. And I can't find time to get working on the stator if it isn't at work. Can't work on it at home because my mom would like the mess. The thread has been pretty boring lately. I want to see what I can do about series/parallel the windings. You should do that with your motor! Just need to find contactors that are up for the job :? . I just dont know wht to look for.
How hard was putting the nomex paper in the teeth?


What's the varnish for?
 
The only real advantage to delta is increased rpm, bit harder on controllers and less efficient, i think, not sure by how much.
I've changed a few hubs to delta termination before but I'd rather just increase voltage to get the extra rpm now...more on that soon tho :(

The nomex paper was fairly easy to put in, just fold it so it sits in the bottom of the slot nicely, like the pic http://endless-sphere.com/forums/viewtopic.php?f=30&t=43781&start=30#p644010
and protrudes above the slot high enough so you can feed the wires in easier, and 2 or 3 mm wider than each side.
 
So oldhaq,

What's the motor like now compared to factory? Bottom torque? Top speed? Enough to keep the front end light? How about efficiency? Amp sucker or sipper?

Tom
 
What is this? Where are the pics, the videos That you have promised us :(
Hope all is well mate :mrgreen:
I'm going to start winding this weekend.... Hopefully. I have two spools of copper wire. And I want 10 strands of the stuff. Do you recommend wrapping wire around two poles 5 times cutting it at bother ends and winding all the wires together?
If you don't understand what I just said.... How did you set up your wire for winding? Lol
 
litespeed said:
So oldhaq,

What's the motor like now compared to factory? Bottom torque? Top speed? Enough to keep the front end light? How about efficiency? Amp sucker or sipper?

Tom
It was pretty towey, seemed to handle the power i was feeding it without a worry, had the 24 fet cranked up to 150 batt amps and 250 phase, and disabled the over-current protection circuit cos it was stuttering under heavy load no matter what settings or controller type I set it too. It was a scream and made my regular little test track too short now to open it right up. Gotta stay forward or it Will flip.
I was surprised that even after a good hour of riding I only had to put 6.5ah back in.
Top speed is probably about 5-10kmh slower on 22s, Id guess about 55-60 kmh.
It is also a bit quieter in that it has resonates differently now, the 7 wind had more vibration
Trackman417 said:
What is this? Where are the pics, the videos That you have promised us :(
Hope all is well mate :mrgreen:
I'm going to start winding this weekend.... Hopefully. I have two spools of copper wire. And I want 10 strands of the stuff. Do you recommend wrapping wire around two poles 5 times cutting it at bother ends and winding all the wires together?
If you don't understand what I just said.... How did you set up your wire for winding? Lol
Having drama trying to convert the .mov video from a pos iphone, I'll try to get something up soon. It's not all good though, you'll see why...
I put 2 sticks in the ground 15.5 metres apart, and made 4 loops to give me 8 lengths. you only need to cut after the final loop - just twist all together at the corner at stick. So I had effectively a 15.5 metre multistranded wire with 8 strands in it. I then just wound this 15.5m long wire onto a large upside down bucket to keep it neat.
 
oldhaq said:
It was pretty towey, seemed to handle the power i was feeding it without a worry, had the 24 fet cranked up to 150 batt amps and 250 phase, and disabled the over-current protection circuit cos it was stuttering under heavy load no matter what settings or controller type I set it too. It was a scream and made my regular little test track too short now to open it right up. Gotta stay forward or it Will flip.
I was surprised that even after a good hour of riding I only had to put 6.5ah back in.
Top speed is probably about 5-10kmh slower on 22s, Id guess about 55-60 kmh.
It is also a bit quieter in that it has resonates differently now, the 7 wind had more vibration

I just bought a 4065 for my DH Team bike with a Lyen 18 FET controller and having it mounted in a 26" DH rim. I assume it is quite a bit faster wind than your rebuild since yours is now slower than your original 4060. I guess for some reason Kenny discontinued the 4060 and went to a 4065. I'm going to run mine on 24s 2 or 3p. I think I'll do 24s2p in a pelican case on the forks and 24s1p in a frame bag. I'm also going to add a 7 speed freewheel and slightly spread the rear chain stays just in case I ever have to peddle out of somewhere.

I'd really like to see a video of your going now to hold me over. :wink:

Tom
 
I have a 4065 too, they have a "6" or "10" written on the stator which'd indicate 6 turns, so in between the 5 and 7 of the 4080/4060's. Should make it a weapon for street use.
I haven't ridden one yet as my priority is getting the 8x8 back up, just finished lacing it into a new 24" DX32 rim. I was also delighted that the spoke holes on the 4065 magnet ring are smaller than the 4060's, so my rewind is now sitting snuggly inside of that with 14g DT Swiss spokes holding it in. 8) awesome!
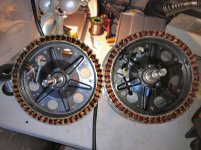
10x6_8x8 side2side.jpg
odds on the reason Kenny changed to 10x6's is they'd be a shitload easier and quicker to wind than 9x7's, no need to cram the wire in. I reckon I could do a 10x6 rewind in a 10th of the time it took for mine. It's not hard to see the difference in the amount of copper in that pic.
 
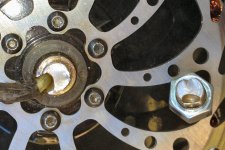
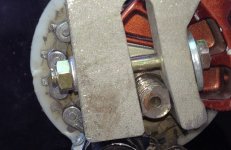
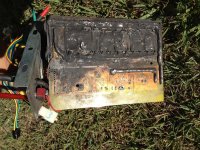
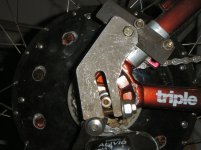
so had a mishap last Sunday, not exactly sure what went first, but the left side of the axel snapped, the rhs twisted out of the torq arm and dropout, and the controller fried. It happenned on the first full twist of the throttle on the first run @ 27s, so 113v combined with no safety current cutoff is what killed the radio star, it felt pretty good tho in that second before :lol:
snapped lhs axle.jpg
streched rhsta.jpg
blown contr.jpg
Pressed in an axle from a good HS I had, had to dremel the wire harness groove to fit the thicker wire bundle, and though the keyway is about 180° different it wasn't much of a problem. Rhs torq arm will be clamped, like the left is.
It will be back together tomorrow.
 
WOW! That looks like um,....expensive. I guess I had better keep my right twist of the wrist down to a minimum if I up the amps much. There is a substantial difference in wire from the 2 stators you show in that picture. Hopefully mine will have enough get up and go to keep the grin going. Really missing my e-bike right now who's parts I sold to do build number 2. I plan to keep the set up under 5000 watts for at least the first few minuets or so. :twisted:

Tom
 
Damn, litespeed is right. Rather expensive mistake.
I think a change in the title from "rewinding" to rewound is in order mate 8)
Is hyena still selling these H40 series motors? I thought he ran out of stock :?: Not that it matters, just curious
 
Expense has already been spared, I had mental noted a little while back to have some backup controllers. and that's all the real expense, just takes some time as well. I don't like it when something goes and then a frantic search for a replacement, especially when you knew you're gonna be needing it before.
So yeah, a 1 week turnaround isn't too bad considering what happened.
Hopefully I won't feel the need to remove the OC cutout again, but can't guarantee it :evil: :twisted: :evil: :twisted:
Whatever misfortunes I have had with this bike, it's been worth it, even for the amount of time I've actually been in the saddle vs repairing.
yep, truly addicted :D :D :D :D
 
Holy mother of shitloads hitting the fans !

is that the new controler, more chared than the dead 1 ? sheesh

in the pic "stretched rhs" is this how the broken side was clamped also ?

it would be better if the axle was after the bolt more up in the cut and not at the end of the cut.

i know that on the drive side as in the pic the derailure is in the way of doing that, so you set it up this way.
 
Yep, that would be one of the new controllers, and the other 24 fet went poof too.
So I ran a bit short on controllers at that point, but still had a 12 fet kit with 10 new 4110's and 2 donor organs from another victim of controller abuse.
It's set on 50a battery and 120a phase and is performing beautifully on 22s. I'm also thinking things go poof more often over 100v now too
I've noticed that there is only smallish foil traces joining the 2 paralleled source legs on 2 of the phases in the 12 fet (18's too, but 3 legs) xie chang boards, on the + rail (from memory).
One of the source legs from each pair close to beefed up traces but the other is only connected by a foil trace. So I ran a copper bridge to even things out. I swear it's the smoothest running 12 fet controller I've ever made. It's seems to me to be a design flaw in these and has probably been done by of others before, though I've not heard of it being done before.
Anyway, enough of that, heres some video, turn your volume down, the wind noise is loud, but I've just found the tiny mike hole next to the earphone socket on the iphone, so future vids will be easier to listen to.
Firstly, on my way to the trails i saw the rc car and thought, that's pretty quick, I wonder how i'd go against that.
[youtube]QPR3LmivskU[/youtube]

And some dirt. this is with the 12 fet controller. YT severely dragged the vid quality down for the lower resolutions, so watch it in 480p minimum, and there's no image stabilisation.
ENJOY!!!
I certainly did. Some nice uphill climbs, hottest the motor got to was about 50-60 deg C, controller 35-45 deg -- yeah, that surprised me too
[youtube]LfK2qlWBUPY[/youtube]

[youtube]VYjU-OJCqH8[/youtube]
 
That looked really impressive. Can't wait to finally get mine going on my bike.

Awesome job on the rewind.

Tom
 
scriewy said:
Holy mother of shitloads hitting the fans !
is that the new controler, more chared than the dead 1 ? sheesh
in the pic "stretched rhs" is this how the broken side was clamped also ?
it would be better if the axle was after the bolt more up in the cut and not at the end of the cut.
i know that on the drive side as in the pic the derailure is in the way of doing that, so you set it up this way.
The axle broke on the left side, and its' torq arm had clamping,
like in this pic on page 1 http://endless-sphere.com/forums/viewtopic.php?f=6&t=42361#p619892
The rhs TA is now as it should be, was just enough clearance to put a 1/4" 6mm HT bolt thru, into about 3/8" 10mm of thread
rhs ta redo.jpg
 
Wow. Awesome bike and awesome damage!

You might have to consider making up a new beefier axle.... don't think I'd trust that cheese metal with 5KW!
 
Just a rewind question. Got my MXUS DD from Hyena here ready to rewind.

When you rewind the copper strand into the teeth, did you basically feed it all through the gaps inbetween teh teeth and then compress it down using hte spatular etc or did you at times also thread it through the sides if you get teh difference.

Great work on the rewind

Wayne
 
I think I get what you're asking.
As the wire is a continuous length run it thru the small outermost gaps of the stator...you could i suppose poke it thru the ends but you'll be doing that forever.
Ideally it would be best to have the feed spool mounted above and able to spin. Less twisting but not really essential as it only twists 8 times (for my 8 turns) one way then 8 times back every 2 teeth...and you can absorb most of the twisting in the slack you have between the spool and the job.
My basic pattern as I run the wires around a tooth, start in the bottom and run the 2nd wind over the 1st, 4th over the 3rd, 6th over the 5th, and 8th over the 7th. Depending on whether its a CW or ACW next tooth, will determine whether to "cross" back down to the bottom for the next new tooth on the 7 1/2 or 8th end turn, so that you're starting at the bottom for the new tooth, and not crossing-down inside the slot.
Hope it all helps, dunno if my way is the go 100%, worked for me.
 
What are some of your estimated 0-60kmh times for your motor running those kinds of amps?

I also found when attempting to rewind my hub was that over thinking the winding, would cause you to make more mistakes. I realize now, the I probably put around one more wind around every tooth in the center. Glad I sold the project before I completed it. It's now in better hands.
 
Couldn't really say, I don't think it quite gets to 60 on the 22s it's on. I'd guess 5-6 secs to 50, anywhere up to 40 is where it all happens tho, and spot on for the terrain I like. Some of the climbs before rewind it labored at very low rpm but now it's a lot better and am able to use the throttle more and less WOT.
Fairly easy to lose count whilst winding due to distractions or just plain not concentrating - had to unwind a tooth more than once to get back on track.
Can't blame you for stopping yours, it's not for everyone and you obviously didn't have time after all. Thanks for cheering me on thru mine.
 
Back
Top