2WD Electric Yuba Mundo Build

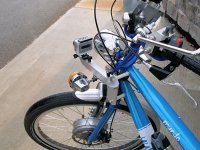
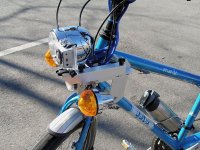
GoPro Hero2 Camera Mount

A few posts back I ran down my quickie camera mount for a cheapie eBay camera. This really worked pretty well and my plan was to mod it slightly to accept a Hero2.
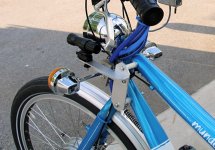
72-10_mountV1_iv250.jpg
A little extender was fabbed to move the camera forward and extra spacers were added to get side clearance from the headlight for the Hero2, but the mount simply had too much flex. The heavier GoPro with the higher center of gravity applied more twist to the simple angle strut which did not have the torsional stability to hold the camera steady.

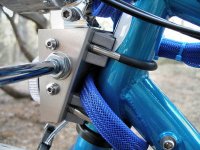
To solve the twist problem and reuse the old mount, two lengths of 10-32 threaded rod are threaded into it as fixed studs and tightened in place with acorn nuts. Some spacers (Ace Hardware) are used to clamp the edge of the extension firmly against the old mount. The spacers are actually a few thinner spacers stacked to get the exact inside height (7/8") of one leg of the angle used for the extender bar. This arrangement makes the new piece of angle stock somewhat more rigid like a channel. Some 10-32 theaded knobs (Ace Hardware) top the screw studs make the extension removable.

Unfortunately, to properly position the camera, the extender bar needs to be too long for the original rear-only mount to prevent side to side camera motion. A couple of bits of angle and rubber-lined steel cable clamps around the turn signal stalk solve the problem in a patchwork sort of way. The reworked 'old' mount is now rigid enough that a different extender could be fabbed to secure a fairly heavy camera. With the new cable clamps to reduce motion, the original rear vertical piece only needs to be wide enough to provide a mounting point, not stability. This will get trimmed down a bit as a winter project.
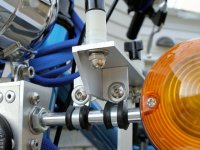
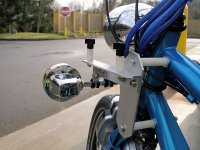
72-06_lateralStabilityMounts.jpg
72-08_mountingStuds.jpg
I found a nice little CNC aluminum tripod shoe for a standard GoPro mount on eBay for only $1.99 - the price seems to have gone up, but they work great. This is bolted up to the end of the extender bar with a 1/4-20 bolt (same as tripod screw).
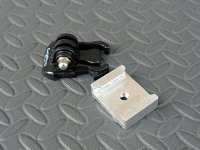
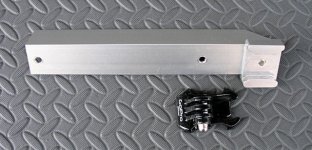
72-02_HeroMountingBracket.jpg
72-04_Hero AdapterBar.jpg
72-12_HeroMount.jpg
72-14_HeroMountFront.jpg
The final mount works great - no camera shake at all. With the Fat Franks to soak up small road irregularities, the videos are nice and smooth without post-processing stabilization. Got to post some vids! :D.
 
man that look's nice. I need to get one of those.

What's the big contraption around your front wheel the grey/black thing ? Looks like a c clamp or something.

Love your bike looks so clean and professional.
 
ohzee said:
man that look's nice. I need to get one of those.
Thanks - it would be a whole lot easier without all that lighting stuff out front! :)

Actually, an easy way to build up a head tube mount would be to use one of the SS saddle clamps (DX Engineering http://www.dxengineering.com/Products.asp?ID=14&SecID=1 ) I used to mount the front light pod. Just turn the clamp sideways and shoot a couple of matching holes in a bit of angle or channel with the camera on top and sticking out front of the cables - very solid.

07_24opt.jpg
ohzee said:
What's the big contraption around your front wheel the grey/black thing ?
You got stuck in one of those 'new page' snafus - take a look at the end of the previous page - it's a frame lock I stuck on the front wheel - super handy for quick stops (those Dutch are crafty folk! :D ). It seems many frames already have inserts in the frame to mount these up on the seat stays - the Mundo does, but I have electronics in the way, so it got put up front.
 
(first time poster)

I have enjoyed your your posts on here, and I've been considering making my own yuba mundo, but instead making it a hybrid. My intention is to have a front wheel electric, and real wheel 35cc RC engine converted mounted in the middle, connected to the chain some possible way. I just got my crystalite 5303 in the mail today, now i just need to get the rest of the bike, I hope to have it done by next summer.

Some other thoughts I was having, but have not yet figured out or understood, is how possible is it to connect an arduino to an E bike controller? I was wondering because I find the idea of an autonomous bike interesting, specifically if it were able to use both dynamic balancing/steering of the two wheels and a flywheel.
 
endomorphosis said:
...I've been considering making my own yuba mundo, but instead making it a hybrid. My intention is to have a front wheel electric, and real wheel 35cc RC engine converted mounted in the middle, connected to the chain some possible way. I just got my crystalite 5303 in the mail today, now i just need to get the rest of the bike, I hope to have it done by next summer.
On the face of it this sounds like the worst of both worlds, but for situations with a long commute to a destination where electric is an advantage, this might make sense. I suppose you are looking at something like an Urban Commuter mid-drive assembly - but IC instead. Since we are talking about a motor the size of weed-whacker, there really isn't much of a weight penalty for dragging the extra IC around, although the e-purists will be aghast :wink: . This can certainly be done with a Mundo but as you can see from these mid-drives, there isn't much room and you will need to fab a bit of framework for mounting motor/jackshaft/freewheel. As much as I like the Mundo, I would review your strategy for the chain drive carefully because of the offbeat 14mm Mundo rear axle.

For a practical, no-fab solution I might recommend starting with Da Bomb from Design Logic. There is an original thread here about their longtail bike and some other posts about subsequent versions. I'm not a big fan of the Vee-shaped rack and stays in back but this would get you an out-of-box IC solution with little but a simple front hub installation to address + lots of battery room. Here you might adapt some Surly sideloader parts or fab your own, but these are low-tolerance non-mechanical bits that you can postpone implementing (if at all). Of course, we are all in this for different reasons, so if you are looking forward to the design and fabrication in its own right, then this quickie build approach may not be as attractive.

Not trying to dissuade you from using a Mundo, but there are other longtails from which to choose as well that might be mentioned in one of the IC-bike forums to get a head start on the fab and get a heads-up on any special issues that have arisen.

endomorphosis said:
Some other thoughts I was having, but have not yet figured out or understood, is how possible is it to connect an arduino to an E bike controller?
The basic throttle is a simple voltage in a range typically 1-4v. There are a few other 0/5v switch closures for regen, ebrakes, 3-position speed switch, etc. All are easy to produce.

Anyhow - this promises to be an interesting build - and you get to post a thread in the electric or IC forums or both... :)
 
beautiful build. I have a mundo v4 with an HT3540 rear drive, crystalyte controller, and a ping 48v20ah pack.

The bike chassis im happy with. Pittsburgh roads are not kind to any motor vehicle and the chassis has handled it beautifully. The wheels on the other hand..... ive already broken one spoke and had to limp to the bike shop because several others let go at the same time. the motor has so much torque that it has actually separated the hoop seam and ob longed the hoop into a football shape. you should have seen my mechanics face when i asked her to try to lace it back up well enough to get me thru next weekend so i can order new spokes and buy the new hoop. after the acrobatics she had to do to bend that sucker into a sorta circle again, i owed her a few tequilla shots. and the front rim and spokes are so weak i get a significant wobble. and i know its flex because ive watched it.

but, with the yuba, seeing the only things that i havn't replaced on the chassis is the derailers, i would have to say that if i were to do a second one, i would just buy the yuba frame and go from there instead of getting the whole bike.

I am getting ready to redo all my wiring, battery boxes and lighting. i just started selecting components and getting things ready to order tonight. i am certainly going to borrow on several of your ideas, i love how you pulled this together.
 
scphantm said:
... The bike chassis im happy with. Pittsburgh roads are not kind to any motor vehicle and the chassis has handled it beautifully. The wheels on the other hand.....

I am getting ready to redo all my wiring, battery boxes and lighting.

Thanks - It's been a really enjoyable build. I too like the frame. It's remarkably rigid and tracks well at speeds my build can achieve.

Bummer about your wheels. When I bought the BMCs from Ilia at Ebikes SF, I drop-shipped Sun Mammoths to him and he did a nice cross 1 lace for me. 4300 miles and still true - I think the Fat Franks have contributed to rim health as well :D. Sadly they don't make these rims anymore - replaced with Rhyno Lites (identical construction but a tad narrower).

I hoping to finally get to reworking my battery boxes this winter - this last season slipped by without the upgrade but I've been thinking about it a lot lately....
 
I took your advice regarding the cargo bike situation, and have made myself one that looks like it, that I'm going to be prototyping on.

http://endless-sphere.com/forums/viewtopic.php?f=6&t=47075
 
endomorphosis said:
I took your advice regarding the cargo bike situation, and have made myself one that looks like it, that I'm going to be prototyping on.
Very nifty solution! I'm subscribed and looking forward to seeing your build - you seem to be off to a great start. :)
You've also got me me hunting down one of those clamps.... thanks!
 
There is another version called a "clamptite" however the device is relatively simple to build yourself if you have tools, which i assume that you do by the complexity of your build.
 
CA V3 Ebike Simulator

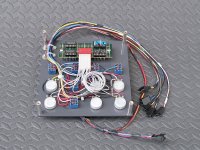
Not much riding over the winter months - too much snow = no road shoulders and dangerous cycling. Instead I've been Beta testing the CA V3 and tinkering a bit on an Unofficial User Guide for it. But, I ran into some issues when attention began to focus on the PAS stuff - I don't have PAS and the weather was pretty nasty. I rummaged up some stuff in the lab and tacked together a little CA V3 ebike simulator as a quickie project - everything was on hand except a bunch of 5K linear pots and knobs that I picked up at Surplus Electronics Sales- very nice parts at a great price.

There's not too much to this, it replaces the normal CA sensors with pots and switches and has a couple of adjustable clocks to drive the speed and PAS RPM inputs. The unit is fabbed from a couple of 6 inch squares of 1/8 PVC sheet. The two clock circuits are located on a scrap of protoboard and wire-wrapped. All the discrete parts are soldered onto a 16 pin DIP header so there is no soldering on the board - all board connections are quickie wire wrap - the header can be popped and parts swapped easily. A scrap 16 pin DIP IDC ribbon connector ties the board to the switches, etc. The CA mount is the top half of a standard CA mount minus the handlebar clamp.

The front panel is laser printed on a 1/2 page UPS-style shipping label, trimmed, applied, then sprayed with clear acrylic lacquer from the auto parts store. It's not the most rugged faceplate, but fine for medium duty. I made the mistake of using Avery 8126 Inkjet labels which have a bit of a waxy finish to prevent ink blotting, but it also caused a little toner flaking until I got it lacquered - Avery (15516) Laser Weatherproof labels would have been a better choice.

There is a short tapped pass-through CA-DP cable with connectors and single mating connectors for all the regular CA V3 stuff. The schematic (below) shows a CA-DP power cable to hook this into a bench supply - nothing special, but to avoid using a motor, controller, and shunt to run the tests, the Throttle OUT signal goes to a voltage divider that is used to drive the CA (S+, S-) inputs directly. This gives a pseudo-current reading on throttle application without all the other hardware. The values are selected for a max current of about 65A at WOT configured for an imaginary 0.76 mOhm shunt.

View attachment 2
CAV3_ebikeSim2_800x600_iv250.jpg
View attachment 1
Anyhow, it's worked out great and allows going through dozens of configurations and PAS/speed scenarios very quickly without actually having all the PAS gear and braving the cold. It's been a huge help figuring out the nuances of V3 operation to avoid having the User Guide turn into a work of fiction :D

Here's a little package with the schematic, Excel tables for selecting the PAS and Speed clock components, and the front panel layout - also PDFs for those without the appropriate apps. The schematic shows the Speed On/Off, RPM On/Off, and DIR Quad/Level switches as just switching the logic input between the rails - not too elegant, but okay for this simple application... :wink:
View attachment 3
 
Chain/Crankset Upgrade

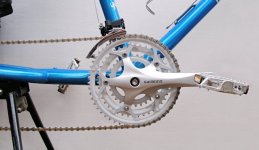
78-02_52-42-30_crankset_iv250.jpg
I ordered up a Thun BB sensor for the V3 and decided to replace my well-worn chain while I was it. Since the cranks would be off, it also seemed a good time to upgrade the stock Yuba crankset - as shown in the Mundo spec excerpt below, the stock chainrings are 44/32/22T (newer Mundos are a bit different). Using an 11T on the freewheel, the stock 44T is pretty much spun out at 30+mph and I use the 22T very very seldom.

78-04_Mundo4-0_DriveSpecs.png
The stock chain is a Shimano CN-UG51/narrow, but I wanted a removable master link instead of the Shimano special pin system so I opted to go all SRAM (even though different links can be used cross-manufacturer). I was lucky enough to stumble across a sale on SRAM 890 double-sided chrome chain for a $20 at Competitive Cyclist. This is the next higher chain grade over SRAM 870 which appears to be a very popular 7/8 speed replacement chain (with a little extra chrome for durability, rust protection, and bling). One and a half chains makes one cargo bike chain so I ordered three for $60 and got free shipping. These come with SRAM PowerLinks - 3 chains = 3 links. That's two to build a chain and one for the toolkit (assemble the second cargo chain later when needed).

Figuring out the crankset/chainring end was interesting as well - it sort of trips into the front derailleur spec. As shown in the spec above, the Mundo has an SRAM X5.0 up front which turns out to have a max chainring range of 22T - it's rated to 48T. In the end, I went with a Shimano FC-2303 52/42/30T from Niagara Cycle Works through Amazon for $63 (shipping included). The new mid/small 42/30 rings are close to stock Mundo big/mid 44/32 rings, but it loses the unused 22T in favor of a 118% improvement for the big 52T ring (translates to new max of 36-37mph :) ). This chainring set has a 52-30=22T range so it's in range of the X5 derailleur (although the diameter looked just a bit over-spec - 52T vs 48T max).

Damage report:
  • $30 - SRAM 890 chain Competitive Cyclist (3x$20 = two chains) (Still on sale at the time of this post!)
  • $63 Shimano FC-2303 - Amazon
  • $13 Park CWP-7 Compact Crank Puller - Amazon
  • $14 Park MLP-1 Master link pliers - Amazon
  • $16 Park CT-5 mini chain tool - Amazon
All the parts showed up and I decided to fit and tune the new stuff prior to the Thun installation. It was necessary to raise the front derailleur. Front adjustment according to SRAM instructions went pretty much as described. 52T vs the claimed SRAM5.0 48T max was not an issue - no mods required. I re-used the original Mundo crank bolts since they eliminated the annoying Shimano pop-out plastic covers.

View attachment my10-sram-tech-manual-rev-a_excerpt.pdf
To make the chain installation a bit easier, I tied the right pedal back to the double kickstand to prevent the crankset from turning. This made it easy to lay the chain into the teeth to measure, etc. I spliced two chains and used the 'Largest Cog/Largest Chainring Method' described at the Park Help Site to select the length.

Unfortunately, the chain turned out to be an in-between length - I had two length choices, 1 link or 3 links (0.5" or 1.5" or a half link and 1.5links if you are counting inner/outer plate pairs) so I tried the longer chain first. All went well but the rear derailleur had no cage tension at all in the cross-shifted smallest cog/ring ranges and quite a bit of chain sag. I mused about this for awhile and finally shortened the chain by a couple links. This fixed the sag and derailleur tension issue - there is also a margin of extra tension/motion available in the cage when engaged on the largest cog/sprockets. Using the large chainring, the chain easily shifts onto the large cog using the rear derailleur - but - the rear derailleur cannot shift off the largest cog - it needs the midrange front chainring as well to assist in the shift. This seems okay though since this is a not-to-be-used cross-shift anyway and the second largest freewheel cog is quite a bit smaller and shifts perfectly.

BTW - the chain link pliers not only made releasing the PowerLinks effortless, but they were very useful in just holding the chain ends for link insertion, etc. You can get by with needle nose and cursing, but these are well worth it.

Anyhow - the new chain is really quiet and shifts really smoothly - very noticable upgrade. The pedaling experience is a remarkable improvement. As expected, the bike can be pedaled into the high 30's - which is very cool - but the real improvement is in the high 20's to 30 where the madman aspect is replaced with a really comfortable cadence. A very highly recommended Mundo upgrade - I should have done this sooner… ;)
 
A good solution for the slightly tight chain installation (above) is to switch from an 11-32T to an 11-28T freewheel. The lower cogs are the same for the three available DNP 7 speed freewheels:
  • 11,13,15,18,21,24, 28
  • 11,13,15,18,21,24, 30
  • 11,13,15,18,21,24, 32
Here are the ratios for the DNP common lower 6 cogs and the three optional large cogs vs the new (Shimano) and old (stock Mundo) cranksets:

sprocketCogRatios2.png
There is frankly no good reason for the 11-32T - I got the giant granny gear model in case of complete breakdown, but that reasoning seems pretty questionable with dual motors/controllers. The 32T cog is quite a huge step from the neighboring 24T cog.

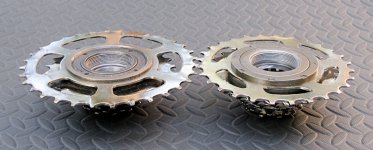
I actually bought an 11-28T last year and mounted it up only to find a really close fit to the dropout. Pulling the freewheel off and comparing it with the older 11-32T showed why: the 28T has a thicker (more protruding) freewheel sleeve and lacks the recess of the 32T sleeve. This spaces the 28T cogs quite a bit further to the right.

62-02_freewheelComparison_iv250.jpg
I popped the old 32T back on, but I think I may give the 28T another try next time the wheel is off. I have since spread the stays and can likely squeeze in an outer spacer to pick up a mm or two from the dropout... or use the spreader gadget again to pick up a bit more room.

Why these two DNP units are so different is a mystery - or more accurately - why the design was changed this particular way. The 11-32T is from 2011, is branded 'DNP' on the inside sleeve face, and came from the now-defunct Cycle9. The newer 28T came from Ebikes SF in 2012 and has 'DNP' branding on the retainer outside the small cog. Interestingly, the new revamped Ebikes SF site cautions that an outer spacer may be necessary for BMC and other hub motors when using this freewheel.
 
CA V3 PAS Installation

A while time back (wintery) I ordered a 16 magnet PAS wheel from eBay just as V3 development began to focus on PAS. Quite a bit of time went by working on V3 PAS testing and somewhere in the middle I actually ordered up a Thun BB from Justin. Nothing got installed and with the recent Spring weather I had an opportunity to get in some really great daily riding. I paid particular attention to how I rode/pedaled and how the Thun or PAS wheel would work out. It became clear that the Thun would be wasted and that the new V3 PAS modes could do exactly what I needed with just the wheel and a little tinkering. So the Thun is going back.

Although the V3 has nice support for a PAS wheel, it uses the AuxPot input to provide an Assist Level adjustment control. My AuxPot is tied up with motor power level via the one/two motor and 3-pos switches (6 power levels). Going with the conventional Aux Pot Assist Level would leave the throttle controlling the max power level of 3300W which is fairly unpleasant at bike path speeds - I normally limit it to 500W with the 3-pos switch. Of course, I could set MaxPower in a PAS preset to only 500W, but that would require swapping presets and higher power would no longer be available on demand.

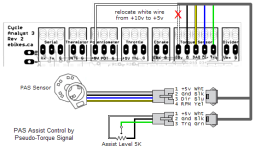
So - the idea is instead to use the V3 as if it had a torque sensor attached instead of just a PAS wheel (PASMode = TorqPAS), and use a pot to provide a 'virtual torque' level to affect different assist levels. This is called out in the 'Tips and Tricks' Appendix of the V3 Unofficial User Guide. For cadence above 55rpm, the assist level scales up with rpm so even though the torque is fixed, the assist is still proportional. Here's a small variation on that scheme with the CA re-wired with two connectors instead of the original single TRQ/PAS 5 pin JST. With this approach, I can have an Assist Level knob plus the Aux Pot switches at the same time. :D

80-01_PasAssistByTorqueSignal.png

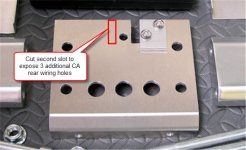
First problem was that the dash was designed for the old V2 and was slotted only to three of the six rear CA wiring holes. I have squeezed in additional wires over the last year or so, but this PAS addition needed too much room, so the dash was disassembled and notched. This gave me lots of room to add wiring for PAS as well as a temp sensor and ebrakes. The whole mess was re-assembled. (Modifying custom stuff like this is a serious PITA...)

36-04a_dashboard.jpg
80-02_DashRework_1v250.jpg
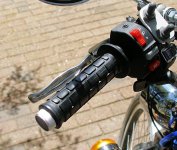
The next problem was where to mount the PAS Assist Knob - the bars are already crowded with controls. I decided to mount the control on the bar end and lucked into some miniature 5K linear pots on eBay. I ordered up a couple of different knobs that looked low-profile. The main problem with this mounting scheme is that the pot only has a 1/8" shaft which is not rugged at all, and the bar end is arguably the most exposed place to put it.

To minimize the chance of bending the shaft, I wanted to support the shaft externally and arrange the knob so it was flush with the support so there was little exposed shaft on which to apply bending forces. This would leave only shear force considerations which are of much less concern here. I found some 5/8" Delrin rod on eBay, ordered it up, and fabbed a little plug to slide into the bar end. The plug is drilled diagonally for a 6-32 setscrew to fix it in place and has a narrow snout that supports the shaft right up to the knob - it's the same length as the butt end of the handgrip is thick. This makes the snout flush with the grip end when everything is installed. The snout was ghetto-turned by chucking the rod up in a drill press and working the end with a thick grinding wheel and file. The back of the plug is drilled and tapped 1/4-32NEF so the pot screws right in and is held in place with a simple star washer.

View attachment 7
View attachment 5

I pulled the right Magura grip and punched a hole in the center using a very nifty Harbor Freight hollow punch that chucks up in the drill press. The press isn't actually run to punch, it just provides the downward force. A section of broom handle inside the grip provided a backing for the punch. Perfect hole in 5 seconds. There are a 6 punches in the set - a really handy tool...

80-04_HarborFreightPunch.jpg

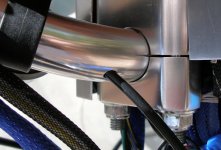
The bars were drilled at an angle near the dash/stem and the inside de-burred by inserting a round Dremel HSS round cutter burr bit into the hole and shaving the inside edge. The three conductor wire for the pot was actually lopped off the PAS sensor and recycled.

80-08_wireEgress.jpg
A nice surplus aluminum knob less than 1/2" high finished off the installation.

80-10_endBarPasKnob_iv250.jpg
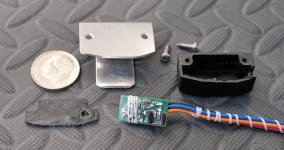
The PAS wheel mount proved more problematic. The pickup has two halls so it could determine pedaling direction - but instead of simply not sending pulses in the reverse direction, it just alters the on/off duty cycle - completely worthless for the CA DIR (direction) input. I pulled the pickup head apart and found the halls to be capacitively coupled to a simple two-transistor flip-flop. I removed the tiny SMD transistors to eliminate the idle current from misc resistors in the circuit and tacked a couple of output leads directly to the hall outputs. This gave the same type of sine/cosine quadrature encoding that the Thun BB develops. With a little dental floss for strain relief and some hot glue, the pickup head was re-assembled with a short 6" cable and JST-4 connector.

80-12_reworkedPasPickup.jpg
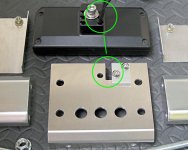
Unfortunately, the PAS wheel could not be mounted as intended on the right side because there is insufficient room between the small chainring and the BB. So, it got put on the left side instead. But - the left threaded BB insert has no shoulder, so the provided BB donut mount could not be used. I fabbed a little bracket from aluminum and just clamped it to the seat tube - not too ugly... I made up a 4 conductor cable to plug into the PAS connector and temporarily tie wrapped it to the underside of the downtube. I was going to route it through the tube, but may just tape to the underside instead - it's out of sight, so.... The JST-4 connectors on the PAS and cable live under the BB and got a dab of Permatex Dielectric grease and are wrapped in self-fusing silicone tape ('Stretch and Seal' at your local Home Depot) for weatherproofing.

80-14_pickupInSitu.jpg

Finally plugging everything together and going for a test drive, the pot proved to be a bit wonky - it had generated nice linear voltage output when installed a few days before. I pulled it apart and it seemed to have some odd flaking on the resistive material. I wasn't sure, but thought that perhaps the soapy water I used to slip on the grip had wicked into the pot. I replaced the pot, filling the shaft hole in the Delrin plug with silicone gel (scuba o-ring lube) and then slipping a tiny 1/8" ID o-ring (Ace Hardware Plumbing Dept) around the shaft under the knob to lock out water - it's compressed between the plug snout and the flat knob bottom.

Take two: another few test rides and I am loving this gadget! :mrgreen: :mrgreen:

I confess to having been skeptical about the whole PAS thing, but I am completely won over by the change in the riding experience. For me, the PAS feature is not helpful in all riding situations because of the heavy bike and hilly terrain, but for the bulk of my bike path riding, it's quite captivating.

Some of my favorite rides are on Rails-to-Trails bike paths that have miles of gentle grades that were done a century ago for trains. These are a bit of drudge going the wrong way and always required supplying very low range throttle for quite a distance. With the PAS, I can just dial in the assist and enjoy a pleasant wooded throttle-free ride. Turning the knob to zero kills the assist, returning the bike to normal operation. I actually only use one CA preset which is a big plus - no stopping to hot-swap presets.

The placement of the knob on the bar end is working out super. I was a little concerned that it would be difficult to manipulate, but I find it very simple to press the grip with index and second fingers to 'steady the bar'/'steady the hand' while turning the knob with thumb and forth finger. Very quick and natural with good refined rotational control. This is not quite full-hand-on-grip control, but it's close enough...

Anyhow - this simple PAS wheel with the trick Assist Level knob is a terrific feature - another score for the V3! The PAS wheel, pot, knob, and Delrin cost $30. The proportional rpm assist works great. For my particular riding, the Thun would really offer little, if any, advantage and at significantly greater price.

EDIT - a trimpot was subsequently added to eliminate the 'dead zone' at the beginning of the PAS Level pot when configuring this setup for rpm-scaled power. The RPM scaling and trimpot are now documented in the Unofficial User Guide.
 
That's very interesting, how would you suppose this setup would work for trail riding. I have been considering the Thun as the last piece of hardware needed to complete my ebike for trail use. The fact that it is the old style tapered cranks has put me off. The used of a simple PAS setup would sure be appealing if it works well in trail use.
 
Interesting question. I guess there are at least two questions here:
  • How would the V3 PAS work on the trail?
  • How would the V3 PAS-wheel technique (vs Thun) work on the trail?
So - for the first question: Not to state the obvious, but there's trail riding and there's trail riding... I think the V3 PAS would work pretty well for non-technical stuff that might be slightly above 'family trails' and had a fair amount of constant speed riding. If you look at the V3 thread, you will see that there are some issues with the speed at which it engages, the overrun when it cuts out, and some occasional power surges when starting/stopping. In general, it seems posters to that thread are using a fairly low WGain setting to smooth out operation, but this makes response a bit slow. Since that's what the folks are looking for - a smooth natural power application, all is well. There have also been quite a few posts about the lag when switching to throttle - the PAS is wheeling along nicely, then you apply throttle for a little extra boost - but if you don't hit the throttle hard enough, the power can actually drop briefly until you crank it up bit. Again, no big deal for cruising, but if trying to climb a sudden trail incline, the speed loss would not be good.

So, for more technical trail riding (not the family bike path variety), some of these behaviors may be undesirable. I think some could be configured away (haven't tried it) and some may be addressed in the production 3.0 firmware (we are still in Beta), but the whole PAS thing seems best suited for more constant pedaling without a lot of radical speed changes. If you are a sedate wooded bike path rider, things are great. If you are into more technical riding, the PAS may still be useful for select stretches of trail to take a throttle break before bearing down on craziness again.

I'm on the East Coast Greenway every day ('bike path' type trail) and use PAS extensively - sometimes pedaling sedately along, sometimes flying along deserted paths - but all flat, more or less constant speed stuff. (Actually, since my initial installation, I have learned to use PAS to advantage and use it almost all the time, road or trail.)

For the second question: I haven't run a Thun, but I can see that it would improve responsiveness over the simple PAS wheel. I am using the 'virtual torque' pot technique called out in the Guide and adjust the pot fairly often to get a good match between my effort and the power the bike applies based only on rpm. Much of this would go away with a Thun as the actual rider torque would give the needed cue without the manual pot adjust. I really like the way the present setup operates - just saying that if I had more hills/inclines and speed changes, the Thun would help a lot. I would always recommend some adjustment pot - either the 'virtual pot' or the AuxPot approach to make it easy to dial in the system. I would recommend that the pot be mounted where it is easily adjusted with the left hand (as with a thumb switch). A possibility is to mod a thumb throttle instead of using a pot.

Anyhow - I don't know if any of this helps or not - sort of a slippery topic. For my kind of 'trail riding' the PAS wheel is great. For aggressive riding, even the Thun would not work out...

I think from one of your build threads (Motobecane) that you may have a v2 just now, so the step up to try this would involve getting a v3. Frankly, the vastly improved throttle control would make that worth doing anyway - the improvement is startling. From there, an extra few bucks to try out the PAS wheel is a small step and would let you do a good first-hand evaluation for cheap.... Used V2's sell like hotcakes on ES so you could defray half the cost of the v3...
 
Thanks for the informative post. I'm a fairly aggressive trail rider. From what you have stated, I probably would not be happy with the simple PAS setup and would have to consider a true torque sensor. Unfortunately, the Thun only comes in a square taper and not Isis. I could make it work, but I don't think it would last very long with the same abuse that my current isis cranks have seen.

The throttle response on my Motobecane is very smooth, there isn't any reason for me to move into a v3 that I can think of. I'm not after more speed. Even picked up a spare v2t as a backup, when I saw it on sale a year ago. Very happy with the setup, just looking to improve the human to machine interface. Twisting a throttle works, but isn't quite ideal. I can still see a need for it, but sensing torque would seem more natural most of the time.
 
kfong said:
From what you have stated, I probably would not be happy with the simple PAS setup and would have to consider a true torque sensor.
To be honest, I actually don't think that even the Thun will give you the responsiveness that you seek. You are an aggressive rider with a clear sense of bike and rider being One. The V3 PAS system presently has some behaviors that will separate you from the bike as the automation does things in its own time - sometimes a bit unexpectedly. That doesn't make it Bad, it just may not apply to your particular riding situation (IMHO).

The preceding post is long but I hope a more or less honest presentation of facts and impressions - that seemed a better approach than just plopping a specific opinion about your particular case on the page. I stretched the definition of 'trail riding' as far as possible (to include even the wussy riding I do :) ) so perhaps a broader range of folks might be able to judge the utility of the V3/PAS wheel/Thun features for their situation. It's a tough question and PAS operation can be difficult to visualize/appreciate without experiencing it first hand. In my case, installation was sort of an idle venture that was wonderfully surprising - a different experience than I envisioned - now I wouldn't do a build without it...

kfong said:
The throttle response on my Motobecane is very smooth, there isn't any reason for me to move into a v3
Great to hear your bike is well-behaved! With the V3 at $150 and the Thun at $240, I was hoping there might be some other good reason to make the jump to V3 so you could sample the PAS with a lower financial investment. But in this case, walking away looks the best plan - less is more :D
 
Yes, that looks the case from what I gather. The Thun would of been a fun thing to try, but not if it doesn't provide the solutions I'm looking for. Your write up was very useful in my decision making. Thanks again for posting, I will focus on other aspects of improving my trail ebike such as installing better shocks.
 
Totally mind blowing! Such a PRO job. I enjoy going thru this post! It's so very...... 8)
Wonderful work here!

Tommy L sends......
mosh.gif

I did a Lawn tractor conversion. Although not as refined as your work! ;)
http://endless-sphere.com/forums/viewtopic.php?f=7&t=50784&hilit=+tractor&start=50
 
Thanks TL - very much appreciated! This build is slowly winding down - I've done some work on the batteries and have a new fork/stem/headset to install, but the summer sort of got away from me - it's been more fun to ride it than work on it... :)

I've been following your tractor conversion - very inventive conversion that seems to be working really well. The aluminum motor and battery box fabrication looks really rugged and production quality - I like the serviceability - well thought out.

Actually, I used to TIG years ago and your aluminum box fabrication got me thinking about springing for a rig for the home shop - there are so many projects where laying in a bead is simply the fastest and strongest approach. I'm thinking I'll be thanking you for helping me spend some money!
 
Motor Temp Monitoring via Axle

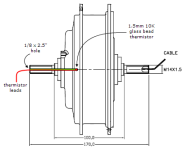
A month or so back I finished up installation of temperature monitoring on the front wheel using a quickie technique that is described in this thread. The idea is to place a sensor deep in the axle where it will pick up internal motor heat conducted from the stator and as far from the heat radiating surfaces as possible (dropout and side cover). The thermistor is attached to CA V3 to progressively roll back the throttle when temperatures reach a configured threshold.

BMC-axleTempProbe.png
After a pretty fair amount of running, I am very happy with the installation - works great :D . In normal operation the motors never get much beyond warm, but hills and high speed runs with traffic for a few miles always managed to heat things up - as measured by touch. This led to some (overly) cautious driving in many situations to avoid damage. With the new monitoring, I've got peace of mind and have been able to up the throttle quite a bit driving in several local areas.

Anyhow - this was a last big piece of the build puzzle and although not an optimal monitoring solution, it works well for the BMC and my riding situations.
 
Teklektik, this is a truly amazing thread/job!
Soo many ideas and nice implementations!

Wish I had 1% of your knowledge/drive/energy/accuracy/love to detail/engineering/ideas/ingenuity!

Great work!! (saluting)
 
Thanks Sm! Quite an honor to be chosen for an article - it's nice to help cargo bikes get some ebike exposure - they're sort of the big moose SUV or pickup truck of the biking world :D
 
Back
Top