Razor E200 Build

You like my artistic drawings do you?
its just so I can get a visual and keep my ideas recorded
I have not done anything but some more research

12 and 14" rims come in 20h and 28h not 36h which is what my ezee rear hub is. I really wanted an ebike hub motor powered stand up scooter but that plan is gone aside from using a hub motor as a mid drive like the link but I would have raised the axle slot to accommodate deck angle, I know some people laced mismatched hubs/rims.

Using the i.g.h. hub laced to a 12" or 14" rim would be a close second ideal situation, but the igh has 36h and the 12/14" rims are 20h and 28h.

The good news was I could have bought 12/14" tubes and tires locally.
 
Should I try to fit the steel plate to the wheel lip or does it really matter?

The one bolt that was stuck was easy once I squared off the sides. I could have had it without squaring off the bolt head with the rotary tool if I had a little more bite or the washers underneath did not screw up the bite. No heat was necessary, I think the washers underneath stuck out a little and I tried my best to lock the pliers above it, I thought the bolt was tighter then it really was.

Had some steel plate sheet laying around, got the biggest drill bit that was stored away in the unused drill bit box near the bottom, you know how that goes. The axle itself fits, the 2nd biggest drill bit the axle did not fit.

See the lip on the razor wheel, I want to keep that so might have to drop $5 of some cheap house use rotary tool bits and a file to dial it in. Luckily there is enough wiggle room for the axle so the gear holes line up. I could just leave it the way it is without trying to get the steel plate hole to fit the lip but I will try with what I got then look at a $5 item to see if it can speed things up. Just drill a bunch of smaller holes and plow out the area could be an option.

Be hard to center the gear to drill the bolts for the bicycle gear.
28t is about the same diameter as the #25 gear whatever tooth count that is. 74mm bcd 4 bolts measured across not next to.
22t is the smaller one with 65mm bcd measured same.
I have a ton more gears from freewheel s/s's to s/s's to lots of cassettes and fw's to cranks and crank gears. I can dial in whatever speed and torque I want.

The part time scooter store is open but never picked up, I walked in one day and got the cold shoulder there to. Store was closed but the door was open and people, maybe his friends in the store. I was about to drop $500+ on a scooters for my brothers kids, but never did. Hopefully the store owner has a line on and stocks 200x50 tubes and tires for a reasonable price. Remember 14" kids tubes and tires are $8 and $12 respectively so I would assume its the same price, less material.

lip on razor wheel.JPG

steel plate to mount bicycle gears to.JPG

bolts.jpeg

22t crank.jpeg

28t crank.jpeg
 
Eyeballed the plate first with the big hole already drilled in that was off center because I just not carefully eyeballed that one. Drew a line then figured out the 54t #25 and the 28t 74mm bcd, #25 matched the plate eyeballed lines.

I dont know what the smaller gear came off pictured in the prev post with its 45mm bcd, the 28t is the small gear on some cranks I got in a pile.
Sheldon Brown website https://sheldonbrown.com/cribsheet-bcd.html
Other gears are 52, 36, 26, 28/38, 22, 53, plus more big cranks 40+


gears.png


Making more progress today, not sure if I will use the old scrap ccm bicycles steel fork or not.

ccm fork and 22t.png


Freewheel is unlaced, hard to get the freewheel off without taking the cover plate off to screw to plywood to undo. Ezee hub is 11/13/15/18/21/24/28/34, just using one gear starting off with the biggest # gear and moving down to shorten chain. Maybe later figure out how to hook it up so it shifts with a hanger, derailleur, shifter.


Progress not perfection. Thinking about it, I dont think it will be that hard to get the rear gears to change, just need to make the extended cage big enough to have space for the rear derailer.

gears1.png

gears 2.png


Shim the gap somehow

shim the gap.png
 
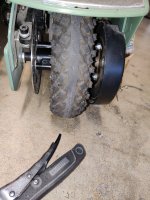
I tried a preliminary go at undoing the brake drum with a rubber band style oil filter removal thats for general purposes. It does not come off, did the same with two small hose clamps (because non fit with just one) but its to late to wake people up hammering on it.

One thing I did notice is the video the guys gear freewheels, mine doesnt but looking at mine it does look like it comes off.

If it comes off then I will buy that ebay hd freewheel disk flange adapter. Its coming from china so who knows when it will be at my door.

This odd guy with green fingernails just grinds it down, his gear also freewheels, mine doesnt. I dont know if he knew his would come off and the ebay purchase. I would have left the drum and just drilled into the drum and put a spacer in there, just small straight pieces of scrap metal to fit inside. The metal shop would even cut them for you if I purchased off cuts :thumb:
https://www.youtube.com/watch?v=7jXPPaRMylI

I dont want to mess up the drum, a few holes on the side wont hurt nothing. Theres already 2 holes in it :lol:

Amazon sells tire and tube for $25 shipped or set of 2 tires 2 tubes for $35 shipped :thumb:


Skippo said:
For the brake, from my understanding the brake drum is screw on to the hub. If you can remove it a fly wheel disc adapter like this one will allow you to add the disc easy.
Check out this video:
https://youtu.be/yID1TMHh6iA
Here is the adapter:
https://www.ebay.com/itm/254853896427?chn=ps&_trkparms=ispr%3D1&amdata=enc%3A1AJkjOrhySSWhbemE7WyUDw66&norover=1&mkevt=1&mkrid=711-117182-37290-0&mkcid=2&itemid=254853896427&targetid=1262376589176&device=m&mktype=&googleloc=9031525&poi=&campaignid=15275224983&mkgroupid=131097072938&rlsatarget=pla-1262376589176&abcId=9300697&merchantid=112081934&gclid=CjwKCAiA24SPBhB0EiwAjBgkhmuE4tmfhg0JdackZeyM8uisn9hzJ_6AUf7wb4Tc-R2f5lgXbrqFSBoCgaMQAvD_BwE


I got it off, did not take much hammering ccw with the hose clamp on to get it off. It has lots of threads engaged, probably took 7.45 full turns to get it off. Thanks for the link, I would never have done or tried it, I would have gotten the grinder out :mrgreen: That ebay adapter should be sweet :thumb: tyvm skippo :thumb:


razor wheel drum off.jpeg


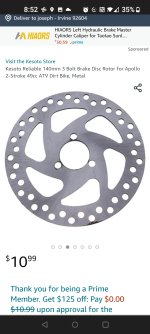
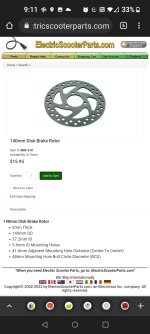
Been looking for 120mm and 140mm disc brakes, there is a lot out there, but how good is the material they use?
Just a random luck of the draw.
Will I need a different caliper or normal 160 caliper works?
Will see


Next up I dont know what shape to cut the steel plate where the bicycle crank gear will mount to. Have to keep it balanced so a circular shape, will have to cut triangles out close to the circular scribe mark then use the grinder flap disk on mark.


palte.jpeg
 
Amazon has next day for $12 for two of those Threaded Hubs Disk Disc Brake Rotor 6Bolt Flange Adapter where the multispeed is on the razor wheel. Just had to confirm the sizes and threads were the same.

Would seem so nice to have gears, an igh between motor and wheel like a mid drive but with a hub motor. I found the shifter for the aw. Easier just to use the rear end I have from an old cut up full suspension and using its hanger, but would it drive the razors wheel? I think it would keep the gear side on the right side.

setup, drive side right side.png


This sadly is an aluminum rear, but the pivot points would have been sweet to utilize :thumb: When it warms up I need to ride around and hunt down any multispeed steel bicycle for kids or adults thats been placed like its being dumped.

rear fs alum.jpeg


Nexus SG-3C41 - no chain out the axle :(
https://bike.shimano.com/en-US/product/component/nexus-inter3/SG-3C41.html
https://www.bikebug.com/shimano-nexus-sg-3c41-3-speed-coaster-brake-hub---silver-36h.html

sg-3c41 nexus.png


Sturmey Archer AW model year 1979 - Has chain out the axle, and I found the shifter last night :thumb:

aw.png


Tried a s/s fixed fw gear and it only goes on half the threads before it tightens a lot.

fw.png


Still on the fence which way to power
1) just s/s gear on hub to razor wheel

2) use multi speed using one gear on the highest gear on it on the hub to razor wheel
- Then I can always shorten the chain to go to a smaller m/s gear.
- Will end up doing it this way

3) use mutli speed using rear derailer to shift gears to razor wheel
- I am probably to lazy to do the extra work.

4) hub motor to sturmey archer a.w. igh to razor wheel
- A ton of work, I am to lazy to do that. Plus the igh needs rebuilding.
 
Nice progress.
I see that you use the threaded side of the wheel for gear. Then maybe there is a 3 bolt brake disc that can go on the other side.
https://www.amazon.com/Kesoto-Reliable-140mm-Apollo-2-Stroke/dp/B07QM2WXM5
 

Attachments

  • Screenshot_20220203-085258.jpg
    Screenshot_20220203-085258.jpg
    561.7 KB · Views: 941
Now that I look at it. Gear on the threaded side and brake disc on the 3 bolt side is exactly how the rx200 wheel set up. Just flipped the wheel hub vs the e200.
Hope this help
 

Attachments

  • IMG_20220203_093957.jpg
    IMG_20220203_093957.jpg
    3.8 MB · Views: 940
The multi speed freewheel on the razors drum brake thread mount was just to see if that screw on ebay disk adapter would fit.
Knowing its intended for bicycles, I just clued in and grabbed a few.
I was wary that it was the same thread and pitch on the razor drum brake threads.

So what I did was put a single speed fixed gear on and it got stuck about 4 complete turns in (or half way down) but I was able to spin it back out. I did not want to risk cross threading anything. I took another s/s fix gear but it had fewer threads, same thing. I put the multi speed freewheel on there and it goes down further but as you can see not all the way plus now I have to get the fw removal tool to unspin the ms fw.

I plan to use the threads for the threaded adapter and put on the disk brake rotor. I'd want a half decent quality rotor at a good price, 140mm is common but there are 120mm disks out there.

I wouldnt say I made much progress, just fuckingg around with not much to do. I'd say road trip if I was 1 or 2 months ahead of schedule, and thats not with the razor or any bicycles, just a road trip bruh.

I bought some m5x0.80 bolts from home depot that are a bit longer, probably 30's or 35 long for the metal bicycle gear mount will go where the #25 razor gear was.

I am actively looking for any steel bicycle with 135mm dropouts, kids or adults. I struck out today at one spot, but if I just cruise something pops up.

3 bolts
Razor E200 is 29.11mm and 29.40mm (probably just didnt snug the caliper up) from bolt hole to bolt hole.
ID is 29mm (the lip part)
But thats where my gear is going. Amazons got that threaded on adapter for 6 bolt disk rotor.


I looked around for something to mark my cut, old grinder wheel will do.

outline.png

outline1.png


Skippo said:
Nice progress.
I see that you use the threaded side of the wheel for gear. Then maybe there is a 3 bolt brake disc that can go on the other side.
https://www.amazon.com/Kesoto-Reliable-140mm-Apollo-2-Stroke/dp/B07QM2WXM5


Skippo said:
Now that I look at it. Gear on the threaded side and brake disc on the 3 bolt side is exactly how the rx200 wheel set up. Just flipped the wheel hub vs the e200.
Hope this help
 
Hub motor mount mock up will be soon, I see all the fabricators in the entertainment media using cardboard so thats what I will use.

I used a piece of paper with a hole scissored out for the axle, to shove down on the lip to get the outline then used a small box cutter, then pushed the paper to get the bolt hole lines then just used a drill bit. To bad I didnt have heavier paper, I had some backs of note pads but the paper worked. I got a good deal on a carbide scriber 4.99$

Slow progress, with that lip on the rim I need the steel plate to fit around that. Its just to easy to tighten one bolt and get the plate and gear off center. I will probably end up using all my rotary tool little bits, till they are worn out.

nippling away.png

gap1.png

gap2.png

gears.png


edit
Sat Feb 5, 2022
Nibbling away at the hole with the cheesy rotary tool, they are not meant for real metal work, those tools are meant for childrens hobby not manly hobbies. Will have to look into air rotary what fab shops use if I ever get into needing that, like cylinder head porting on the truck.
 
Fun Times

It is flush, still needs a 1 to 2 minute hair somewhere taken off that the bolts power through, down to my last rotary bit which happens to be a 1" cutoff wheel, I literally have no other cheesy rotary bits :lol: Tomorrow will be the mock up, that I just might do with wood, then bolted together metal to weld later.

3 hour hole.png

better1.png

better2.png

better 3.png
 
Welding is holding this project up, I need to weld but cant.
Maybe there will be a hair appointment I can squeeze some welding in, if you know what I mean :wink:
Should be good for an hour or two :lol:
With the cold weather, I get no time alone at the house.
I was thinking of just bolting some metal together to get the shape and see how I can affix the hub motor bracket to the razors frame. A combination of bolting to the flat surface of the rear wheel dropout and some bolt U-clamps. Bolted flat metal on both sides of the dropout and U-clamp on both sides should work.
Once I get time then its a matter of welding it.

I will turn the heater on tomorrow and get on it.
I cant right at the moment visualize how I will attach the flat metal plate to the bolt U clamps, the flat bar part of the U-clamp could be replaced with the 1/4" or 3/8" steel, reduce the flex of the bracket.

I need 22.5mm clamps or 0.8858268" U-bolt clamps.
https://www.amazon.com/s?k=22.5mm+Steel+U-Bolt+7%2F8&crid=3FII4OKMYBF5T&sprefix=22.5mm+steel+u-bolt+7%2F8%2Caps%2C388&ref=nb_sb_noss

I just found these, but 0.88" is a bit off as 7/8" is 0.875" so maybe I find 1", there is 15/16'ths
https://www.amazon.com/s?k=Climax+Metal+22.5mm+u+bolt+clamp+7%2F8&crid=3H1JH8MB9B44C&sprefix=climax+metal+22.5mm+u+bolt+clamp+7%2F8%2Caps%2C118&ref=nb_sb_noss


bolt method.jpg


u bolt clamp.jpg
 
I did a quick mockup and noted the crank gear I put on the rear razor wheel is dished or offset, that is good because it gives me a bit of leeway by putting the gear on the inside opposite of the pictures I posted earlier. I can add washers to move the gear inwards to align with the hub motor. The hub motor will have to be offset to one side to align a s/s fw gear.

This is a plan I quickly drew up, the only item I require is structural angle iron the rest I have laying around. I am going to utilize the bracket over the wheel and do a lot of sandwiching of steel, utilizing the flat dropouts for mounts.

rear frame1.png
 
Back
Top