2017 Honda CRF250R to Electric

chrisflysit

10 mW
Joined
Mar 17, 2020
Messages
30
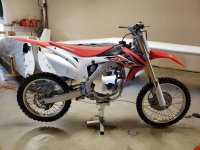
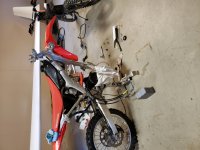
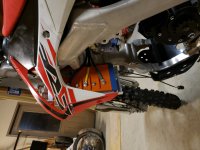
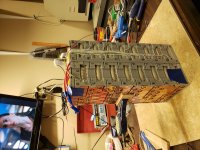
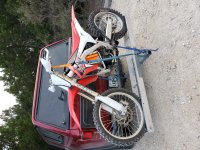
Here is the way I brought it home. No motor, leaking forks, bent handle bars, bald rear tire, rusted and broken spokes, flat front tire (spoke parts in tube), bent radiator and scratched up plastics. Other than that, it seemed pretty nice.
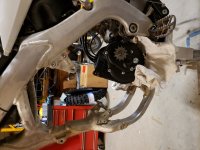
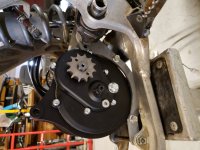
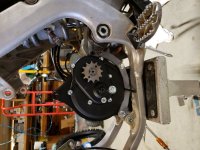
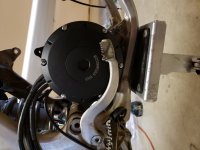
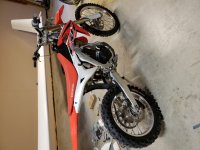
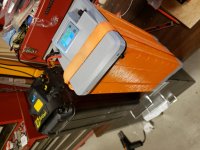
Motor: QS138 70H V3 it has a 1:2.35 gear box already attached to the motor.
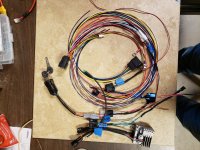
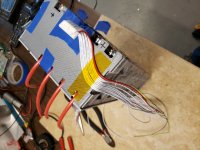
Controller: BAC8000
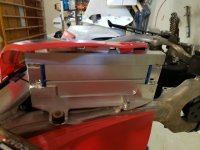
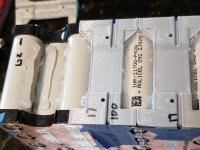
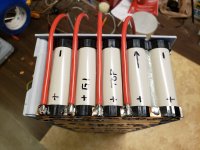
Battery: Custom built Molicel P42A 20s10p with cell fusing and BMS.
 

Attachments

  • 20210208_155916.jpg
    20210208_155916.jpg
    324.2 KB · Views: 5,883
3D printed motor mounts. I knew the rev A mounts would not get the motor in the correct place but I needed it mounted and not sitting on a T-shirt in order to get better measurements.
 

Attachments

  • 20210305_162748.jpg
    20210305_162748.jpg
    337.6 KB · Views: 5,886
  • 20210306_201804.jpg
    20210306_201804.jpg
    317.3 KB · Views: 5,886
  • 20210310_100435.jpg
    20210310_100435.jpg
    321.5 KB · Views: 5,888
Rev B motor mounts on the right. They get the motor in the correct position.
 

Attachments

  • 20210310_103845.jpg
    20210310_103845.jpg
    485.5 KB · Views: 5,880
  • 20210310_110749.jpg
    20210310_110749.jpg
    312.6 KB · Views: 5,880
  • 20210310_110803.jpg
    20210310_110803.jpg
    216.2 KB · Views: 5,880
  • 20210310_110828.jpg
    20210310_110828.jpg
    221.3 KB · Views: 5,880
  • 20210310_110838.jpg
    20210310_110838.jpg
    328.3 KB · Views: 5,880
I noticed that the BAC8000 was the same size as one of radiators. I put it on the left side to help counter balance the motor since its CG is shifted to the right. An Alpha Tig welder came in handy to make the mount with aluminum from Home Depot and Lows.
 

Attachments

  • 20210314_131706.jpg
    20210314_131706.jpg
    218.2 KB · Views: 5,879
  • 20210315_004514.jpg
    20210315_004514.jpg
    278.6 KB · Views: 5,880
Here is how it sits after getting the forks back from 812, new handle bars, a kick stand, replaced broken front spokes and building the rear wheel as and 18".
The bike will be used for trail riding. It still has a long ways to go before completion.
 

Attachments

  • 20210315_004534.jpg
    20210315_004534.jpg
    353.8 KB · Views: 5,882
My experience with radiators and dirt bikes has been that eventually they get smashed. I'd consider mounting the controller where the airbox was instead.

Otherwise I love what you're doing.
 
I was just thinking that I love where you put the controller but I would add a radiator brace......my DRZ400 fell on the trailer one time ever and landed right in the center of the left radiator. Looked like it got karate chopped but never needed fixed.

Tom
 
To answer a few questions...
1. The 3D printing was done with PETG. They are surprisingly strong and should work for testing but the final motor mounts will be .250" aluminum.
2. Mounting the controller where I removed a bent radiator from is a risk but the controller and bracket are much stronger than the radiator and it gets free air flow. So we will see how that turns out.
3. The cells are rated at 45 amps each, so 10p is 450 amps and way more than I plan to use.
4. More cells will fit but I would rather leave the extra battery in the truck than carry it around on the bike. A 35 lb pack is plenty for my endurance. The technical trails I ride are short enough to swap out the pack between loops. Keeping the bike under 220 lbs is a design goal.

Wiring up the controller now. More to come.
 
It's alive! Finished up the wire harness and programing. I forgot to take a picture of the finished harness but it it pretty compact. I decided to go with the Sur-Ron throttle, power map switch, key switch and DC to DC converter. The DC to DC converter isn't necessary but I might add a horn and lights in the future. All those part have a connector on them already so I used a stock Sur-Ron harness. It was easy enough to just cut everything out I didn't need and replaced the stock controller connectors with the ASI versions. Some soldering, heat shrink and cloth tape did the trick. The motor is similar to the Sur-Ron LightBee motor in that the connector is identical as is the pinout. I was able to copy the tune over from my other bike and run the ASI motor discovery program with the Sur-Ron stock battery tie wrapped and bubble wrapped in place. I'm surprised the printed motor mounts work as well as they do, but is best to keep the power at 2000 watts until the aluminum motor mounts come back form the water jet. It was going well enough to try a 3' jump in the back yard. Right now it is weighing in at 201 lbs. The new battery should bring it to around 212 lbs. plus another pound of battery mounting. It is still long ways from being done but is was inspiring to ride it today.
 

Attachments

  • 20210318_180202.jpg
    20210318_180202.jpg
    574.8 KB · Views: 5,598
  • 20210319_193710.jpg
    20210319_193710.jpg
    305.6 KB · Views: 5,599
Great bilt! Without the rear side panels/exhaust covers looks great, like it was meant to be electrified!
Did you cut them or are they just bolted on?

I am going with the same motor, and designed almost the same bracket as you, but for an older Husqvarna Te-250.

Will your high discharge, but small, 3 kWh battery be enought for trail riding? I tought it was mainly for mx use!
The weight is just perfect! 200 lbs is almost the same of a modern 125sx with some gas....
Does she have the air kyb fork or the coil one?

Looking forward to see some more from you! :bigthumb:
 
Awesome looking build, mirroring what the others have said, excited to see this thing in action!

Are you from the Houston TX area? I just moved here, and I'm pretty sure I met a guy with a suspension company called 812 at the last race I attended.
 
Thanks guys.
The bike came stock with dual exhaust. I just removed to number plates, at least for now. The new motor mount brackets are designed and in the hands of the water jet guys now. I was able to redesign them to be stronger and move the motor 6.5mm to the rear. Jhoexp I will be looking forward to seeing posts of your build. My Sur-Ron wears me out with the stock battery on the technical trails I ride but is lacking duration on faster enduro trails. My new battery for that bike is almost done (pictured below) and should be finished tomorrow. It is a 20s8p of the Molicel P42A. It should single handedly solve the range problem on the endro trail. 8000 watts is quite a bit for a 137 pound bike but the new battery will allow much more. The Honda build should have more power and range but we shall see.
I'm near Austin. I should have the bike running well enough to bring it out for the AMSA ride on the 11th.
 

Attachments

  • 20210323_205159.jpg
    20210323_205159.jpg
    477 KB · Views: 5,359
Details on the battery, are the soldered connections series and spot weld you're parallel? How did you make the copper bus?

thanks!
 
:bigthumb: Cred for having Farscape on in the background. I also think you should name your first battery "Borg1". Your build looks very professional.
 
It is a Molicel 21700 P42A in a 20s8p 72v. It has cell level fusing via 28 awg copper wire in a 7mm long Teflon tubes that are soldered to the copper. I did some testing and found they hold 30 amps blow at around 35 to 40 amps. This battery pack is intended to be capped at 200 amps. The components would allow for more but that is all I needed. Each cell is rated for a 45 amp discharge. The copper buses were cut out with scissors and hole punches. Copper is several times better than nickel at conducting electricity. I used the nickel strips to aid in welding. Copper was hard to weld on its own to the battery but easy through the nickel. The positive sides have small piece nickel and copper also to make soldering the fuse wire easy. The divider plates and half round side parts along with all the screws in the case are to aid in mechanical stress relief. The pack has 300 amp bluetooth BMS inside.
 

Attachments

  • 20210320_175115.jpg
    20210320_175115.jpg
    327.2 KB · Views: 5,200
  • 20210326_105036.jpg
    20210326_105036.jpg
    332.3 KB · Views: 5,199
  • 20210323_145426.jpg
    20210323_145426.jpg
    302.2 KB · Views: 5,198
  • 20210323_162407.jpg
    20210323_162407.jpg
    333.1 KB · Views: 5,198
fantastic thanks for the detail w/ pics!
 
Great build. Where did you buy the QS138 70H V3 motor? Aliexpress. Is that pretty smooth, I haven't tried that yet. That looks like the hot setup. When QS comes out with their bigger motor with that gear reduction it is going to make builds so much easier. I like your weight goal. My ebike conversion weighs 260lbs YZ250F, ME1302 with gear reduction, 72V 63AH battery
https://altaownersforum.com/threads/a-little-bit-about-my-2008-yz250f-electric-conversion.2055/
But so do Alta's, I like 220lbs better.
A friend in Orange County is building a CR with a BAC8000 and a ME1304 motor. I think his battery is the same cells and size as yours.
 
The motor was ordered from Aliexpress. No problems there. This motor would likely not be suitable for MX but for single track it should be excellent. Your build was part of my research - Thanks for posting it. If your friend has a build post, please share it.
 
Did you 3d print the battery boxes? That looks really good. I know that stuff takes forever to draw up, do you want to sell or share the files? I have a 3d printer, but haven't used it a lot. I got frustated learning Fusion 360. I am using Solidworks now , but I'm still just learning. I am drawing up my motor mounts and gear box assembly off my YZ now to get them built professionally. I want to go with the bigger motor/gear reduction on a newer YZ frame and the battery like yours up the middle. The BAC 8000 controller would be great if it would do 96V at 450A. My Kelly controller weighs 12lbs, I think the BAC8000 weighs 7lbs. Curtis and Sevcon are over 10 also. I sure would like to see 220lbs for the final. Post some videos of yours on the trails after you get it running. I also have a 1976 Maico coming real soon for electric upgrade. I'm thinking QS 138 70H V3 motor on it. Did you look at their controller? I think the Electro Braap guys used it with your motor.
 
I did 3D print the orange battery box and innards. That battery was designed for my Sur-Ron but works well in the Honda. I took it out two weekends in a row to ride. This setup is very impressive. The battery is a20s8p using 160 of the 21700 Molicels. It is running at 16KW. I planed a 200 cell pack but I'm not convinced it needs it, nor is anyone else who road it. The bike has gobs of power and speed for trail riding. The great part about it is that you don't have to find the right gear or wait for the power to roll on. The power is just there and at any speed. I had to add a steel plate under the battery, that along with all the other things on the bike have the weight at 220 lbs ready for the trails.
 

Attachments

  • 20210404_181734.jpg
    20210404_181734.jpg
    717.7 KB · Views: 4,735
Back
Top