Building cylindrical battery pack for Dummy!

leamcorp

100 W
Joined
Jun 30, 2008
Messages
242
After spending tons of money buying several Ebay 18650 cylindrical batteries (ping and lau's) that went bad after 6 months of usage (Lau and Ping V1), I've decided to build a battery holder to see if I could re-use some of the left over cell from those pack. I'm now only building A123 cells but this will work for any cylindrical cells - Original thread is here,

http://endless-sphere.com/forums/viewtopic.php?f=14&t=8660&start=0&hilit=18650+holder

From that effort, I think I found a way for almost anyone with basic woodworking skill to build a battery pack in any configuration or shape. And when something is wrong with the pack, its easy troubleshoot and take out just the cell/string without disassembling entire pack.

Note - I'm building this pack at this point, so it will be work in progress and more details will be filled in...

----------------------------------------------------------------------
(Update 1)

Materials needed:

1) Battery Clips from Mouser.com (Part # 534-209) - I typically buy 1000 at a time but you only need 160 or so for 48v 12ah pack.

2) Copper Strip from McMaster.com (Part # 8964K721) - this is 1/2" x 1/16 x 6' strip. You'll need 3 or 4 strips.

3) Soft wood - From home depot or lowes. Make sure its soft wood (pine works great). The soft wood is easier to work with and you don't have to pre-drill holes. If you like to measure thing in n-th degree, go for it. But for those of use who like to eyeball thing - you could screw right into soft wood without pilot hole and it won't split the wood :)

4) #6 and #8 wood screws. Get bunch of these in 3/4" and 1" length.

5) Aviation Snip - to cut the copper strip.

6) Wires - I'll let you determine this but I like to use 24 gauge for single cell line as its easier to hide/fold. For main lines - I use 2 gauge wire or you could double it up. I forget where but I bought super flexible wire from some post from this forum.
-------------------------------------------------------------------------------

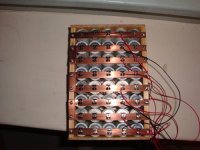
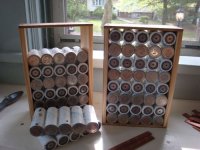
This pictures show the frame for this pack. I'm building 48v 12ah pack (I'll list the dimension later),battery1.jpg
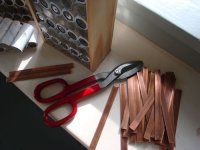
Here's picture showing cut copper strips. The aviation snip makes it easy to cut those. You'll also need a file to smooth the edges,battery2.jpg
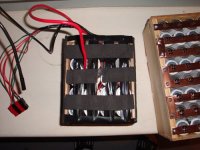
I've recently purchase a battery bracket from Electricrider.com (http://electricrider.com/crystalyte/battbrkt_detail.htm). Surprisingly, this pack fits nicely into that bracket. I'm not sure if I'll use the pack as I like to hide my batteries but its an option.View attachment 2

The copper strips are placed and is strong enough to hold 6 cell string. If you are going for bigger string, you'll need to put a spacer to pull the strips together. A 1/4" wood rod will work. The cells on this pictures are not clamped down or soldered - they are free floating and this will make it easy to troubleshoot or take individual cells if need be (I've rode this setup all last year and it works great).battery4.jpg
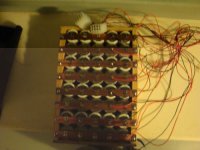
The wires shown here are soldered on back of the battery clips. On previous packs, I didn't soldered them and just duct tape them - works fine either way. Most batteries are hidden anyway, so whatever makes it easy wins! These wires are for single cell charging. You could also use the same wire for balancing if you are going that route.battery5.jpg
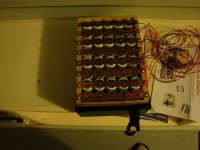
I'll post more as I move toward final configuration. I'm still deciding on where to put the battery. I was going to put it in the frame (its 3 1/2' wide) but I'm leaning toward Electric rider's bracket or rear pannier - we'll see.

cheers!
 
I love it, simple, and no soldering. How thick were the copper strips? Perfect for those that have little money, but can get ahold of a problem pack for cheap.

When did you buy the ping? As far as I know, Ping never sold round cells, but he did have a problem with somebody calling thier round cell packs pings back in the v1 days. At the time, the summer of the gas spike, pings auctions were going for crazy prices so ebayers started calling their stuff ping.
 
I like the copper strip "suspension" from the wood frame. My 10AH headway cells were free floating and would tap on the covers on every bump until I put a dab of latex caulk on the ends.

If you don't have a big enough soldering iron, a small refillable butane torch is useful for soldering a bare wire stub to the copper straps, then you can use a small iron to solder wires to the stub.

I screwed plastic sheets on the ends and drilled holes over voltage monitoring points to poke the probes through. With the pack on its side it only takes a few seconds to step them through all the cells. Plastic storm window replacements are suitable and can be cut on a table saw.
 
Dogman, I don't remember, its was couple/several years ago and even the pouch version is not that stable and had couple of them go bad too. I guess that is why I wanted something very simple so that I don't have to de-couple/de-solder an entire pack to troubleshoot. In the end, I just gave up on most of those Chinese packs. The other thing is the power that you won't get in Chinese packs (or even newer stuff some are using now). As long as your controller can handle it, you could get some high amp's out of these cells. By the way, I don't use BMS/balancer, etc. I know what I need and I use single cell chargers every once in a while and they are good to go. Granted, I never go below 50% anyway but again, thats the draw for some I would assume.

As for the free-floating, I did use glue gun for each string. Its not permanent but made it easier to handle. Again, these cells are pretty durable and its easy to pad to make it tight. For this pack, I'll be using expanding foam material (not the home depot stuff) and fit it into final bag/bracket.
 
Update - Added following information to original post.

Materials needed:

1) Battery Clips from Mouser.com (Part # 534-209) - I typically buy 1000 at a time but you only need 160 or so for 48v 12ah pack.

2) Copper Strip from McMaster.com (Part # 8964K721) - this is 1/2" x 1/16 x 6' strip. You'll need 3 or 4 strips.

3) Soft wood - From home depot or lowes. Make sure its soft wood (pine works great). The soft wood is easier to work with and you don't have to pre-drill holes. If you like to measure thing in n-th degree, go for it. But for those of use who like to eyeball thing - you could screw right into soft wood without pilot hole and it won't split the wood :)

4) #6 and #8 wood screws. Get bunch of these in 3/4" and 1" length.

5) Aviation Snip - to cut the copper strip.

6) Wires - I'll let you determine this but I like to use 24 gauge for single cell line as its easier to hide/fold. For main lines - I use 2 gauge wire or you could double it up. I forget where but I bought super flexible wire from some post from this forum.

All I could think of it for now.
 
What are the battery clips for? I thought everything is held together with the copper strips.
 
This is exactly how I plan on building my first pack, I'm a big fan of the simplicity of your setup Leamcorp.

Weird shape? No problem.
Expandable? Yes.
Compatible with upgrades (more range or booster pack) ? Yes.
Easy to build? Yes.

Keep up the good work. I would like to know what you mean about the expanding foam, that sounds interesting.

Katou
 
Makes me want to look at the prices of loose A123's.
 
Hi,
snowranger said:
What are the battery clips for? I thought everything is held together with the copper strips.

The clips (work like springs) clip onto the copper strips and form a contact with the ends of the individual cells.

Nice job!

Very useful thread!

Why not wider strips spanning two rows of cells to make a serial connection between adjacent rows?
 
MitchJi said:
Hi,
snowranger said:
What are the battery clips for? I thought everything is held together with the copper strips.

The clips (work like springs) clip onto the copper strips and form a contact with the ends of the individual cells.

Nice job!

Very useful thread!

Why not wider strips spanning two rows of cells to make a serial connection between adjacent rows?

That's correct. The A123 cell have a paper sheathing that partially cover the negative end, making a clean contact impossible. In addition, the clip is also used to push against the strip to hold the cells in place.

You could use wider copper strip and would of actually made a better architecture as it would made the box stronger, wider electrical path, etc - but I already bought the 1/2" strips - next time.
 
I'm done with the basic pack building. The final dimension of this pack is 6"x3"x9" - the pack is quite tidy and this 48v 12ah pack is about same size as 36v 15ah duct tape pack from Ebay.

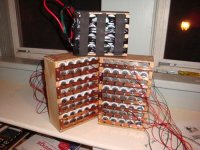
Here's nearly finished pack,batt14.jpg

Close up,View attachment 2

Here's 12v 12ah booster pack for times when I need more power,batt13.jpg

Full pack, batt10.jpg

I'll be tidying up the cables and once that is done, I'll be fitting this in a waterproof pannier for my rear rack. One new thing I'll be trying this time is to use a expanding foam material. I'll post that once I'm done.

Hope this will help someone.
 
Wow, this is great. I have been playing around with trying to find simple "bolt together " solutions for building a123-based packs for, well, for years. :) This is about as simple as it comes, great job. :)

A couple of suggestions. You might want to use brass strips, instead of copper, as they won't oxidize. Also, I agree that a single wider strip might be a bit better, connection-wise, but the single strips will certainly work fine. I would put connecting strips on each end, though, to even out the load.

I usually soldered the battery clips to the strips, to keep them from moving around, but I was using the thinner copper strapping. These strips are a lot thicker.

For the tap wires, I really think 24-gauge is a bit small. With the BMS stuff I've been doing, I've discovered there can be quite a bit of voltage loss in the tap wires, which plays havoc with balancing circuits. Even with individual cell charging, which is usually 2A, or so, minimum, I think 24-gauge wires will get a bit warm. Anyway, I use 18-gauge now, on everything.

I think using the glue gun, to hold the five cells together, is a good idea, as the glue sticks well to the paper/cardboard tube on the cells, but can be "snapped" apart, if you need to replace a cell, or reconfigure some.

Maybe a few more pics, with some closeups of the straps/clips?

Anyway, great idea. :)

-- Gary
 
katou said:
What is the black tape on the booster pack for? Looks good overall.

Katou

Its just electrical tape. I've do that to make sure there's not exposed metal part anywhere.
 
GGoodrum said:
Wow, this is great. I have been playing around with trying to find simple "bolt together " solutions for building a123-based packs for, well, for years. :) This is about as simple as it comes, great job. :)

A couple of suggestions. You might want to use brass strips, instead of copper, as they won't oxidize. Also, I agree that a single wider strip might be a bit better, connection-wise, but the single strips will certainly work fine. I would put connecting strips on each end, though, to even out the load.

I usually soldered the battery clips to the strips, to keep them from moving around, but I was using the thinner copper strapping. These strips are a lot thicker.

For the tap wires, I really think 24-gauge is a bit small. With the BMS stuff I've been doing, I've discovered there can be quite a bit of voltage loss in the tap wires, which plays havoc with balancing circuits. Even with individual cell charging, which is usually 2A, or so, minimum, I think 24-gauge wires will get a bit warm. Anyway, I use 18-gauge now, on everything.

I think using the glue gun, to hold the five cells together, is a good idea, as the glue sticks well to the paper/cardboard tube on the cells, but can be "snapped" apart, if you need to replace a cell, or reconfigure some.

Maybe a few more pics, with some closeups of the straps/clips?

Anyway, great idea. :)

-- Gary

Thanks, your thread is what got me started on A123 cell anyway.

I agree, I can't think of anything that is more easier to build - if I had to put actual numbers, I would say you could build any pack in about a day if you have all the parts. I usually run out of parts, so it usually take weeks :)

The only reason why I'm using 24gauge is for the thin-ness of the wire. On the booster pack (and previous packs), I typically used 18gauge wires but since I only use that for a single cell charging, 24gauge is okay since thats what was on the charger to begin with. I don't use BMS (I just change to different size pack for a given ride). The way I use the pack is, I'll use 36 or 48v SLA charger for 20 or so charges. Then I'll use a single cell chargers from volt phreaks.com to make sure everything is up and up. I've been doing it this way for more than a year and haven't had a single cells go bad yet. Even if I found some after couple/few years, these cells are quite cheap, so no biggie to lose a bunch.

I'll take more pics once I'm done with the pack.
 
I like this idea, simple and efficient. Is there any chance of a clip jumping off or losing contact?

I've read some posts by doctorbass where he states that it's better for the cells to have more than one point of contact connecting the paralell groups in series. Might want to take a look, I don't think it would be hard to implement this at all. The wider strips covering two sets of cells would do the job nicely.
 
No, clips didn't move or come off as I usually duct tape the whole thing. For this pack, I'll won't be using duct tape, rather, I'll be trying new foam material to encapsulate the whole thing.

More contact point is always good, especially if you're building a high volt/amp pack. You have to remember that 1/2" by 1/16" strip is quite thick/wide. I remember looking at bare 4gauge wire at home depot and thought that you'll need 6 to 8 strands to equal 1/2" strip (just guesstimating). Beside, I'm using 4 gauge wire coming out of the pack and that certainly is smaller than the strip. Again, no need to use heavier or thicker anything for no reason - it just make things bigger, which is last thing I want to do.
 
Excellent, the KISS principle mostly work all the time.
I'm thinking about using abs plastic instead of wood, like 1/4" thick and rivet nuts to screw-on the straps or a base to slide and clamp it in place.
Casing will then be a bit narrower and lighter.
 
shinyballs said:
Excellent, the KISS principle mostly work all the time.
I'm thinking about using abs plastic instead of wood, like 1/4" thick and rivet nuts to screw-on the straps or a base to slide and clamp it in place.
Casing will then be a bit narrower and lighter.

I built a pack last year using plastic - turns out, those soft wood I'm using now is lighter (its like hobby type of wood) and thickness is about the same.

Also, the plastic is harder to work with (to cut, drill, etc). But if you are precise type of person, you could build a much better looking pack.
 
Hi,
patrickza said:
Is there any chance of a clip jumping off or losing contact?
If it looks like a potential problem drill a hole and use a pop rivet (probably ~30 seconds per clip).

shinyballs said:
I'm thinking about using abs plastic instead of wood…
Drilling and fastening on the edge like leamcorp did with the wood might be difficult and would require thicker material. I'd bend the copper or brass strips over the edge of the plastic side and fasten them by drilling in from the side.
 
Okay, there won't be anymore pictures - I've finished my pack and its now all wrapped up in my pannier.

I did however tried the expanding foam and it kind of worked... but was very messy. So I dumped it and used a duct tape/foam tape like my booster pack. Might not be pretty but make the pack smaller by compressing any loose ends.

For test ride today, I went up to 48mph (yikes) on 60v while drawing up to 70amp - my CA is now programmed so that max is 35amp.

I do have a question - I've been using both single cell chargers and a 48v SLA charger both rated at 2amp. I saw a 5amp 48v LIFEPO4 charger from Vpower on ebay - will this work like SLA charger? Is this a better charger for A123 than a SLA charger? I guess Ggoodrum will know.
 
I am a trucker and pick up freight from Boeing. What I see for expanded foam packing that Boeing uses for some of its parts.
They slide a plastic bag into the space then spay the foam inside the bag. Makes a tight, form fitting pad.
 
Nice work.
I have about 1,500 26700 Emoli cells left over that I have been trying to figure out how to wire up.
I am going to try a variant of this - I will post pictures when done.
Tips I read along they way that resonated with me:

* Brass instead of copper - stronger and wont corrode
* heavier balance leads
* Wider bars to serve double duty
* ABS or other material

I would add to those:

* Treat all mechanical contacts with petroleum jelly to prevent corrosion at contact point. It is neither a conductor nor an insulator and is electrically inert.

Good work - and thank you for posting.
This is just the kick I needed to try it myself.
Much appreciated.

-methods
 
Hi,
PedalingBiped said:
I am a trucker and pick up freight from Boeing. What I see for expanded foam packing that Boeing uses for some of its parts.
They slide a plastic bag into the space then spay the foam inside the bag. Makes a tight, form fitting pad.

Makes a tight, form fitting pad that holds in the heat?
 
MitchJi said:
Hi,
PedalingBiped said:
I am a trucker and pick up freight from Boeing. What I see for expanded foam packing that Boeing uses for some of its parts.
They slide a plastic bag into the space then spay the foam inside the bag. Makes a tight, form fitting pad.

Makes a tight, form fitting pad that holds in the heat?

I meant to convey the concept of using expandable foam. With a plastic bag method you can control the expansion.
Once done, you could then modify the piece to suit your requirements.
Doing anything to soften the blows to the battery pack would cut off air circulation.

Oh well, there is always plan E or F by now. I am way past plan B. :eek:

leamcorp, I am going to copy you, thanks very much.
"Imitation is the highest form of flattery
 
Back
Top