Sigmacom
10 W
Finally got around to posting the details on my Panasonic NCR18650B pack for my Bomber.
Most of my riding is done in National Parks and after my first ebike (Hyena kit) I decided that you can never have too much range. Going into wilderness areas range and climbing torque is much more important to me than max speed. I'm happy with a max speed of around 45km/hr. I bought the 2nd hand Bomber with a dead battery as at the time it had the biggest battery compartment around, in a good frame. I wanted the cells with the highest energy density, so chose the Pana NCR18650B (3.4Ah per cell). I know these cells wont tolerate heavy discharge (or recharge) so I planned for a 14P 47.6Ah setup. My max pack current draw is around 60A so at 14P this worked out to 4.3A per cell or 1.2C peak. Before building the whole pack I built a 1S14P module and put it in series with my first ebike's LiPo pack, with a Cellog attached.

After doing a couple of discharge cycles I found that the cells performed well under my typical riding conditions tracking the lowest (0.2C) discharge curve as provided by Panasonic.
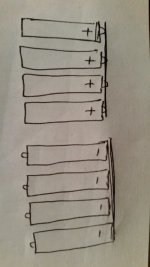
Having had a few individual cell failures in my Lipo pack I also wanted to be able to pull the pack apart without too much effort. Since the cells are tab welded I decided that each 1S14P module would be the minimum replaceable unit. All of the nickel strip is double layered and spot welded. It turned out that having 3 of these modules side-to-side fitted perfectly in the Bomber's battery box! Here are the drawings I gave the tab welderer for the assembly of each 3S14P block:

These 3S14P blocks were then stacked on top of each other (with insulating card in between) and the tabs hanging over each end folded down and soldered to the tabs on the pack below. Each series connection is carried by 4 double thickness nickel strips this way. As the cell spacers slide apart removing a 1S14P pack for replacement would mean desoldering these tabs then cutting 4 nickel strips on each side. Not pleasant but doable if necessary in the future.
5 of these packs were stacked end-to-end forming a 15S14P pack laying down on a sheet of aluminium cut to size. Balance leads and discharge leads were added, and a 60A breaker mounted on the end :

The whole thing was then shrinkwrapped. As seen below the pack is about the same size as the original Bomber battery (yellow) and only weighs about 500g more:

I hooked the pack up to my home made 3kW load and pulled around 50A for several minutes - cells did not even get warm to the touch!

There was still room in the Bomber's battery box in the top right corner just under the seat post to fit the additional 1S14P test pack in series for a total of 16S14P. I cut a square piece of aluminium which was screwed into place under this pack to keep it in place:

Since I plan to use my android app to monitor cells using a bluetooth cellog I'm also working on, there is no BMS. I also charge the pack using two UNA9 balanced chargers (same as BC168s but 9S each) through a HMC Molex connection where the CA used to be (idea stolen from Hyena). As others have mentioned on this forum these cells cannot be charged at 0.5C despite what the Panasonic documentation suggests! Doing so will rapidly reduce their capacity. I charge them at about 550mA per cell as the UNA9 max out at 8A. The pack can also be bulk charged via the usual charging port at the side.

With the original 5404 motor and rim I was able to get 130km out of this pack on moderate trails and taking it fairly easy, with a top speed hot off the charger of just under 50km/hr. I've just fitted a TC65 in a 17" moto rim for more torque (see separate post).
Most of my riding is done in National Parks and after my first ebike (Hyena kit) I decided that you can never have too much range. Going into wilderness areas range and climbing torque is much more important to me than max speed. I'm happy with a max speed of around 45km/hr. I bought the 2nd hand Bomber with a dead battery as at the time it had the biggest battery compartment around, in a good frame. I wanted the cells with the highest energy density, so chose the Pana NCR18650B (3.4Ah per cell). I know these cells wont tolerate heavy discharge (or recharge) so I planned for a 14P 47.6Ah setup. My max pack current draw is around 60A so at 14P this worked out to 4.3A per cell or 1.2C peak. Before building the whole pack I built a 1S14P module and put it in series with my first ebike's LiPo pack, with a Cellog attached.
After doing a couple of discharge cycles I found that the cells performed well under my typical riding conditions tracking the lowest (0.2C) discharge curve as provided by Panasonic.
Having had a few individual cell failures in my Lipo pack I also wanted to be able to pull the pack apart without too much effort. Since the cells are tab welded I decided that each 1S14P module would be the minimum replaceable unit. All of the nickel strip is double layered and spot welded. It turned out that having 3 of these modules side-to-side fitted perfectly in the Bomber's battery box! Here are the drawings I gave the tab welderer for the assembly of each 3S14P block:
These 3S14P blocks were then stacked on top of each other (with insulating card in between) and the tabs hanging over each end folded down and soldered to the tabs on the pack below. Each series connection is carried by 4 double thickness nickel strips this way. As the cell spacers slide apart removing a 1S14P pack for replacement would mean desoldering these tabs then cutting 4 nickel strips on each side. Not pleasant but doable if necessary in the future.
5 of these packs were stacked end-to-end forming a 15S14P pack laying down on a sheet of aluminium cut to size. Balance leads and discharge leads were added, and a 60A breaker mounted on the end :
The whole thing was then shrinkwrapped. As seen below the pack is about the same size as the original Bomber battery (yellow) and only weighs about 500g more:
I hooked the pack up to my home made 3kW load and pulled around 50A for several minutes - cells did not even get warm to the touch!
There was still room in the Bomber's battery box in the top right corner just under the seat post to fit the additional 1S14P test pack in series for a total of 16S14P. I cut a square piece of aluminium which was screwed into place under this pack to keep it in place:
Since I plan to use my android app to monitor cells using a bluetooth cellog I'm also working on, there is no BMS. I also charge the pack using two UNA9 balanced chargers (same as BC168s but 9S each) through a HMC Molex connection where the CA used to be (idea stolen from Hyena). As others have mentioned on this forum these cells cannot be charged at 0.5C despite what the Panasonic documentation suggests! Doing so will rapidly reduce their capacity. I charge them at about 550mA per cell as the UNA9 max out at 8A. The pack can also be bulk charged via the usual charging port at the side.
With the original 5404 motor and rim I was able to get 130km out of this pack on moderate trails and taking it fairly easy, with a top speed hot off the charger of just under 50km/hr. I've just fitted a TC65 in a 17" moto rim for more torque (see separate post).
")