Hi all
Long time lurker; been reading on here for more than 4 years now. As such, I find that it is reasonable now to start on the battery building adventure.
I plan on doing a 14S10P build for my ebike commuter. I recently (10 months ago) switched jobs, which extended my commute a fair bit: 28 km in each direction. This battery is designed to have enough capacity to last the round-trip commute, which takes 2 hours. I will be using Samsung 29E cells. I plan to source these cells from user tumich on this site.
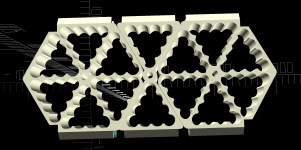
To hold the 18650 cells, I plan to 3D print the following casing/holder:
Seen from side:

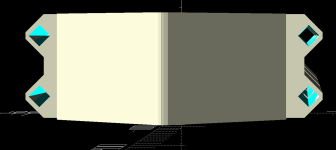
Seen from end:

Each parallel group is designed in a triangle pattern to minimize space consumption. Two adjacent triangles will be connected in series. The batteries will be spot welded using a spot welder from user pguk on this site. Connections will be made with pure nickel strips from nkon.eu.
Note that each the battery pack is cut into three separate pieces, which is visible from the side. This is to keep each object within the maximum dimensions of most printers. An earlier prototype that I had printed, was solid enough that it could support my weight, 80 kg, so I think the design will be plenty stable.
The three holes seen on the side view, is designed to fit an Ø8 mm threaded rod. These rods will be used to mount the side plates. The side plates are to be made of 5 mm acrylic sheet.
The 2 holes on top and on bottom (see the end-view), are designed to fit an 8mm threaded rod. The four rods will be used to provide rigidity for the pack, and for fixing to the downtube/seat post tube. The the missing spots on the two lower rods will be used to fits heavy-duty nylon strips through to fix the battery pack onto the down tube. The two upper rods will extend a bit out from the pack such that the seat post tube will be in-between the two rods, which hopefully will prevent any sideways motion of the pack.
What do you guys/girls think of this idea? Sound? Or problematic?
The bike has a BBS02 mid-drive, programmed for a max current of 18A. 29E cells in 10P configuration should give close to 29 Ah capacity. Continuous current will be somewhat lower than 18A, probably closer to 10-12A. In winter, it gets cold here (-10 is the lowest where is plan to keep riding the bike), and I plan to keep riding throughout the year, so some extra capacity is required for those cold days. The bike is parked outside while I am at work, and the battery will be left on the bike for that time. The bike is parked in a shed, but wind and rain can still get to it, but much less than was it parked in the open. When at home, the bike is parked in an insulated garage.
A full round trip commute require some 1000 Wh. This pack will hold approx 1.5 kWh, so there should be some in reserve.
Now for the hard parts:
1. Charger: I will bulk charge the pack. I do not have a 14S charger, so I will probably get a satiator and call it a day.
2. BMS. I "plan" to run without BMS and manually monitor the pack. The reason it is just a "plan" is that I change opinion every second day. A normal ebike BMS probably wont be able to keep it in balance anyway, but could be useful for monitoring cell voltages, and prevent over charge/discharge. Any recommended BMS'es out there?
3. Waterproofing: I plan to use type II silicon glue along the outer rim. In addition, I will use an outer cover made of tarp.
4. Connectors: XT 90 connectors with spark resistor.
5. Cell voltages: Min should be 3.3V, max 4.1V.
6. Balancing monitoring: RC lipo alarms 8s. 2x http://www.ebay.com/itm/NEW-RC-Lipo-Battery-Low-Voltage-Alarm-1S-8S-Buzzer-Indicator-Checker-Tester-LED-/271746517929
7. Balance leads: TBD
8. Spot welder: The 6pence welder from pguk on here.
Ideally, I want something plug'n'play, that I can just plug in when I get home, and the battery is charged and balanced in the morning. The only charger for this, that I was able to find, is the hyperion 1420, which appears to not be produced any more. Are there any alternatives for 14S?
Thank you all in advance
[moderator edit to correct title]
Long time lurker; been reading on here for more than 4 years now. As such, I find that it is reasonable now to start on the battery building adventure.
I plan on doing a 14S10P build for my ebike commuter. I recently (10 months ago) switched jobs, which extended my commute a fair bit: 28 km in each direction. This battery is designed to have enough capacity to last the round-trip commute, which takes 2 hours. I will be using Samsung 29E cells. I plan to source these cells from user tumich on this site.
To hold the 18650 cells, I plan to 3D print the following casing/holder:
Seen from side:

Seen from end:

Each parallel group is designed in a triangle pattern to minimize space consumption. Two adjacent triangles will be connected in series. The batteries will be spot welded using a spot welder from user pguk on this site. Connections will be made with pure nickel strips from nkon.eu.
Note that each the battery pack is cut into three separate pieces, which is visible from the side. This is to keep each object within the maximum dimensions of most printers. An earlier prototype that I had printed, was solid enough that it could support my weight, 80 kg, so I think the design will be plenty stable.
The three holes seen on the side view, is designed to fit an Ø8 mm threaded rod. These rods will be used to mount the side plates. The side plates are to be made of 5 mm acrylic sheet.
The 2 holes on top and on bottom (see the end-view), are designed to fit an 8mm threaded rod. The four rods will be used to provide rigidity for the pack, and for fixing to the downtube/seat post tube. The the missing spots on the two lower rods will be used to fits heavy-duty nylon strips through to fix the battery pack onto the down tube. The two upper rods will extend a bit out from the pack such that the seat post tube will be in-between the two rods, which hopefully will prevent any sideways motion of the pack.
What do you guys/girls think of this idea? Sound? Or problematic?
The bike has a BBS02 mid-drive, programmed for a max current of 18A. 29E cells in 10P configuration should give close to 29 Ah capacity. Continuous current will be somewhat lower than 18A, probably closer to 10-12A. In winter, it gets cold here (-10 is the lowest where is plan to keep riding the bike), and I plan to keep riding throughout the year, so some extra capacity is required for those cold days. The bike is parked outside while I am at work, and the battery will be left on the bike for that time. The bike is parked in a shed, but wind and rain can still get to it, but much less than was it parked in the open. When at home, the bike is parked in an insulated garage.
A full round trip commute require some 1000 Wh. This pack will hold approx 1.5 kWh, so there should be some in reserve.
Now for the hard parts:
1. Charger: I will bulk charge the pack. I do not have a 14S charger, so I will probably get a satiator and call it a day.
2. BMS. I "plan" to run without BMS and manually monitor the pack. The reason it is just a "plan" is that I change opinion every second day. A normal ebike BMS probably wont be able to keep it in balance anyway, but could be useful for monitoring cell voltages, and prevent over charge/discharge. Any recommended BMS'es out there?
3. Waterproofing: I plan to use type II silicon glue along the outer rim. In addition, I will use an outer cover made of tarp.
4. Connectors: XT 90 connectors with spark resistor.
5. Cell voltages: Min should be 3.3V, max 4.1V.
6. Balancing monitoring: RC lipo alarms 8s. 2x http://www.ebay.com/itm/NEW-RC-Lipo-Battery-Low-Voltage-Alarm-1S-8S-Buzzer-Indicator-Checker-Tester-LED-/271746517929
7. Balance leads: TBD
8. Spot welder: The 6pence welder from pguk on here.
Ideally, I want something plug'n'play, that I can just plug in when I get home, and the battery is charged and balanced in the morning. The only charger for this, that I was able to find, is the hyperion 1420, which appears to not be produced any more. Are there any alternatives for 14S?
Thank you all in advance
[moderator edit to correct title]

