Packbuilders of ES...Take a look at my triangle wiring?

miffi

100 µW
Joined
Aug 23, 2016
Messages
9
Location
Charlotte
Thanks for taking the time took at this thread.


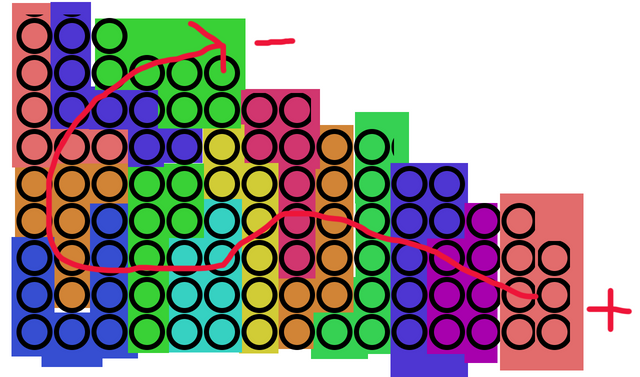
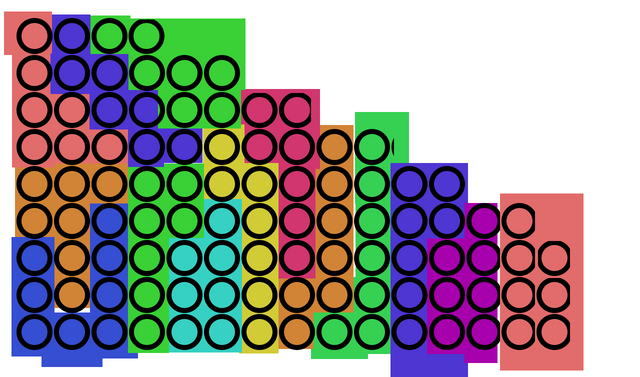
I'm trying to build a 14s8p triangle battery for my bike build. I've built a few packs before but they were always small and square. Anyway, here's my 'diagram' of how I want to connect my cells. The colored boxes represent parallel groups while the black lines represent series connections.

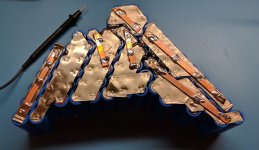
For the battery, I'm using 25r cells and will be drawing high current. I was planning on layering 8 x .2mm nickel strips on the series connections between 1-4,6-7,etc.

I plan to be pulling 40 amps, but would like to support 80amp draws. Does this look sane to you? Any advice?

battery.png
 

Attachments

  • battery.psd.zip
    87.2 KB · Views: 30
You also have a current sharing issue between a few groups eg btw 7-8. The cells that are joined will take a disproportionate amount of current compared to those that have no direct series connection.
You can't pull 80a through two connects even if they are copper because of this reason. Also pay attention to how your main power leads are connected for this reason.
 
It is not perfect but you can make it work
Stack a couple of layers of nickel
Then you can solder copper strip on top where you need extra the extra electrical reinforcement
I use 1mm thick copper sheet that I cut into 7mm strips.
here is a random example. Copper quickly added where the +/- connection was less then ideal.
file.php


In some areas we just stack 2-3 layers of nickel (0.2mm thick)
Where more is needed, we solder copper as shown.

If you have an ideal layout (rectangle or parallelogram with xSeries by yParallel shape) just 0.2mm nickel sheet is enough for 15A+ per cell.
 

Attachments

  • Capture.JPG
    Capture.JPG
    128.9 KB · Views: 576
Here is a quick example of something that would be more efficient with nickel, assuming you are flexible in terms of +/- location
file.php


In this case, I started at the right, and continue left staying at the bottom. Then loop around up as shown by red arrow. (It's not finished)
 

Attachments

  • Capture.PNG
    Capture.PNG
    83.9 KB · Views: 1,003
Thanks for the responses. I'm going to take your advice in mind as i redo the layout.
 
For anybody viewing this thread in the future, this is what I came up with:
battery_3.png


I changed the cell count and arrangement as well.
 
Back
Top