New 14S7P & 14S5P packs need advices (to climb high mountain)

ichiban

100 W
Joined
Aug 19, 2018
Messages
197
Location
Bangkok, Thailand
Guys,

I have a mission to climb a steep mountain 3,000+m rise & 60+km range after this build. So, I need some advices to prepare my new power pack...

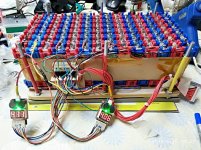
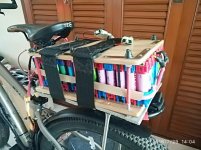
I have ordered parts needed to DIY 14s7p (98 cells) pack using new LG18650 MJ1 (@3.4Ah ea./10A max) on my BBSHD & 27.5" MTB. This will be my very 1st spot-welding pack (but not the last). Cell holders will be the narrow type as shown. Dont like the airflow of it though. But not much choice, it is hard to squeeze 98 cells into my rather small bike triangle. I want to have this pack power me (65kgs) with the bike (30kgs) up high steep mountain (60+km / 3,000+m. elevation rise). This pack alone might nor be ennough, I will have a second 14s5p of same LG MJ1 on it, parallel with the 1st 14s7p.

I need advices & comments to accomplish all these :

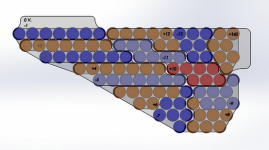
1) My layout of the triangle pack 14S7P. Some narrow nickel might need to manually solder with copper braid that connect between p group (like the +10s to -11s group in the picture). I plan to use 0.3mm pure nickel & kWeld or the 0.2mm nickel will be fine ?

0.3mm x 36mm 99.96% Pure Nickel Plate Strap Strip Sheets pure nickel for Battery electrode Spot Welding Machine 18650 nickel US $70.00
https://www.aliexpress.com/item/0-3mm-x-36mm-99-96-Pure-Nickel-Plate-Strap-Strip-Sheets-pure-nickel-for-Battery/32850367866.html?spm=a2g0s.13010208.99999999.287.2b0f3c00hxUBKk


Slide1.PNG


View attachment 3


The semi-transparent shade from of the pack are the intended nickel tabs. I color-label each cell into colors, red/orange = + and blue/light blue= -. Cells also divided into groups of 7-parallel. 1s, 2s, ..., 14s and vice versa. Should be clear enough.


View attachment 2


Re cut-out slit on nickel. Made a punch from steel pipe. Not perfect but should do the job in one punch for each slit. Hv not tried out yet & need to harden the steel pipe & sharpen. Easy & primitive, quick & cheap. LOL. Donot even have to go to laser shop.


View attachment 1


2) Do I need individual fuse for each cell ? Plan to use none.

3) Need a good BMS with bluetooth, preferable. My old BMS with my old salvaged laptop cells (also 14s7p with slip-on Vruzend caps) did not do a good job to my expectation. Slow balancing (daysss, if even balancing at all) and just cut power off during ride without even a small warning at all. Left me frustrated in the middle of the road several times already.

I ordered 1 of this, 60A & bluetooth + pc port, but have not tried it out yet. Anyone have good experience with it ? Any precautions ?

14S Smart Li-ion Battery PCB board Bluetooth Mobile BMS for 48V 58.8VLi-Ion E-bike Battery system with 20A to 60A Current US $47.24 / piece
https://www.aliexpress.com/item/14S-Smart-Li-ion-Battery-PCB-board-Bluetooth-Mobile-BMS-for-48V-58-8VLi-Ion/32794186005.html?spm=a2g0s.9042311.0.0.27424c4dACoIBE


Thanks a bunch. Any help will be greatly appreciated.
 
Hey nice post - I'm afraid I'm not able to help - just attaching to say that I'm interested in this as well. Just ordered the Vruzend 2.0 kit and a bunch of Samsung 18650s to try and turn a Vespa small frame fuel tank into a 72v 20s4p pack. I'd love to know about your experience with your new 60A bluetooth BMS.
 
aaron_mason said:
Hey nice post - I'm afraid I'm not able to help - just attaching to say that I'm interested in this as well. Just ordered the Vruzend 2.0 kit and a bunch of Samsung 18650s to try and turn a Vespa small frame fuel tank into a 72v 20s4p pack. I'd love to know about your experience with your new 60A bluetooth BMS.

Thanks for yr post.

What exact motor, bike, cells are u using ? What is your riding plan ?

I hv used the Vruzend caps myself just for beginning of my learning. It's a good start to learn how ebike system goes. And I didn't have a spot welder, did not know much about the subject, so the friction caps (some called LEGO caps) fill the gaps.
But it is heavy & bulky. Plus you hv to make sure the "sandwich plates" are tight & rigid or the pack will become loosen & batt connections will b bad & give you headache in no time. Also make sure you have good amount of conductor connecting the serial groups together. Since those will be the one carrying high current. While the conductors linking within the same p group will only do the balancing voltage most of the time. I used folded aluminium foil tape connecting in between the same group. Better than nickel anyway. Make sure they are wide and thick.

Better do it right the 1st time. As the gurus in this ES forum said "Your pack is as good as the weakest cell" and I found that to be absolutely true.


View attachment 2


IMG_20180626_094739_resize.jpg


41305.jpg


My pack was clamped tightly with 6x6mm bolts, zip ties & sandwiched betwn kitchen cutting boards holding the pack together and in place cos you will never know when the slip-on caps will be loosen, given the shake & shock environment of riding. Though I manage to put 1200+km with this system already. Not one electrical issues from the pack at all. But the pack shows V sagging 0.4-0.5V oftenly. It s hard to check whether the cells or the caps that give me that since if there is one (or more) non-performing cell (or connection) that will put the rest in a heavier load. My old 14s7p pack from salvaged laptop cells, though I manually picked them to have balance capacities in the same p group, they still sag quite a bit. I manually balance that lower volt 7-p groups by directly charging with an adjustable power supply that can display v & amp to about 4.1v & limit to 2-3A CC (3A/7p = 4xxmA each cell >> slow enough) during the charging. That improves motor responses a bit. If you have a balance charger that should be better, but I don't hv one.

I learned a bunch from reading and doing quite a bit and just extend those experiences shared by other users to a next level. When there are things I found beneficial to the community, contribution will be great and that will help evolve the knowledge even further. Following guys will learned from our shared knowledge and avoid traps and tricks we frustrated about.

Next project will be 3D printing (Creality CR-X) and MPCNC. Tons of fun toys to play with. Ain't that life should be all about ?

Have a great day.
 
Hey thanks for the detailed reply! I'm using a Kelly 72v motor (http://kellycontroller.com/hub-motor-72v-6kwdisc-brake10-inch-p-41.html), and a bunch of Samsung 25R cells. Riding plan is limited - this is a conversion for my wife who wanted to jet around on a Vespa from time to time. I'd love to get 30 miles out of a charge, but even 10 would be fine to start. But I'm in SF, and there are some substantial hills. I went with a higher power setup so that she could cruise just fine, and the system wouldn't balk when asked to go 20mph up a pretty steep hill.

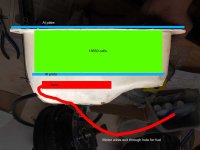
Oh interesting re the plates - I hadn't seen those. My battery is going to be mounted in the center of a Vespa, so fairly low vibration as it's heavy and everything is suspended. I'm also mounting the whole thing inside a Vespa fuel tank, which should make sandwiching fairly easy as the top of the tank is getting cut out and replaced with a piece of aluminum. Something like this:

IMG_0843.jpg

One thing that might be useful is a video on the Vruzend kit, and the difference in the ways you can assemble it. https://www.dailymotion.com/video/x6fr778 It seems like he was having some of the same issues as you did, until he assembled each cell and then snapped them together, which was way more solid.

The question I'm grappling with now is voltage and BMS. I'm thinking I might kick the system down to 60V where there seem to be a ton more BMS systems, like https://www.speedict.com/.
 
Wow ! What a huge motor you have there - 72V 6kW and it weights 38 lbs !

What size of battery pack do you have in mind, P & S ? Per spec, sounds like you should be OK climbing steep hills of SF since some of them are steep but not that long. This motor should be more than adequate considers its power and torque. But the battery pack will be big too. I think 20S6P should be a minimum, better 7P or 8P if you plan to ride longer range. Wait for the guru to answer you in this aspect. I'm just a newbie here trying to help.

I use a BBSHD Bafang 1000w 48V mid-drive and I climb steep & long bridge (almost 1 mile long just for the ascending section) without any problem at all. I checked consumption during climbing and it consumed not more than 600w @ 40kmh (25mph) throttle only - I was sure it can go uphill considerably faster than that, may be 50+kmh. On flat, it consumes only 35-40% of that on the same PAS. But it is a bike, with me altogether is 95kgs (210lbs). Yours might be much heavier considering it is a Vespa frame and 38-lbs motor alone.

Mid-drive should be better at climbing compared to rear-hub at the same power rating. Plus gear shifting helps a lot when climbing where your motor is a direct drive ? I did not see if they state that it is internal geared.

Re the plates : I follow the instructions from one of that Micah Toll's Youtube for clamping. During pack assembly, I check each cell voltage and found a couple of cells with O voltage from poor connections (before clamping). So I had to clamp the pack before putting the stainless steel bridges linking the 14x7P groups together. Those are the serial links. Just don't want any shorts circuit to happen during assembly since the pack contains pretty high energy. I unintentionally left it clamped for several days since I was outside and busy during then. It turned out OK and the pack was solid and tight. I was able to squeeze down the pack another 1-2 mm even after I hammered (rubberized) the pack fairly hard, evenly and thoroughly. This is what I meant by tightly clamped. After that, zip ties, sandwich plates with 6 bolts did not get the pack any tighter, just to hold it in place.

From what I recalled, that Garcia guy does not prefer this Vruzend caps that much. You know why.

That Speedict BMSs looks cool. Folks in ES here discussed about it before, positively. You can search. But to me their prices ans shipping is kind of prohibitive. I am a cheapo type - if it is really not that much better, performance-wise gear like BMS, it is hard to have me breaking my piggy bank. LOL.

Good luck with your build. Wait for the gurus to see this thread and some better advice will show up. I'm waiting for the answers to my questions too.
 
I just finished wrapping up my 10S12P and charged up to 40V on them dinky 50W rc chargers with a split pack connection, so two 6S useless rc chargers that has taken 4 hours what used to take 45 minutes. But your pack looks interesting, and those solderless connections. My next pack is going to be done to the nines, balance leads and bms.

All I use is some wood, duct tape and a handful of 48" zip ties.

Some of us arent going for looks, but we go for transportation.

I feel a little like a hermit now, not leaving the house all day or yesterday because no juice top up means no riding.

I suggest buying a decent charger and aim for 0.75-1C charge rate. Since yours is 14S, I'd suggest them Meanwells, they are robust, its just user error that breaks them. Sealed LED drivers are good too, I just like to charge up in under 1 hour so I can relax at a Starbucks and relax while my ride is juicing up.
 
markz said:
I just finished wrapping up my 10S12P and charged up to 40V on them dinky 50W rc chargers with a split pack connection, so two 6S useless rc chargers that has taken 4 hours what used to take 45 minutes. But your pack looks interesting, and those solderless connections. My next pack is going to be done to the nines, balance leads and bms.

All I use is some wood, duct tape and a handful of 48" zip ties.

Some of us arent going for looks, but we go for transportation.

I feel a little like a hermit now, not leaving the house all day or yesterday because no juice top up means no riding.

I suggest buying a decent charger and aim for 0.75-1C charge rate. Since yours is 14S, I'd suggest them Meanwells, they are robust, its just user error that breaks them. Sealed LED drivers are good too, I just like to charge up in under 1 hour so I can relax at a Starbucks and relax while my ride is juicing up.


I plan to split both packs too. It's kind of complicated but for the sake of taking good care of our investment, why not.

My bulk charger is Luna's, 58.8V, 5A with 80%/100% charge selectable. Charging from almost drained takes at least 3+hours. Never have problem with it so far. My new pack of LG MJ1 will take much longer. Current pack : 14S7P @2.2Ah ea. from old laptop cells compared to the new pack : 14S7P @3.4Ah ea. with new MJ1. It will be great if you can send supplier link to the Meanwell charger you mentioned. There are tons of Meanwell PSUs on the web. But when I searched for that exact model or similar, it is just not come by that easy.

My philosophy of designing/doing things, function must be good as well as aesthetic should not be a visual pollution too. If it is good looking, that will be superb. I can live happily with the joy/pride it returns every time I use it.
 
Forgot to mention that I prepare wires for balance charging for both packs. The intended balance charger is iSDT T8. I prefer to have everything completed before closing the pack and forget about it for a long time. Balance charging should be done once a month or so. Since the BMS I mentioned in the 1st post is bluetooth capable, so I should be able to monitor pack's health all the time.

Can I connect bluetooth for both packs (+ other gears) at the same time ?
1st pack : 14s7p
2nd pack : 14s5p

Plus MP3 music out to on-board speaker, Strava, map and etc. altogether on my phone. Someone might call in during the ride and I will answer via bluetooth headphone. Do not like to carry more than 1 phone during riding. :lol:
 
Your phone should have no problem maintaining multiple Bluetooth connections at once, and as long as you don't exceed the total bandwidth of your phones Bluetooth transceiver you shouldn't have any dropouts in your audio.

The BMSs won't use much bandwidth at all, they're not transferring much data, but having more than one connected will depend on the particular software. You might be able to download and test the app, or ask the manufacturer of the BMS if this is supported.
 
Thank you dustNbone for the advice. I never connect to this many bluetooth devices, so ask if anyone has experience with it.


999zip999 said:
Ichiban where you going to hang the disco ball ? Following.

Com'on follow me, 999zip999 :D

It is called "Doi Inthanon". It is always a challenge people want to conquer since it is the highest mountain in the country. Someone rode it and posted :

Doi inthanon backside with Eva February 28, 2017
distance : 225.7km elevation : 3,581m time : 11:17:52 hr use : 5,894 Calories
https://www.strava.com/activities/882485652

I found that interesting and wanna give it a try. Will not go all the way from the city of Chiangmai like the person did - too far and pain in the butt on saddle. But will try to start at the boundary of the park (60+ km) where it starts to ascend. Saw part of the steep ones are 22% grade! Hope to not see much of that steeps. Temp will be single digit deg C (30-40F), wet, cold and foggy.

I really need a proper way to do this right. Most of the parts are on the ways including 180 x LG MJ1s, kWeld, and etc.

That is the main reason for this build and that why I need to get the best gears I can. There won't be much to no help along the way of the steep and cold mountain. We all love some spice in life, ain't we ?
 
I found out that to cut a slit (on nickel strip) for the spot welder to weld better, the method spinningmagnet suggested to use Dremel tool is not bad at all. But considering my pack to be 14s7p = 98x2 slits to cut using Dremel is really something. Plus my under-downtube pack is 14s5p = 70x2 = another 140 slits to cut. Total of almost 340 slits.... I will apply for certified nickel slits cut license. :lol:

May be I need to make a jig for that. OR... have the 0.3mm nickel laser cut.
 
999zip999 said:
Ask spinningmagnets. As to where to find the nickle buss with the slots already cut. Who makes that welder ?

Thanks 999zip999, i will check with spinningmagnet.

The welding engine of that welder is Frank's (Tatus) :

kWeld - "Next level" DIY battery spot welder
by tatus1969 » Jun 22 2017 6:26am
https://endless-sphere.com/forums/viewtopic.php?f=14&t=89039&hilit=kweld

and

kWeld Spot Welder Questions 2018.09.27
by ichiban » Sep 27 2018 11:58pm
https://endless-sphere.com/forums/viewtopic.php?f=14&t=96566&p=1415674&hilit=keenlab#p1415674

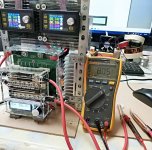
I bought from him a complete kit and add 2 x PSUs, programmable regulators (CC-CV, 50V15A, cheap $30-40 from AliExpress), frame & etc. to complete the unit. The 2 x is to double up current that each programmable regulator can deliver only 15A and make it 30A - quicker to charge the cap bank and we don't have to wait for long for the next weld. Actually, he recommends Lipo batt (easy to start with) but I don't have one and figure that I should be better using a stationary unit. kWeld is a robust unit with quality parts and design. I also ordered kCap 6 x 310-Farad that the main energy storage of this welder. I tried welding 0.3mm pure nickel @ 130-150J and it came out OK (he recommend 100Joules on document). The kweld can be adjusted to 500 Joules. I like the idea of measuring the amount of energy deposit to each weld, so we can make sure that each welded spot is within very close ideal condition - the most important thing is that perfect sticking of each weld we always wanted. Most of the welders out there base on timing length of pulse(s). That does not mean they are not good. I've heard people successfully made great packs with them all the time. It is just the matter of who is clicking with what.
 
That set-up is very well done!

You mentioned that you will be using the BBSHD. Will you be using the stock 30A setting? or the upgraded 50A controller?

For a long climb, the best advice I can give you is to use a smaller chainring. Since I am happy with 25-MPH (40 km/h), then I am using a small 30T sprocket, however, I would not use a smaller one if it was available.
 
Thanks, Spinningmagnets.

I have been using BBSHD for almost 1500km till now. It's a stock unit with 30-A controller. I have not done anything with it except greasing the internal parts with Mobilgrease 28 at the beginning. Interested in the 50-amp mod too but looks like it is a bit cumbersome (to me) to do so. Just wait and see the experts come up with something a bit easier. :wink: Plus, I have considerably invested in parts, time and effort into it, BBSHD, charger, greasing, disc-brakes upgrade, non-solder 1st batt pack, new batts for pack 2 & 3 (14s7p & 14s5p), several BMSs, a welder, etc.

Re the smaller chainring you mentioned, I am currently having the stock 46T chainring that came with the kit. It is big, heavy and ugly as it can be. :(

My sprocket is also stock Shimano HG30, 11-34T (34T/30T/26T/23T/20T/17/.../.../11T). When climbing, I plan to use the first 3 gears : 34T, 30T and 26T or as required by terrain condition. Eyes, ears wide-opened.

I have tried steep bridge nearby, it is steep and long (approx. 1.5km) and the bike ran OK with max 550w @35-40km/hr continuously on gear 5 = 20T. I can feel that it can go faster, may be 45km/hr without overloading. Will I be OK with this set ?

My question is, re this chainring, AFAIK the chainring that comes with BBSHD kit is different from normal chainrings, it has free-wheel clutch in it ? Will I be able to find the particular chainring in the size / teeth-count I need.

Another thing, "the chain". I snapped a chain during the first 300-km. Do not really know whether it was the chain itself cannot withstand the much higher BBSHD torque (as my bike mechanic tried to convince me that way), OR, my fault during learning curve (with e-bike) that shifted gears under power quite oftenly. However, the current set of chain, Shimano, has been in service for over 1200+km without any sign of premature... I think that, without shifting under power frequently and fairly gentle riding style, both will get along with a good quality chain long enough. May be comparable to chains on normal bikes. Need comments from anyone who has experiences with this.
 
Since you are using a 10A rated cell, the 30A of the stock BBSHD controller means you will be drawing 4.3A per cell, which is well within their capabilities, so the cells should not get hot.

This also means the 0.30mm thick nickel bus plates will be more capable than needed, which is good. The two ends of the battery pack need to have the current of the 7P funneled into a single cable at each end (positive and negative). You might consider bonding some copper across the two end bus-plates to avoid hot spots. If that appeals to you, perhaps bond the copper (plate or wire) before spot-welding the nickel plate over the seven cells at either end.
 
Also that nickel strips questions :

To do next :
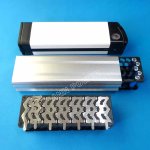
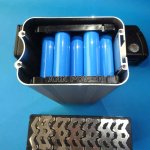
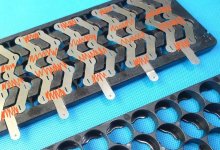
I will be welding 14s5p of LG MJ1 (3.4Ah each, 10A max) in a tube aluminium box, to be mounted under downtube first. The cell holders and nickel (only 0.15mm thick, zig-zag shapes) are from Aliexpress. They are too thin for the job - optimistically given that they are pure nickel.

So I will electrically boost conductivity of each one first (before spot-welding them to cells) by spot-welding another layer of 0.15mm nickel tape on the zig-zag nickels, especially on the parallel path between S groups. In most of the parallel/serial battery layout that we use for the packs, 14S5P in my case, for existing 30-Amp controller, max @ 30Amps. But for 50-Amp future controller mod, max @ 50Amps. High current will be flowing from group to group, i.e. ; 1S to 2S to 3S to...14S and out to controller. While the connecting bridges within the same S group will simply balance the cells' voltage - not much current should be flowing within the same group. Since the cell holders and nickels are odd shapes, aluminium box are super tight (no space for BMS in the same box). All these restricted constraints already give me homework to think about. Better simplify things out. I will be using most of the parts as is, and try to solve upcoming technical challenges one by one. Functions leads, then aesthetic follows. It will be working perfectly and good looking too. I personally do not like flawless working machine but be a visual pollution. It will have to live with me for a long while.

Will this be OK ?

Next pack will be triangle 14s7p complete units with case (FRP?) to mount on the bike.
 
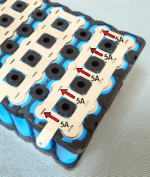
When deciding to overlay more nickel to help reduce resistance, keep in mind that the high flow of current is along the series lines. The parallel connections between the cells can be very small.

Here is a 5P pack below, and the motor / controller will be drawing 25A peak. The red arrows show where the current will flow. The parallel connections are the same width and thickness of nickel, but as far as the current goes, the parallel connections only keep the cells all balanced at the same volts as the pack slowly depletes over the course of the ride.

The parallel connections will only flow "less than" one amp under all conditions (even for 20A HG2 cells), during the ride and also when charging.

Battery186508.png
 
Nice work. Well we know your not out drinking as all the money is going to your new love.
You found the nickle strips with the slots. Luna cycle has the blink ring and maybe em3ev.
That welder is something else. With little or no delay time. After couple hunderd welds.
 
Thanks guys.

It is just I have fun with this.

Re the electrical reinforcing of nickel strips, it is just the way we call it. So, like I mentioned somewhere in ES, better put pictures to explain than text.

The orange doodled lines are what to add extra layers BEFORE actually weld the nickel strips on the cells. The idea is to make sure our connecting bridges can handle high current and more than just adequate is better.

Does it really show on performance of riding ? If the nickel are inadequate ? Or it is just some good practices to carry.


60195.jpg
 
Back
Top