Replacement cable for hub motors

geoff57

10 kW
Joined
Apr 25, 2007
Messages
752
Location
England
Hi all
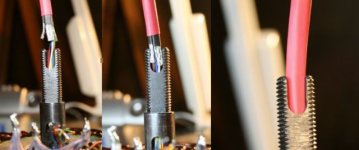
following a case of letting a cycle shop put a block on my new puma out of my sight when I arrived back at the house this was the state of my motor.
web wire damage.jpg
I replaced the cable with a new one I designed myself, several people have said to split the cable rebuild out of my main thread and into this one.

the first few posts are taken straight off my other threadhttp://endless-sphere.com/forums/viewtopic.php?f=6&p=68110#p68110
 
hi all
A note of caution when it comes to allowing cycle shops to come in close contact with your hub motor, it could be very dagerous see theb picture below, I had taken the motor to get a 7 speed block put on when I went in the cable was fine, now look at it :evil: :evil: I did not see the damage until I was back at the house so cannot prove it was them, but the motor was out of my sight while the block was fitted and to put a block on the axel with all the wires coming out is down and was either put on a bench or put in a vice and the wires have been crushed,no proof no come back and as the only cycle shop in town I can't go anywhere else I will just be much more carefull in future.

It looks like its time for open axel surgery later on I'm glad I took the time to work out how to get wires down the axel for the temp. sensor this knowlage will allow me to replace the wires in the axel.
file.php
 
I recived sympathy on my misfortune

thanks for the sympathy, just finished fixing the cable and thought I would upgrade at the same time.
First 8 thin wires to allow for any other things I might think of at a later date I now have 2 spare shrink wraped then the shrink wrap glued down to the motor.the temp. sensor is glued in place using 1 wire and the negitive hall as a return.The big inprovement was in the phase wires,try this on for size I used a length of brade that is used to make battery packs rated 50amps+ sheathed it in shrink wrap to make a cable that was flat not round so fit better in the axel with all the other wires 6.4mm shrink on the outside blast it with some heat and the cable was ready to go in the axel.
Its worked but I used all the brade up so I can't show you till I get some more.
 
Hi all
After the cable was damaged by the cycle shop and I came up with an alternative, I thought I would show you in detail how I made the cable.
file.php

from the top down 8 core security cable,each wire is proably 76/0.1NOT the thicker 7/0.2 wire sold as single wires for hookup that I use mostly(if you are worried about heat melting the sleaving and causing a short in the hall setup then you could use teflon coated wire, 3.2mm heat shrink, battery connecting brade and 6.4 mm heat shrink.
First remove the outer cover of the 8 cable core and place in the outter sleaving about 40 mm.now put to one side.
file.php

sleave the brade with 3.2mm heat shrink tubing (the maximum length of sleeving I was ever able to push the brade into was about 300mm)as the amount gets longer you may have to push the brade together it will try to spread instead of going in the tubing.
file.php

shrink the tubing onto the brade this gives you a flat cable instead of the usual round, and remember heat shrink tubing can stand temeratures of 100 degrees any motor should of cut out long befor that.
file.php

The 3 phase wires are fed into the outer sleaving as shown in the picture below.
file.php

this is in a triange around the sensor wires, continue to line up the wires as they are in the sleave and push as much outer sleaving as is required max probably 250mm have spair wires coming out of either end to aid feeding cable through axel.
once everything is in the outer sleave shrink outer as much as will go, which will not be much.

below is a cross section of the final cable.
file.php

well thats how I made it with pictures hope this gives others ideas.
 
Hi all
I recived this via PM
When my cable frayed on my e-ride Xpe and arced blowing up the controller and hall sensors, there was enough cable left to simply cut the cable and run more cable in. In the end it might be easier to put extensions on the other ends of the cables than to build a new cable, but a new cable would certainly reduce losses, but is definately more work.
I don't know what motor this was on but I use puma motors and they suffer from having very short cables coming out of the axel the length is about 100mm not long enough to use as a axel cable replacement.

Besides my cable is more than a replacement it is an inprovment but one that takes time and so would not be something the manufactures could do it would take too long. But for us this cable fits the bill.

It has 8 thin wires not 5 as in the normal cable this allows for other information to be sent to or from the motor in my case a temperature sensor will be used for one of the wires and the other wire are fixed down to keep them out of the way until I find a use for them, of the wires that are there in the cable I use there is the 5 colours of the hall wires so colour matching for the hall wires will not be a problem, the big advantage this cable has had the phase wires replaced with brade that is used to join batteries rated at 50amp+ this brade should handle anything the motor controller combo could throw at it.
I will be concentrating on replaceing the wires in both mk1 and mk2 pumas with the new cable I made!
 
Hi all
I may have been able to find the bits in the uk but for all of the rest of the world I thought it was time I found out a little more on the unknown part of the cable I had designed, the phase wires flat braid used for making RCbattery packs by a local R/C shop. For those in the UK getting the braid will be no problem the reel at the shop has a lot on it and they charge £0.25 a metre one and a half is enough for a cable sorry wrong price correct price £0.25 a foot get £1 of braid the postage will be £1 this is from http://www.gliders.uk.com this is for UK only sorry. For the rest of the world I asked the shop where he got the braid from, he said farnell so I got out the book and looked it up the part number from farnell is 1302724 this is for a reel of 30.5m at a cost of just over 120 usd, be best to find a R/C shop that makes up its own batteries and ask about battery building braid also check out model shops that sell Scalextric slot car racing kits and spares some have the braid we want instead of the braid that comes with the cars.
As to the amperage rating I think the shop has caused me to overate the amp rating of the brade according to makers specs it is rated at 25 A.
View attachment size of wire braid v mk2 Puma.jpg
As you can see from the picture above the braid is larger than the mk2 new puma phase wires, the new puma phase wires are ok but mark at Team Hybrid recomends that the cable that comes with the Puma be as short as possable. The braid may be rated at 25A but if the way the R/C shop uses that braid is anything to go by my first statement of 50A will probably hold true.

above is a closeup of the end of the cable that comes with the mk2 puma on the left and my cable on the right.
The diameter of the cable is 6.4mm.
 
Hi all
this next post is aimed at Puma motor owners as they are the only motor I have to work with.
When the cable gets mangled as mine did on the mk2 Puma it was a LBL with the mk1 Puma it was a throttle that went wrong while I was off the bike my snob chopper conversion and sped off at full speed landing on the side the wires come out of the axel. That is the reason I have both versions to work on, though I think the Puma off the snob may have been an early model the axel was extra long.

To replace the cable in a Puma mk1 or mk2 the steps are just about the same at times pictures may be of a mk1 or a mk2 Puma this part of the motor are very similar.
file.php

In this picture of the mk2 Puma the screws in pink should be removed and stored the blue arrow points to the "key " in the axel and the red arrow points to the place that has had some potting compound put in it so the collar will not come off.View attachment puma motor collar.jpg
To jump foward for a moment above is the collar once removed.

So now to the problem collar problem.jpg the potting compound has been shaded pink and the arrow points to it on the picture, the compound only goes down 3 mm but that is hard to get at, I found the best way was to drill the potting compound with a fine drill I used a electric screwdriver so the speed was slow and the weight of the drill light.View attachment 1

drill lightly stopping frequently to suck up the loos compound with a vacume cleaner if you blow it it could go anywhere and could damage the motor,once you have drilled through the compound once keep on doing it until as muchof the compound as posable has been removed after each drilling put a flat bladed on oposite sides of the collar and try to lift the collar off the motor as below.
View attachment start remove of collar.jpg
once the collar is removed scrap any remaning compound off everything, then put the collar the "key" and all the screws in a bag and keep safe, you are now ready to put the new cable in the axel.
 
Hi all
I have just checked the axels of the mk1 and mk2 Pumas, there is a diffrence in size, the mk1 has 12mm axel just what the thread is I can't say, the mk2 has 15mm axel the same I don't know the thread. Both the mk1 and mk2 have 10mm flats and the axel hole has a diameter of 7.5mm, at the motor end the axel hole is angled out of the axel at approx. 45 degrees see picture below.
View attachment axel hole in motor.jpg
 
Hi all
Ok this is what it looks like
View attachment mk1 cable down the hole.jpg
it took about 15 minutes,3 tries and several sware words later this was how the motor looks now with the cable fed down the axel the wires as you can see have not yet been connected.
This was the mk1 Puma that I just put the new cable in don't expect me to pull it out out to do a step by step guide of how I did it. I still have the mk 2 to refit with a similar length cable this will be fully documented with pictures.
 
A warning before you remove a screw or bolt look to see if there is a washer on there make sure you get it off with the screw or bolt.
I missed on one split washer and it found its way into the gap between the stator and the magnets I knew it had gone and was not going to stop till I found it, after some carfull looking with a light I saw the washer in a place that was ungettable by any tool I hadView attachment stator magnet gap.jpgin that thin gap between the green of the stator and the magnets. I had to get a thin bit of piano wire and bend a hook in it I could then hook out the washer.
 
Hi all
I hav been in the eletronics workshop working on putting the cable down the hole in the mk2 Puma, took plenty of pictures and will post tommorow. The time was taken to to solder up all the connections then make sure the wires or anything else is touching the shell of the motor. Wait for tommorrow then.
 
Hi all
Ok time to start on a step by step guide to putting the new cable into the Puma motor in this case a mk2.

first a word on safety, a lot of people with hub motors that have flats on put them in a vice to hold the lower axel still, I worked on a difrend bench to the one with my vice on so I had to find an alternative, I have a small clamp on vice for the bench but this would not take the weight, so I took the drill vice off the bench press drill I have and cleaned it up the tried to use that, it works is stable and the angle does not matter.

drill vice.jpg
 
Hi all
first check the cable will fit by putting the wrong end of the cable into the axel hole, this is to make sure the cable will fit once done remove the cable and prepare to put in the correct way round.
 

Attachments

  • pre check.jpg
    pre check.jpg
    25.2 KB · Views: 8,229
Hi all
ok its time to put the cable down the hole.
first check the cable is cut to the corect length, when making up the cable use 0.5m of 8 core security cable strip off the outer cover and throw away, cut 3 lengths of 3.2mm 25cm long and 1 6.4mm 23cm long heat shrink , cut three lengths of braid 37cm, 32cm and 28cm.When the cable is made up butt the end of the tubing up to one end of the braid this end will be the end the connectors go on at the other end of the cable the sensor wires should come out the farthest then the uncovered phase braid wire one by one.

take cable and feed sendor wires down hole and pull them as they come out the other end
View attachment cable in 2.jpg

next feed the longest phase wire in down the back
View attachment cable in 4.jpg
picture here taken from the side

View attachment cable in 5.jpg


push the cable in when the braid shows hook it out with small pliers
View attachment cable in 6.jpg
insert second phase wire slowly push cable in putting third phase wire in when ready as they become accssesable at the base start to bend the phase wires out when the outer cover gets to the top of the axel check it goes in ok as you push the cable in then keep on pushing fromthe top and pulling from the bottom until the outer cover appears at the base of the axel.
 
Hi all
that has covered how to make a new and IMHO better cable for hub motors, don't do this unless you have to due to a damaged cable or want to due to wanting more sensor wires in the motor as I did when I put a temp sensor in the motor all my motors have temp sensors put in.
View attachment protection from damage.jpg
in the picture above I have covered the end of the axel with heat shrink tubing to protect the wire from the damage it recived before.

This cable should work with x'tlyte motors, if anyone has tried and found it works please PM me, also if you want any other help or have any opinons please PM me.


Thats the end of this help thread for now.
 
Back
Top