The SB Cruiser : Amberwolf's 2WD Heavy Cargo Trike & Dog Carrier

RTIII said:
don't forget that it could possibly have a valve leak. They sell, and I keep on one wheel MOST of the time, a valve tool for tightening or removing shrader valves that serves also as a cap, so you have it handy at all times... When a leak is first suspected, my first step is to gently tighten the valve on that tire - often the leak goes away!

You may very well have a puncture, and you may very well have a valve leak; one does not preclude the other! :D

I keep a little screwdriver with me that actually has a valve removal tool as part of it, and I also have an old steel valve cap that does as well. ;)

But I NEVER keep them on the wheels, because there are assholes out there that will use them to take your valve cores out just to mess with you (and the rest of the bikes on or near the rack / parking area). Bad enough when they deflate the tires, but even though I keep extra valve cores with me it still sucks when that happens, rare as it is.


I already eliminated the valve (core) leak by temporarily swapping out the core, some time ago around when the problem began. :)

I also use valve extender elbows at 90 degrees due to the small space in the hub...and if it were a valve problem caused by the original impact (whatever caused it started at that moment) it would have been in the in-tube valve, not the extender. Since the extender keeps the original valve open always, it would not matter if the original core was damaged or not, anyway.

I also eliminated the extender in two ways---first I just left it off for some days (weeks, actually) with no change in the problem, and second I swapped the extenders on teh left and right wheels, and the problem did not move with the extender.


So I'm nearly absolutely certain it isn't anything to do with the valve, with the exception that it could be a defect or damage in the rubber lamination around the valve stem itself. Not very likely; usually when this occurs it rapidly degenerates and causes complete stem seal-to-tube failure, and is unrepairable. Seen it happen a lot of times over the years. :(


At present, the Slime has sealed the leak at least for now. There is no detectable pressure change from getting home last night to today as of a few minutes ago. Might change during a ride, of course, since the Slime seals are not perfect and can come loose during flex of the rubber, with a tiny bit of air loss as it reseals each time this happens.

We'll see how it works out, though, until I go get new tubes. Apparently there isn't anywhere on the internet that doesnt' cost more for shipping than the tubes would cost (for tubes I would be reasonably certain of the quality of, and/or trust the vendor), so I'll be taking a trip up to the shop up north where I got these from originally to get more, once I confirm they have a pair in stock.


Used to be that I'd just keep running with the Slime until a leak got bad enough to show itself to put a rubber patch on, and deal with it when that happened. These days I'd much rather not get stuck on the side of the road with a problem, especially as heavy as the trike is and as much as my knees hurt (and everything else); if something *couldn't* be fixed roadside it's kinda hard on it and me to get it home. Not impossible, but not fun at all.

So I'm a bit more proactive in prevention and repair than I used to be ;) as long as I can afford to do it (can't always).
 
I think I found the cause of the "efficiency change": there's an intermittent glitch in the speedometer, where it reads hundreds of MPH for just an instant. I suspect it happens more often than I actually see, because I've only seen it twice, which isn't enough to account for the drop in wh/mile I'm seeing.

But if it happens often enough, the false increase in distance travelled vs the true Wh consumed would appear to be an efficiency increase.

Since I haven't actually paid attention to or logged the distance data (because that's always the same, within a few dozen feet or so, for my commutes), I couldn't say if there is any significant difference to the odometer measurements, or else I could confirm the speedo glitch is indeed causing it.

So I went thru the wiring for hte speedo, and fixed a splice that might've had a poor connection, and repositioned the sensor relative to the magnet just a tad, so we'll see how it does over the next few days.

If Wh/mile goes back up, and I don't see the glitch, I'll be pretty certain that the speedo issue caused the apparent efficiency increase.


In other news, the tire is still holding pressure, and I haven't gone to get new tubes (it's was 116F yesterday, and 118F today, and that's not on the streets with traffic where it would be even hotter (especially sitting at lights with cars around me); don't really wanna go a dozen+ miles in this heat unless I absolutely have to).


I havent' yet gotten the materials together to build the bracket to hold the seat back (or finalized the design), and my shoulders are a little tired of the banging they get on the front of the rack. So for now I've ziptied a piece of foam from the arm of the chair that my "seat" (the footrest) came from. It's not as good as a seat back, but it'll do for now.


Thanks to an anonymous donor, I was able to buy Korpin's old MXUS3k 45H 4T motor, that had it's wires ripped out but was otherwise undamaged. The theory is to replace the X5304 motor that's on the right rear, possibly moving that to the front wheel for 3WD and all-wheel electric braking. Dunno when that might happen, though.

Testing will happen after I replace the phases and halls. There's two sets of halls in it; might only end up wiring out one set depending on what wire I have available. Once it's rewired, I'll put the stator in the existing leftside MXUS rotor/wheel on the trike, since the "new" motor isn't built into a wheel yet. That will let me test the stator out and be sure it's working ok before I spend the time to build it into a wheel (or rather, to unlace the X5304 and relace that wheel onto the MXUS. Or a slim possibility I might unlace the HSR3548 off CrazyBike2 and relace *that* wheel onto the MXUS, and move the X5304 to CB2).


Since his bike was being worked on by HPC, he had them send the motor to me; they must've used overnight shipping cuz it was there danged fast.

As it was already apart since he was saving the wheel (with rotor in it) and one of the vented covers for his new motor, and the old stator has to have new hall/phase wires installed anyway, it was shipped with stator out, saving me some work (and possibly skin) disassembling it. :) The new rotor, new (unvented) freewheel-side cover, and old (vented) disc brake-side cover were shipped bolted together, keeping all that stuff together in a separate part of the box from the old stator.


Pics as soon as I get them on the computer and uploaded.
 
Amberwolf,

I see from this latest update that you're an experienced rim lacer... I have laced a few but have a new problem and I'd like to get your insight, please.

I've got a 27" rim bike that I want to keep that way while I upgrade to a cassette style rear gearing because I can't get a quality rear gear in a freewheel part any longer (not since the 1990s, reportedly). So, I've bought a Shimano 36h, 7 gear cassette style rear axle, new, and a new Sta Tru Wheel 27" (X 1.25) aluminum wheel, and today I relaced the rim using the new spokes that came with the wheel, removing the (new, but not desired) freewheel from the new wheel and installing the new Shimano freehub style axle. But, it didn't go well.

At first, I did what I thought was the standard pattern, noting of course that the two sets of holes are offset one half spacing right-for-left, alternating up and down threading through the axle, top and bottom, and I even had my original, untouched (ancient) Shimano rear wheel to copy, lest I forget or lose track somehow. But when I had it done, the spokes weren't coming taught as expected, though I did NOT tighten them all, and certainly not as far as possible. I was just alarmed that I had threads coming all the way through many spoke "nuts", and that some "nuts" were becoming tight, and somehow it just seemed wrong. So, prudently, I stopped.

After thorough investigation uncovered no faults I guessed that perhaps I had started the one side one pair of holes off (since it's an every-other kind of affair), such that while the pattern may be correct, maybe I was shifted rotationally "one spot" (two holes). But when I tried that - in the only rotational direction that seemed to make sense - before I could get far around the rim, it was clear this was wrong because the axle was distorting considerably and the spokes just weren't nearly long enough. So, again, I stopped out of prudence before any harm was done.

I then tried again and this time, I returned it to the originally attempted rotational position but I only threaded the nuts on such that the nut covered all the threads. I did ALL the spokes this way, and then "admired" my work, only to be horrified that while some spoke nuts appeared to be reasonably well positioned length wise, a great many stuck out a considerable amount - like 1/4" or so - and there was no apparent pattern to this ... um ... anomaly.

The only thing that comes to mind at the moment is that the spokes from the Sta-Tru Wheel are manufactured with great inconsistency. But the wheel I took apart didn't seem so crazy! How could it even be that when all the nuts are threaded to the same spot - just where the threads "disappear" into the nut - their lengths are so wildly different?

Your insights greatly appreciated - you can PM me if you want, or point me to some internet resource, as you see fit.

... AFTER writing that, it occurred to me that I mixed up all the spokes; could ONE SIDE be longer than the other? Hmmm... If so, WHICH side?!

TIA,
RTIII
 
It's a little late for this now, but normally when moving a hub from one rim into another, it's best to tape the new rim to the side of the old, valve holes lined up, making sure you have it so the nipple holes are in teh same pattern (offset in the same direction) and begin transferring spoke nipples/spokes from the old to the new one at a time. This ensures you have the same pattern on the new wheel as the old.

However, unless the rims have the same ERD (you can google how to measure this if the rims don't have it marked on them), the spokes may not fit from one to the other even though they are the "same size".


Additionally, rear drive wheels (and disc brake front wheels) are dished, meaning the spokes on the drive side (or disc side) are shorter than the ones on the other side.

If you've mixed them up, just unlace everything, then lay them all out side by side. It'll be obvious which are which, so sort them till you have two sets.

After that, I recommend reading the Sheldon Brown website section on wheelbuilding, before you restart the wheel build. He's written it better than I could. ;)

You can also look around ES at all the various wheel building threads; they show various methods for building wheels, too. (but sheldon brown is my first stop for any bicycle-related repair/etc info).


I'd also recommend taking apart and rebuilding a junk wheel you don't need, before you tackle one you do need. That way you can learn how to fix mistakes without destroying something you'd have to replace. ;) I'd do a front wheel (non-disc) first, as those are symmetrical, and much easier to lace and true. Once you've got that down, then do a rear wheel or a disc wheel, and get that built and trued so it is centered on the axle.

Once you've got all *that* down, then build your actual wheel. :)


Might seem like a waste of time to do all that other when you could be practicing on the wheel you actually want to build, but it's possible to damage a rim or nipples (rarely spokes) by incorrectly building the wheel, if you get far enough in tensioning with stuff not put together right.
 
amberwolf said:
It's a little late for this now, but normally when moving a hub from one rim into another, it's best to tape the new rim to the side of the old, valve holes lined up, making sure you have it so the nipple holes are in teh same pattern (offset in the same direction) and begin transferring spoke nipples/spokes from the old to the new one at a time. This ensures you have the same pattern on the new wheel as the old.

However, unless the rims have the same ERD (you can google how to measure this if the rims don't have it marked on them), the spokes may not fit from one to the other even though they are the "same size".


Additionally, rear drive wheels (and disc brake front wheels) are dished, meaning the spokes on the drive side (or disc side) are shorter than the ones on the other side.

If you've mixed them up, just unlace everything, then lay them all out side by side. It'll be obvious which are which, so sort them till you have two sets.

After that, I recommend reading the Sheldon Brown website section on wheelbuilding, before you restart the wheel build. He's written it better than I could. ;)

You can also look around ES at all the various wheel building threads; they show various methods for building wheels, too. (but sheldon brown is my first stop for any bicycle-related repair/etc info).


I'd also recommend taking apart and rebuilding a junk wheel you don't need, before you tackle one you do need. That way you can learn how to fix mistakes without destroying something you'd have to replace. ;) I'd do a front wheel (non-disc) first, as those are symmetrical, and much easier to lace and true. Once you've got that down, then do a rear wheel or a disc wheel, and get that built and trued so it is centered on the axle.

Once you've got all *that* down, then build your actual wheel. :)


Might seem like a waste of time to do all that other when you could be practicing on the wheel you actually want to build, but it's possible to damage a rim or nipples (rarely spokes) by incorrectly building the wheel, if you get far enough in tensioning with stuff not put together right.

Hi Amber,

it's late, so I'm not bothering with my usual [...snip...] to keep only pertinent things, but I'm a trained airframe and powerplant mechanic (airworthy stuff) (though I haven't rebuilt an aircraft in, oh, 30-ish years) and experienced in many other engineering systems. I'm an extremely cautious "mechanic" (and usually competent engineer), and I'm not the guy who needs to do too many trial assemblies; just point me to the right data, and from what you've written I get it now that unlike my assumption, the spokes are most likely of two different lengths simply because many are clearly way too long and others (appropriately?) short. Question is, which side are the longer and which the shorter?! I guess I'll be looking to Sir Brown for that!

Thanks for the pointers!

And, glad you figured out I was correct in my first assessment; your performance anomaly was likely due to a measurement anomaly! :wink: :D

RTIII
 
RTIII said:
Question is, which side are the longer and which the shorter?! I guess I'll be looking to Sir Brown for that!
That's already answered in the post you quoted. ;) (the part about dishing)


And, glad you figured out I was correct in my first assessment; your performance anomaly was likely due to a measurement anomaly! :wink: :D
Most likely, though we'll have to see how it works out to be sure that's all it is. :)
 
amberwolf said:
RTIII said:
Question is, which side are the longer and which the shorter?! I guess I'll be looking to Sir Brown for that!
That's already answered in the post you quoted. ;) (the part about dishing)

Roger that: "the spokes on the drive side (or disc side) are shorter"

amberwolf said:
And, glad you figured out I was correct in my first assessment; your performance anomaly was likely due to a measurement anomaly! :wink: :D
Most likely, though we'll have to see how it works out to be sure that's all it is. :)

I guess it WOULD be nice to, for brief moments, do over 100MPH safely! :D
 
Thanks for your comments, Amberwolf,

I ended up determining that I had done nothing wrong. All the spokes were the same length and I had laced it correctly. Simply, the former axle and new axle require different length spokes. Given the buyer reports on the donor rim, I deduced that even with its original axle, the spokes were right on the edge of too long as many people reported an inability to true up the rim - and bottoming out the nipples on the spokes would perhaps do that. So, rather than go one mm shorter, I went two. ...Still waiting on shipment and will later determine if I was correct or not! I will surely be annoyed if I must get the intermediate length but there has to be some adjustment room, right?

Anyway, getting there! :) Thanks for your help. :wink:
 
I guess I didn't understand the wording you used describing your problem--it sounded like you were ending up with different amounts of spoke sticking out of the nipples on different ones. That happens when there are different spoke lengths involved, or when the lacing is either an odd one (not just 2-cross or 3-cross, etc), or is using the wrong nipple holes (vs the original lacing the spokes came from).

If the spokes are all just the wrong length for the rim, well, there's more than one problem to contend with, and it's something you have to check on each part. (hubs and rims)

I'd assumed (bad idea, I know ;) ) that you either were using hubs that had the same spoke flange diameter and distance from each other, or that you could see / knew that they were different and would see that this would affect the length of spoke needed, as it changes the distance from the rim's holes to the hub's holes.

This is what limited my choices of wheels to take apart and rebuild for that front wheel, several posts back. ;)

So for a wheel build, to get the right spoke length, you have to know
--the distance between hub's spoke flanges
--the diameter of the hub's spoke flange holes
--the rim's ERD

There's a number of wheelbuilding calculators/etc out there that can help with figuring out the lengths needed for any particular set of hub/rim, though if you put hte same numbers into different ones, you may get different spoke lengths. ;)

http://www.ebikes.ca/tools/spoke-calc.html is made for hubmotors, though you can use the "custom" function to input the numbers for a regular hub and it'd give you spokes for that, in combination with the ERD and other numbers for your rim.
 
Thanks again amberwolf,

...I figured out a lot of what you just replied to me through empirical experiment! Upon casual comparison, putting the one next to the other, they appear to be DAMNED similar if not exactly identical. However, upon confirming I had done everything correctly - tried "what if I'm one rotational step off on one side" and other kinds of double-checking - I took the time to measure the two axles.

There's a very subtle difference in both the separation of the two flanges and the radius of the spoke holes from the axle center - expressed here as the diameter of the circles formed by the spoke holes (all lengths / distances in mm):

Freehub: Nexave FH-T300 Silent Clutch 130mm 36H 7-Speed, silver, with quick-release
Shaft length: 140.75
Frame width: 130
Holes: 36-count, D: 2.6+ Circle diameter: 44.5
Spoke Flange: Thickness: 3.4, distance C to C: 55.8

Freewheel: Sta-Tru Wheel, 27", with quick release
Shaft length: 140
Frame width: 126
Holes: 36-count, D: 2.6+ Circle diameter: 45
Spoke Flange: Thickness: 3.3 , distance C to C: 53.95

So, the critical ones here ARE different: the hole circle diameters, 44.5 vs 45, and flange width, 55.8 vs 53.95.

Apparently that small difference pushed it over the edge!

All the original Sta-Tru spokes were the same length, but it MIGHT be that the new axle wants different length spokes! Not sure how to determine that!

Onward through the fog! We're off like a heard of turtles!
 
RTIII said:
Upon casual comparison, putting the one next to the other, they appear to be DAMNED similar if not exactly identical.
Well, a 1mm difference would be visible but not stop you from building a wheel with them, and there's no reason to have an intentional difference of less than 1mm. ;)

So if they look that similar, then for whatever reason they did not build that wheel with dished-length spokes. The only reason I can think of is if it is also a disc-brake hub, becuase then they have to move the non-drive side flange inward similarly to the drive side.

Otherwise, it would be odd to not use different (dished) length spokes on a rear wheel. The reason for using them is so that both sides can be normally tensioned, but still have the hub pulled over to the left so the rim is still centered between the axle locknuts/dropouts.

If non-dished-length spokes are used, then in order to do that, one side of the wheel ends up with incorrect tension vs the other, and the wheel is not as strong as it should be, more vulnerable to damage/sideloads/etc.

Sounds like you should use the spokes from the old wheel instead of the new one, if those spokes are different lengths for one half of them vs the other.


So, the critical ones here ARE different: the hole circle diameters, 44.5 vs 45, and flange width, 55.8 vs 53.95.
That is a pretty small difference to see by eye; without them sitting side by side I wouldn't have noticed the width difference, and I probably would not have been noticed the HCD difference, since any visual comparison would have enough parallax to make it invisible. :/


All the original Sta-Tru spokes were the same length, but it MIGHT be that the new axle wants different length spokes! Not sure how to determine that!
That's where the spoke calculators come in, like the one linked in my previous post, and others around the web. With the measurements you have, plus similar ones on the rim and it's ERD, you can determine the spoke length needed for a rim plus a hub.


Onward through the fog! We're off like a heard of turtles!
Or a herd, even. ;) :p
 
Pics of the MXUS from Korpin; I haven't gotten to the rewiring yet:
 

Attachments

  • dsc06446.jpg
    dsc06446.jpg
    67.5 KB · Views: 3,997
  • dsc06447.jpg
    dsc06447.jpg
    39 KB · Views: 3,997
  • dsc06448.jpg
    dsc06448.jpg
    34 KB · Views: 3,997
  • dsc06450.jpg
    dsc06450.jpg
    55.9 KB · Views: 3,997
  • dsc06451.jpg
    dsc06451.jpg
    50.3 KB · Views: 3,997
  • dsc06452.jpg
    dsc06452.jpg
    37.9 KB · Views: 3,997
  • dsc06453.jpg
    dsc06453.jpg
    57.9 KB · Views: 3,997
  • dsc06455.jpg
    dsc06455.jpg
    44.6 KB · Views: 3,998
  • dsc06456.jpg
    dsc06456.jpg
    53.1 KB · Views: 3,998
  • dsc06457.jpg
    dsc06457.jpg
    43.2 KB · Views: 3,998
  • dsc06458.jpg
    dsc06458.jpg
    47.8 KB · Views: 3,997
  • dsc06459.jpg
    dsc06459.jpg
    47.4 KB · Views: 3,997
  • dsc06460.jpg
    dsc06460.jpg
    50.1 KB · Views: 3,997
You're certainly brave, attempting to rewire that!

Meanwhile, I still have to determine my rim's effective diameter - should have it done today - but in running the calculator you pointed me to, I was "following directions" and determined that the freewheel, with an offset of 11.975, has a MUCH greater need for being dished than the freehub, which is only at 6.2. This got me thinking that while I found 13 to be a tiny bit longer than the others, I must have gotten it wrong, so I went through them again and found my measurement strategy to have been flawed. This time I was a Lot more careful to base sorting and found 17 / 19, and then finally found the one stray in the wrong pile. My error was not paying enough attention to subtle changes to the 90 degree bend due to having been previously installed. ... So now I know they're in fact 296 and 297, respectively. And either way, my new axle has LESS of a need for dishing - by half - and if there's a 1mm difference between spokes on the freewheel... Hmmm... I'll complete the math today - and MAYBE attempt another re-lace, but I still feel comfortable that some of them are too long. ...I'd ordered shorter based on the shorter, not longer, unfortunately - If I had, I might have put the new shortest ones on the freehub side and run the former shorter on the opposite side and ended up with perfection!

The spoke holes are offset from rim centerline; I take it it's a bad idea to mount the spokes in the opposing offset!

...Looks like we both still have some lacing ahead of us! :wink:
 
RTIII said:
You're certainly brave, attempting to rewire that!
Not really, it's a common enough repair around here. ;)


Meanwhile, I still have to determine my rim's effective diameter - should have it done today - but in running the calculator you pointed me to, I was "following directions" and determined that the freewheel, with an offset of 11.975, has a MUCH greater need for being dished than the freehub, which is only at 6.2.

Just to check, then the freewheel is a much thicker stack than the freehub is, out to the locknut? (vs the other side) (this isn't a question the calculators ask, but it's something to consider because it has to do with the total width of your hub/axle, and centering the rim over that)

Just want to be sure you don't end up with a wheel with insufficient dish, and thus a rim that's not centered between the stays/dropouts--or having to lace it with too little tension on one side and too much on the other, to force the dishing you need.


BTW, there's a manual guesstimate you can do, where you install the axle/hub into the dropouts, with the rim loose around it, then clamp the rim between the brake pads, using something to tie/clamp the brake handle down. You can visually verify offsets at least, and if you're good enough at centering the rim this way you can make measurements with a thin rod or even string if you can keep it taut, from the spoke flange holes to the rim's nipple holes. Is tedious and isn't as easy as a calculator or as precise, but for those of us that are very visual / hands-on, it can give a double-check for what we're doing with a calculator. If you do it this way it's best to first do it with an already-well-built wheel, so you can just measure the existing spokes and then see what you get measuring the same things the same way with a hub/rim without spokes in it yet.


This got me thinking that while I found 13 to be a tiny bit longer than the others, I must have gotten it wrong, so I went through them again and found my measurement strategy to have been flawed. This time I was a Lot more careful to base sorting and found 17 / 19, and then finally found the one stray in the wrong pile. My error was not paying enough attention to subtle changes to the 90 degree bend due to having been previously installed. ... So now I know they're in fact 296 and 297, respectively.
Generally you can probably ignore the elbow, and just measure the straight part past that point, for sorting existing spokes off a wheel, if the elbow is causing you problems with perception or measurement for whatever reason.

I myself don't normally measure, just judge by eye, when disassembling a wheel and reusing it's parts for other wheels, and it mostly works out ok. When it doesn't, then I may go measure and use a calculator, then find the closest spoke set I have from a disassembled wheel. :) But then, I also build and ride pretty janky bikes around. ;)


In my experience so far, differences between spoke pairs on a rear wheel that does not have disc brake mount hub are generally not subtle, unless it's gear cluster is very narrow or singlespeed. So it seems odd to me to have only a 1mm difference between pairs--If I were looking at those, I'd probably call them the same for my purposes.

If it's a disc mount hub then that's a different beast, and might not have any difference at all between the spokes, depending on design and gear cluster stack size.


All the elbows should be the same; if they're drastically different from each other you might want to examine them for damage (cracks, dents, deformities, etc) as that will result in breakage either when tensioning or later in use/riding.


Also remember that generally spokes are laced with alternating head-in/head-out at the flange, and if the flange is very tall past the holes, and the flanges are very widely spaced with a narrow rim, that can result in bending of the spoke above the elbow for the head-in spokes, making them look different than the head-out spokes even if they aren't. The wheel builder might even have chosen to use slightly longer spokes for the head-in spokes to compensate for that, but I haven't seen that in any of the wheels I"ve taken apart for parts for other things.


The spoke holes are offset from rim centerline; I take it it's a bad idea to mount the spokes in the opposing offset!
Generally only to be done if there is little or no triangulation due to a very wide rim with widely-spaced nipple holes, and narrow spoke flanges on the hub, resulting in nearly vertical spokes. The closer to an equilateral triangle, the stronger it is against sideloads/etc. The closer to a rectangle, the weaker the wheel.
 
amberwolf said:
RTIII said:
You're certainly brave, attempting to rewire that!
Not really, it's a common enough repair around here. ;)

I see, well, you're not planning to rewind the motor windings, are you? Just repairing the leads, I trust? From your word choice it almost sounds like rewinding the whole motor! :shock:

amberwolf said:
Just to check, then the freewheel is a much thicker stack than the freehub is, out to the locknut?'

My take of it was that one determines the "true center" of the axle as the axle mounting length / 2. Then, determine the center of the two spoke mounting flanges. Whatever the difference is the offset. The freewheel's "pair of centers" is just a pinch shy of 12mm from each other, while the freehub's is about half at a tiny bit over 6mm. Certainly, the spoke-mount center is to the left of axle centerline.

I think this is true for at least two reasons: 1) the freehub is more consciously built to push the spoke anchors outboard as far as they can, and 2) even at 7 gears, the freehub fits those gears in about the same space as the 5 gear freehub but it's ALSO a several mm wider axle.

amberwolf said:
BTW, there's a manual guesstimate you can do, where you install the axle/hub into the dropouts, with the rim loose around it, then clamp the rim between the brake pads, using something to tie/clamp the brake handle down. You can visually verify offsets at least, and if you're good enough at centering the rim this way you can make measurements with a thin rod or even string if you can keep it taut, from the spoke flange holes to the rim's nipple holes. Is tedious and isn't as easy as a calculator or as precise, but for those of us that are very visual / hands-on, it can give a double-check for what we're doing with a calculator. If you do it this way it's best to first do it with an already-well-built wheel, so you can just measure the existing spokes and then see what you get measuring the same things the same way with a hub/rim without spokes in it yet.

Great tip(s) and sounds EXACTLY like what I might do myself, and call it a mock-up, if only I had patience and more scarcity or resources. Hell, I might even do it anyway, except that I haven't yet spread the forks to fit the wider axle... I had expected to wait until the last minute to spread the mounting points, but am now forced. (Note, damage during my outing today, update with photos here: https://endless-sphere.com/forums/viewtopic.php?f=3&t=88943&p=1299145#p1299145 ) ... Me, I'm one of those weird people who's equally at home with the mathematics and visuals - I can do either and translate one to the other easily... One of my best friends pretty much requires a visual and it can be frustrating to talk on the phone with him sometimes as he says, "I've got to see it to understand you" a bit often! :(

amberwolf said:
I myself don't normally measure, just judge by eye, when disassembling a wheel and reusing it's parts for other wheels, and it mostly works out ok.

That's what I did, and it didn't work out. :(

amberwolf said:
In my experience so far, differences between spoke pairs on a rear wheel that does not have disc brake mount hub are generally not subtle

That's exactly what I had expected, which is why I hadn't noticed the spokes are actually different until later.

amberwolf said:
So it seems odd to me to have only a 1mm difference between pairs--If I were looking at those, I'd probably call them the same for my purposes.

Yes, I DID call them the same and it didn't work out - they ARE definitely 1mm, and ONLY 1mm, different and, in any event, too long! How much? Not sure! Maybe I run the shorter in the longer position on my new axle and the new 2mm shorter ones in the short position?! Hmmm... Will do the calculator but it's an idea.

Actually, ATM, I'm thinking I'll take apart my now deceased rim and measure its spokes - maybe I'll get lucky! Otherwise, I'm stuck without transportation for now. :(

The new wheel I took apart did not have properly torqued spokes in the first place, none were properly tight. Owner reports online say some have had serious difficulty getting the rims trued up, even by professionals, and my suspicion is they're running too-long spokes and they're bottoming out before the rim can be made taught. ... How much thread is needed in the nipple? Any guideline there? (Sorry, still haven't looked up Mr. Brown's work.)

amberwolf said:
Also remember that generally spokes are laced with alternating head-in/head-out at the flange, and if the flange is very tall past the holes, and the flanges are very widely spaced with a narrow rim, that can result in bending of the spoke above the elbow for the head-in spokes, making them look different than the head-out spokes even if they aren't.

I think that's exactly what happened.

amberwolf said:
The spoke holes are offset from rim centerline; I take it it's a bad idea to mount the spokes in the opposing offset!
Generally only to be done if there is little or no triangulation due to a very wide rim with widely-spaced nipple holes, and narrow spoke flanges on the hub, resulting in nearly vertical spokes. The closer to an equilateral triangle, the stronger it is against sideloads/etc. The closer to a rectangle, the weaker the wheel.

Makes damned good sense to me, however, I was tempted to try it as a way of basically making the spokes I have on hand shorter... I'm not likely to try it, but would that get someone in trouble in, for example, my circumstance? (1.25" rim, maybe 2mm offset)

...OK, now, to take that bent rim off and do something about it!...
 
Hi amberwolf,

I finally had the time to measure the ERD on my new rear rim. I got a VERY consistent 612mm as an inside diameter and 4.5mm from there to the outside end of the nipple, making an ERD of 621, based on the measurement advice here (the link you gave me upthread):

http://www.ypedal.com/wheelbuilding/wheelbuilding.htm

I used all the best data I could figure out and got a length a good bit longer than I'm now using, which I know is just barely too long! The calculator DOES say there should be two lengths, 1mm apart, though! My "old" spokes are 296 and 297, and that calculator suggests 299 and 300. (rounded up two tenths of a mm). So, I tried the spoke calculator that the first one points to and had some problems getting it working (its an excel spreadsheet, as you probably already know!) but eventually got the data in there and it's suggesting cross 2 as having one exactly the length of spoke I already ordered! :D ... AND, one a mm shorter :( But frankly, I think that 1mm even shorter isn't going to work out, since I already built the wheel a few times! I just guessed that 2mm shorter than I already had was about right...

Either way, I'm getting closer! :D
 
I saw your other updates in your build thread; sounds like it worked out with the new wheel build. :)


On SB Cruiser, the Wh/mile has been consistent at 49 since fixing the speedo issue; hasn't had a recurrence. So the speedo thing seems to have been the cause of the extra-low Wh/mile, but doesn't seem to be the cause of the lower than previously-usual wh/mile.


No problems with the leaky tube since putting the Slime in, but still wanna get some new ones.
 
amberwolf said:
I saw your other updates in your build thread; sounds like it worked out with the new wheel build. :)

On SB Cruiser, the Wh/mile has been consistent at 49 since fixing the speedo issue; hasn't had a recurrence. So the speedo thing seems to have been the cause of the extra-low Wh/mile, but doesn't seem to be the cause of the lower than previously-usual wh/mile.

No problems with the leaky tube since putting the Slime in, but still wanna get some new ones.

Yes, thanks, amberwolf, the build worked out just fine. I ended up using the shorter of the two spoke lengths that came with the donor wheel and the 2mm shorter spokes I'd ordered and I didn't have any troubles truing up the wheel. I don't have a spoke tensionometer - or whatever you call it - and spoke tension is the only potential issue I can think of, aside from rotational balance, but I don't know what I can do to improve that. I trued both, and, where the aluminum rim attaches to itself, there were four small steps (one per side), and so I took a hand file and "dressed" the surfaces to remove them. I also took off the reflectors because they caused the wheels to become seriously out of balance at speed.

Interestingly, Calvin, the technician at the Cycle Shop I visited yesterday admired my wheel building, asking, "You built that wheel?" "Yes, I got a Sta-Tru wheel and relaced it with a new Shimano 7 gear freehub." "Ah, looks nice [...picks up bike by the rear rack, spins the tire...] ah, runs true, nice job." 8) "Well, it may STAY true, but it didn't arrive true!" "Yes, they're a machine built wheel..."

I just did the math; depending on whether I did or didn't lose a couple of miles from the odometer when the battery popped off, I'm getting either:

If it was 19 miles: 0.196 Ah, 10.52 Wh / mile
If it was 22 miles: 0.177 Ah, 9.09 Wh / mile

...Not sure I have confidence in the numbers yet. I should start a log book! :)

Anyway, just want to say thanks again for your insights. I'm loving my e-bike!
 
Trip to the grocery store today for some of the good one-day deals and regular sale stuff for the holiday; was a bit windy, so ended up with 57Wh/mile for the whole trip.

Was only 55Wh/mile for the trip there, so that means the weight (and probably change in aero) of the stuff completely filling the cargo area from rack down to bed decreased the efficiency by a few Wh/mile, as the route home was the same as the route there, with same number of stops and starts.

It's also possible the wind (which wasn't constant and changed directions several times) affected it, too.


No trouble with the tire/tube even with the extra several dozen pounds load on it. It's not leaking anymore so it is almost certainly not the valve causing it, but must be in the outer circumference of the tube itself, or else the Slime wouldn't have fixed it. (I made sure to clear the valve stem before reinstalling the valve core, cuz I've had valves jammed by Slime if I don't do that, when I first install it in a tube).


The turn signal switch is getting worse, so I definitely need to replace it; still looking for the right switch to use for it. I am thinking that given the present design, which essentially works like a toggle switch pointed downward, I might as well emulate it and actually use a toggle switch mounted like that, once I find one of my on-off-on switches with a long-enough toggle.


I also still need to find a permanent fix for the tab on the righthand thumb throttle; none of my adhesive-based fixes have worked, so I'm still pondering more mechanically-sound fixes.


The rainy season is about to start up, with 10-20% chance for at least the next week or so, so I also ought to get the rest of the weatherproofing done on the electrical stuff, that I started on a fwe months back during the last rains.


At the store today, when I arrived and was parking at the bike rack area, locking it up, there were a few interested people I talked to about it for a few minutes, and there were more after shopping, while I packed groceries into coolers and strapped it all down, including a family waiting for their ride with the mom saying they ought to "get" one of these. If they'd had something like the trike with a slightly larger cargo area, all the kids could've ridden in the back while the mom drove it around in the front seat; their few groceries would've all fit inside just half of the bench seat box area.

It isn't too hard to build one, but that this particular kind doesn't exist except for this one, and while it's relatively cheap to build one for yourself, it's too expensive for me to build them for others.

WHenever I talk to interested people about it, though, pretty much everyone is not interested in building one, and if it costs more than a couple hundred dollars, they aren't interested in buying one, either. To them, I guess they see it as a toy rather than serious transportation, cuz it isnt' as big as a car so it can't be worth as much as one either.

I haven't ever sat down and made a parts list and looked up what all the junk I've used would actually cost to make another of these out of all-new store-bought parts, even just pedal-only, but I expect it would be at least several hundred dollars, and probably over a thousand.

It would probably be three or four times that to make it electric the same way this one is now, though just any basic geared ebike kit could be used to motorize just the front wheel easily enough; it just wouldn't perform anywhere near the same as this does with any load in it. A DD kit probably wouldn't do as well just because you'd end up at speeds of 5-10mph with any serous load in it plus the rider and trike weight, and most of those DD kits are not wound for that speed in 26" wheels.

If I thought there would actually be interest in people building their own, I'd draw up plans for it and put them up on here--but I think that anyone motivated enough to actually build one could figure it all out just from the pics I have here plus their own specific needs. It's not exactly a complex design. ;)


Also, a note from a few days ago (Saturday, I think?): I was on my way home from work, just making the right turn off Metro Parkway south onto 29th Ave, when a police SUV lit up it's lights behind me. There's nowhere to pull over or get out of the way there (it's a bridge over the canal), and there was opposing traffic so they couldn't go around me if they were actually going after someone else, so I just had to keep going till I was across the bridge, then move into the left turn lane I go into anyway to make my turn into the parking lot of that shopping center for part of my path home.

Since they didn't go around me but followed me, I pulled into a parking space and waited; then two female officers came up, one on either side, apparently just curious about the trike itself (kinda like the single male officer that did something similar in that same parking lot but further south and east in it) some months ago.

So I talked about it with them for a couple of minutes, satisfying their curiosity, and they went on their way, and I went home.

They did like the lighting, turn signals, brake lights, etc., which make it highly visible (that's the point ;) ); if it were practical I'd like to see that on every bicycle; it'd probably prevent a significant number of unintentional collisions in poor lighting conditions. (though it'd probably make it easier for the intentional ones to find their targets).
 
amberwolf said:
WHenever I talk to interested people about it, though, pretty much everyone is not interested in building one, and if it costs more than a couple hundred dollars, they aren't interested in buying one, either. To them, I guess they see it as a toy rather than serious transportation, cuz it isnt' as big as a car so it can't be worth as much as one either.

...The real killers in your vehicle being produced in any numbers is that first it requires some metal working tools / ability, and second the time - and the time of the person / workshop that can do it to actually do so is worth a considerable sum, at least, here in the USA. So, you've got to have a more than whimsical need, I think.

amberwolf said:
It would probably be three or four times that to make it electric the same way this one is now, though just any basic geared ebike kit could be used to motorize just the front wheel easily enough; it just wouldn't perform anywhere near the same as this does with any load in it. A DD kit probably wouldn't do as well just because you'd end up at speeds of 5-10mph with any serous load in it plus the rider and trike weight, and most of those DD kits are not wound for that speed in 26" wheels.

On a different thread here on ES, I recall reading someone asking about help electrifying his trike and someone responding with different photos of motors and rear axle assemblies for electrifying peda-taxi's used in China and southeast Asia - one of them looked like it had VERY good engineering and manufacturing effort put into it. I'd think finding a source for one of those, used even, would be a great start.

amberwolf said:
If I thought there would actually be interest in people building their own, I'd draw up plans for it and put them up on here--but I think that anyone motivated enough to actually build one could figure it all out just from the pics I have here plus their own specific needs. It's not exactly a complex design.

No doubt you've helped many people with your images and textual descriptions to gain more imagination in their own efforts, to gain some insights into bike building (the real kind, from "scratch!"), imagine their own projects better and think up how they can make their own bikes better, understand better some of the challenges and that it amounts to new-product-development, and will have its ups and downs, all in addition, of course, to helping people figure out how to make one like yours! :D ... You've done a nice job in this thread, and I'm an avid reader! Keep up the good work! 8)
 
I've looked around at various transaxles, powered and not; for my own purposes the cost is too high for new ones (partly because of shipping costs), and I havent' found used ones locally (shipping would be prohibitive given the weight and size, as it would probably push total cost back up to that of a new one, as an individual doesn't get the same shipping discounts a company does). Plus, if the item didnt' work out (could't fit, or couldnt' do what I wanted, etc), if it's not local I likely couldn't return it (again, shipping costs)--if it's local I could probably just go look at one and see if it would work, holding it in my hands I can figure that kind of stuff out--it's a lot harder with only pictures and dry specs to work with.


That said, I am using a similar thing from just a pedal trike now; you can see what it looked like originally in the beginning of my Delta Tripper thread, before I started hacking it up to become what it is now. So to build more or less just another of what I have now, one could buy the same or similar unit (a "trike kit" that bolts onto regular bike frames' dropouts), and a couple of front hubmotors, though for a pedal chain you'd ahve to modify the cover of one of those motors to add a freewheel mount (easy to do; I started a thread on how to somewhere around here).


There's a number of ways to do the transaxle thing, with or without power; AFAICT a Peerless differential would be the best way, drving that with a chain from the pedals and optionally with a motor as well. Those of a class to deal with my weight/power needs seem to run around at least $150 or so (not including shipping) and don't include hubs/sprockets/etc., or any of the other stuff like chains/etc to get the power to it, and would still need engineering of all that.

If I was selling trikes for a living and people would actually pay for them what they would cost (a few thousand dollars), it'd be worth doing all that.

But for my own uses...unless I run across something like that I can just salvage as junk from something, it's more than I can spend on it, since I have a working solution, and I still have other stuff I have to finish on it that I'm still saving money for, like the parts for the Lebowski controllers.


It's sort of a chicken/egg thing, in that maybe if I sold one I'd built, I'd have the money to build one to sell. But I couldn't sell one built out of the junk I build mine from--it's reliable enough for me, but I wouldn't guarantee it'd be enough for someone else that hadn't built it and didn't know how to fix it. Most likley nothing would go wrong...but enough little things have for me that were easy for me to fix but impossible for someone that doesnt' know how to "macguyver" stuff that I just couldn't be responsible for that sort of thing.

Selling one in the first place would be tough--it's just too expensive for those that actually would need one, those that would really use it. (again, the toy thing). Have to find the right people...hasnt' happened yet.

Something else that has prevented me from really pursuing commercialization: I'd also have to be able to trust that these people are going to use it within the laws, because I don't want to have them making it harder for *me* to ride around town (also within the laws) without being harassed. I don't have trouble now, and dont' want to get any. Right now I'm the only wierd trike on the roads (at least, anything like this). :)

I also don't want people that really don't know how to be a bike rider on the roads (cuz these things aren't suitable for sidewalks in most places) to end up squished and injured or dead. Even if they dont' get hurt they might end up triggering legislation preventing me (or anyone else) from riding something like this (something actually useful as a car replacement) on the roads. That would essentially end my ability to get around safely and usefully, and I'd be back to a bicycle with a permanent large trailer, which is a lot less safe on the roads in traffic, not to mention less useful to me than the trike is. (and presents other problems like parking, security, etc).
 
Last several days have had a number of people stop and chat about the trike; today's was a guy that came over while I was parking to go get stuff at a store on my way to work. He said it was impressive; he seemed to know just enough about bikes to understand much of what he was seeing, though not about the motor stuff; neither of us had enough time to talk long so I recommended he come here to look up this thread (and the rest of the site) for more info/contact.

Most of the others were just passing interest, some were about the alternative transportation it provides, some about the "cool factor", some about how dangerous it must be to ride in traffic (it isn't really, with experience and attention), some about just how wierd one has to be to not only live car-free, but to actually build one's own transportation "from scratch", etc.

But a week ago there was also a coworker from another store interested in it, possibly to build a fat-tire version for use on the playa at Burning Man. She actually put the website and info in her phone so she'll probably really come here and look around (unlike pretty much everyone else that talks to me about it). I didn't have enough time to actually talk about much of it with her, though, as we were too busy at work to do so, and couldn't take a break at the same time either. :/


Everything, with one exception, has been working fine lately: the righthand turn signal had a problem a few days back where it blinked twice as fast as usual, which is the blinker's way of saying there's something wrong. What I found was taht the DIY LED/reflector signal on the righthand mirror was shorting out that side's turnsignal. My temporary fix was to just disconnect that LED unit from the righthand signal array, so I just had the regular incandescent front and rear signals.

I didn't have time to go further than that until yesterday, when I found the source of that problme is the extra wire I left on the end of the LED unit to chain it to another later (whcih I never did). That extra wire has been flopped around and bent and whatnot since the beginning, and eventually broke the insulation at the base of the wrie where it enters the LED housing--and shorted the conductors together. Easy to fix; just use a boxcutter to slice off the wire at teh entrance to the housing. Then reconnect the mirror's LED unit to the righthand signal array.

Which I'll probably get around to day after tomorrow (that'll be my next day off).
 
The mirror light ws an easy fix.

Have had a couple rides in rain, though pretty light, everythign continues to work ok. Might not in a real rainstorm (like the one we had this late afternoon or this past sunday night, which put inches of water down in minutes).

Wh/mile has been 52-56 for the most part, but on windy days like today it's been 60-62. That canopy top probably doesn't help with that. :oops: But it keeps me cool in the summer sun, and dryer in the rain (as long as wind isnt driving it horizontally).
 
amberwolf said:
[...] Might not in a real rainstorm (like the one we had this late afternoon or this past sunday night, which put inches of water down in minutes).

Sounds like a common enough occurance I used to experience in New Orleans - and for a time, I rode my Panasonic 10-speed to work every day, 16 miles each way, and went over the bridge over the intercoastal waterway between Chalmette and New Orleans-East. (And if any of you know that bridge, you'll shudder at the thought of riding it in a bicycle!)

amberwolf said:
[...] That canopy top probably doesn't help with that. :oops: But it keeps me cool in the summer sun, and dryer in the rain (as long as wind isnt driving it horizontally).

(My real reason to reply is:) Got any pics of that canopy? I'm very curious - don't recall seeing it before.

And, while you're at it, can you summarize for us the bike's current state of build? Are you running three wheel drive ATM? What motors? Etc.
 
RTIII said:
(My real reason to reply is:) Got any pics of that canopy? I'm very curious - don't recall seeing it before.
It's in all the pics of the (whole) trike for the last several months or so. I moved it over from the bike a while back; I'd added it to CrazyBike2 originally last summer or spring, I think it was.

This is the old version canopy side view pic, taken April or May 2017, from the first post of the thread (where i try to keep updating with new images; I should probably also update the configuration there too).
file.php

Post about the install of the canopy
https://endless-sphere.com/forums/viewtopic.php?f=2&t=67833&start=375#p1250698
and pics
https://endless-sphere.com/forums/viewtopic.php?f=2&t=67833&start=375#p1250808


Since then I've altered the canopy, replacing the blue snuggie (which while a bit water repellent wasn't waterproof) with some brown naugahyde that used to be a snap-on cover for something. I've got a smaller matching one that will probably eventually be used to cover the seat once I build the next padded bench seat top with a back.

I'd like to dye or bleach it white, but I don't want to damage it; this thing has lasted for more than a decade being used for various covers for things, and I got it well-used from somewhere else years before that. White would reflect more sunlight, and also make it more visible--the brown blends in with backgrounds easily and makes the trike less visible as a whole.

The post about changeover to the new cover:
https://endless-sphere.com/forums/viewtopic.php?f=2&t=67833&start=475#p1288515
file.php


And, while you're at it, can you summarize for us the bike's current state of build? Are you running three wheel drive ATM? What motors? Etc.
[/quote]

Still only 2WD. front is still just a regular bike wheel, with dual rim brakes. Sunlite Rhino rim, 26", CST City tire with thickest Sunlite tube (actually made by CST, IIRC), 15g spokes off an old wheel.

Left rear is pedal powered as well as motor; pedals run a triple with hand-shifted chain (no derailer) if necessary, to an old Shimano333 3speed IGH (when it breaks I'll stick an old SA 3speed in there instead), with an output sprocket (that used to be part of an old multispeed freewheel) welded to the righthand spoke flange of the IGH (bolting it on just sheared the bolts). IGH shifter is below the tiller on the frame. It's geared down so far that with the granny ring on the cranks and low gear on IGH it's about 1MPH or so at a comfortable cadence, but I can keep it moving by myself without as much joint pain; don't have to stop every few dozen feet. Chain is presently an amalgam of various BMX chains, mostly old and worn, with one length of new chain in the loop from the IGH output to the transfer axle, and the loop from transfer axle to the single speed freewheel on the left motor hub. I think all the chain on the cranks to IGH loop is old.

Can't pedal decent hills (including the canal path underpasses) with it; even if the chain/etc survived the torque I wouldn't. It's so heavy that to do that I'd probably have to have motorcycle chain and sprockets, and a dual IGH to spread the load, or just use sprockets. I'd also probably want a ratcheting system I could engage on the wheels so it cant' roll backwards and I could do stop/start pedalling--crank a moment, rest while ratchets hold it in place, etc. But the pedals are honestly just emergency backups in case all the motor/battery stuff fails, given the state of my joints and strength.


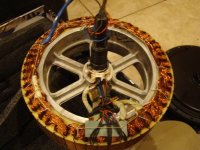
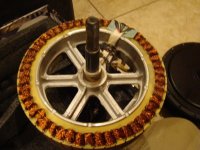
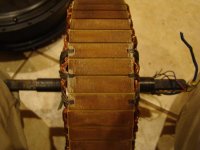
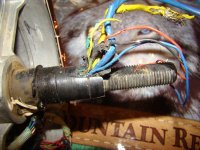
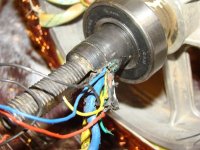
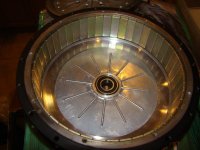
Left rear motor is a used (repaired) MXUS 3K 45H 3t hubmotor run by a generic 12FET 30A controller. (sometimes gets as high as 35A peaks, IIRC).

Right rear is a well-used front Crystalyte X5304 run by basically the same controller in a different shell with slightly different factory behaviors.

Need better controllers; still collecting parts for a pair of Lebowski controllers to better run these things, to give me the startup torque I need (especially with heavy loads) to be able to get up to speed (20MPH) as quickly as possible (<2 seconds would be great) so I can get out of the way of traffic at the start of a green light when I'm stuck in the front of the line at an intersection.


(I have another MXUS, 4t, that has to be rewired and tested, that will probably replace the X5304 once I get time (trike could be down for a few days so can only do stuff like this when I can get at least a week off work). then I can see about putting the X5304 into the front wheel just for giggles to test it out; swapping back to the bike wheel if necessary).


Both rears are 20" wide ex-Zero rim, 13/14butted radial spokes, with Shinko moped tires & tubes. I forget exactly which model, SR241 or something? 2.5".

Only rear braking is electric; plain regen on the left and EABS active braking on the right.

All powered from a 14s2p 40Ah EIG NMC pack from used cells; this is charged either from the Cycle Satiator or a pair of Meanwell HLG-600 LED PSUs (depedning on how fast I want/need to charge; the satiator's max is less than 8A, the HLGs is 24A).

Monitored by a Cycle Analyst v2.3 with standalone shunt, typical cruising power at 18-20MPh seems to be around 900W on "flat" terrain; there's always some breeze or wind so it's hard to say exactly; it varies a couple hundred watts as I watch due to terrain and wind.

I'd guess present weight is 300-350lbs unloaded. Can easily carry at least that much cargo, plus my 180lbs, plus pull a trailer with at least a couple hundred pounds on it or more. Typically not used anywhere near that capacity; mostly just me. Grocery trips around 50-120lbs of stuff. Dog food runs 100-200lbs+. Dog runs about 120-270lbs at present, plus trailer weight of 30-ish lbs.

Trailer uses an automotive 1-7/8" ball hitch; I have two trailers presently setup to work with it. One is narrow enough to fit between path bollards (as is the trike, barely), the other is much wider. See the Flatbed Kennel Trailer threads, Mk III and Mk IV, for info on those.

CrazyBike2 uses the same size hitch ball to pull the trailers if needed (it doesn't have nearly the carrying capacity of the trike, so it needs them more often than the trike would).


There's probably a lot more details I could put in, but it's time to head out for work. :(


....back from work, so:

Separate 4s 20Ah EIG pack runs a lighting system that includes a car headlight (presently from a KIA something-or-other, found in the parking lot as I was headed home one night), used to actually see on the roads, since the cars' headlights are usually so bright in opposing traffic that it takes a very bright light to be able to see the road surface between me and them as they approach, especially on undivided/unstriped side streets.

Grin Tech LED headlight, mostly just a "see me" light, and for use on well-lit bike paths where I don't need a car headlight or it would be unhelpful.

MC incandescent turn signals either side of the headlight.

Aquarium LED modules glued to the back of old pedal reflectors mounted to the rightside mirror (used to be also on the left, but now the leftside is a Suzuki MC mirror with integrated incandescent turn signal; wish I had a second one for the right, but there was only one at goodwill).

Downlighting strip of LEDs on the front/bottom of the downtube, to light up the whole road area around the front of the trike, to make it look larger to other traffic on the road, especially that coming from behind or to the side.


Aquarium LED light for the same purpose (and to light up the cargo area/back of trike) mounted on the wire rack over the cargo deck. A second one is mounted inside the dog crate to light it up inside, whenever it's on the trike (goes in the cargo deck under the rack, blocking the other light).

Back of rack has aquarium LED lights replacing the incandescents in a couple of old Honda moped/MC taillights, in each there's two strips for tail plus a third for brake; eventually I'll add two more strips in each for brake for better daylight visibility of braking lights.

Between those units is a "third brakelight" module (incandescent) from some car; don't remember what kind, from a junkyard years back, IIRC.

Incandescent MC turn signals on the rear corners of the rack.

The whole lighting module is actually a bar bolted to the rack, so it can be removed from teh rack and bolted to the edge of the cargo deck instead, so that for tall cargo that won't fit under the rack, the rack can be removed entirely (presently this would also remove the canopy; eventually I'll fix that). Mostly I use a trailer for tall cargo instead, but sometimes I might not want to, so....

For cargo that would obstruct or otherwise be problematic with the lighting bar in either of those positions, it can be removed and tied to the cargo itself with the cargo straps that secure the cargo to the trailer, or to the back of the canopy, etc.


The trailers have a lighting bar of their own, with MC LED tailight/brake light in the center, and MC turn signals with aquarium LED lights in place of their incandescents. The bar gets moved from one trailer to the other as needed, since I don't have enough lighting for each to have their own. For cargo that would obstruct or otherwise be problematic with the lighting bar, it can be removed and tied to the cargo itself with the cargo straps that secure the cargo to the trailer.
 
Back
Top