Rewiring a Crystalyte HS3540

jezzyg

1 µW
Joined
Aug 17, 2019
Messages
4
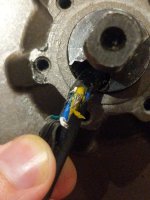
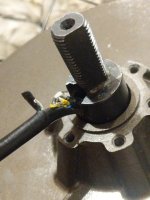
Unfortunately at the very start of my first test ride of a newly built bike, the wire coming out of my Crystalyte HS3540 rear hub motor got pinched between the hub and fork, and took this damage: (see attachments)

I suspect the only real solution is to take the motor apart and rewire it? I can see that two of the hall sensor cables are fully broken, one of the phase cables is badly damaged but perhaps not cut entirely through, and then there are two more hall sensor cables that have just about got their inner cores exposed as well, but may still be otherwise intact.

I found this video to remove one side of the motor:

https://www.youtube.com/watch?v=1gl39KzUIuc

Looks simple enough, but how do I remove the other side? I guess I'll need both sides off to access the main loom leading out of the motor? I read something about having to use a gear puller?

Also found this thread about repairing the wiring on this motor:

https://endless-sphere.com/forums/viewtopic.php?f=2&t=29731&sid=ed595094787c229ad86edc126a90501f

Looks like I've got a later version of the motor, but I can see both sides or off in some of the pictures there, it's just not obvious how.

Thanks a lot!
 

Attachments

  • IMG_20190818_003606.jpg
    IMG_20190818_003606.jpg
    166.3 KB · Views: 770
  • IMG_20190818_003641.jpg
    IMG_20190818_003641.jpg
    134.2 KB · Views: 770
jezzyg said:
I suspect the only real solution is to take the motor apart and rewire it?
The easy way is to just take one cover off, then pull the wire *into* the motor from the inside at the axle, until the damaged part is all inside the motor.

Then cut the damaged part out and splice each wire together, preferably installing heatshrink over each wire before connecting them, to cover the splice points.


Both covers just pop off after you unscrew all the 9 screws on each side.

Unscrew one side, then hold the tire / rim with both hands with that side up, and firmly "tap" the axle on a piece of wood that's on a concrete surface, to pop the cover seal. Don't whack it too hard or you can break the cover if it's stuck.

Flip the wheel over and do it again if you need to do the other side.

YOu don't need to take the stator out of the magnet ring (rotor) to fix the wires.

If you have to fix the halls, and have to teake the stator out, you can hold the rim by both hands and set the axle on that wood block on the concrete, and lean hard into it so the axle is pressed straight upward, and the stator will pop suddenly out of the magnets. Don't let go of the rim, but put both knees on it to hold it down while you pull the stator off and set it aside. It can be put back in teh same way...but you can cut off fingertips if you're not careful, so a 3-jaw puller is safer, to "lower" the stator into the rotor.

Now the bad news...its' very possible the controller *and* the hall sensors are damaged, if the phase wire conductors touched any of the hall sensor conductors. :(

You can test eh hall sensors with just a magnet, without reassembling the motor, once you fix the wiring, and hook it back to the controller. Don't try throttling, just power it on, and use a meter to read each hall signal in turn, and pass a magnet across the face of the sensor in question. If it toggles from near zero to near 5v, it's ok. If it doesn't, it's probably dead.

Once the halls work you can reassemble the motor and test the controller by using it as expected, if it doesnt' work and you have veified the wiring is ok, the controller was probably killed by the short.
 
Thank you so much, I'll give that a go. I'm hoping the controller is fine, I'm using a Phaserunner v2 and it immediately cut off and started throwing a "POST Static Gate Test Outside Range" fault, so hopefully that prevented any damage. I'll have to see about the sensors.

I was worried that splicing two wires together would be insufficient for the amount of power that needs to go through it, but I guess with it being 3 phase it's not so bad? So if I just splice, solder, heatshrink wrap that should be good enough?
 
amberwolf said:
Both covers just pop off after you unscrew all the 9 screws on each side.

Unscrew one side, then hold the tire / rim with both hands with that side up, and firmly "tap" the axle on a piece of wood that's on a concrete surface, to pop the cover seal. Don't whack it too hard or you can break the cover if it's stuck.

I'm having a nightmare managing this... I've removed the screws, used a blade to wedge the cover open, and managed to pull it maybe 3mm away from the rest of the motor, but I'm really struggling to get it any further. It seems impossible without a gear puller, like they use here: https://www.youtube.com/watch?v=QA2qQkexj2g

I've just got no way of levering it out,and I'm worried I'm already damaging the metal and getting scrapings and tiny bits of metal inside the motor.
 
Gear puller is pretty slick and glad I bought one from the get go.

I think I paid $20.

Makes it really easy to push out the shaft from side plate, remove the stator (bolted to dropout) from the rotor (attached to spokes) AND most importantly reinstall the stator into the rotor! The magnets are very strong and will slam the rotor back into the stator in a millisecond, but you can use the gear puller to slowly lower the rotor back in.

https://www.ebikes.ca/documents/HubMotorStatorRemoval.pdf

Make sure to double check what side panel you want to remove and make sure to remove the appropriate screws and it is always good to use the gear puller hooks on the stator instead of just the side plate as it could crack.

Good luck
 
jezzyg said:
amberwolf said:
Unscrew one side, then hold the tire / rim with both hands with that side up, and firmly "tap" the axle on a piece of wood that's on a concrete surface, to pop the cover seal. Don't whack it too hard or you can break the cover if it's stuck.

I'm having a nightmare managing this... I've removed the screws, used a blade to wedge the cover open, and managed to pull it maybe 3mm away from the rest of the motor, but I'm really struggling to get it any further.
Well, you can use a gear puller; that is generally pretty easy, once you figure out how to set it up and use it. I rebuilt a small one into a bigger one with longer arms to pull apart a motor taht doesn't have "covers" like this motor does, and to push the stator out of the MXUS 450x motors, whcih have even more powerful magnets, and werent' safe to do the kneeling trick to get the stators out.

But you can also do what I said in the part you quoted; it's how I take my HSR3548 apart, and other motors of similar design.

Unless something is stuck (rusted?) really hard, then if you have the axle of the still-screwed down side on the wood block, and the axle of the unscrewed side pointed toward you as you do it, the action of tapping the axle will push the cover up enough to get fingers under it if you like.

Or keep pushing down wiht your whole weight on the rim/tire, and it will push the stator up which will push the cover up, and you can lift the whole stator out and away, so you can work on it without the wheel, though the other cover will still be on there until you wiggle it off.

Don't use tools to stick under the cover and pry, because if you slip you'll hit the windings and damage or destroy the motor. :(
 
captain387 said:
it is always good to use the gear puller hooks on the stator instead of just the side plate as it could crack.
You can't use the gear puller hooks on teh stator, because the center of the gear puller has to push on teh axle which is part of the stator.

You have to use them on the cover edges to pull a cover off.

You have to use them on the spoke flanges of the rotor to push the stator out of the rotor. (and the cover on the opposite side has to be unscrewed first, or it will break, or the spoke flanges will, or the gear puller will).
 
amberwolf said:
captain387 said:
it is always good to use the gear puller hooks on the stator instead of just the side plate as it could crack.
You can't use the gear puller hooks on teh stator, because the center of the gear puller has to push on teh axle which is part of the stator.

You have to use them on the cover edges to pull a cover off.

Yes that is correct, wrote my message then realized that I had the rotor and stator reversed and corrected all references but that one. Thanks for setting it straight :thumb:
 
Thanks for the replies everyone, some updates:

I managed to get both covers off, pulled the wire through, snipped it and re soldered everything back onto the PCB. Put it all back together, ran the phaserunner autotune, and the motor works, but unfortunately, the software reports that there is no hall sensor signal. I guess they got fried :( I ran it in sensorless mode, went for a test ride and it was great fun, but the motor judders like crazy and rotates one way and then the other way, if I engage the throttle from stationary. As long as I'm moving forward a tiny amount, then it engages properly. I was wondering if there might be any other disadvantages of running it without the sensors? Are there any tweaks I can make in the phaserunner suite to get things smoothed out?

I was looking for the sensors when I had both covers off, and it wasn't obvious where they were, presumably underneath the coils? I don't expect to be able to replace them.

So I bought another motor... expecting to be able to just swap the stator over, so I don't have to get another wheel built, which was an absolute nightmare. Unfortunately Crystalyte have sent me a different motor! It must be a different revision, it's a completely different shape, and it has another, different, proprietary connector on it! Thanks guys! :shock:

So I guess I'm going to have to go to a different shop to get a wheel built from the new motor, because I think there's no way the first shop I went to would take that job on again. The guy that did it said in 20 years it might be the hardest job he's ever had to do.

Thanks for the help!
 

Attachments

  • bike smaller.jpg
    bike smaller.jpg
    418 KB · Views: 638
Hall sensors are extremely easy to replace,,,, once you get the cover off :D

There are a lot of threads about them, here is one of the first to come up from the search bar above:

https://endless-sphere.com/forums/viewtopic.php?t=73524

Now to make this even more interesting, are you sure when you soldered the wires back together that you have the same wiring sequence?

There are testers or there is a manual way to test them with a 9v? battery.

https://endless-sphere.com/forums/viewtopic.php?f=31&t=20413
 
Back
Top