Fiberglass battery case

davy1010

100 mW
Joined
Jul 4, 2010
Messages
43
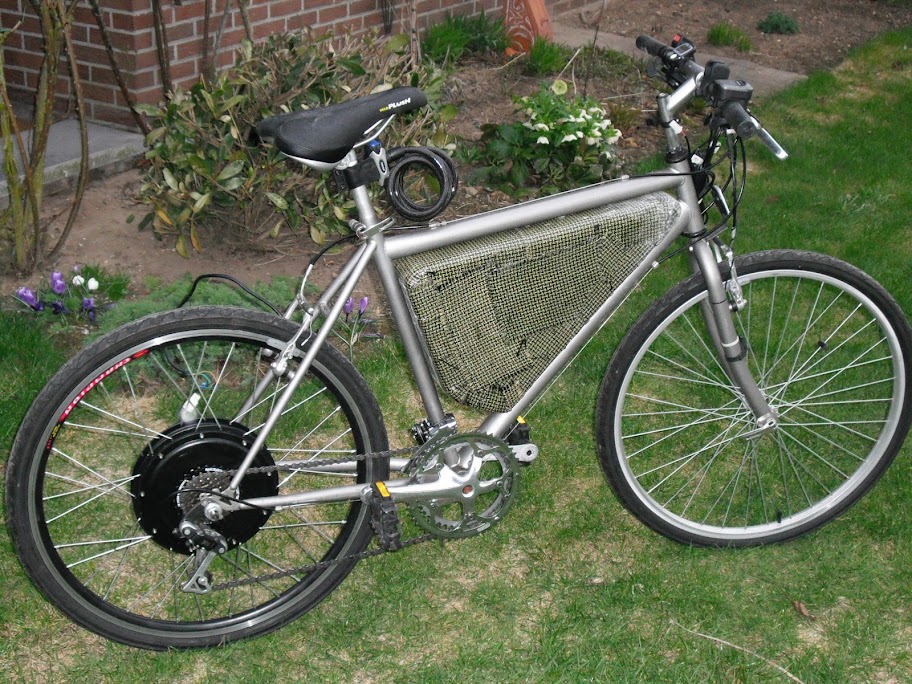
To improve the weight distribution of my current ebike I'm going to build a custom battery case that fits in the triangle of the bike. So the weight moves from the high back of the bike to the low middle.

I've got my inspiration from these threads:
http://endless-sphere.com/forums/viewtopic.php?f=6&t=13411
http://endless-sphere.com/forums/viewtopic.php?f=2&t=22771&hilit=custom+battery+case

Bill of material:
- styrofoam to make a mold
- Polyester resin -> 17/01/2011 -> Decided to go for Epoxy resin because polyester resin will react with the styrofoam
- hardener
- fiberglas cloth (5M2 should be plenty)
- latex gloves, respiratory protection mask and eye protection for safety
- filler to create a smooth surface (if necessary)
- Primer to create a paintable surface
- Epoxy based paint (black)
- Acryllic glass to make a door
- piano hinge for the door
- lock for door
- 2nd lock to switch my system on/off

-> 17/01/2011 -> I had some trouble finding a supplier in Belgium for my fiberglass materials so I looked online and found: http://www.polyestershoppen.nl, I can highly recommend this supplier he was interested in my project, keen on helping me and answered quickly on emails I send.

Questions on my mind:
- I know my polyester resin is going to eat away on the styrofoam, does a coat exist to protect the stryrofoam?, any other ideas to solve this problem?-> 17/01/2011 -> Opted for epoxy resin, problem solved
- What's a good way to attach the fiberglass case to my bike frame? -> 17/01/2011 -> Will use threaded rivets and threaded bolts
- It would be cool If I needed only one lock that could both open/close the door and switch the system on/off, any ideas? -> 6/03/2011 ->I've opted for a kill-switch, will need a second lock for the door. Cheap and effective.
- I'm thinking of using 1 layer of fiberglass on the sides and 3 layer in the corners, is it enough? -> 6/03/2011 ->I did 2 layers, 1 layer of fiberglass and one of carbon/kevlar

I'm still in the designing fase as soon as I start I'll make some pictures of the progress.

Any info/ideas are welcome

Progress pics:
17/01/2011:
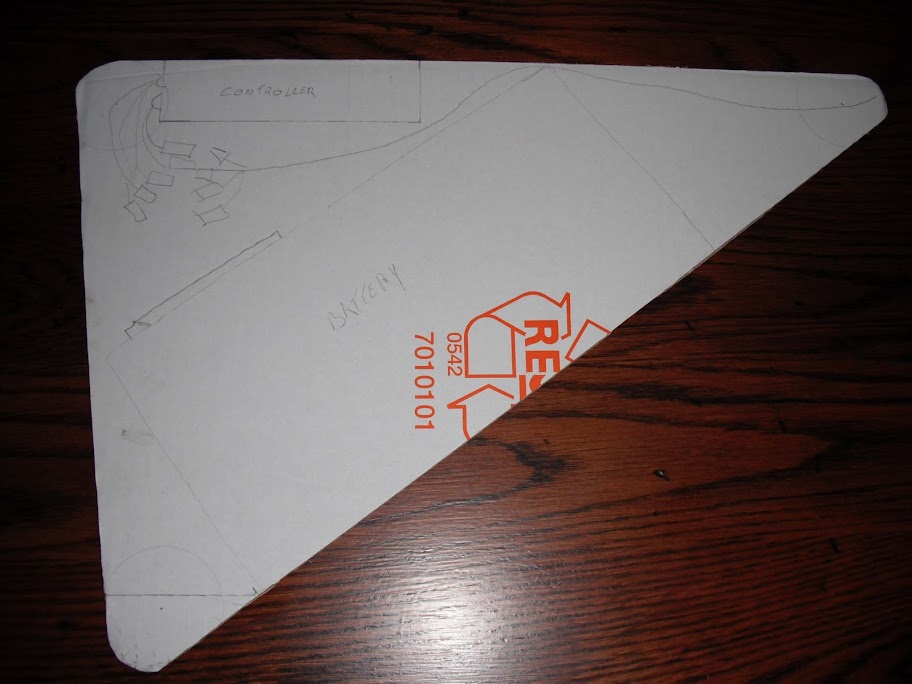
Today I made a cardboard mock up:

DSCF0001%5B1%5D.JPG


19/01/2011:
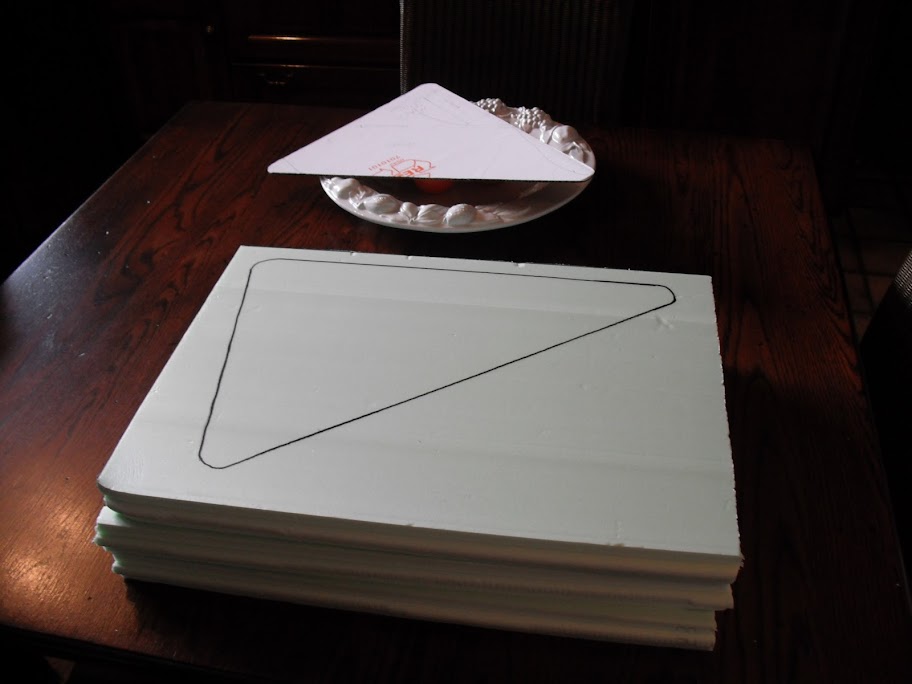
I bought BASF Styropor insulation foam, only 4 cm thick insulation was available so I needed to glue them together.

DSCF0004.JPG


DSCF0005.JPG


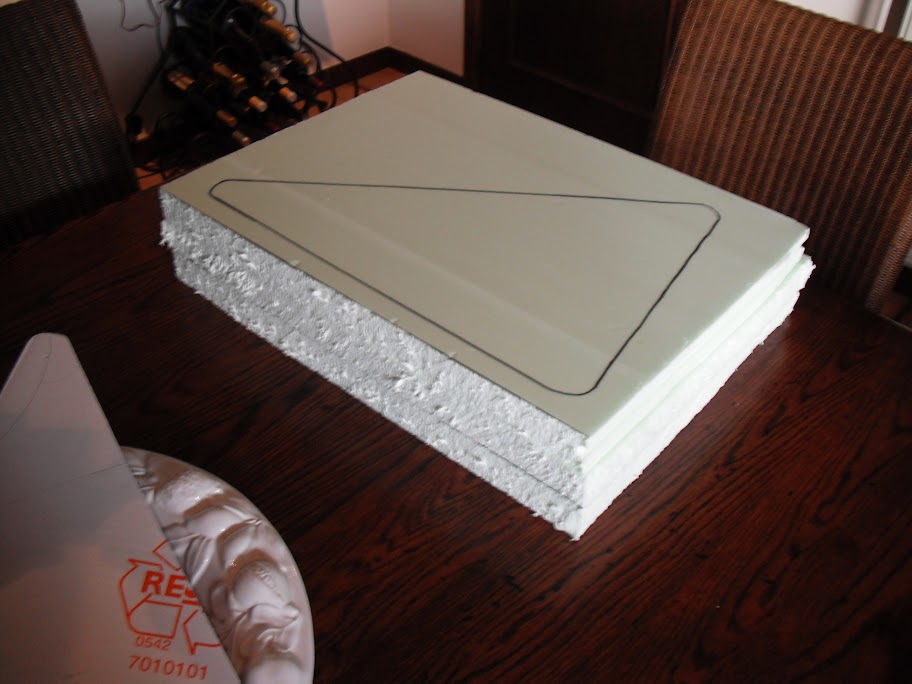
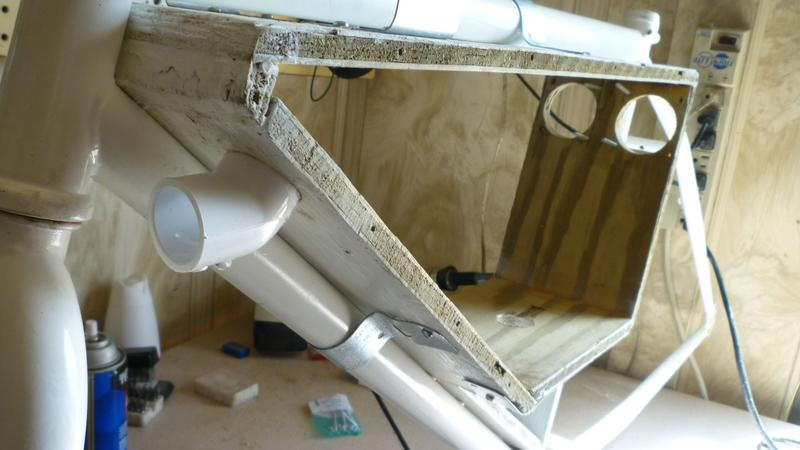
After some sanding my foam mold is finished, I adapted the design a little bit to make some room for a larger chainring:

DSCF0007.JPG


DSCF0008.JPG


21/01/2011:
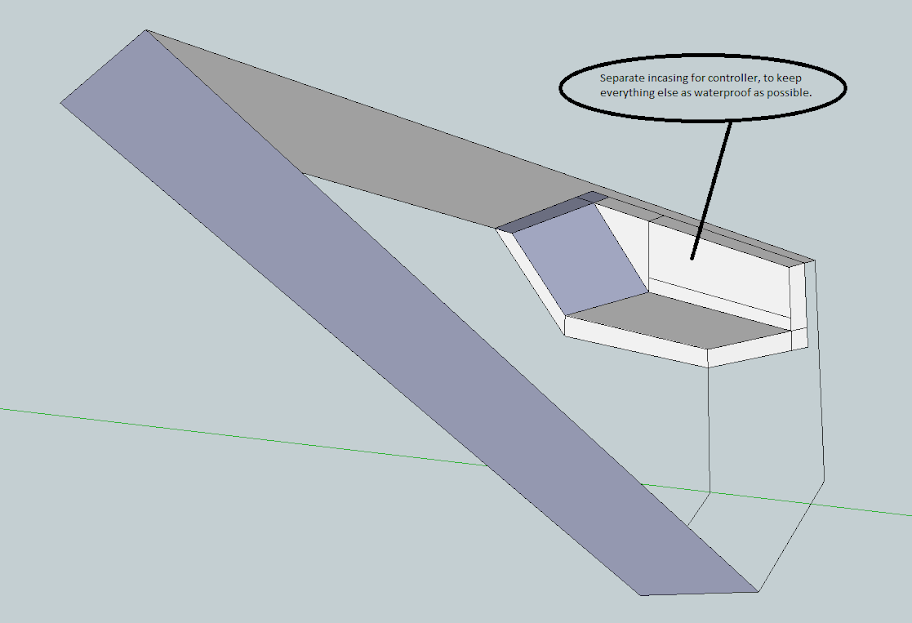
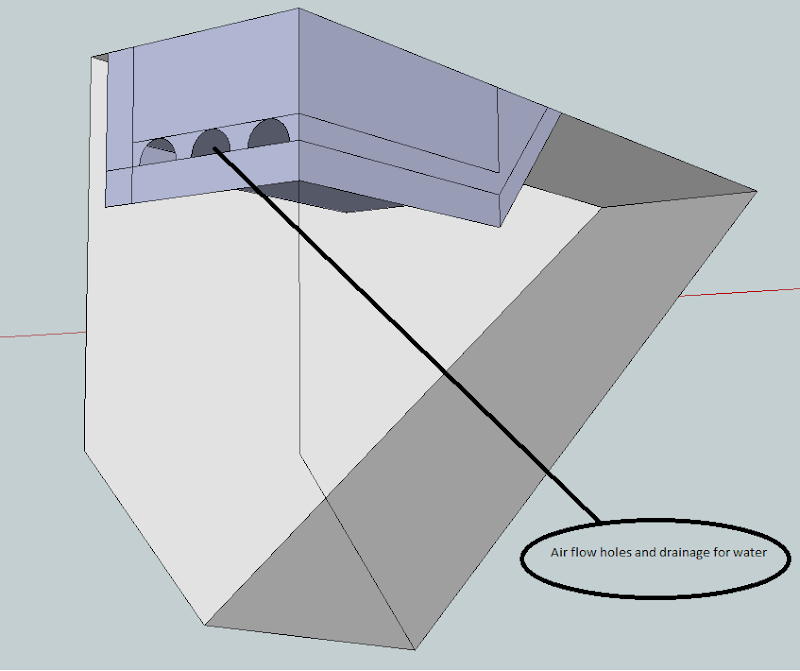
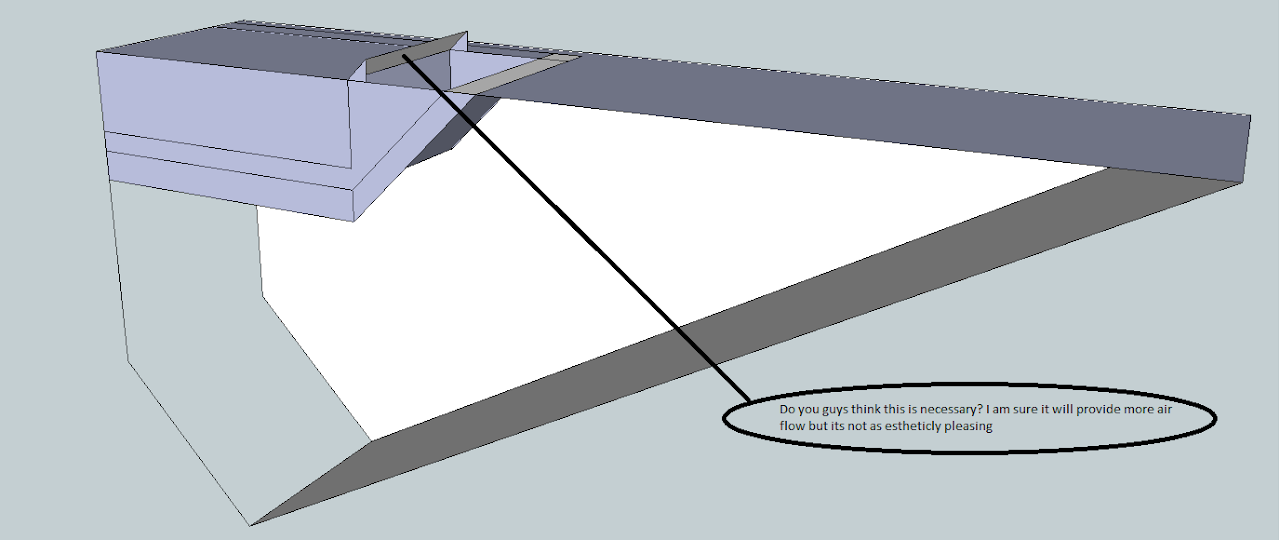
Because the controller needs airflow I decided to make a separate incasing for the controller this will allow me to make a hole in my case without compromising the waterproof concept, I made a quick sketch with sketch up. First I'm going to finish the main battery case, then I'm going to make the incasing out of cardboard so I can fiberglass it:

controller%20incasing.png


controller%20incasing%202.png


controller%20incasing%203.png


controller%20incasing%204.png


22/01/2011:
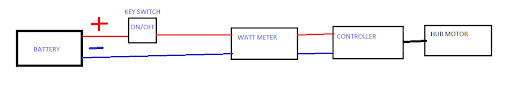
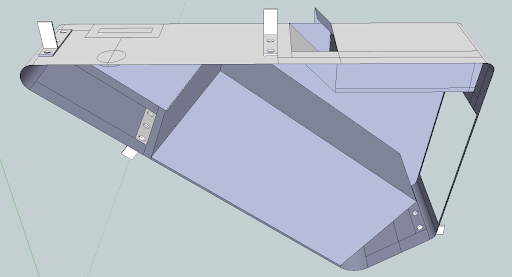
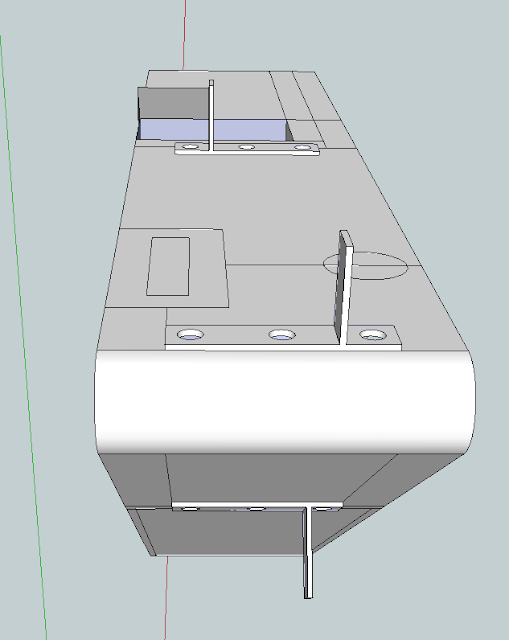
Construction can begin because today I finished my design and found a place for:
- on/off switch (battery kill switch)
- watt meter
- battery
- controller

box.png


box%20front%20view.png


06/03/2011:
OK guys so its bin a while, I had some busy weekends and I ordered some stuff online and it took a while to be delivered.

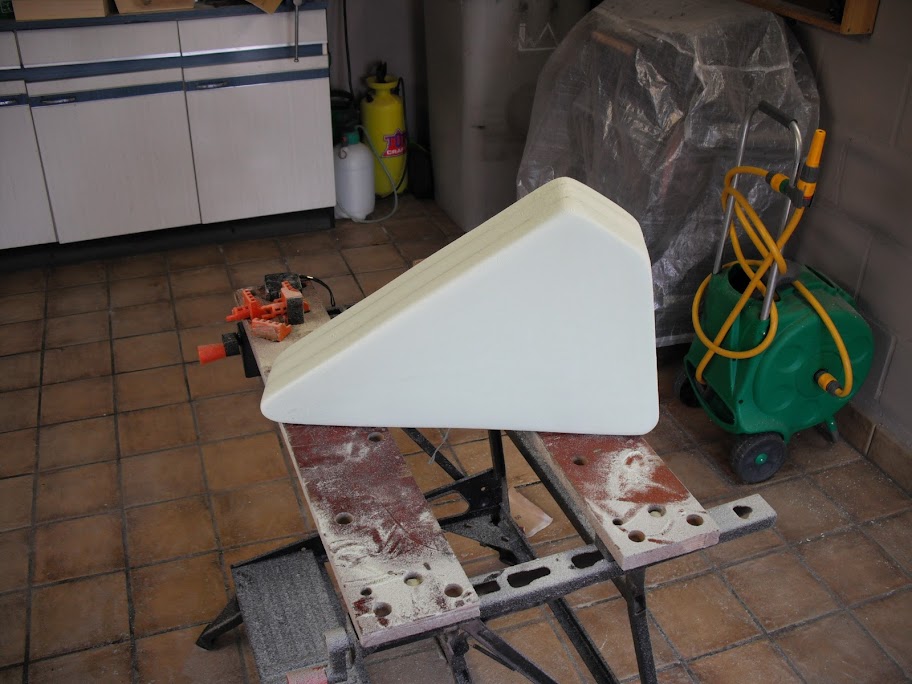
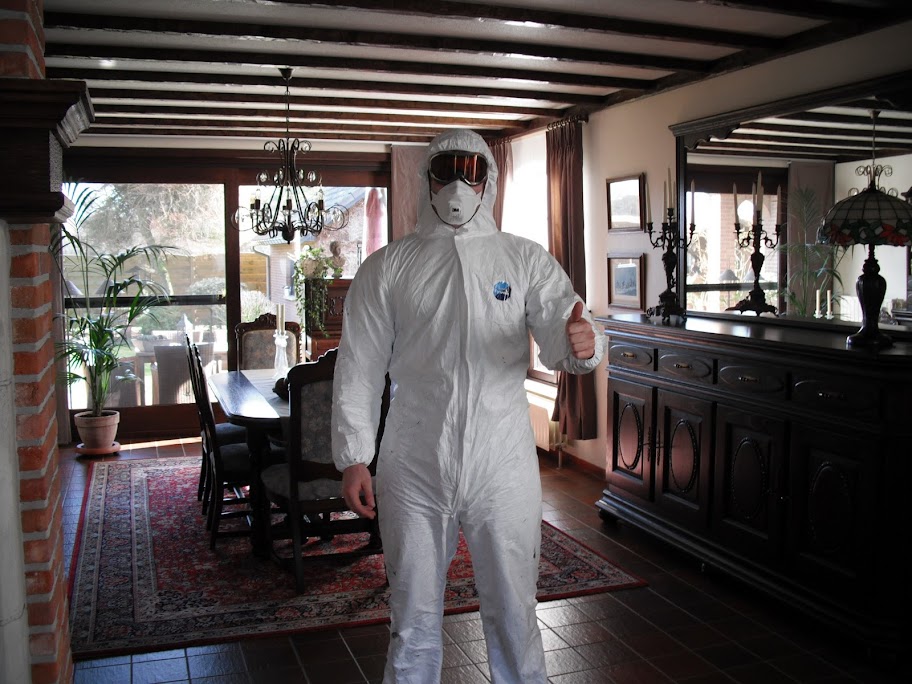
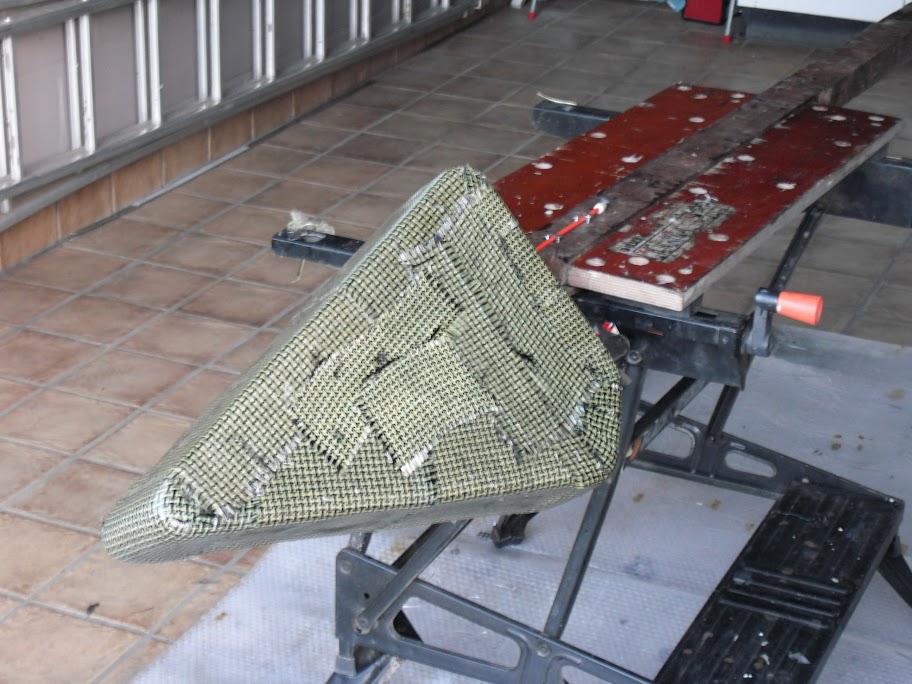
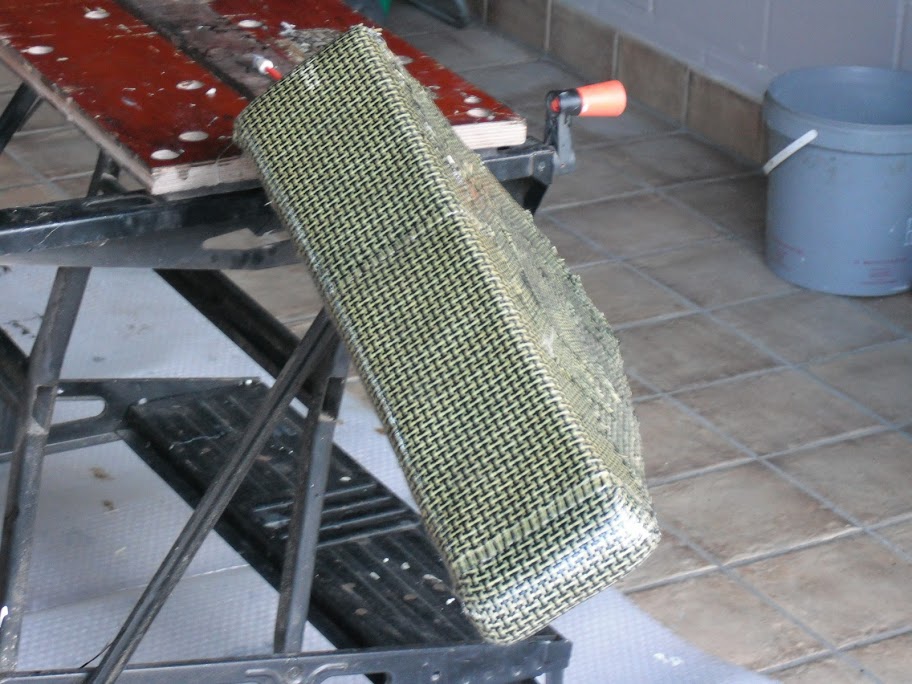
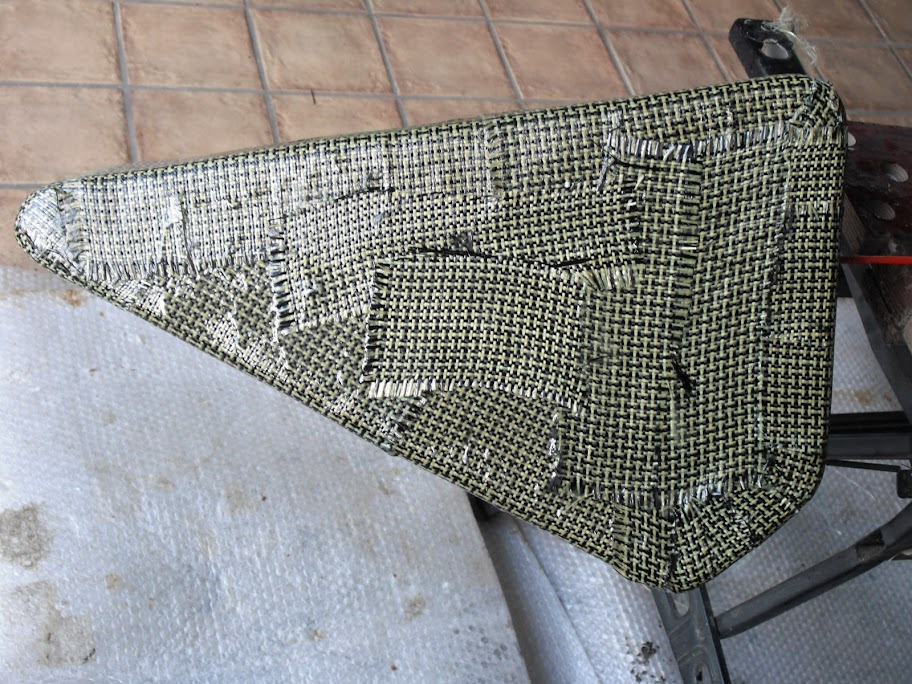
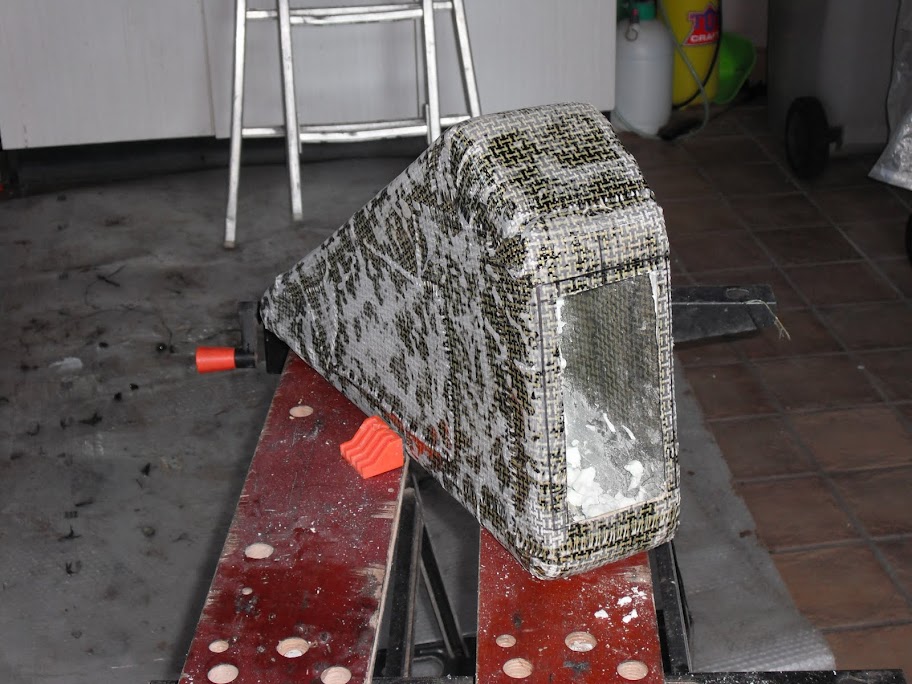
Today I've fiberglassed my mold. Don't mind the ski goggles, the fiberglass usersguide mentioned spray water proof safety glasses ... You will also notice the tight Tyvek suite, I borrowed it from my dad and he isn't as big as me.

It was my first time fiberglassing, I did one layer of fiberglass and one of kevlar/carbon. I used epoxy resin. I hope it will turn out ok, I'm pretty satisfied with how it looks but I'll wait with getting excited till its cured.

DSCF0014%5B1%5D.JPG


DSCF0016%5B1%5D.JPG


DSCF0017%5B1%5D.JPG


DSCF0018%5B1%5D.JPG


13/03/2011:
OK guys, another weekend, another job completed, it may not look like much happened but images can decieve...

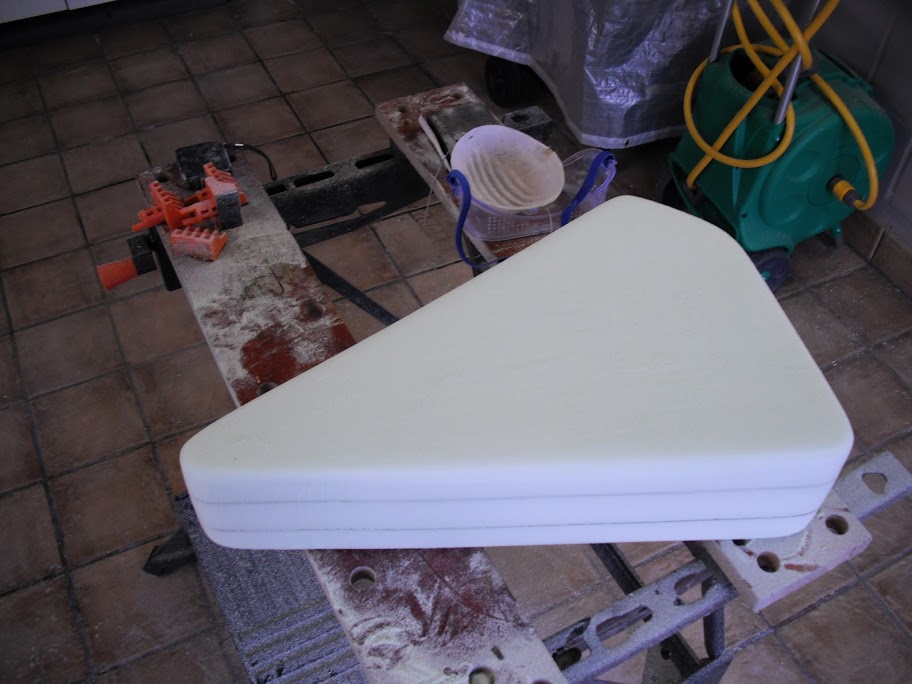
During the week I decided to put another coat of resin on the box because I wasn't completely satisfied with the coverage (in some places I could feel the roughness of the cloth). So I did on Saturday.

Today (Sunday) I planned to sand it completely to make the surface nice and smooth. First I tried to fit my box in my bike but to my surprice it didn't fit anymore :D . I kinda saw this one coming because I knew I did (to) much layers in the corners to make it extra strong. This is typically me, when I saw I had some spare cloth and resin I thought what the heck, let's put on an extra coath for added strength :D .

So I've spend much of the afternoon sanding the one corner that didn't fit anymore. Offcourse I needed to sand that much that I had to sand into the cloth ... not very happy with that. It fit's now and I put a little resin on the places where I sanded into the cloth.

Next week I will sand the box as smooth as i can without sanding into the cloth and I will take the foam out (really curious if my release agent wil work :D). Weekend after that I plan to make it completely smooth with some filler and put in my electrical stuff, final step will be painting and mounting it on the bike frame.

DSCF0024%5B1%5D.JPG


1/05/2011:
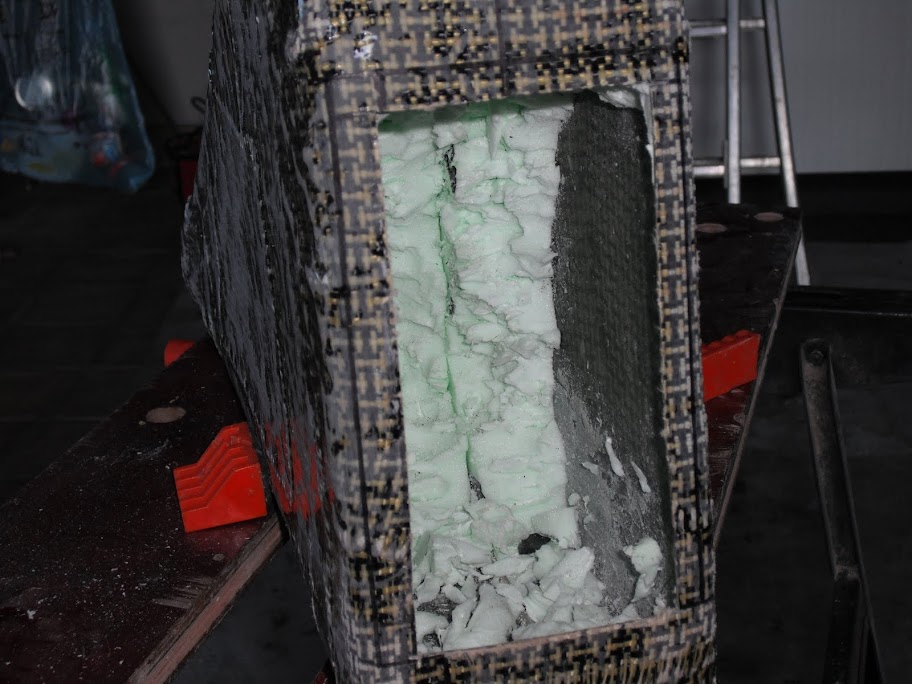
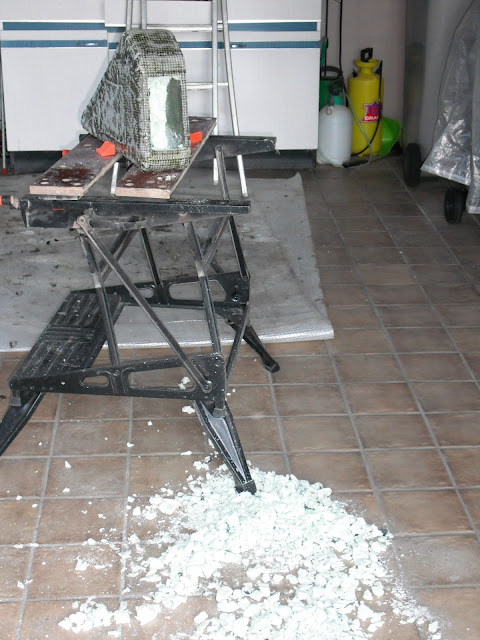
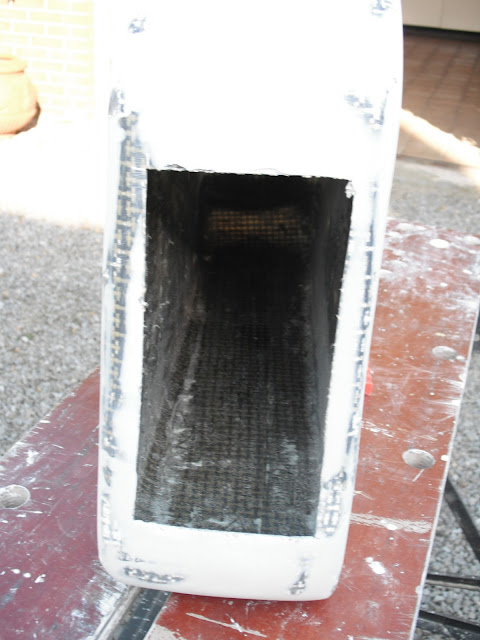
It's been a while but this weekend I finally found time to work on my box again. I finished taking the foam out. Special thanks to my neighbour, he helped and if it wasn't for him I would have quit and start again another time :), my release agent worked but the space to work in was so small I went crazy at times.

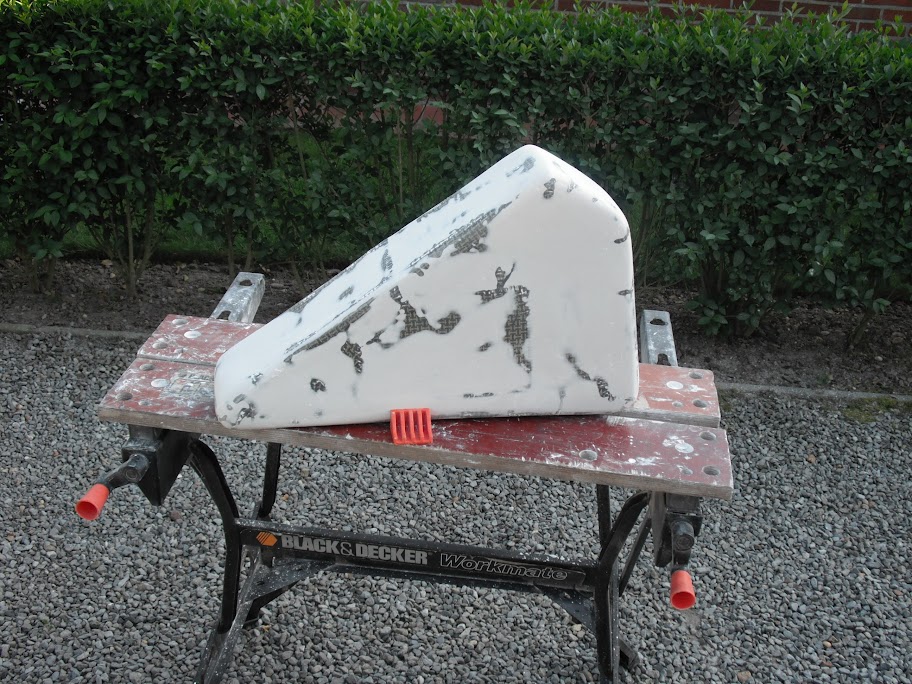
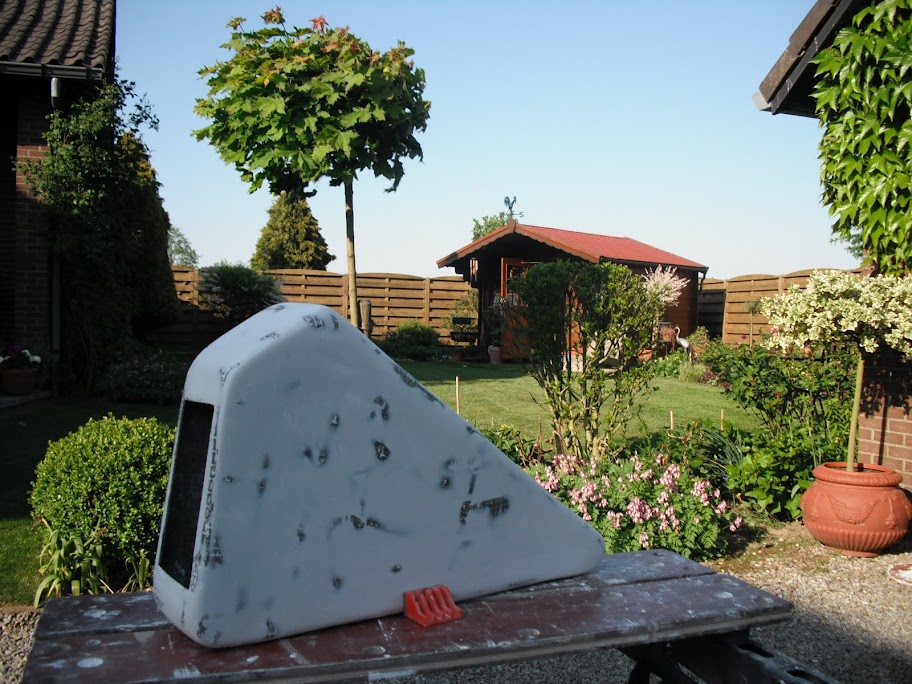
When I found my sanity again, I started with the filler to make a smooth surface. The surface needed a lot of filler to make it straight but now it feels and looks pretty good. I need to do some finishing touches but I ran out of filler. Will do the last details another time, I also need to find a solution for the places where I sanded into the cloth, maybe I'll do some filler on it but then my box will not be straight anymore.

Next weekend will be electronics weekend I'm going to lay out the complete circuit and find places for everything in my box, I will mark these places and cut holes where needed.

DSCF0025.JPG


DSCF0026.JPG


DSCF0027.JPG


DSCF0058.JPG


DSCF0057.JPG


DSCF0060.JPG
 
davy1010 said:
Questions on my mind:
- I know my polyester resin is going to eat away on the styrofoam, does a coat exist to protect the stryrofoam?, any other ideas to solve this problem?

Yes you can coat the foam, i used bondo, on my latest enclosure i am trying spakfilla, seems to work as well and is alot cheaper and easier to work with.

Here's a few series pics on the enclosure i made for my e-crusier.

1) Shapped and coated in bondo

2) sanded smooth and coated with release agent

3) 3 layers of fiberglass added

4) bondo used to fill imperfections then a coat of spray putty

5) top marked, cut and foam dug out

6) alumnium edging added and hinge (hinge later discarded0

7) spray putty wet sanded prior to couple of coats of etch primer

8 ) finished battery enclosure painted and mounted

Hope these pics help...best of luck with the construction of your fiberglass enclosure.

KiM

p.s Tip* get ALOT of rags ALOT of newspaper to lay down and ALOT of acetone to clean up...
 
Consider using epoxy resin instead of acrylic.
It doesn't attack Styrofoam and tools clean up with vinegar instead of solvent.
I used the West System epoxies for my glass box. I think it's stronger than polyester resin too.

My box got a third layer cloth inside the sides that seemed too flimsy. The perimeter of the triangle was four layers of cloth that had a tighter weave.
For a release layer I used cello tape but it doesn't finish smoothly. The wrinkles and bubbles transmit through the glass cloth.
Next time I'll try melted paraffin* over the Styrofoam faired with light weight wall patching compound.
First and still sole attempt

*Paraffin, in North American parlance, is candle wax.
 
Latex primer worked on home made plane floats . Use 2 coats , cheap latex not acrylic . Drywall type fillers may outgas from resin reaction heat , only effects first coat of resin . A lot less solvents .
 
In my fiberglass case I want to incorporate a key switch to on/off the system.

My electrical knowledge is really basic so I've made the scheme below, will this work? What requirements does the key switch needs to have, I have a 48V 15 AH ping battery. Most of the key switches I can find are only caple of handling something like 30V/1A, I guess they are not suitable or am I looking at this the wrong way?

wiring.png
 
Your controller needs air flow for cooling, so enclosing it in your battery box as shown in your cardboard mock-up is a no-no,
 
John in CR said:
Your controller needs air flow for cooling, so enclosing it in your battery box as shown in your cardboard mock-up is a no-no,

I know, I am thinking about making some holes for airflow but that will kill the whole waterproof concept. Maybe I'll install a cooling fan (pc processor grade). I really want to have everything nice and conceiled.
 
Put the battery where you show the controller and the controller in the front. That way you can put the battery behind a waterproof wall in the enclosure and put enough ventilation holes in the controller's section to get good airflow there at the front along with drain holes at the bottom corner of the controller section in case water gets in there. Water will follow the wires in from outside the case, so truly waterproof was difficult anyway, so give the water a place to go. When laying out the cabling be sure to still include drip loops or use gravity to your advantage so that water would have to flow up hill along the wires to enter the controller or to enter the battery compartment via the +/- wires.

Yes your battery will be slightly higher, but since it will be closer to your body's central mass, the effect will be negligible. Since it looks like you plan a front motor based on the wires in your drawing, you get the added benefit of being able to make your cabling shorter.

If your battery pack has a BMS, then it's a good idea to get some air flow through there as well, so that would be another good reason to put the battery up high so it can be away from water running out of drain holes at the bottom. Good rain resistance is pretty easy even with ventilation holes. eg My batteries protected by only duct tape took a broadside hit from a rogue ocean wave without issue. Waterproof is a completely different matter though, which would mean submersible, and much harder to achieve, since water can migrate even inside the insulation of wires. Are you wanting to ride your bike through small rivers and creeks where things might get submerged, or do you just want to protect it from rain.

BTW, It's throttles that seem to be the most common rain related failure. Also, drip loops and using gravity in your favor goes for the wires entering your motor too.
 
John in CR said:
Put the battery where you show the controller and the controller in the front......... etc.

Thanks for the advice John it's not possible because there is not enough space in front of the battery, I've got a pretty big battery. I need to set it up like on the cardboard mock up, I thought about it and I believe there is not other way.

For the air flow of the controller, you can see my new solution in the first post of this thread (21/01/2011 update). What do you think?
 
West Systems epoxy with their "Special Coating Hardener" forms an optically smooth surface when it sets up. That hardener has magic additives that cause it form a self-leveling surface. You can use the hardener for the normal layup... it is just as strong as their other hardeners. For the final coats, I brush it on with a foam brush, let cure, wash the amine blush off with warm water, sand, repeat until you get the surface that you want. Forms a beautiful result with carbon fiber. The stuff has survived going from 0 to Mach 2.9 in one second flat :shock: ... but that transition back to Mach 2.0 is a royal bitch :twisted:
 
Great looking box so far Davy1010.

I was really interested to see your proposed solution to the controller airflow issue. I have been pondering the same problem myself. I have ordered a Greyborg RC frame from Hal and Accountant, it is about to turn up in the next day or so http://endless-sphere.com/forums/viewtopic.php?f=31&t=20321&p=347605&hilit=greyborg+rc#p347605 (for the record dealing with Hal and Accountant in ordering was a total pleasure, and they were enormously helpful with all my moronic and constant questions).

I wanted to put my controller inside the plastic canopy, but was also worried about airflow over the controller. I saw Hal put his Kelly controller enclosed inside the frame/canopy in his build, and he didn't seem to have any problems with overheating, but I was trying to think of ways to get airflow in whilst retaining some water proofness, I too thought of a similar air intake like you did (but sideways in my case, ie on the side of the canopy).

I am very mindful of airflow over the controller as I have a x5303 running on 20S/84v @ 40 amps. I previously had a 18 Fet controller, and because I had it stored in the battery box with insufficient airflow it got so hot it actually exploded (luckily it wasn't under my nuts, but rather behind me on a bike rack). I initially thought my lipo had blown up, and with 16 bricks of 5S lipo on board I nearly lost bowel control..., I was in a packed city carpark at the time, and there was much yelling and screaming about me having a bomb, and two idiots tried a citizens arrest that ended in regrets on all sides.... suffice to say I am very aware of the need for airflow now (and have moved to a 24 Fet controller, exposed completely to airflow - now it barely gets warm).... It actually reassured me as to the hardiness of Lipo, in that the explosion was strong enough to completely blow apart the ends of the controller, spread the battery box over tens of metres, and yet the lipo remained fine.

Out of interest what voltage/controller/motor are you running? I think so much of it depends on what motor and controller you are running. The reason I made the mistake initially when I went to 20S, was that previously on 48V @ 40 amps with a BMC hub and BMC controller, I had been running with a completely air enclosed controller, and although it got slightly warm, it never once got hot. As soon as I moved to 20S/84v and the 5303 with 18 Fet, the explosion I describe above occured on my very first commute with it enclosed.

But I digress, will be really interested in whether people think the Air Scoop idea will deliver sufficient airflow. I was thinking of putting on a lip as you did as well to increase the airflow. Other option I realise is to put the controller out front like a radiator, like the Stealth Bombers do (my 24 Fet may not even fit in the frame, I haven't got the frame yet). Will be curious to see you how you go, box looks great so far though, top work.
 
Philistine said:
Great looking box so far Davy1010.

Thx, I'm satisfied with the results so far, it'll be my first experience with fiberglass so we"ll see how it turns out.

I was really interested to see your proposed solution to the controller airflow issue. I have been pondering the same problem myself. I have ordered a Greyborg RC frame from Hal and Accountant, it is about to turn up in the next day or so http://endless-sphere.com/forums/viewtopic.php?f=31&t=20321&p=347605&hilit=greyborg+rc#p347605 (for the record dealing with Hal and Accountant in ordering was a total pleasure, and they were enormously helpful with all my moronic and constant questions).

I wanted to put my controller inside the plastic canopy, but was also worried about airflow over the controller. I saw Hal put his Kelly controller enclosed inside the frame/canopy in his build, and he didn't seem to have any problems with overheating, but I was trying to think of ways to get airflow in whilst retaining some water proofness, I too thought of a similar air intake like you did (but sideways in my case, ie on the side of the canopy).

I'd also prefer to put mine on the side panel, it looks cooler and I think it catches more wind on the side but I don't have the space so I need to put it like I designed.

I am very mindful of airflow over the controller as I have a x5303 running on 20S/84v @ 40 amps. I previously had a 18 Fet controller, and because I had it stored in the battery box with insufficient airflow it got so hot it actually exploded (luckily it wasn't under my nuts, but rather behind me on a bike rack). I initially thought my lipo had blown up, and with 16 bricks of 5S lipo on board I nearly lost bowel control..., I was in a packed city carpark at the time, and there was much yelling and screaming about me having a bomb, and two idiots tried a citizens arrest that ended in regrets on all sides.... suffice to say I am very aware of the need for airflow now (and have moved to a 24 Fet controller, exposed completely to airflow - now it barely gets warm).... It actually reassured me as to the hardiness of Lipo, in that the explosion was strong enough to completely blow apart the ends of the controller, spread the battery box over tens of metres, and yet the lipo remained fine.

LOL, good thing everything turned out ok.

Out of interest what voltage/controller/motor are you running? I think so much of it depends on what motor and controller you are running. The reason I made the mistake initially when I went to 20S, was that previously on 48V @ 40 amps with a BMC hub and BMC controller, I had been running with a completely air enclosed controller, and although it got slightly warm, it never once got hot. As soon as I moved to 20S/84v and the 5303 with 18 Fet, the explosion I describe above occured on my very first commute with it enclosed.

Powerfull system you've got, nice. I've only been into ebiking for a couple of months so I have a simple beginners set up. I purchased my kit at http://www.ampedbikes.com (rear direct drive), it runs on an Ping Battery of 48V 15AH, my max. speed is 50 km/h.

But I digress, will be really interested in whether people think the Air Scoop idea will deliver sufficient airflow. I was thinking of putting on a lip as you did as well to increase the airflow. Other option I realise is to put the controller out front like a radiator, like the Stealth Bombers do (my 24 Fet may not even fit in the frame, I haven't got the frame yet). Will be curious to see you how you go, box looks great so far though, top work.

I think with your system, you should definately go with a lip, if that will be sufficient? I really don't know. It will be a couple of weeks before my project is finished but I will defenitaly post my experience with my air scoop ... I'm counting on it not exploding so close to my nuts :)
 
The case is looking great, will be keen to see it when it is finished.

On the post you put about a keyswitch, it is hard to find switches that can take the current run on most bikes. A popular option (this is what I do) is to use a battery isolation switch (used in race cars), such as this:

http://www.jaycar.com.au/productResults.asp?keywords=battery+isolation+switch&keyform=KEYWORD

(you can find these type of switches must cheaper, this is just where they are available here in Australia, I think Harbour freight in US used to sell them for $3, but they stopped selling them).

But even then you should put a pre-charge resistor arrangement in, otherwise the contacts in the switch will eventually weld shut from the arcing (before I put my precharge resistor in, my switch lasted maybe two months before becoming welded/damaged from the constant arcing).

I use the type of switch above, then I have a 1k ohm, 5w resistor, and a temporary push button. I push the button in to complete the circuit with the resistor in line, then after a few seconds when the caps have charged up throw the switch. Using a precharge resistor in this way reduces/eliminates arcing and maintains the life of the keyswitch.
 
Looks good...

Sanding kevlar is a bitch. It fuzzes up and makes a mess. Recoating it with resin can yield an even bigger size because of the fuzzies. And always remember that carbon conducts electricity. You don't want the cells wearing through the resin and shorting to the carbon :twisted:
 
I'm working on a similar project, a triangular battery box, but mine's made out of wood. Yours is much cooler, and no doubt gains a good bit of space inside using the composite.

I am very interested in the cooling question as well, I am planning (or was until I saw this thread) to put the controller inside the box too.

Katou
 
katou said:
I'm working on a similar project, a triangular battery box, but mine's made out of wood. Yours is much cooler, and no doubt gains a good bit of space inside using the composite.

I am very interested in the cooling question as well, I am planning (or was until I saw this thread) to put the controller inside the box too.

Katou

I'm thinking about changing my original design ... I like how the box looks and I don't want to cut holes in it so I've bought a 6 cm cooling fan from dealextreme for 2.30 $, which I'm going to fix onto the controller.
http://www.dealextreme.com/p/pc-chassis-cooling-fan-6cm-5198

I will hook the fan up to my bike battery using a lyen DC to DC converter wich will convert the power of the battery from 48V DC to 12V DC. I think this will give enough cooling, keep in mind I'm running a pretty standard setup here not an electric hot rod... so I don't need freezing temperatures in my box.

sku_5198_1.jpg
 
Very cool ~ How do you think it weighs? The wood box I'm building now probably weighs ~ 3lbs

Fans are good..... might not need them though..... if you do need them, I'm not sure cycling air in the small enclosed space will do much. Another Idea I toyed with was mounting heat sinks to the controller, and slotting the case so that the heatsinks protruded from it.

In the end I decided to go the quick and easy route with hardware store 45 degree pvc connects:

YeAHl.jpg

Controller is being mounted outside.... I'm concerned about heat of the battery, but it's because this bike will see heavy use in the hotest part of the texas summer, all summer.

Also watch shipping times from China. I've been waiting a month already for some silly little parts.....
 
auraslip said:
Very cool ~ How do you think it weighs? The wood box I'm building now probably weighs ~ 3lbs

Fans are good..... might not need them though..... if you do need them, I'm not sure cycling air in the small enclosed space will do much. Another Idea I toyed with was mounting heat sinks to the controller, and slotting the case so that the heatsinks protruded from it.

In the end I decided to go the quick and easy route with hardware store 45 degree pvc connects

Controller is being mounted outside.... I'm concerned about heat of the battery, but it's because this bike will see heavy use in the hotest part of the texas summer, all summer.

Also watch shipping times from China. I've been waiting a month already for some silly little parts.....

I'm not sure how much it weighs but its very light I can tell you that. I will weigh it next time I have time to work on it and will let you know.

I think your wooden box will be heavier but I do like the fact that wood is a natural material and my box really isn't environmental friendly. I also like the way you are fixing the box to the frame. It doesn't require drilling into the frame... really simple and good solution (funny I didn't came up with it :lol: ) I think I'm going to steal this idea from you because I'm not to keen on drilling into the frame, i'm afraid it will affect the strength.

Concerning the fan, I'm going to place it directly ontop of the controller kinda like you place a fan ontop of a microprocessor, i have a gut feeling this will make quite a differnce. When everything is complete I will try to back this up with science facts by placing some kind of thermometer.

I see you live in Texas, I live in Belgium (Europe) we don't have those hot summers you got in Texas, sometimes having bad summers can also be an advantage :D.
 
oooooooooooh does it get hot here........ bic lighters explode when left on car dashboards..... eggs fry on pavemnet 8)

There are some good thermometers out there..... search my posts for the thread about thermometers!
 
A new update (1/05/2011) see first post.

Guys, I need to find a solution for the places where I sanded into the cloth, I think this will be visible when I paint it like it is now. Any ideas? Maybe I'll do some filler on it but then my box will not be straight anymore, there will be a little wave in it. Maybe a good base paint is a solution, I don't have experience with this so I'm just shooting ideas here.
 
Back
Top