The helpful 9C wire upgrade thread, explicit DIY pictures.

Joined
Oct 28, 2008
Messages
14,539
Location
Manhattan Beach, CA, USA
So, Methy received a giant load of 9C motors, including some 8x8's which are the best of the 9c motors for hot-rodding.
http://endless-sphere.com/forums/viewtopic.php?f=31&t=24515

However, for the extreme hot-roders out there, 9C phase wires are small. Phase currents are large, often triple battery currents.
For motors running high-power setups, this makes phase wires get too hot, sometimes melting hall wires, sometimes melting the solder, sometimes leading to connector failures, etc. (Though amazingly, we were dumping 13-14kw into the bone stock motor and it didn't melt it's phase wires... but it would have if we had not given it a light duty-cycle to cool.)


I made a previous thread about upgrading 9c phase wires to 10awg, but I didn't take the time to share the procedure details of how to make it happen, and as a result, most folks who tried it failed badly.

The goal of this thread is to create greater success chances.

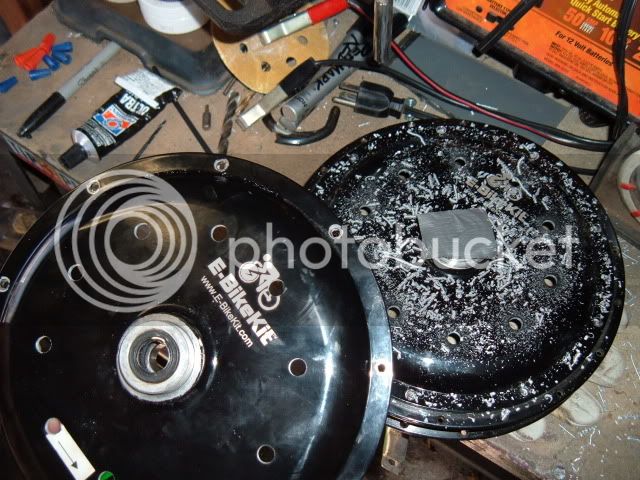
1. Remove the side cover (if you can't remove the side cover without help, quit reading this guide).

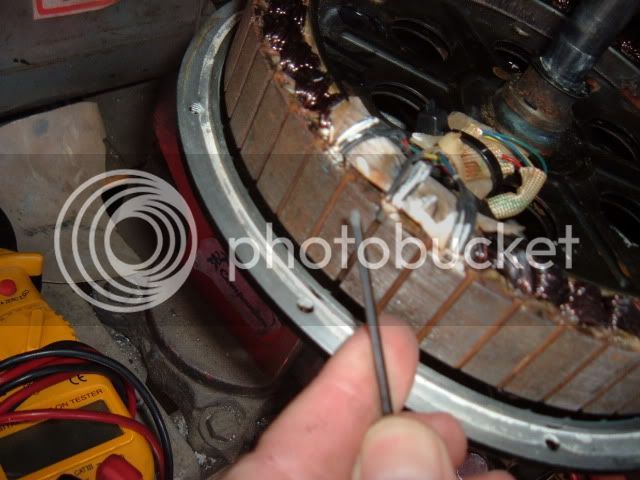
2. Cut off the hall sensor and phase wire plugs, cut the zip-ties etc, and pull them through to the inside of the stator (just somewhere out of the way, and be careful with the hall sensor wires).

3. While your axle path is bare, you've got 2 options to make 10awg work easily. Option #1. Replace the thicker-than-needed hall sensor wires with something very fine, like teflon 30awg wire. Option #2, run a drill down the bore of the axle, I think 3/8" works, but it's whatever drill size that just barely doesn't fit on it's own, you don't need to remove much material here, but removing a whisker makes things go much easier.

4. 10awg wire insulation is thick. Even the best teflon wire insulation is thicker than you can fit for 10awg. Shrink wrap is thin. You will need 3mm shrink wrap if you're going to fit 10awg. 10awg wire can BARELY tuck into 3mm shrink, you need to first straighten the strands out.

wirestraighten.png


5. With the strands straightened, you can just barely slide 3mm shrink up over the 10awg wire. If you use 4 or 5mm shrink, when it shrinks the wall thickness was actually too much for me to get it through (without doing the above tricks of drilling a bit, or replacing the hall wires.) Notice the different shrink sizes end up as different diameters when shunk down, with the bottom wire being thin-insulation marine 10awg.

wiresizes.png


6. When you slide the wire length needed into the shrink, leave an 8" un-stuffed shrink pigtail hanging. Seems like a waste of shrink, but this will come in very handy later.
wireshrinktails.png


7. Melt those 3 pigtails of shrink together.
wirebundledtails.png


8. Fish the un-stuffed pigtail bundle of 3 through (making sure the phase wires are all ready through the axle, and I zip-tie them off to the side to hold them out of the way). The 3 shrink pigtails should slide through easily.
wiretailsthrough.png


9. Now you can gently tug the pigtail end while pushing on the wire stuffed end to get the wire section through. A little soap on the insulation helps to prevent chaffing, and then can be washed out when it's time to epoxy them (to prevent a chaffing/vibration type failure over time.)

wire10awgthrough.png


10. Solder up your connection to the motor windings, shrink, and epoxy them into place. I also epoxied down the axle, and on both sides of the axle's exit. This keeps the wires stable so the thin shrink doesn't fail from chaffing over time.

wiresoldereddone.png


Put your cover back on, re-solder up the hall plug, mount your phase connectors, and enjoy never worrying about melting your phase wires.

**Note** This is not easy.

**Note** Non-extreme hot-rodders don't need to do this.


Enjoy.
-Luke
 
Bookmarked ! Nice writeup. And pics. Your timing is perfect, for me :D
 
Nice tutorial. Especially like the shrink wrap needle. :arrow:

Which has more copper area now? The 10 AWG or the 8 x ?? AWG phase wire?
 
I've just been to the hardware store to buy all the bits, have bought a wheel pulled off'er thing but I think it is too small now I look at it back at home. Will have to hammer the stator out of the wheel to get at the hall sensors.....doh!

Bought a butane soldering iron, lots of shrink wrap, tape, titanium epoxy which was the only stuff they had that was high temperature 150C.

Was thinking though that KY Jelly ...... Or 'Butt Lube' as it's known lol would be good for lubricating the wires as it evaporates after a while....too embarrased to go and buy some in town today, especially as I had the Mrs with me and I don't think the girl on the chemist would believe me about the bike.
 
You want a lube that washes off (so the epoxy can stick), and a non-petroleum based lube, as the shrink is made from petroleum, and likes dissolve likes. This is why I use a bit of soap, as I can run hot water through the axle afterwards in the sink and end up with a surface epoxy can bite.

This is not easy, so buy plenty of extra shrink for re-do's, and be prepared for spending a few hours. I strongly recommend running that drill down the hole as well. 2mins with the drill can save an hour of frustrated pushing and tugging.
 
spacy, if i understand this correctly, you are gonna hammer on the stator to knock it out of the wheel?

you only have to remove the cover on the side where the wires are, and you can free it up with a knife under the lip, or bestter is to RAP the axle against a wooden block to pop the cover free on the other side. 1st put the axle nut on backwards on the axle end opposite the end where the wires come out. make certain the nut is backwards so the wide part is facing out and the end of the axle does not protrude below the end of the nut's face. 2nd loosen and remove all the little cap screws on the cover of the side where the wires come out. 3rd put a hard block of wood on the sidewalk or floor where it is stiff, then strike down holding the wheel with the axle vertical so the axle nut hits the block of wood, which will push the axle up through the hub and push the cover off on the other side, or at least get it to separate at the joint so you can pry it open with a butter knife.

all the wires are on that side, and you can cut off the hall sensor leads on that side and then just resolder them there without having to open the other cover.

no need to take it apart to replace the phase wires. just that cover.
 
liveforphysics said:
You want a lube that washes off (so the epoxy can stick), and a non-petroleum based lube, as the shrink is made from petroleum, and likes dissolve likes.
If you happen to keep Xanthan gum around for cooking and stuff, just mix a pinch of it with water and you now have a great slimy lubricant that is easily washed away with water.

(also, you can use it as a great brush-on paint-mask, too, as it dries into a thin film that can be peeled off just about any non-porous surface)
 
Nice post Captain Luke!

For those here who are not named Luke - I would suggest following his directions verbatim with the exception of using a slightly smaller gauge wire (2.3mm) or removing a few strands of the 10awg. Don't try and be a hero :)

This can make the difference between the job taking 5 hours.... and 5 minutes - and you can certainly eliminate the need to drill the axle out.

Also - dont forget to scrape out all the old silicone goop at the base of the axle, load your washers and fasteners BEFORE you solder on your connectors, and dont forget to mark your cables YBG (unless you like figuring all that crap out again) :)

-methods
 
dnmun said:
spacy, if i understand this correctly, you are gonna hammer on the stator to knock it out of the wheel?

you only have to remove the cover on the side where the wires are, and you can free it up with a knife under the lip, or bestter is to RAP the axle against a wooden block to pop the cover free on the other side. 1st put the axle nut on backwards on the axle end opposite the end where the wires come out. make certain the nut is backwards so the wide part is facing out and the end of the axle does not protrude below the end of the nut's face. 2nd loosen and remove all the little cap screws on the cover of the side where the wires come out. 3rd put a hard block of wood on the sidewalk or floor where it is stiff, then strike down holding the wheel with the axle vertical so the axle nut hits the block of wood, which will push the axle up through the hub and push the cover off on the other side, or at least get it to separate at the joint so you can pry it open with a butter knife.

all the wires are on that side, and you can cut off the hall sensor leads on that side and then just resolder them there without having to open the other cover.

no need to take it apart to replace the phase wires. just that cover.

Dnmun much kudos for the notes, I started to follow them then decided to bight the bullet and buy a ...not sure what they are called...but it clamps either side of the wheel and has a screw bolt that pushes the axle through. Was a bit easier in the end...but thank you for taking the time out to help :)
 
I did mine with magnet wire, so instead of 3 shrunk bundles I wrapped the 3 sets of phase copper together in a layer of electrical tape and then put shrink wrap over the whole thing with the halls for a single circular harness going through the axle. A single layer of shrink made me nervous.. I used enough strands to end up with slightly smaller than 10ga each, but they are much thicker than the phases coming off the motor, which are between 12 and 14ga on my 9x7 9C. It was a piece of cake going through the axle, and I still have overkill with a much larger gauge than the motor windings, and worlds better than the absurd 16ga phase wires used by 9C.
 
Another suggestion - Use coloured heatshrink for the phase wires, makes it easier than labelling...
 
John in CR said:
I did mine with magnet wire, so instead of 3 shrunk bundles I wrapped the 3 sets of phase copper together in a layer of electrical tape and then put shrink wrap over the whole thing with the halls for a single circular harness going through the axle. A single layer of shrink made me nervous.. I used enough strands to end up with slightly smaller than 10ga each, but they are much thicker than the phases coming off the motor, which are between 12 and 14ga on my 9x7 9C. It was a piece of cake going through the axle, and I still have overkill with a much larger gauge than the motor windings, and worlds better than the absurd 16ga phase wires used by 9C.


I think this is also a very good, maybe even better way to do it. Great work John!
 
Nice work Luke, a new and improved thread to point noobs too!
One other bit of advice while you have the axle bare is to check it for hard or sharp edges where the wires exits. I've seen a few that have particuarly hard or sharp ends where they've been poorly machined and they'll quickly wear through insulation (especially heatshrink) with movement. 30 seconds with a file or dremel will sort it out.

Also if your motor has an axle that has the wires leaving straight out the end vs a slot just before the end I'd recommend cutting a slut with an angle grinder or dremel. One of my bikes had wires leaving straight out the end somone knocked it over one day causing it to chop clean through the wires. If you cut a slot ~10mm (or a bit under 1/2") long into the axle if the bike does happen to fall or on the axle or take a hit to the end hopefully your wires won't be damaged


methods said:
For those here who are not named Luke

daves-4-life-7764-1240521280-17.jpg


:mrgreen:
 
Hyena said:
I'd recommend cutting a slut with an angle grinder or dremel.
I dunno, she might object to that, but I suppose it depends on her preferences. :p

That said, what you *meant* to say is a good idea. ;)
 
amberwolf said:
Hyena said:
I'd recommend cutting a slut with an angle grinder or dremel.
I dunno, she might object to that, but I suppose it depends on her preferences. :p

That said, what you *meant* to say is a good idea. ;)

Freudian slip :lol:

I'm sure Luke would never do such a thing

size=50]
...not with an angle grinder anyway, geeezus! LOL[/size]
 
A good read Luke. I got my 6x10 going. Blue phase had a cold solder joint. Pulled right apart when I was trying to slide the woven braid out of the way. Then I took it back apart to drill cooling holes and replace the "paper" isolator that goes under the wires ( that I forgot) and the second time back together the left side cover didn't seat all the way. So as soon as I installed the magnet side, which slams shut with incredible force the motor would not turn. Of course with both covers on I could now see the 1/8" gap in the left cover. My fists were getting sore trying to make it seat so, I started all the screws and set the clutch on my drill to the lightest setting and carefully went round and round the screws till the cover was seated good. Now it spins :mrgreen:
Just thought I would add this for anybody working on this. Glad I pulled it apart again as 2 of the halls I could wiggle around. I made a little screwdriver on the grinder from an old hex driver and the offending halls slipped right out . 3M 2 part epoxy to the rescue :mrgreen:
hubcooling.jpg
hubhalls.jpg
 
Great photos. Good notes.
I wonder when the ornamental manufacturers will begin paying attention to quality control. I guess as long as we buy their s**t, nothing will change? Maybe when our standard of living gets low enough, we will begin building our own machines again? The puzzle is where will we find the labor. Not from the current pool of zombies passing their days tweeting and twittering.
 
Actually the quality on these 9C impresses me. But when you push 9 KW through a 500 w motor you are going to find the weak point. :shock: I know what you are saying though. I wouldn't know a tweet if it smacked me upside the head. I send maybe 60 texts a month, my wife 600, my daughter 6000 :roll:
 
Gordo said:
Maybe when our standard of living gets low enough, we will begin building our own machines again? The puzzle is where will we find the labor. Not from the current pool of zombies passing their days tweeting and twittering.

That is what I am counting on..... The more smoked out zombies there are the more valuable my skill-sets become. If/when the shit hits the fan I am going to be the king of the retards.

I actually started working half-time at my zombie government job so that I could hone my at-home entrepreneurial skills - the type of skills that will be well suited to a ruined economy.

-methods
 
Like the movie Idiocracy. Really bad movie btw. The guy gets frozen by the govt. and the world goes to shit so he doesn't wake up for 500 yrs. When he does Society is so dumbed down he is the smartest guy on the planet and becomes president.
 
Even though I've bought a 40amp Sensorless controller for my 9C, I was going to attempt to get the Halls wired up but gave up after it was going to be an impossible job to dig them out of the stator.

I do like the 9C motor a lot and really hope that mine works after all the work I've put into it, just waiting on the sensorless controller to arrive.
 
Back
Top