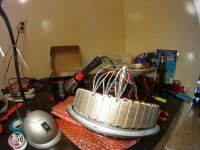
Crystalyte HS3540 HAL

Joined
May 9, 2011
Messages
30
Location
Bolton, ON, CA
Does anyone have a wiring diagram of how to incorporate HAL sensors into the Crystalyte HS3540 sensorless motor?

I've seen pictures of electricwheels.de doing it...

Any help would be great.
 
Righto...
You've got the Stator in front of you, Hall Sensors inserted with the face up (the flat face with the 2 chamfered edges towards the outside) and epoxied in, facing you. Now trim these legs to 8 mm (5/16"), measured from the stator edge.

Connection of Hall Sensors
You've got 3 wires coming out of each Sensor:

  • left - Positive (red wire) Vcc
    centre - Negative (black wire) GND
    The right side wire is the output wire.

On the left hand sensor goes the blue wire, on the centre sensor the yellow wire and the sensor to your right gets the green wire. Best is Spec 44 wire 28AWG :shock: . Take about 4 mm (5/32") of the insulation off and put some solder on the bare strands. Also put some solder on the hall sensor legs.

Now put the wire against the end of the hall sensor leg, and solder it together. The first 3-4mm of the hall sensor leg should be kept clear, so you can bend it easier.

Then you take some 20mm pieces of dia 1.2 mm shrinking tube, slide it over the cables until you hit the sensor body and heat them up till they're done. :wink:

Now go and find some gaps in the stator coils and thread these wire through :shock: . When you are done, epoxy the wires above the coils in.

Now wait till all is dry. File or sand off of the bits that stick out above the stator diametre.

Now connect all 3 red wires and solder them to a 24AWG wire, do the same with the 3 black wires.
The 3 other colors stay as single wires, just solder them to AWG 24 Wire of the same color.

That's basically it. :mrgreen:

When you wire the cables to the Mini-XLR connector, you can use this wiring diagram.
http://electricwheels.de/electrical%20wiring%20diagram%20for%20Crystalyte%20hub%20motors.html

Good luck :mrgreen:
 
Thanks alot! I'm sure this will help alot of members out in the future. :mrgreen:


How long did it take to cure with the epoxy you used? I was looking at the spec sheet and they say 24hrs workable and 7days fully hardened!!! Seems like a long time. Can you think of any alternatives?

Have you had any experience with wiring in a temp sensor with this motor?
 
Hi,
We are using 3M DP 490 epoxy, workable potting time about 1 - 1 1/2 hrs, sets in about 8 hrs to a workable / usable condition, then cures during the next few days.
Incredible stuff, high temp & age resistant, also ideal to stick neodym magnets to surfaces or fix small holes. Is hard, tough, expensive but really good. Look at the spec sheet and you'll know what I mean.
 
hal.jpg

HELP>>>

O.K. Had it all installed and did a trial (no load) @ 40v, no problems, great torque from the motor. Played with it for about 1 hr. Decided to try 60v, ran it to full speed (no load) and that was it... its as if a HAL went out or i hit my LVC (which i didn't). I switched back to 40v, and same thing, it will go about 2-3ft and cuts out as if it hit LVC/over torque. Let off the throttle and sometimes you can get it to move again, but, when you rotate the motor back even just a bit you get another 2-3 ft rotation out of it.

I checked the HAL sensors (at the controller plug). and when i spin the motor all 3 hals go from 0v - 5v between the Neg and Signal Lines.

Ive tried everything i could think of on Lyen's controller and CA settings. Im still getting the same thing.


I may just have to take apart the motor again :cry:

Any ideas?
 
electricwheels.de said:
Hi,
We are using 3M DP 490 epoxy, workable potting time about 1 - 1 1/2 hrs, sets in about 8 hrs to a workable / usable condition, then cures during the next few days.
Incredible stuff, high temp & age resistant, also ideal to stick neodym magnets to surfaces or fix small holes. Is hard, tough, expensive but really good. Look at the spec sheet and you'll know what I mean.

The DP420 is the same stuff but the work life is 20 minutes.. just enough to place the hall sensor.

Than, put that in an oven at 170F during 30 minutes and than leave them to cool down during 2-3 hours.. the epoxy will become as hard as metal!

Ebay often offer the DP460 and DP420.

I know alot these DP epoxy from 3M I used them nearly once a week at my job.

My torque arms ( the two on my giant DH) are glued with the DP420. and with 20kW burst on that motor they never failed !

DP scotchweld from 3M are some of the best!... also to fix magnets to the metal parts.

Doc
 
Hey Pete, did u get the motor/controller sorted?

i'm happy to report that on my front the bike was taken on its maiden voyage yesterday at midnight. 40km/h at 48v....umm looks like i'll be contacting mr Lyen about his controller and doing some surgery on the Magic Pie! :twisted:

give me a shout and lemme know how it goes...

or better yet, bring that sucker to work tommorow!
 
yeah it ended up being the +, -, and 1 hall line that had rubbed through the sheathing by the tight seal ring on the hub. got that sorted this morning, am currently on the road (at public wifi hotspot) with 12km under the belt. runs smooth. peaked at 144A (41v) :lol:


ended the day with 48km under the belt :D
 
okay so bring the biatch to work tommorow and we'll compare notes....

now you're just two steps ahead of me, batteries and charger vs charger alone!
 
Back
Top