JST-SM Crimp Tool

danielrlee

10 kW
Joined
Mar 29, 2013
Messages
506
Location
Wiltshire, UK
Can anyone reconmend a crimping tool for JST-SM connectors, for around the £10 mark? There are a bewildering array of dies and sizes and none at a sane price point actually specify for the SM type solderless terminal.

How exactly do manufacturers of 'official' crimp tools justify triple digit prices?
 
I know this is double of your cost , but thought id put it out there. Still reasonable , but I am sure a quality tool.

http://www.ebikes.ca/shop/ebike-parts/repair-tools/jstcrimp.html

I have one I bought a while back at I think harbor freight. It's not advertisised to do jst , but it does them fine. It was
also dirt cheap like less then 10 bucks. Looking at their web site I can't find it , but if you have one near check em out.

when I go out in my garage shortly Ill see if there is any markings on it.

edit -just seen your from over the pond. Not sure if you have harbor freight there or not , but if not im sure you have something similar.
 
My 2cents-
Hmmmm I've been using needle nose pliers. I KNEW there had to be a special tool lol.
I'm actually used to the pliers now for whatever the two types are I've done.
The key is mostly the perfect size pliers, and working the crimp part just so.

Anybody else use pliers with good results? or are the tools worth the money?
 
nutspecial said:
My 2cents-
Hmmmm I've been using needle nose pliers. I KNEW there had to be a special tool lol.
I'm actually used to the pliers now for whatever the two types are I've done.
The key is mostly the perfect size pliers, and working the crimp part just so.

Anybody else use pliers with good results? or are the tools worth the money?
The tools are worth the money.
(if you use it more than twice a year lol)
The ratcheting crimp tool I use takes different jaws for different connectors.
it cost ~20$ (usa -partsexpress.com) and is compatible with my older, worn out tool's die-sets (jaws) so I have no idea about the cost of jaws.
My (very) old tool was exorbitantly priced.
 
Thanks everyone for your help and input. I wasn't far from ordering the crimp tool from Grin, but.....

agniusm said:
Using this as a lead (always good when you have a specific search term) I finally ordered the SN-28B model - similar to the SN-48B, but covers a range of smaller crimp sizes. I have a number of other non-dedicated wire tools with crimping functionality built-in, but I found none of them small enough, so went for the smaller dies to be sure.
 
imho those are the best crimpers you can get: http://www.amazon.com/Engineer-PA-09-Micro-Connector-Crimpers/dp/B002AVVO7K/ref=sr_1_1?ie=UTF8&qid=1432123464&sr=8-1&keywords=jst+crimp+tool

they make excellent crimps. no ratching mechanism or other goofy stuff. just plain crimping. but high quality steel, very precise. i guess i did at least a thousand crimps with them and they go like new.

BUT just for the fun of it, and because i love tools, i ordered one of those SN-28B models to try out :)
i will tell you my personal experience comparing the two.
 
izeman said:
imho those are the best crimpers you can get: http://www.amazon.com/Engineer-PA-09-Micro-Connector-Crimpers/dp/B002AVVO7K/ref=sr_1_1?ie=UTF8&qid=1432123464&sr=8-1&keywords=jst+crimp+tool
Whoa! This is a nice tool.
Excellent find.
 
thanks. just notice that there is PA-20 and PA-21 for slightly different sized crimps as well.
i'm not sure if i have the PA-09 or PA-20 model, so if you are in rc-models as well it may be better to take the smaller tool. but both are good for the regular jst-xh and jst-sm connectors.

this by the way is a great source for jst-sm connectors: http://www.aliexpress.com/item/100sets-lot-SM-2-3-4-5-6Pin-2-54-Female-and-Male-JST-2-54MM/32314486142.html
i ordered the 100pcs set which includes 20 sets of 2/3/4/5/6 pin male/females jst-sm connectors. i use them everywhere in my bikes (as justin does on the CA) and need a lot of them. normally i buy the set from ebikes.ca when i order from them. but if there is no CA ordering in the queue p&p is too much for those little plug from canada to europe.
 
http://www.electricscooterparts.com/blackwireconnectors.html
I started off with a few sets of these for pretty cheap stateside.

But wholly smokes, 100pairs- that is an awesome deal. That's going on the shopping list.

I'm on the fence with the crimping tools, waiting for someone to confirm i'm an idiot for using the needlenose pliers on about 100+ conductors so far. :lol:
 
nutspecial said:
http://www.electricscooterparts.com/blackwireconnectors.html
I started off with a few sets of these for pretty cheap stateside.

But wholly smokes, 100pairs- that is an awesome deal. That's going on the shopping list.

I'm on the fence with the crimping tools, waiting for someone to confirm i'm an idiot for using the needlenose pliers on about 100+ conductors so far. :lol:

You're not an idiot, you just have MUCH more patience than the average human being. I used to do that and take FOREVER to get things done. Now it's just click-clack-done. Remembering to put heatshrink on first is more of an issue now.
 
cal3thousand said:
...You're not an idiot, you just have MUCH more patience than the average human being. I used to do that and take FOREVER to get things done. Now it's just click-clack-done. Remembering to put heatshrink on first is more of an issue now.
no. he IS and idiot ;) sorry. that was harsh. but you started it.
pliers are NOT adequate. a crimping tool "rolls" the two flaps and closely surrounds the wire insulation.
with pliers you can only press the flaps down. this can make the connector too wide to fit into the housing and provide inadequate hold of the wire. so for the professional fit use the correct crimping tool.
 
Can't say I didn't ask for that! In my defense, the properly sized needle nose are a challenge, and the 'rolls' not as perfect (i admit there is less grip potential on the insulated wire crimp portion), but I'm happy with the outcome. Wires don't pull out and the conductors go in and out of the housing as they do with the factory crimped ones.

I thought jst's were cheesy at first and replaced them all with soldered spades. That was a big pita that I abandoned shortly after. Now that I understand how compact, robust, and convenient jst's are and I really like them. But they make me feel like a watchmaker or something lol.

Should probably buy a crimper. Just was kinda wondring if anyone else was acheiving success without it.
 
r3volved said:
I use the one supplied by ebikes.ca and it works great.
Pretty heavy duty little quality unit - I would expect it to outlive me...

I bought one from them too. A nice piece of kit. Works well! It's so nice to make my own connections. It seems like controllers always come with the wrong connection. Male when I need female and female when I need male. Now if I can find a more reasonable source for small quantities of connects than ebikes.ca... Their selection is pretty handy but is us some more than others.

Amazon seems to have a few choices in the 13GBP range(sorry can't remember the proper keystroke)
 
izeman said:
i ordered the 100pcs set which includes 20 sets of 2/3/4/5/6 pin male/females jst-sm connectors. i use them everywhere in my bikes (as justin does on the CA) and need a lot of them. normally i buy the set from ebikes.ca when i order from them. but if there is no CA ordering in the queue p&p is too much for those little plug from canada to europe.
Excellent find. Ordered!
 
FYI,

While those previously mentioned are a bit more versatile you can get one of these at your local R/C hobby shop for around 10 bux and they sell all the connectors for JST connectors that are used in both balance leads and servo connectors.

Not sure if everyone knew that or not.

Tom
 
tomjasz said:
izeman said:
i ordered the 100pcs set which includes 20 sets of 2/3/4/5/6 pin male/females jst-sm connectors. i use them everywhere in my bikes (as justin does on the CA) and need a lot of them. normally i buy the set from ebikes.ca when i order from them. but if there is no CA ordering in the queue p&p is too much for those little plug from canada to europe.
Excellent find. Ordered!

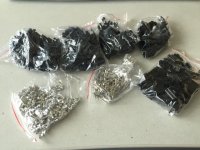
I just had a similar bag show up in my mailbox last week :D

this bag was fortunately separated by pin counts. Last order I had was a mix of 5 and 6 pin and they were all thrown in the same bag. Needless to say that most of them still sit like that, waiting for me to be bored enough to sort them out.
 
the connector set arrived yesterday. i LOVE it. i LOVE to have enough spares when i do the rewiring, and just have to grab in my box and take out the correct connector instead of removing pins from an old one and re-using that.

IMG_1084.JPG
i can HIGHLY recommend that seller and his products to everyone needing those.
 
Related issue - please share tools/techniques for removing the pins from the connector instead of just cutting the whole thing off and starting over. You know, like when you want to add a washer to your axle and it doesn't fit over the hall connector.
 
cycborg said:
Related issue - please share tools/techniques for removing the pins from the connector instead of just cutting the whole thing off and starting over. You know, like when you want to add a washer to your axle and it doesn't fit over the hall connector.

I use a sewing needle or straight pin to depress the tang retaining it in the housings. Takes some practice and may help to memorize a blank contact to understand where to press. Once you get it out, the tang will likely need to be re-shaped a bit to be re-used.

Speaking of JST crimping tools - I recently got one of these and does a great job - http://www.hobbyking.com/hobbyking/store/uh_viewItem.asp?idProduct=34109
 
only one word: PITA. a REAL PITA.
removing the femals pins is easy. use a little screwdriver and gently press in the little flap. remove the pin, use a stanley knife to slip under the flap and lift it. done.
the male pins are next to impossile to remove. i searched the web for a pro tool especially made for this, but couldn't find any. you can use a needle and push it in the connector, wiggle it around and try to push down the flap while pushing the pin IN so you can reach the flap with the needle.
i even filed down an allen key and a drill to make a little pin remover tool, but only work sometimes.
i guess those connectors are not meant to be removed. they are a one time application.
 
izeman said:
only one word: PITA. a REAL PITA.
removing the femals pins is easy. use a little screwdriver and gently press in the little flap. remove the pin, use a stanley knife to slip under the flap and lift it. done.
the male pins are next to impossile to remove. i searched the web for a pro tool especially made for this, but couldn't find any. you can use a needle and push it in the connector, wiggle it around and try to push down the flap while pushing the pin IN so you can reach the flap with the needle.
i even filed down an allen key and a drill to make a little pin remover tool, but only work sometimes.
i guess those connectors are not meant to be removed. they are a one time application.

For the male pins, I use a safety pin with the needle point snipped off. This is the cheapest way I have found that is thin enough, yet strong enough. And if I lose my 'tool', I just go make another one. 1.5 - 2.0" have a good thickness of wire.
 
Back
Top