Just installed Sick Bike Parts SHIFTELECTRIKIT 48V

Joined
Mar 17, 2015
Messages
24
I was going to try and fit an E-flite power 360 + Phoenix Edge 160 I had lying around to my MTB. After pricing it out I decided to go in a different direction as it was not much more expensive for the sick bike kit and it comes with EVERYTHING needed.

Kit Link: http://www.sickbikeparts.com/catalog/product_info.php?cPath=26&products_id=181

I am really happy/impressed with Sick Bike Parts so far. They are in the US and shipping was only $14 and the kit was at my door in 2 business days. They were also very responsive to a few questions i had.

The build was pretty straightforward and I had the kit installed in a day once I had all the right tools. Successfully completed a bench test today, everything seems to work properly. If anyone has any questions about this kit or needs a measurement or something I will do my best to accommodate.

After I get the wiring cleaned up a bit I will post some more pics.

And of course I will report back with my thoughts on how the kit performs soon.

Some initial thoughts....
-I really like the planetary gear reduction built into the motor!
-Full use of rear gears/derailleur
-I also really like the freewheel setup, you can pedal power with little/no resistance, power it completely from the motor, or power it hybrid style with combined pedaling/motor.

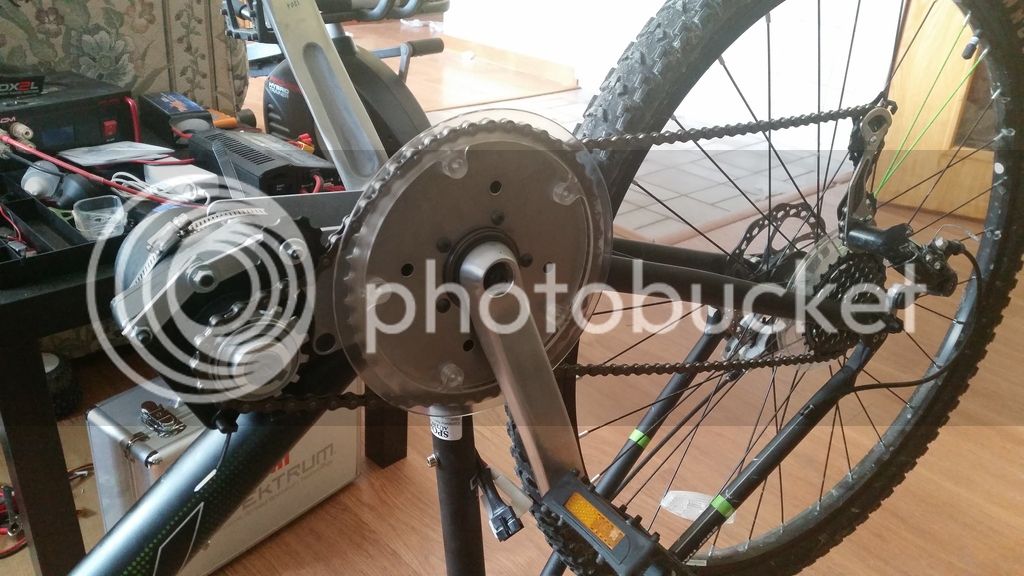
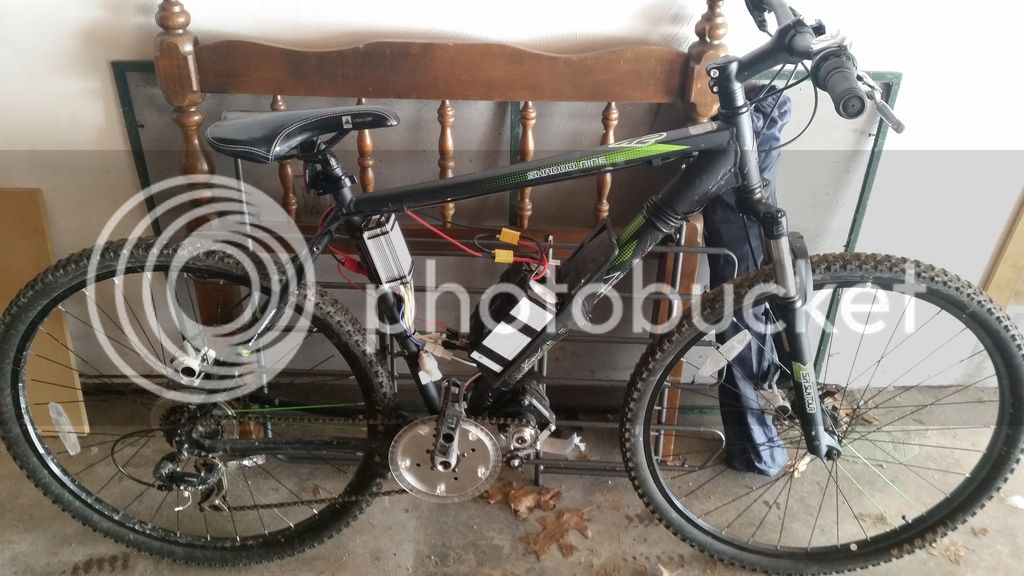
Quick pic, more to come!
20150324_141059_zpsrxuj6is4.jpg
 
That is the well-known Headline motor and planetary geared reduction, first made famous by Cyclone. Here's some pics and links to more stuff: http://endless-sphere.com/forums/viewtopic.php?f=16&t=62589
 
Took it for a test ride and it went pretty well. Only issue is some chain skip, only happens when under %50+ power. I bought the bike last year and only put a few hundred miles on it at most so I dont think the chain or gears are worn out. Not sure exactly how to diagnose/fix this, i think it is skipping at the rear (kinda sounds like a hard shift).
 
Some derailers have a tension adjustment screw. That might help a little bit.

But in higher gears, there's simply less teeth to hold the chain, and more loose chain in the system, so it's more likely to skip even under pedal power with hard cranking.

As long as you're keepng both front and rear in the right gear for the speed/torque you're after, it'll be better, but if you've lost your other rings in the front then that takes out some combinations.

Because you don't have the big chanring in front anymore, you also don't need as long a chain, so you can probably take one set of links out at least, and that will increase chain tension and help with skip.
 
The rear derailleur was a tiny bit off so I just adjusted a bit, thanks for the tip.

Yes the problem seemed to happen more on the smallest rear gear, probably a combination of less teeth to grip and the derailleur being slightly off.

Yep down to one sprocket in the front with this conversion (removed the front derailleur). I think I can get by pretty easy not using the outermost and inner most rear gears to keep the chain mostly straight.

I also connected the kelly controller to my computer and tuned it down a little bit to take some stress off the drive components.
 
The tension adjustment screw does not adjust the position of the derailer, it makes the cage pull back harder on the chain. Not all derailers have this. See Sheldon Brown's bike website for info on that sort of stuff (lots of bike maintenance and "how it works" articles).

If you no longer have the largest chainring in front, taking links out is your best bet to prevent the problem, and also to prevent wear (or damage) to your chain and chainrings.

Otherwise you may wind up replacing all of them much sooner than otherwise, becuase the chain is going to ride up on the tips of the teeth instead of down in the root, and wear the teeth off faster in the "surf wave" shape you can see on badly worn sprockets.

(and because you've lost the fastest (largest) chainring, you will tend to have to use the smaller sprockets more to make up for that on the speed.
 
10kmah consumed and not a single chain skip. I set the power output of controller to 60% for testing and it was still plenty enough to power up medium hills so i will probably just leave it this way. Stayed in middle gear for most of the time and had a lot of fun.

20150325_133421_zpsroofksug.jpg
 
professorcake said:
10kmah consumed and not a single chain skip.
Glad it's working...if you have problems later you can refer back to this thread. ;)

What is "10kmah"?
 
"The tension adjustment screw does not adjust the position of the derailer"

oh i get it. thanks for the insights. im definitely not an expert on bikes but i have learned a lot through this build.

ill see if i have this adjustment and probably take out a link since i wont be using the largest chainring like you said.
 
10k mah is how much battery capacity i consumed during my test ride. mah is milli amp hours. well ok my batteries are 10k mah total so i probably consumed a bit less ~8-9k mah.
 
Ah. Then you probably should write it as simply "10Ah", because "k" is 1000x unit and "m" is .001x unit, so they simply cancel each other out. ;)
 
speaking of batteries and AH, my throttle leds show low battery (single red blinking led) but my batteries have plenty of life left, is this a result of me using 12s lipo vs some other battery chemistry with a slightly different voltage? When i measure my batteries (red led flashing) they are around 4v per cell so I know really they are only around half depleted, i set the low voltage cutoff in the controller to around 3.2v per cell i think. is there a way to calibrate the throttle leds?
 
What's your top speed with this kit?
 
professorcake said:
is there a way to calibrate the throttle leds?
Yes, but you'll have to take it apart, find the resistances, look up "TIL431 voltage reference" and recalculate the resistances on them so each one lights up at the voltage you want it to. In my old DayGlo Avenger thread, probably in the pages after I painted it yellow, there should be some pics of such a throttle disassembled showing those boards inside.

Basically on most of these 3LED throttles, one is always on, and one lights up at some amount just below "full" voltage of the pack it's made for (36v might=40v, 48v might=54v, etc). The other lights up at some lower voltage, perhaps halfway down or less in voltage of the pack. If you like, you can determine what point each lights up at now simply by checking your pack voltage when each one goes out. (or if you have a variable voltage power supply, set it to your battery's empty voltage, hook it up to the battery input of the biek in place of the battery, and turn it up till it lights each one, noting down what they are.
 
professorcake said:
speaking of batteries and AH, my throttle leds show low battery (single red blinking led) but my batteries have plenty of life left, is this a result of me using 12s lipo vs some other battery chemistry with a slightly different voltage? When i measure my batteries (red led flashing) they are around 4v per cell so I know really they are only around half depleted, i set the low voltage cutoff in the controller to around 3.2v per cell i think. is there a way to calibrate the throttle leds?

If you are using lipo batteries, keep them above 3.6 volts per cell or you will drastically shorten their life.

Matt
 
evolutiongts said:
What's your top speed with this kit?

Not sure i really only started riding it today. I should have time in the next few days to get it on a straight/level and let her rip with the gps on my phone running. Need to put the controller back at 100% however to get a better idea of its capabilities, it is currently set at 60% and i would guess im getting 25mph+ easy.
 
recumpence said:
professorcake said:
speaking of batteries and AH, my throttle leds show low battery (single red blinking led) but my batteries have plenty of life left, is this a result of me using 12s lipo vs some other battery chemistry with a slightly different voltage? When i measure my batteries (red led flashing) they are around 4v per cell so I know really they are only around half depleted, i set the low voltage cutoff in the controller to around 3.2v per cell i think. is there a way to calibrate the throttle leds?

If you are using lipo batteries, keep them above 3.6 volts per cell or you will drastically shorten their life.

Matt

I have been running lipos in RC cars/planes/quads for years with a 3.2v per cell cutoff and I dont think I have experienced premature failure. That being said I usually stop well before cutoff anyway! As far as I know the extreme lower limit for a lipo cell is 3.0v
 
A small RC plane/car will not draw the type of current that an Ebike will, due to the weight and slower acceleration to top RPM. As odd as it may sound to you as an experienced LiPo user, LiPo voltage will "sag" a little on an Ebike, especially with a 1P pack as shown here (looks like 44V / 5-Ah).

BTW, I like the downtube pan you have the two liPo bricks on, where would somebody get one of those?
 
spinningmagnets said:
A small RC plane/car will not draw the type of current that an Ebike will, due to the weight and slower acceleration to top RPM. As odd as it may sound to you as an experienced LiPo user, LiPo voltage will "sag" a little on an Ebike, especially with a 1P pack as shown here (looks like 44V / 5-Ah).

BTW, I like the downtube pan you have the two liPo bricks on, where would somebody get one of those?

Two 10AH 6s 25c lipos in series, potential discharge rate of 250amps, still voltage sag. Even in small scale RC there is some voltage sag. My thought process was lets say the under no load condition the packs voltage per cell is 3.4v per cell and under load it sags to 3.1v, that should trip the low voltage cutoff in the controller and prevent the battery from being discharged any further (below 3.0v). Maybe the voltage sag is more than that with this application, in either case I will keep it in mind, i guess running a more conservative 3.4v-3.6v would be the safest bet.

With a little work the battery tray could hold 2 more of these batteries and I could run a parallel/series combo and get 20AH. However I am wondering if that is any better or worse than carrying 2 more packs in my backpack (which I am usually wearing anyway) and swapping them out when the first set gets low.

Speaking of the battery tray it is sort of a one off part. It was the rear tray for an old mongoose that I re-purposed, needed some dremeling and some holes drilled so that I could mount it to the 2 beverage holder threads on the downtube (also supported with zip ties). It turned out pretty sturdy and has the perfect lip at the bottom to cradle the lipos.

edit: i took another look at it and the brand is "Rhode Gear", i did a quick search on google and ebay but couldnt seem to find it specifically.
 
Please update us on the performance of the kit,
 
Short update

The kit has been working flawlessly since installed. Went through a round of maintenance on my bike (tightened everything up, chased down some squeeks/creaks, derailleur adjusted, chain lubed) and have been using it more frequently recently. The previous chain skip problem I was having has been eliminated except for occasionally while in the smallest rear gear.

Got my bike on a scale, bike with batteries weighs 49lbs, without batteries 43lbs. This seems pretty heavy, how does this compare to other non hub e bikes? Unfortunately I am not sure of what my bike weighed before the conversion but I know its a somewhat heavy bike.

Using my phones GPS I was able to clock my bike at just under 30mph under its own power on a flat. Note that this is with the controller set to 60% output and I was using the second smallest rear gear as the smallest tends to skip a bit. So should be reasonable to assume 35+ with controller @ 100% and in smallest gear.

I can now ride up two very steep sections of trail that I found impossible to climb prior to converting my bike, very satisfying! Also I can outpace my Siberian Husky no problem now (also very satisfying!).

With the areas I ride and my style of riding I was thinking of converting the rear to a single speed to save some weight and reduce mechanical complexity. Just a thought, maybe ill try this when I have some extra time/money (lol).

happy riding!
 
Ok ebikes are easily the most fun one can have on two wheels. Motorcycle comes close but i think i am having more fun on my ebike!

Just wiped out pretty hard and twisted up my front wheel something nasty lol. Front wheel came up over some whoops and managed to land with it pretty out of line with the rear wheel, this was not a recipe for success. A few minor scrapes but laughing my ass off the entire time, too much fun! My dogs face was priceless, he was like "dude, you ok?". Any suggestions for a replacement front 29er disc brake wheel on a budget? I dont think the one I was using was particularly strong.
 
Nice build, and I wasn't aware that SBP was selling electric kits now... The last time I dealt with them was 2009, and they were a pleasure to work with as I recall.

The complete kit for $329?? That's pretty cheap, and I wish I had known then what I was getting into with my build... I used SBP components and some custom stuff, and ended up spending well over 700 at the time... as well as countless hours of cussing and re-adjusting the thing.

I'm glad to hear your build will do 30-ish. I've found that's a comfortable top speed for me on the road, and it's not always easy to achieve with a hub kit unless you want to spend a little extra. I like the ability to shift too, as I find it gives me a better range of control. Hub motor advocates might say that hub motors can be reconfigured for any speed range, you just have to think ahead and buy the right winding. I find this to be a bit like the manual vs automatic argument. Yes I could get an automatic, and driving would be easier... but there is something about a manual and clutch that I just like.

As to your skipping issue, if you're still having it, I'd check the vertical chain alignment. You mentioned you were getting skips on the smallest sprocket? I found over NUMEROUS teardown/readjustments of my build that if your crank-to-cassette chain ring alignment is off, you'll have this issue. You have to make sure that crank sprocket is dead-center on the cassette when viewed from above. You can't adjust the cassette very easily, but you can shim the SBP chain ring fairly easily I've found. The chain ring can also be adjusted by using different length bottom bracket spindles. You just kinda have to play with it until that alignment is optimized... see the graphic below. I didn't ever really get skips again after I had this adjusted properly.

centreline-chain-alignment.jpg
 
Back
Top