Solar Trike build thread

AF7JA

100 W
Joined
Jun 9, 2015
Messages
167
Location
South-West Kansas
I have mentioned my desire to build a solar trike. I that point I have all the main parts. The motor is still on order; but should arrive soon. All the others are in my basement, or sitting next to my desk.

I will be using:

Solar panels:
140-150W_medium.jpg

EVTV Motor Verks Store: Flexible Solar Panel 140w, Solar, Boat and Golf, 140wsolarpanel. This will provide power for motor, power for ham radio, and the, all important, sunshade. So far I am going with two. If I add more I will need to do something with the charge controller, as it can only handle two panels.

Charge controller:
genasunboost-1_medium.jpg

One solar panel to Li-Po voltage regulator

Trike:
IMG_20150222_111329.jpg

One Trike (A performer Trike-E, note, the "E" does not signify that it is already rigged for electric, it is not, that just happens to be the name)

Motor:
IMG_0397__58736.1457576428.550.550.jpg

Bafang 750W BBS02 Mid Drive

Battery:
48v_Tiger_Shark_17.5ah_GA-1__30477.1467854266.550.550.jpg

48V 17.5Ah Li-Po Battery

I decided to go with the Ba-Fang. Part of the reasoning is that it is reputed to be a simpler install. I am adding enough complication with the solar panels.

The other reason is that the Ba-Fang is a legal power kit. Even with the cyclone limited in power, by the Cycle-analyst, I feel that it would leave me constantly explaining myself and, if I ever were to be cited (I know that is on the extreme edge of unlikely) the Ba-Fang is clearly legally rated.

The Ba-Fang also comes with a built in Pedal Assist Sensor (PAS). It is also reported to be very reliable when run at, or below, legal power levels.

Stage one will just be to get the trike running under Electric power. I expect to put the battery between the rider's knees; any better places come to mind?


When done, I expect it will be similar to this:
rsz_0502161053.jpg

His write-up is here.
 
There really aren't a lot of good places to put the battery in this trike. I ended up deciding on the main boom. I tried closer to the seat to help centralize weight. However, when testing, I immediately saw that my legs were going to rub on it while pedaling.

This is about the only good place I can find, it will be slightly forward of that point, it just wouldn't sty forward on its own, for the picture:
IMG_0117.jpg


I went down to ACE hardware yesterday for some small parts:
IMG_0118.jpg


The idea is to make six clamps like this:
IMG_0119.jpg


They will then fit through the battery bracket like this:
IMG_0120.jpg


Then attach like this:
IMG_0121.jpg


And attach to the bike like this; only with six, not just one:
IMG_0122.jpg


*****************************************************

Well, a minor problem has shown up. See the little screws in the picture below?

Well, nothing fits them. I went back to Ace hardware, and I do appreciate that they let me use their hardware section was a parts fitting shop, they have even loaned tools for stuff in the past. However, we tried all the allen wrenches they have, both standard and metric. Nothing fit those screws.

Well, a crescent wrench fits them, I just didn't want to go that route so early in the project.

While I was there I remembered to get some nonslip drawer line in the Kitchen gadgets section, that will go between the hose clamps and the boom. It will provide a tiny bit of shock absorption for the battery pack, and will protect the paint. However, the main reason for using it is to keep that battery pack from slipping on the boom, once it is in place.

IMG_0121.jpg


Even with that problem, I did get it mounted on the trike:
IMG_0123.jpg
 
AF7JA said:
Well, a minor problem has shown up. See the little screws in the picture below?

Well, nothing fits them. I went back to Ace hardware, and I do appreciate that they let me use their hardware section was a parts fitting shop, they have even loaned tools for stuff in the past. However, we tried all the allen wrenches they have, both standard and metric. Nothing fit those screws.
That's kinda wierd. I've run into some stuff on ebike bits that don't fit "standard" allen (or torx) wrenches or bits, being just a hair too small to be able to insert one, or just a hair too large to firmly fit one in, but so far not in stuff from a hardware store. :/
 
amberwolf said:
AF7JA said:
Well, a minor problem has shown up. See the little screws in the picture below?

Well, nothing fits them. I went back to Ace hardware, and I do appreciate that they let me use their hardware section was a parts fitting shop, they have even loaned tools for stuff in the past. However, we tried all the allen wrenches they have, both standard and metric. Nothing fit those screws.
That's kinda wierd. I've run into some stuff on ebike bits that don't fit "standard" allen (or torx) wrenches or bits, being just a hair too small to be able to insert one, or just a hair too large to firmly fit one in, but so far not in stuff from a hardware store. :/

It really was a, "what could I possibly be doing wrong?" kind of a feeling. The guys at the hardware store had no idea either. It wasn't a case of one screw being messed up, we went back to the bin and tried several. They did not fit in any of the allen keys they had.

As you can see, it wasn't a show stopper. But I would like to do things right.

The motor install will probably wait until next weekend.
 
Sorry it has been a while since I posted. While working I discovered a crack in the frame on the trike. I was sent a replacement by the manufacturer. However, it took me a while to move the parts over.

Changes made: installed NuVinci Transmission.

On my test runs I found that, when using the PAS, speed was basically controlled by gear settings. However, changing gears resulted in a lot of bothersome banging and clanging. As such, I decided to go with the NuVinci. I have on on my commuter and on my wife's trike; so I am reasonably familiar with them already.

This was several months ago:
Okay, I completed step 1. That step was to get the bike moving and, generally working as an e-bike.

I will post pictures later as I had to do a little PVC fab in order to make a place for the dash.

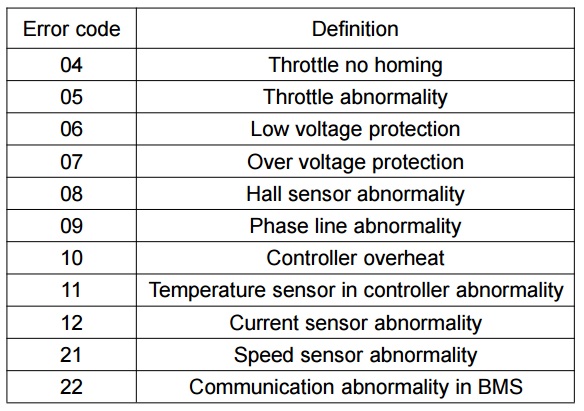
I test rode it to Mass this morning. It worked fine; however, when I left I had an "error 8." To deal with this I had to pull the right cover off and press the connector in. This requires a crank-arm puller, an allen wrench, and a philips screwdriver. There are things that will need to be in the "road kit."
c961codes.jpg

from here

I was able to feel movement as I pressed the connector in from the back. This is what it looks from the right side:
hall_connect_1.jpg

This is what it looks like from the left side:
hall_connect_2.jpg

both Hall sensor connector pictures are from here

When I pressed in the connector I did feel a slight movement. This makes me more confident that it did seat. The Female connector on the other side is part of a circuit board that is screwed into place.

Here is a comment on installing the NuVinci, and a major change in how I will be assembling the frame for the panels.
Robert C;19375229 said:
In the last post I mentioned the switch to the NuVinci. I have that installed. I will comment that to install the N380, do not follow the instructions on the Park Tool site. The instructions are for a different model. Go to the NuNinci instructions. It seems to be shifting through its entire range.

I am still waiting for a Presta tube to arrive. I ordered a Schrader rim; however, the wheel was built with a presta rim. Instead of drilling it out, I decided to use adapters and put presta tubes on the front too (I don't want to be fiddling with the pumps valve by the side of the road, I want one system, whichever it is). I am in a small town so I had to order a tube.

I have everything transferred over from the old frame. The frames are not exactly the same; so some adapting was necessary. The only concern is that steering alignment is different.

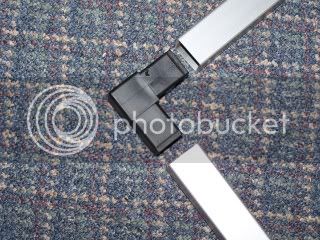
Instead of going with PVC, as I originally planned, I decided to go with 1" Aluminum tubing. Compared to the price for UV resistant PVC, this comes in a bit cheaper, and if the websites are to be believed, a bit lighter; however, I am concerned that it will be harder to work with. I have noticed that many of the solar bike projects online have gone this route. So, a bunch of metal and end fittings are on order.

frameconnect1.jpg
image from here


Here is where I was yesterday with the project:

The aluminum arrived today :)
IMG_0223.jpg


Package opened in basement.
IMG_0224.jpg


The frame knocked together probably gives an idea of where I am going with this. There is a gap between the panels. My intent is to put a bit of sheet metal there to support a ham radio antenna and the charge controller.

IMG_0225.jpg
 
I did some more work on it today. As a comment, if I were buying a bike with this project in mind, I would probably start with a trike that uses square tubing. I can't remember who makes it; but I know there is one.
IMG_0227.jpg


IMG_0228.jpg


The tools used are:
  • mallet
  • wrenches
  • power drill
  • saber saw
 
This is what I added today. The panels are working. The metal plate between them is actually a lot bigger than it looks. There is just enough space between the panels for a NMO antenna mount, for my 2m radio.

The wires in front are there to reduce the side to side rocking of the panels. I will probably add some to the rear too.

IMG_0232.jpg


Mounting the panels went pretty straightforward. I used blind (pop) rivets. I went with thick rivets, which was probably a bad idea. The shafts kept breaking off near the top, instead of pulling out like they are supposed to.

I first tried running the brace bolts through the panels, as you can see on one side. It was a lot more trouble than it was worth; so I didn't do it on the other side. Because the rails were not supported, they were bowed out a little. I used a strap to pull them into position as I put the panels on. At this point the panels will hold the rails parallel.

The crimping tool and a meter to put on the output of the panel arrived today. As such, I didn't wire them up yet. I plan to use 15A powerpoles going in to the battery, and 30A coming out to the 12V inverter which will then go to the amateur radio. Part of the reason for wanting to go with different sizes is to avoid mishaps when connecting stuff.
 
AF7JA said:
There is just enough space between the panels for a NMO antenna mount, for my 2m radio.

Keep in mind that any shadow falling on a solar array reduces the performance of the entire panel to whatever the shaded part can do. It's like putting a kink in a hose.

How do you get in and out of that trike with the canopy in the way?
 
Chalo said:
AF7JA said:
There is just enough space between the panels for a NMO antenna mount, for my 2m radio.

Keep in mind that any shadow falling on a solar array reduces the performance of the entire panel to whatever the shaded part can do. It's like putting a kink in a hose.

How do you get in and out of that trike with the canopy in the way?

That is an interesting point. The antenna comes off easy (I am using a NMO mount). This is part of the reason I am putting a gauge directly after the panel and before the charge controller; I can do some experiments.

As far as getting out; yes, it looks funny. I wanted to keep it as low as possible because I am concerned with wind.

A lot of the inspiration comes from this bike:
2-Dragonfly-recumbent-trike-powered-by-eZee-drive-system-e1438877816532.jpg

Picture taken from here
 
Road test complete!

I am going to call it a success by the metrics I put forward at the beginning of the project. At the beginning I defined success and being able to charge at the consumption rate at 12mph. I still am pedaling and can feel that I am pedaling; but I am not working at a rate that I will have any trouble maintaining.

On my road test today, at 12mph steady, I was pulling between 60 and 70 watts. I was charging at 190-220 watts. If these numbers hold true, I will have the unlimited range that I wanted on my touring trike.

It is nowhere near the 280W that these panels are rated at; however, they are not in an ideal position either.
IMG_0234.jpg


IMG_0235.jpg


IMG_0233.jpg

I had to open the battery to make sure that my power was going in on the same side as the standard charger and my load out (to the 12V circuit) is going out on the load side.

It still needs some guy wires on the rear of the solar deck. I am also going to put one more brace under the solar deck.
 
Nice work!

Have you ever had any RFI issues with the motor controller when using the radio?
 
fechter said:
Nice work!

Have you ever had any RFI issues with the motor controller when using the radio?

I am not done with the 12V side yet; but I did get a filter that I will put after the voltage regulator.
 
It would be interesting to see how fast you can go without a battery, just straight off the panels.

I'm sure a filter won't hurt. I just don't trust the filtering in the motor controller much and have always been afraid to let any RF get close. Easy enough to test. Also your antenna will be in a good position to minimize any pickup.
 
Building a Trailer that will house the Solar Panels will have many advantages.

1) Lower to the Ground so it will not be affected as much by winds.

2) If a large gust of wind does lift up the trailer and turn it on its side, that is much better than that happening to you on the trike.

3 ) While on a trailer with the Solar Panels much closer to the Ground, you can tilt the panels ... a little ,
to get better efficiency according to your starting point and finish. ( Perfect example: you are riding from the South to a North Destination in the Morning , you tilt up the panels a number of degrees to get a better angle of Sun exposure, then in the afternoon when traveling South the same angle will give you better charge as well.

4 ) You can have a little amount of storage space under the panels on the trailer for cargo.

5 ) Most Motor Vehicles pass you with more space when ever you are pulling a trailer .


AF7JA said:
As far as getting out; yes, it looks funny. I wanted to keep it as low as possible because I am concerned with wind.

A lot of the inspiration comes from this bike:
2-Dragonfly-recumbent-trike-powered-by-eZee-drive-system-e1438877816532.jpg

Picture taken from here
 
ScooterMan101 said:
Building a Trailer that will house the Solar Panels will have many advantages.

I think V.2 will use a trailer. Some of the other advantages of a trailer are that it can easily separate from the trike. another problem is adjustability. I need to adjust the boom length. I can already see that this is going to be a major problem.

ONe thing that really surprised me is how little power this uses, in comparison to my upright e-bike.

V.2 is going to wait until I have a velomobile though. On a velomobile having the panels on the actual unit would not work well at all.
 
Since you are going to wait until you get a velomobile before moving the Solar Panels onto a trailer,
Some thoughts I have on that , since I would like to do the same off in the future myself.

Since the trailer will be wide for the panels, which is good because when on the Road with Cars/Trucks, the bigger your area the more visible you are to those coming up behind you , faster than you, add to that the fact that many of them are Distracted in some way. You want to be fast to have more time for them to pay attention , and you want to be as visible as possible.

You can now make a velomobile that is more wide as well, and has suspension.

In my Research I have found most every velomobile to be too thin , like a cigar shape. And you probably have also.
If you do find a wide velomobile please list the link.

Many years ago , I went with some friends to Tehachapi where there was a Sailplane Homebuilders / Small Soaring Aircraft Builders Convention .
I saw a man in a wheelchair , using oxygen , I knew he did not have long to live , Some/Many Elders have allot of wisdom. So I asked him how I could build something for a car replacement, towing a trailer
how that could be very aerodynamic , so as to get the best fuel efficiency possible.
He said to build as low to the ground and as wide as possible, I knew about low to the ground to cut down on drag, but, wide ? he said Yes to also being wide , just make it wide and not too thick, you know don't make it like a SUV or Truck or even a typical car. In other words make it more like a Formula 1 Race Car, in the case of a velomobile make a little like a Arial Atom type of vehicle, better yet a 2 or 3 wheel bike version of a BAC Mono. you get the idea, with the wheels enclosed in the fairing .

That man was Don Mitchell , Designer of the Mitchell Wing, and the B-10 , A-10 , U-2 Ultralights, sailplanes of the 1950's era, and before that Designer of the 1946 Goodyear Racer Flying Wing Design, and I think even Northrup's flying wing aircraft . Interesting that I see reports that of many of the future Commercial Aircraft will be Flying Wings. He was way ahead of his time.

http://www.twitt.org/GoodyearRacer.html


AF7JA said:
V.2 is going to wait until I have a velomobile though. On a velomobile having the panels on the actual unit would not work well at all.
 
fechter said:
It would be interesting to see how fast you can go without a battery, just straight off the panels.


This is exactly what I want to do as an educational project for my middle school students. I have a 285W, 32V solar panel, a trailer and a bike with a BBSHD. Will I damage the BBSHD or built-in controller by plugging the solar panel directly to the power cables instead of the battery?
 
Stu Summer said:
fechter said:
It would be interesting to see how fast you can go without a battery, just straight off the panels.


This is exactly what I want to do as an educational project for my middle school students. I have a 285W, 32V solar panel, a trailer and a bike with a BBSHD. Will I damage the BBSHD or built-in controller by plugging the solar panel directly to the power cables instead of the battery?

Firstly, to ask, what do you teach? I teach computer apps and robotics at my Middle School.

As far as the second, and note that this is purely conjecture. I think you will need some sort of voltage regulator, something like the Gensun thing I am using. The voltage straight off the panels is to variable. I put a Volt/Amp meter immediately after the panels, just to see what they are doing, and the numbers are not steady at all.

Come to think of it, the gensun wouldn't work at all as it looks at the battery voltage between cycles. Just some sort of straight regulator, of the buck regulator type, would work best (if it worked at all). I just don't know where you would get a 36V regulator; they probably exist, I just don't know where to look.

Just going straight from the panel to the befang would be worth a stab. You would need to turn off any low voltage protections that the controller may have. As long as you don't go over voltage I dont see any problems, I also dont expect it to work well.

To add, I installed the 2M radio last night. I don't plan to bother with HF for this first trip.

I did make an attempt to make this thing as low as practical. However, I needed to work with existing items. Further, it still needs to work as a bike. For that is needs to be narrow enough to fit through car barriers and to be able to ride to the right of rumble strips on road shoulders. It also needs to be pedalable. I am looking at existing velomobiles for the next version (but that will be no sooner than next year). They are generally under 1M in width. The trailer cannot be much wider than that or it will be hitting things.
 
Just found this post and am stoked I found it. Very cool AF7JA. Subbed...
 
Stu Summer said:
fechter said:
It would be interesting to see how fast you can go without a battery, just straight off the panels.


This is exactly what I want to do as an educational project for my middle school students. I have a 285W, 32V solar panel, a trailer and a bike with a BBSHD. Will I damage the BBSHD or built-in controller by plugging the solar panel directly to the power cables instead of the battery?

The BBSHD is good for up to 60V so as long as the open circuit voltage of the panels is not above this, it will be OK from a voltage standpoint. The BBSHD will cut off if the voltage is too low, so any sag from acceleration might make it cut off, but this will not damage anything. A big capacitor in place of the battery might help. Of course this would not be a very practical setup, just interesting for a test. In real life you want the extra current from the battery to accelerate from a stop or going uphill. An ammeter will tell you if the panels are keeping up with the drain or not.
 
fechter said:
Stu Summer said:
fechter said:
It would be interesting to see how fast you can go without a battery, just straight off the panels.


This is exactly what I want to do as an educational project for my middle school students. I have a 285W, 32V solar panel, a trailer and a bike with a BBSHD. Will I damage the BBSHD or built-in controller by plugging the solar panel directly to the power cables instead of the battery?

The BBSHD is good for up to 60V so as long as the open circuit voltage of the panels is not above this, it will be OK from a voltage standpoint. The BBSHD will cut off if the voltage is too low, so any sag from acceleration might make it cut off, but this will not damage anything. A big capacitor in place of the battery might help. Of course this would not be a very practical setup, just interesting for a test. In real life you want the extra current from the battery to accelerate from a stop or going uphill. An ammeter will tell you if the panels are keeping up with the drain or not.


Fechter, Thank you so much for your response. I just got the same answer from a local electronics expert I happened across, that I would not damage the motor. This was my greatest concern. I've ordered MC4 to pigtail cables so I can put Anderson's on the other end and connect the panel instead of the battery to the BBSHD AND SEE WHAT HAPPENS! I also bought a $35 MPPT controller (MPPT Solar Panel Battery Regulator Charge Controller with LCD Color Display 24/36/48/60/72V 10A with DC-DC Boost Charge Function) for charging the battery from the panel for longer trips and to see if the proper voltage output runs the BBSHD better.
 
Well, I just finished a 270 mile shakedown. Quite simply, it worked fine. I started the project with the "success metric" of 12mph average speed, with continual rider input. Toward that, I am using a PAS and assist level set and one, of five levels.

There was alight overcast the whole time. That added to the fact that the panels are not ideally positioned led to low charge numbers. The best I saw was 220W.

The only time the battery showed any signs of dropping; but not to a level that would raise concern, was a long 2% grade with a strong headwind (which I later found was a continual 27mph) in the morning were the sun wasn't really fully up. However, by noon the batteries were fully charged again.

Even though 12mph was my success metric, I found that there was no trouble running at a continual 14mph. I could have run faster; but I really didn't want to. As far as stability, which was a concern, it was fine. Trucks passing didn't shake it at all. Heavy side winds called for continual steering input; but that is to be expected.

I need to reposition some stuff before my long ride. This was a shakedown. I overloaded in order to simulate a worst case load, that included a 5 gallon water container and a full toolbox.

Sorry about the lack of pictures, my phone stopped taking a charge. As an aside, there was nothing at all on the 2 meter band.
Heavy_Tour_load.jpg
 
Back
Top