Bubba's 2nd Bike Build

Joined
May 28, 2008
Messages
718
It is never too early to start thinking about the next bike. Maybe waterproofing the motor and gears is not important. Blow the motor out with an air gun and a few squirts of WD40 and it will be good to go. Just don't get WD40 on the belt. A poor mans design more like Matt's may be the answer with some way to enclose the esc if it rains. This is something for my upright tandem or maybe my recumbent tandem. While I wait on my parts for my first build, I have been thinking about the next. I threw in a couple of 1/8" plates of aluminum for strength for those who worry that wood is not strong enough. Not all of the details are there, so this is just an idea of the direction I might go. This will be another attempt to demonstrate that you can do a kool design without being a master machinist. No offense Matt. Now I am going to cheat because I have two CNC machines, but this could be created with a nice jig saw and a small drill press.

Every man cave needs these.
Drill Press http://test.deerso.com/10_DRILL_PRESS365602-details.aspx
Jig Saw http://www.idealtruevalue.com/servlet/the-134072/Detail

Bubba
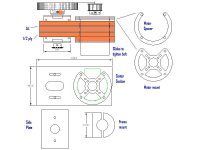
Drawing1.jpg
 
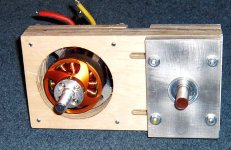
I decide to use my small motor for this build, so I changed the motor mount and spacer design. The mount is two pieces of 1/8 Al that are glued together.

Bubba

 
No offense. I am a self taught machinist with, admittedly, cruddy machines. If I can learn it, pretty much anyone can. :D

So, your plates turned out pretty nice!


What end mill are you using (flute number and diameter)? Also, what RPM, feed speed, and depth per pass?

I can give you what little information I have learned for aluminum machining.

Matt

By the way, your wood stuff turned out very nice, indeed! I have been wondering when you would try cutting aluminum. :D

Lastly, a wood/aluminum composite like that is crazy strong. I have carbon fiber/plywood composite at my shop. It is very similar to what you are doing here. Very good design, very strong, very light.
 
I think my settings are conservative. On one of my mistakes, I saw it cut a full 1/8" deep path for about an inch before I got it stopped. A friend gave me a 3' by 4' sheet of 1/8" aluminum, so that is why I am gluing up pieces.


End Mill : 1/8" 2flute carbide
Speed: 10 in/min
Z increment: .01"
Plunge: 3 in/min
RPM: Maybe 10,000 (As fast as the router will go)

Bubba
 
You are making a good start on your aluminum machining.

Allow me to make a suggestion;

Try moving to a 1/4 inch endmill. I prefer high helix 3 flute endmills. They leave a nice finish without a finish pass.

I would drop your RPM. 3,000 would be perfect. But, that depends on the mill and the head runout.

Reduce your plunge depth to 1 inch per minute. That will give you less mill wander while plunging.

I typically run those 3 flute 1/4 inch end mills at 3,000 RPM, 14 inches per minute transit speed, at .015 to .020 depth per pass. Also, luberication helps alot. If you cannot lube the cutter (small spray of WD40 works great), then you need to al least vacuum the chips off the part as it machines. Milling through chips gives a rough finish and is hard on the cutters.

Lastly, make sure you climb cut, not back cut. Climb cutting leaves the best finish on aluminum, and on the last pass, slow the feed speed down to 5 inches per minute while increasing the head RPM. That will leave a shiney edge finish.

I hope that helps a bit. :D

Matt

P.S. Please don't think I am criticizing you at all. I like your designs. But, some of this information will save you time going through some of the trial and error I went through at the beginnning.
 
I agree, 10,000 rpm is much too fast for metal work. 3000-4000 is about right for 1/8 or 1/4

Another tip: ramp down into your plunge cuts (plunge Z axis while moving X or Y at the same time) that way you do not have to worry about center cutting problems (which can mess up a nice endmill).
 
I welcome all the advice I can get because I am just shooting in the dark. SheetCam will allow me to implement all of your suggestion on my next cut. It is good to hear from people with practical experience.

Is that a better place then OnlineMetals.com to order material?

Bubba
 
I just shop around. Sometimes McMaster Carr is cheapest, sometimes not (usually not).

I get 1/4 inch 6061 T6 plate in scrap pieces from a local welding shop.

It is not hard to find material if you are willing to scrounge around. :wink:

Matt
 
The design is slowly changing as I go along. I have decided that the center section was strong enough with two 1/2" pieces of plywood and one sheet of 1/8" aluminum. Good old JB Weld was used to glue the aluminum to the wood.

Bubba

 
I like 1/2 inch 9ply baltic birch, it comes in a 5'x5' sheet (just purchaced a sheet at about 36$ today) it also comes in 3/4" here in SB)
Years ago when I worked for GM we used it for making "rule" dies " (tempory dies) good strong material.
 
I have 1" of travel for belt adjustment. Next I need to make the ring that will hold the hall effects. It will slide around the motor from the back and leave a 1/8" air gap. The gaps between the windings are marked on the back to help me line up the hall effects. This can also accommodate my larger motor, but without the hall effects.

Bubba

View attachment 1
IMAG0008.JPG
 
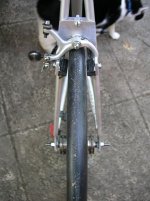
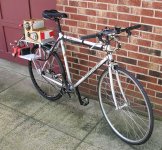
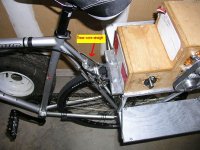
I was using my mountain bike as my ebike platform, but I was bending axles with the 8 speed freewheel. Now I am moving everything over to my fixed gear bike. Money is tight for the next several months at my house, so I can't afford to re-spoke the hub into a 700C rim. The challenge was to lower the brake bridge. I cut two aluminum plates to solve the problem and re-dished my 26" wheel. Now to hack the rack to make it fit.

Bubba

P1010852.JPG
 
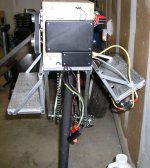
Build 2 took a radical shift in direction. I do like the way a road bike handles as compared to mountain bike. This design works OK, but is ass heavy. Weight needs to be moved forward. To accomplished this the motor box could be turned around, the top of the rack brought closer to the seat stays, and batteries moved to the front of the shelf. Constructing the rack out of aluminum would help. I think it is time to say build two is as complete as it will get and now it is time to start build three.

Bubba

P1010853.JPG
 
OOPS!!! I told my buddy to go easy on the throttle, but he tried to show off to his neighbors and popped a wheel stand that got out of hand. He got a bit of road rash. About an hour in the pits and I was doing 40mph blasts again. I need to get the Arduino working again and program in a slow throttle ramp and current limit for when I let someone do a test ride.

Bubba

P1010854.JPG
P1010855.JPG
 
Back
Top