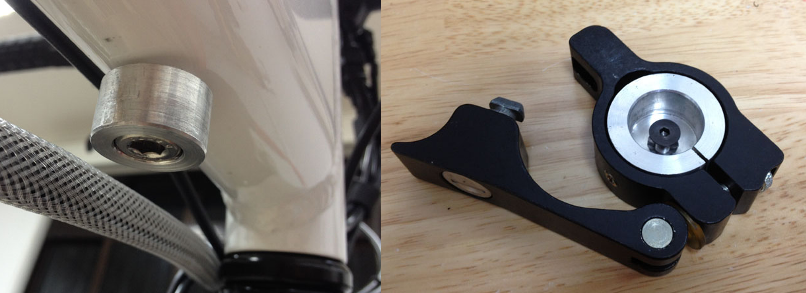
Theft proofing your ebike battery.

Ozziebike

100 W
Joined
Dec 8, 2014
Messages
105
Hey guys, next year I'll be commuting to uni a bit by bike, and I'd just like to know how you guys secure your battery to the bike so it's impossible
for someone to detach it without a ton of tools. I don't really need/want the ability to be able to take the battery off easily and want it secured in
the frame. Stealth would also be handy, but only so much can be done with a 48v battery in a double suspension frame.
 
Try using a locking storage trunk to house the controller and battery. Put it on the rear rack. It works great.
 

Attachments

  • CRUISER1.jpg
    CRUISER1.jpg
    59 KB · Views: 3,046
If you have eZee locking batteries Grin's anchors look very promising: http://www.ebikes.ca/shop/ebike-parts/battery-accessories.html
It would be great it were possible to mount two ERs back to back somehow for a double stack (I have a Big Dummy so lots of seat stay length for available for over&under mounting.)
 
lester12483 said:
Try using a locking storage trunk to house the controller and battery. Put it on the rear rack. It works great.

With any rack mounted solution, you'd also need to use tamper resistant fasteners to attach the rack to the bike. Otherwise, it's simple to back out 4 bolts, and walk off with the battery AND the rack.
 
I was referring to the shiny aluminum bits, I'm not sure they are available for purchase:

BenAWD11.png
 
Yeah I like the idea of those pre done battery boxes, but I really do want mine in the middle of the frame for the balance of the bike, and as I mentioned, it will be difficult to buy a premade one that will fit on a rear suspension bike...

I plan on leaving my bike unattended for hours more than likely, but it will always be in a populated area, so I want to make something that someone would have to come along with an angle grinder to remove. As I also mentioned, I really don't want the ability to remove the battery almost at all unless it needs servicing or something. It will be a 100% in bike battery.

I am pretty competent with fabrication, but I don't know much about security and attachments used on bike frames, so I'd like to see what people have done.
 
lester12483 said:
Try using a locking storage trunk to house the controller and battery. Put it on the rear rack. It works great.
Until someone uses the same cutter tehy could use on a lock, and just cuts the rack supports off and walks off with it. :(

(I've seen two bikes over the years that someone had done that to, dunno what was on teh racks tehy wanted but I guess they wanted it more than the bikes).


Depending on how your bike is made, there's a few ways to do it. If you are using it in the triangle, you could fill the triangle with yoru battery box, made of wood or metal (or plastic, fiberglass, etc), and simply have that fastened together in a way that is either more difficult to open than just cutting your lock and stealing the whole bike, or not openable at all.

In my case, the design of my frame leaves the space pretty hard to get the box out of, even if you cut the clamps I used. It's above the green arrow in the pic below.
 

Attachments

  • 1 090.jpg
    1 090.jpg
    70 KB · Views: 2,921
Lol it looks like one. Yeah I have absolutely zero parts for the whole bike at the moment so it's all flexible.

Yes I'm thinking a metal box is a great idea, I do also want to put it in the triangle of the frame but I'm just unsure of how I can mount it all up to the frame ie. attachments that are going to be difficult to remove with people around.
 
spinningmagnets said:
I was referring to the shiny aluminum bits, I'm not sure they are available for purchase:

BenAWD11.png

That is an amazing bike of work, but impossible to do without machinery and lock needs to be purchased for high price
 
Kiriakos GR said:
Is that battery box an actual machine gun ammunition storage box ? :)
Yes, .50 caliber. My EIG NMC pack is in that one. An EM3EV A123 pack is in another, not presently on the bike (used for extra range, attaches to the empty spot under the seat on the right side). Also have an RC LiPo pack that is in a 7.62mm ammocan (that also would go in that empty spot).


To the OP: regarding ways to make a "normal" triangle box, you should look thru the "homemade battery box" and "my creation's before and after pics" threads--there's probably hundreds of ideas there.
 
If you want one in the triangle, you need to make your own, which can be securely fixed. It's not too difficult to make one out of grp if you're good at woodwork. You just make the shape out of wood, cover it in grp and peel it off when it's cured.

http://rs451.pbsrc.com/albums/qq236/d8veh/Allens%20bike/20141111_141558_zps4fac3324.jpg~320x480

http://rs451.pbsrc.com/albums/qq236/d8veh/Allens%20bike/20141022_141301_zpsa493fedc.jpg~320x480
 
d8veh said:
If you want one in the triangle, you need to make your own, which can be securely fixed. It's not too difficult to make one out of grp if you're good at woodwork. You just make the shape out of wood, cover it in grp and peel it off when it's cured.

http://rs451.pbsrc.com/albums/qq236/d8veh/Allens%20bike/20141111_141558_zps4fac3324.jpg~320x480

http://rs451.pbsrc.com/albums/qq236/d8veh/Allens%20bike/20141022_141301_zpsa493fedc.jpg~320x480

Triangle isn't so hard. Secure quick release is a tough one
 
As mentioned though. I don't want quick release.

Hey I like that formed up battery box! Is Grp basically just like fiberglass?

Oh and where is the "home made battery box thread"? i thought I looked pretty hard...
 
The thread is called "Show us your homemade battery housing".
I posted some details down the page here:

https://endless-sphere.com/forums/viewtopic.php?f=3&t=12847&sid=28384a1794e69722e656106895664ef8&start=375

If you decide to go ahead with it, I can give you a step by step guide, but don't make me do all that if it's just a dream.
GRP is fibreglass. It's quite easy to work with it.
 
Weheeew, yeah this is what I was after! Ok this will get the neurological juices flowing!

Thanks mate!
 
d8veh said:
The thread is called "Show us your homemade battery housing".
I posted some details down the page here:

https://endless-sphere.com/forums/viewtopic.php?f=3&t=12847&sid=28384a1794e69722e656106895664ef8&start=375

If you decide to go ahead with it, I can give you a step by step guide, but don't make me do all that if it's just a dream.
GRP is fibreglass. It's quite easy to work with it.

Something like this?
http://www.amazon.co.uk/9917058-fibreglass-repair-application-included/dp/B00BEWCWF4/ref=sr_1_3?ie=UTF8&qid=1418599559&sr=8-3&keywords=grp+fibreglass

Why not just put some paint on the wood? Why do you need fiberglass on top of the wood?
 
OK. First, you buy a fibreglass kit like the one above and some silicone release spray. You'll also need some wet and dry paper to rub it down.
1. Make a wooden frame the shape of the gap in the frame. It needs to be a few mm smaller than the gap all round to allow for the thickness of the grp. You can use epoxy or PVA glue to glue it together. It needs to be a bit thicker than half the thickness of the finished box.
2. When you're happy with the shape, glue a piece of 3mm plywood to it that just overlaps the frame all round.
3. When the glue is dry/set, use a plane to round off all the corners, then sand it as smooth as possible.
4. Use it as a pattern to make the other side, so you have two identical mirrored ones.
5. You need to add some wood filler to any gaps in the wood, especially where you've sanded the edge of the plywood. Sand everything very smooth with 320 grade or finer.
6. Wax polish it so that it's slippery to touch. Finally, spray with the release agent. Now it's ready.
7. I used woven mat rather than the rough mat in the kit because it gives a flatter finish. You cut a piece of cloth big enough to cover the wood, lay it over the mould, mix up the resin with the catalyst and paint it on. Don't use more than enough to make it wet. You can see any air bubbles, which you can poke with the brush to get rid of them.
8. Lay over another layer if you used woven cloth. One layer is probably enough for the rough stuff. Add two more layers of the finishing cloth. Leave it to cure. It's best to precut all the cloth because the resin starts to go thick after about half an hour. Once it starts to go thick, don't use it. Mix some more.
9. When it's cured, you can remove it from the mould. It's probably well stuck. You can use a dremmel to cut the corners so that you can peel back each edge, which makes it easy to get off. Don't worry about cutting it because it's easy to repair that afterwards.
10. Once it's off, you can repair the corners. New layers won't stick unless you remove the waxy surface, so wherever you want to bandage the cuts, sand it all around. A Dremmel is really good for that. Make up some more resin, cut some bandage strips and paint them on inside and out - more on the inside to add strength to the corners. When they're cured, you can sand them down on the outside to make them nice and smooth again.
11. Use wet and dry to sand it all over smooth.
12. Hold a pencil on a block so that it's the height of half the thickness of the finished box. Don't forget to allow for the thickness of the grp. Run round your box to make a cutting line, then trim the edge to the line. For that you need some good snips or an angle grinder, or any other tool you can think of.
13. If you want it to look really nice, paint it with high-build primer, rub everything down very smooth, then add your final paint.
14 To fix the two halves together, I used 5mm thick softwood. Cut some strips slightly less than the length of the sides and wide enough to get a good overlap. Glue and screw them to one side.
15. Mount that side to your frame. You need to drill holes where the bottle fixings are. Use washers on the inside to stop the screw heads from digging in to the wood. You can design your own brackets to hold the top. I used a single U bracket at the top with one side bolted tight to the box and the orher side loose with a nyloc nut. I then cut a slot in the other half of the box so that it could be slid on. Once slid on, you can screw the second half to the wood.

That's it. Don't worry about any small gaps in the corners. Any water that gets in will run down the bottom edge and back out the bottom corner. Make sure that the way through isn't blocked. You can seal ot all up if you want, but IMHO it's not worth the effort.
 
Wouldn't have very defined/ nicely controlled edges I guess...

I'm thinking I might weld up a thin 1mm box and then clad it with fiberglass so it's extra tough, plus it looks good :D
 
If you don't want rounded corners, you can make a box very quickly out of 3mm balsa wood sheets glued together with superglue, which you can clad with a grp like above. You only need to do the outside, or you could do bothe sides with thinner layers to make a sandwhich. You'd probably still need some plywood or softward to fix the cover or sides to.
 
I am planning my first e-bike build, and the best solution I can come up with is this. Firstly, I will most likely order a Bafang BBS01 kit with a 36V13AH Dolphin Frame Mounted Battery Pack.

When I plan to leave my bike unattended for hours, and I am not planning on charging the battery, I am looking at purchasing this rear trunk case: http://www.ebay.com.au/itm/221399837795?ssPageName=STRK:MEWAX:IT&_trksid=p3984.m1423.l2649

With the trunk case, I can store my backpack/satchel on the way to where I am going, then take it out and lock up my battery, the charger, other bits and pieces (would be nice of the Bafang display was detachable) and my helmet.

Like someone said, they prefer the battery being housed in the middle of the bike, and at the beginning I will do that as well. But if I want, I can also drill a hole in that trunk case and permanently mount the battery inside there, making my e-bike more stealthy, which would be good seeming I will have a 350w engine in Australia where the limit is 250W.

Of course, the lock on this rear rack is nothing special, so I am thinking I might bump up the security by drilling some additional holes and installed this alarm padlock: http://www.ebay.com.au/itm/231313736907?ssPageName=STRK:MEWNX:IT&_trksid=p3984.m1439.l2649

Here is a video about this alarm padlock: https://www.youtube.com/watch?v=qoEbeteATTA

I have looked around and there doesn't seem to be any truly secure trunk storage for bicycles, except maybe for this kickstarter project which is nearing completion: https://www.kickstarter.com/projects/bucaboot/buca-boot-flexible-secure-storage-for-the-urban-bi
 
Back
Top