My DIY studed tire build

markz

100 TW
Joined
Jan 9, 2014
Messages
12,179
Location
Canada and the USA
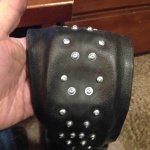
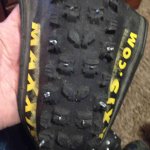
I am about half done, outter took 40 minutes with grinding, and going back and forth with drilling holes, screwing in screws.
Tomorrow I am going to see if I can find some self tap 3/8's, I just dont know how well the current ones will hold up. I am not using the wood screws.
Debating whether to put epoxy on the outside tread around screws. I still want them replaceable. Inner tube lining for sure.
Washers?

The inners placement is tricky, because its off center, so I might stagger them.

View attachment 2
slightly off center.jpg
 
See also - Homemade Studded Tires

All surface use (⅜" center rows and ½" outer rows) - Plenty of rubber and some stud contact

file.php


"HedgeHog" model ⅜" center rows and ½" outer rows - For ice, snow and off road only

file.php
 
Thanks DrkAngel, I read your thread a few times prior to starting mine, I love your "Trophy" HedgeHog tire, a million screws on every lug. I just noticed now that you staggered your outters and inners in a zig-zag pattern.

The tire I did mine on is about ready to go bad, so I just drilled and screwed in screws. I will keep my eye open for a cheap tire with tons of lugs and change screw pattern as necessary.

I just finished the other half of my outters, 1/2" self tap. Still debating which way to go for insides. The 3/8" screw threads seem wide. Next lug up/down puts the screws out a touch and it has more lug material. Im leaning towards that. What I noticed about outters is they will not touch the ground when going straight. Will buy some 1/4" and 3/8" self tap, and go from there.

Studden tire patterns.jpg

Depending on when my ca.mouser.com parts arrive, I will be riding on a frozen lake by next week. I might just solder wire onto my used a123 Lifepo4 batteries, I ground down the bumps, I find the pink/blue grinding drum does the best job.
 
Are you using the self-drillers instead of pointy screws so you don't get shredded?

I rode with sheet metal screws years ago in Montreal and it was really hard to avoid getting my pants ripped and hands cut, just parking and carrying the bike upstairs. Making the homemade ones was fun at first but I got really sick of them, and was really excited when commercial studs became available.

I used to commute across a frozen lake in Northern Ontario. No studs, just really low pressure. It took tons of energy with the soft tires in the cold. And I could only change course really really slowly.
 
Wow :shock: its been a year and its still hanging on the wall in the work room :oops:
frock time flies when you get older. Just yesterday i was 26 yrs old and its been over a decade and a half now, I gained a bit of weight but still I am in good health. I just gotta keep up the good deeds. :D I remember reading that the brain goes on autopilot and it fast forwards that is why time seems to fly by, so the key is to do different things to keep the freshness real and hopefully time will go by slower. When I saw that on the TV, it explained why while backing out of the driveway and down the road I did not remember closing the garage door, yet I did.

The deal with the tire is I want to get it on the wheel so I can rip up the ice in public rinks. Maybe do an Ice Burnout. I am in just that kinda mood lately I guess. I also want to ride the frozen river, but most of all I want to cruise on unmarked powder (snow). Last year I just ripped around baseball fields.

I cant remember what type of fasteners I used, self tapping it looks like.
 
Please remember though ... studded tires are not a cure for ice and snow.
They just give you a fighting chance!


Recommendations:

Keep seat lowered so feet can ski. Or wear mini skis, or flat soled shoes.

Front tire must have better studs!
When the rear tire spins-slides it is called fun, when the front slips-slides it is a rather abrupt ouch!!!

Experiment with tire pressure, traction, etc. on ice with feet lowered and anticipating-expecting a fall.

  • Pre-train yourself to:
  • automatically release throttle - spinning studs can chew up your legs
  • tuck in elbow and roll onto ice ... rather than trying to catch your fall on elbow

  • Attire:
  • Higher calf boots - stud resistant
  • Elbow pads - would have helped me greatly
  • Helmet! - obviously
  • Goggles - snowflakes hurt eyeballs at 20mph
  • Scarf - various wind cold protection or as makeshift sling

Oh ... fun, and a spectacle ... !
After becoming comfortable with it, try skiing along beside your bike. Smooth shoes with high ankle protection recommended. (Cowboy boots w/heavy wool socks?)
Start very slow ... and expect to fall.
Practice collapsing onto ice. Buckle knees and hips, roll down onto ice with bike ahead of you. (mind your elbows!)
Rather than slamming down into some pile with bike.
 
DrkAngel
Great info!
It never occurred to me the danger factor with studded tires.
I'm guessing the danger is more with the DIY studded tires as the screws stick out farther then the studs on a purchased studded tire.
 
https://www.youtube.com/watch?v=v4Fh_BdoWEA

I couldnt quickly find injuries from studded tires, found lots ripping it up!
 
Going to finally give it a god this winter.
 

Attachments

  • Studded Tire Pattern.jpg
    Studded Tire Pattern.jpg
    156.2 KB · Views: 993
  • Studded Tire Pattern1.jpg
    Studded Tire Pattern1.jpg
    184.9 KB · Views: 993
I used to make my studded tires, for both bikes and motorcycles.

First, you can do better than any studded tire on the market. That is a good reason to spend the time to make them, but it is a lot of time to make them good.

Racing on ice with a 250cc MX, they last 2 races, 3 if you add some work rebuilding them. That is an average of 1.5 h of riding for 3 h of making tires.

You need to experiment and test ride various stud types, length and patterns, before finding what suits you and your bike on the surface that you will be riding.

Then about riding technique. You have to be on the front and standing ideally. On a MX we are over the gas tank. You don't want to lean the bike in a turn, so for this purpose you have to move your body aside of the bike in order to keep it straight at all times. Since you don't lean to turn, you steer, and counter steer as the tail drift. That is how to speed on ice. Have fun. :twisted:
 
Any good performers as far as studs are concerned? price, longevity, head size

Should the studs just barely protrude from the knobs?

Any advice to avoid damage to the tubes?

Any tricks or techniques that expedite the insertion of the studs (pre-marking with sharpie, inverting tire and affixing it to something, screw head pattern-philips vs robertson, hand or powertool etc)?

How well do tires typically handle the sheer that a stud might place on the knob? Do you rip studs through the rubber or shred the tire?
 
Snow Day!

http://www.bikestud.com/

http://www.icebike.org/the-ultimate-guide-to-winter-bike-tires-and-studded-tires/
50 (approx.) Robertson head #8 by 1/2″ sheet metal screws (the square head, you’ll thank me for this tip) for mountain bike tires (26inch) or #8 by 3/8 inch for hybrid tires (700c)

Liner for each tire. This can be made by cutting the beads off an old tire, cutting out the valve and slitting along the inside of an inner tube or just buying a Mr. Tuffy tire liner.
Baby powder.
One sharp awl. (or a 1/8″ drill bit)

Select a Stud ;)
http://www.gripstuds.com/Tire_Stud_Selection.php
 
Those look freakin awesome. I just ordered some 700x40c studded Nokian A10s $58 a pair for my gravel grinder, otherwise I absolutely would be doing this to my 650b bike (for which studded tires are $85...apiece). Enjoy those things.
 
Back
Top