My First Build : MILDA MK 1 /out of Commision Please Help!

glenn0010

100 W
Joined
Jul 1, 2015
Messages
117
Location
Mgarr, Malta
Hey Lads,

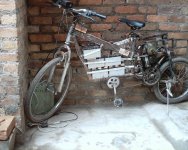
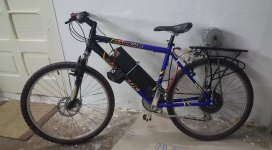
Presenting to you my first build. Possibly the ugliest eBike on ES
Capture22.JPG

Capture1.JPG

Capture2.JPG

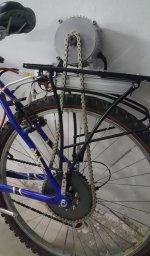
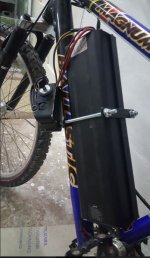
I called her Milda cuase it's an ugly bike worthy of an ugly name. 1kW BHT motor, 1kW-3kW controller 18 FET, Supposedly 48V 15Ah battery. Sill have to do some tidying up with wires and battery key holder thing. There you can see the my patent pending battery quick release system :lol: :lol: :p :p

Took her out for a test drive today and worked relatively well. The only problem I am having is with the BMS. I have to be REALLY gentle with the throttle otherwise the BMS cuts out the power. Or maybe I am not using it correctly since I am not exactly helping with pedaling I am jst letting the motor do the work maybe I have to change that.

Having said that, the throttle is really sensitive and I was wondering if I could change the sensitivity through the controller maybe make it take longer to reach the setpoint.
This is the controller I have, http://e-bike-diffusion.com/index.php?module=produit&prd_id=526&url_retour=http%253A%252F%252Fe-bike-diffusion.com%253A80%252Findex.php%253Fmodule%253Dcategorie%2526code_cat%253D27%2526page_start_num%253D2

Can I program it some how?

I will update with more pictures and videos

Regards Glenn
 
Many here, will remember this piece of art from Pakistan. All made from scrapyard recycling. You see that you have to work very hard to compete in that category.

file.php
 
MadRhino said:
Many here, will remember this piece of art from Pakistan. All made from scrapyard recycling. You see that you have to work very hard to compete in that category.

file.php

Well that might be true haha. I prefer to think that bikes like that have more character :p

Do you know if you can help me with mu BMS / throttle issues?
 
What currents does your wattmeter or amp-meter show when it cuts out?

What voltage does your wattmeter or voltmeter show when it cuts out?

If you have a 3Kw-capable controller running on "48v" (close to 60v charged, probably), then assuming voltage sag down to...maybe 50v (pretty bad) then 3000 / 50 = 60A, which is 4c, which can be a pretty heavy load for cheap 15Ah batteries.

It is possible the current surges are even higher than 60A, potentially twice that or more, or 8C+ from your battery.

If you don't have any specs on the battery, I'd assume it is just a 1C pack, and anything above 15A draw will cause voltage sag greater than designed for, and will also cause heat inside the pack.

Pull enough current from it and the voltage will sag so far it causes at least some of the cells to reach LVC, causing the BMS to shut off output to prevent damage to the pack.


If you don't have any means of measuring voltage and current while under load, I'd recommend getting a wattmeter (even a basic one), as it's your best bet for troubleshooting the problem, aside from disassembling the battery pack and measuring it's individual cell groups under load to see if it's balanced (all cell groups the same voltage).


Something else to consider is gearing--make sure your motor's intended RPM at that voltage matches your intended wheelspeed, times the ratio of the gearing you have used between them.

If it's geared too high, it'll take a lot more current to drive the motor than it needs to, and waste power as heat.


Regarding ugly bikes, you might wanna take a look at my DayGlo Avenger thread for my "normal" bike (several versions in the thread), or my CrazyBike2 for an even uglier bike (but not a "normal" configuration).
 
amberwolf said:
What currents does your wattmeter or amp-meter show when it cuts out?

What voltage does your wattmeter or voltmeter show when it cuts out?

If you have a 3Kw-capable controller running on "48v" (close to 60v charged, probably), then assuming voltage sag down to...maybe 50v (pretty bad) then 3000 / 50 = 60A, which is 4c, which can be a pretty heavy load for cheap 15Ah batteries.

It is possible the current surges are even higher than 60A, potentially twice that or more, or 8C+ from your battery.

If you don't have any specs on the battery, I'd assume it is just a 1C pack, and anything above 15A draw will cause voltage sag greater than designed for, and will also cause heat inside the pack.

Pull enough current from it and the voltage will sag so far it causes at least some of the cells to reach LVC, causing the BMS to shut off output to prevent damage to the pack.


If you don't have any means of measuring voltage and current while under load, I'd recommend getting a wattmeter (even a basic one), as it's your best bet for troubleshooting the problem, aside from disassembling the battery pack and measuring it's individual cell groups under load to see if it's balanced (all cell groups the same voltage).


Something else to consider is gearing--make sure your motor's intended RPM at that voltage matches your intended wheelspeed, times the ratio of the gearing you have used between them.

If it's geared too high, it'll take a lot more current to drive the motor than it needs to, and waste power as heat.


Regarding ugly bikes, you might wanna take a look at my DayGlo Avenger thread for my "normal" bike (several versions in the thread), or my CrazyBike2 for an even uglier bike (but not a "normal" configuration).

Thanks for the reply,

I will give it some more test drives after I tighten every thing down correctly and see how it does with some more practice with the throttle.

Yeah it's from china wasn't cheap though bought it for like 400 Euros with no specs (which is really dumb but I was just getting into ebikes so now I learned my lesson). Then I will run some tests with my multimeter.

Can I do something with the throttle to give it a slower ramp? I was thinking about adding some kind of cap with the throttle signal line though I don't think it will work. Another option would be to add a large capacitor with the battery which will help with the inrush currents.

Saw both you bikes and you avenger is a BEAUTY :lol: No one will not see you in that

As for gearing the motor is rated at 1600 RPM. It has an 8T sprocket and a 26" wheel with a 42T sprocket. So the gearing should be good, I calculated that under load I should be going at roughly 34 Km/h. So the gearing should be good right?


Regards Glenn
 
glenn0010 said:
Can I do something with the throttle to give it a slower ramp? I was thinking about adding some kind of cap with the throttle signal line though I don't think it will work. Another option would be to add a large capacitor with the battery which will help with the inrush currents.
Until you measure as directed, you won't know what's causing hte problem.

You can look around the forum for "throttle ramp" and see what others have done for htat sort of thing, but all it is going to do is make your throttle really really slow to respond to whatever you do.

Caps arent' going to help if it's a battery problem, unless you put more volume of them on there than you have battery. ;)


Measure first, then fix. ;)
 
amberwolf said:
Until you measure as directed, you won't know what's causing hte problem.

You can look around the forum for "throttle ramp" and see what others have done for htat sort of thing, but all it is going to do is make your throttle really really slow to respond to whatever you do.

Caps arent' going to help if it's a battery problem, unless you put more volume of them on there than you have battery. ;)


Measure first, then fix. ;)

Yes you're right but today I took it for a long test drive and got the hang of it I just pedal a bit to get it off the line and then kick in the motor and it's working pretty well. Still have the issue though if I gun the throttle.

The motor chain came off, so I have to fix that issue since the chain is too loose. I will first try to raise the motor up a bit by adding some washers or if that fails add a tensioner.

I do plan however of running the tests of the battery.

Below is a video of quite a long test drive:

[youtube]QLcS0dmSfcw[/youtube]
 
Ugly is in the eye of the beholder.
Naeem's bike is a cult classic on ES. Amazing use of available materials and it was used for commuting to school (where he was an instructor).

Naeem.jpg
Naeem's Bike.jpg


I've had problems with a BMS tripping on hard acceleration. Ultimately, I added parallel resistors to the existing current shunts on the BMS board. This increases the trip point enough that the current limiter in the controller keeps it below the trip point.

If you have to move the throttle quite a ways before the motor starts (large dead zone) it frequently makes the response very twitchy. Sometimes you can get a big improvement by placing a resistor in series with the throttle ground to make the dead zone smaller.
 
fechter said:
I've had problems with a BMS tripping on hard acceleration. Ultimately, I added parallel resistors to the existing current shunts on the BMS board. This increases the trip point enough that the current limiter in the controller keeps it below the trip point. .

Thanks fetcher,

Ugly bikes have more character anyways than the mass produced ones :D

By adding a resistor in paralell you would be reducing the viltage drop across them and hence fooling the bms into thinking there is less current correct? It would work but I risk damaging my batteries right?

Yes I do have quite a large dead zone it sounds exactly like the problem I have now, very twitchy. What size resistor would I need to add to the ground throttle wire? Round about 1k?
 
Yes, you risk damaging your batteries if the current winds up being too high, but what I had was a very brief spike on startup that would be like 1.5x the normal current limit. A short spike won't hurt the batteries. The current limiter in the controller is what really determines the battery current. As long as that is set correctly, your batteries will be fine. The BMS is supposed to only trip when something goes wrong.

There are some old threads about throttle trimming somewhere. I like to use a 200-500 ohm, multi-turn trimmer pot so I can get it dialed in. With the wheel off the ground (or otherwise safe for the motor to start running), you slowly dial the pot up until the motor just starts to turn, then back off a little so it has a small dead band. You need a small dead band to compensate for temperature drift. Once you get it dialed in, you can measure the value of the pot and replace it with a fixed resistor, but I just leave the pot in there. It can be located anywhere between the throttle and controller but should be easily accessible. Covering the whole thing with heat shrink tubing is nice.

Here's an old one I did:
Throttle smoother.jpg
 
fechter said:
Yes, you risk damaging your batteries if the current winds up being too high, but what I had was a very brief spike on startup that would be like 1.5x the normal current limit. A short spike won't hurt the batteries. The current limiter in the controller is what really determines the battery current. As long as that is set correctly, your batteries will be fine. The BMS is supposed to only trip when something goes wrong.

There are some old threads about throttle trimming somewhere. I like to use a 200-500 ohm, multi-turn trimmer pot so I can get it dialed in. With the wheel off the ground (or otherwise safe for the motor to start running), you slowly dial the pot up until the motor just starts to turn, then back off a little so it has a small dead band. You need a small dead band to compensate for temperature drift. Once you get it dialed in, you can measure the value of the pot and replace it with a fixed resistor, but I just leave the pot in there. It can be located anywhere between the throttle and controller but should be easily accessible. Covering the whole thing with heat shrink tubing is nice.

Thanks for your solid advice fetcher

So here is a little update. I bought the battery in summer 2015, came in at 48V charge so it was drained a bit which I know is good. and since then I never charged it once until two days ago. Once I charged it and took it for a ride, the bms issue wasn't that bad. It still cuts out but not as bad as it was the first time. My theory is that after a year and a half the cells drifted out of balance and maybe on parallel gorup would sag below 3V under load and that the BMS would cut out.

So hope fully after a couple more charges they may get more in balance and the issue might go. Failing that I will alter the BMS resistors and do the throttle fix. Or I could just be going nuts and it is a placebo effect ahaha. The battery voltage when fully charged is 54.6V so assuming it is a 13s the cells are at 4.2V exactly.

I have also dialed in my chain so now it is not going off. Now all I have to do is fix it slightly where it is rubbing against the frame slightly.

Quick question, for lights on the bike should I go with stand alone lights or should I tap the battery use some 63V buck converters I have lying around. I guess option 2 would be better?

Thanks
 
If you battery is fully charged, the cells shouldn't be sagging enough to trip on low voltage, at least for a while. Leaving the pack on the charger for a long time may improve the balance. Balancing is very slow with most small BMS boards.

I run the lights on my bike off a dc-dc converter. More wiring work, but worth it in my book. Never have to worry about the lights having power.
 
fechter said:
If you battery is fully charged, the cells shouldn't be sagging enough to trip on low voltage, at least for a while. Leaving the pack on the charger for a long time may improve the balance. Balancing is very slow with most small BMS boards.

I run the lights on my bike off a dc-dc converter. More wiring work, but worth it in my book. Never have to worry about the lights having power.

Yeah that's what I thought being at full voltage it shouldn't be a problem. Anyways I'm going to leave them to balance for a couple of days and see if it has any effect.

Any good reccomendations for some bright lights?

By the way took it on the steepest hill O could find and it climbed it no problem. The torque and acceleration is incredible on just a 1kW motor. More power must be insane ammount of fun. Getting addicted quick already planning my next build haha maybe a LMX frame :D
 
Small update, So after the 5th test drive this is what happened:

17554969_10154269506391561_2078138492_n.jpg

I mounted a plate of 2mm aluminium on top of an off the shelf carrier rack and I guess it wasn't strong enough haha.

The plate is bent quite badly. I will take it to a machinist tomorrow and hopefully replace the top part with steel and maybe add some kind of tensioning system for the chain since I have a problem with chain tension.
 
Hey Guys.

After tons of drive train issues I've finally took my bike out for it's first "long distance" trip. I've been having loads of chain tension issues. Replaced the bent 2mm Aluminium plate seen above with a 6mm aluminium plate which is now really sturdy.

So here is my first trip

Capture1.JPG

Capture2.JPG

Capture3.JPG

Capture22.JPG

Covered a total distance of 16.2 Km

I'd guess my max speed on level ground is rougly 35Km/h

Battery fully charged is at 54.4V and after the trip and letting the battery rest for 5 minutes the voltage was 48.9V. So what kind of range am I looking at because I don't know if my battery is a genuine 15aH.

Also how long does a new chain keep stretching. I have been having issues where my chain keeps loosening up after test drives. I have a suspicion where my chain is stretching. It is either that or the side struts which hold up the rack are warping under load/bumps. Got my chain tension set now and seems good so far but it is difficult to set the tension as I don't have a dedicated chain tensioning system

Will increase distance gradually to continue the tests.

Any suggestions?

Thanks
 
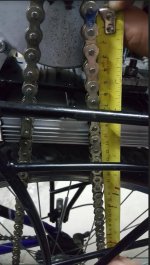
I doubt your chain is wearing that fast. Stretch is actually caused by wear of the pins and bushings; you can measure the distance between 12 links and see how far off the standard it is, from center of pin to center of pin (dividing by 12, you should get 1/2" for a new chain).

It's more likely to be the rack itself bending, unless you have extreme tension on the chain.
 
amberwolf said:
I doubt your chain is wearing that fast. Stretch is actually caused by wear of the pins and bushings; you can measure the distance between 12 links and see how far off the standard it is, from center of pin to center of pin (dividing by 12, you should get 1/2" for a new chain).

It's more likely to be the rack itself bending, unless you have extreme tension on the chain.

Capture1.JPG

Hey amberwolf,

thanks for your help as always. I measured 12 links and from the top most pin to the bottom most pin I measured 29cm/12 links = 2.42cm = 0.95 inches. I probabbly misunderstood your directions cause that's no even close to 0.5 of an inch.

I will keep testing it and if it stays as it is I will be satisfied. However I am pretty certain that the problem is in my rack as after time it will warp with all the bumps and vibrations.

I am thinking of saving up and buying a 1000W hub motor as it will make things really simple as far as the drive-train is concerned. I am searching for a 1000W hub with a rear cassette and the rim attached to it. That's all I need since I already have a controller.

I will se how it does in it's current setup and if it keeps warping I will switch to a hub
 
Yeah, I meant 12 links = 12 inches. :oops: 1" per link (1/2" per "pair of pins").


FWIW, there have been a few rack-mounted chaindrives built on ES (and elsewhere) over the years, and AFAICR all of the successful ones are on sturdy steel racks, or heavy-duty aluminum designed around not bending or cracking.

A good deal of the problem is often hollow tubing not assembled in a way that keeps it in compression, but rather just in bending or other modes that it is not strong in.


Build a rack like this one:

https://endless-sphere.com/forums/viewtopic.php?f=3&t=85317&p=1247409&hilit=Bill%27s+bike%27s+rack.#p1247409

https://endless-sphere.com/forums/viewtopic.php?f=1&t=49550&p=1026929&hilit=bill+bike+rack#p1026929

file.php

file.php

file.php


and I expect you'd have few problems with it, though for your usage I'd weld it to the bike frame rather than bolt it on like I did this one for Bill's cargo stuff.
 
amberwolf said:
Yeah, I meant 12 links = 12 inches. :oops: 1" per link (1/2" per "pair of pins").


FWIW, there have been a few rack-mounted chaindrives built on ES (and elsewhere) over the years, and AFAICR all of the successful ones are on sturdy steel racks, or heavy-duty aluminum designed around not bending or cracking.

A good deal of the problem is often hollow tubing not assembled in a way that keeps it in compression, but rather just in bending or other modes that it is not strong in.


Build a rack like this one:

https://endless-sphere.com/forums/viewtopic.php?f=3&t=85317&p=1247409&hilit=Bill%27s+bike%27s+rack.#p1247409

https://endless-sphere.com/forums/viewtopic.php?f=1&t=49550&p=1026929&hilit=bill+bike+rack#p1026929

file.php

file.php

file.php


and I expect you'd have few problems with it, though for your usage I'd weld it to the bike frame rather than bolt it on like I did this one for Bill's cargo stuff.


That looks really sturdy. Gave her and 16.2Km today and she held up well so far. If my rack fails I will make one based on that design.

IWhat I really want to os chop the frame behind the seat post and extend it slightly to fit the motor down low behind the seat post and infront of the rear wheel.

However it's aluminium and I heard on here that once you weld it, you weaken it considerably

It's a lot of work but the it will be mint
 
glenn0010 said:
However it's aluminium and I heard on here that once you weld it, you weaken it considerably
Yes, and you have to use aluminum welding techniques (tig; gotta weld in gas to keep contaminants out of weld which would make it even worse). YOu can re-heat-treat the frame but you'd have to build an oven to do it in.

What I'd recommend doing is either building your own frame for that exttended version, or getting a steel frame from a garbage pile on trash day, garage sale, thrift store, bike shop's used stuff, craigslist, freecycle, or similar, and modifying it. That's pretty much what I've done for all of my successful long-term builds.

The single aluminum frame I used (other than the Fusin Test Bike, which was just a short-term motor kit test platform) was on DayGlo Avenger, and eventually I cracked the seatstay; it can still be ridden but isn't safe to be used for cargo/etc like I used to. I'd have to rebuild it wiht a steel frame to make it usable for the kind of loads I put on it.
 
amberwolf said:
glenn0010 said:
However it's aluminium and I heard on here that once you weld it, you weaken it considerably
Yes, and you have to use aluminum welding techniques (tig; gotta weld in gas to keep contaminants out of weld which would make it even worse). YOu can re-heat-treat the frame but you'd have to build an oven to do it in.

What I'd recommend doing is either building your own frame for that exttended version, or getting a steel frame from a garbage pile on trash day, garage sale, thrift store, bike shop's used stuff, craigslist, freecycle, or similar, and modifying it. That's pretty much what I've done for all of my successful long-term builds.

The single aluminum frame I used (other than the Fusin Test Bike, which was just a short-term motor kit test platform) was on DayGlo Avenger, and eventually I cracked the seatstay; it can still be ridden but isn't safe to be used for cargo/etc like I used to. I'd have to rebuild it wiht a steel frame to make it usable for the kind of loads I put on it.

That's true a steel frame would be much easier to work with but then there is a weight issue. Also most steel bikes are quite old so they'd have no front suspension. Though I guess I could swap the suspension from my current bike if the fittings are the same (have no idea about bike standards)

Another idea I had was to chop the frame and make 2 steel clamps that clamp around the aluminium seat tube and then go to steel for the back of the bike. Though I would question the durability of such a design.

Fitted a double stand to my bike today which is sturdy. So tomorrow I am going to attempt my first trip to uni with my bike. It is roughly a 33.6 Km round trip and I should be able to make it.

Will be interesting to see if I can get there faster than by driving since the traffic is horrendous in the morning. Will also be intesting if the drive train holds up i.e. chain / rack.

hahah we'll find out :mrgreen:
 
glenn0010 said:
That's true a steel frame would be much easier to work with but then there is a weight issue.
Not in my experience. Most of the cheaper aluminum frames are really thick tubing and end up weighing the same as a good butted-steel-tubing frame, though there are very thin/light aluminum frames they usually are expensive. I have one of those used from someone else, but the toptube is dented to a point that it could potentially collapse under the wrong kind of stress. I think it was a Giant brand, cant' remember for sure.

I don't recall the actual weight but the frame on my DayGlo Avenger is at least as heavy as the one on my old steel Nishiki.


Also most steel bikes are quite old so they'd have no front suspension.
Oh, there's been lots of full-suspension or front-suspension steel bikes; some are good suspension components and some are junk.

Though I guess I could swap the suspension from my current bike if the fittings are the same (have no idea about bike standards)
You can swap lots of parts around. How do you figure I got front suspension on my CrazyBike2 and SB Cruiser? ;)

And if the headtube is the wrong size on the steel bike, you can just swap it out for one that is the right size (I did this on CB2, welding the new one on in front of the old one, so I could use either as needed for experiments).

As for standards, and other bike repair/maintenance info, http://sheldonbrown.com is my first recommendation.


Another idea I had was to chop the frame and make 2 steel clamps that clamp around the aluminium seat tube and then go to steel for the back of the bike. Though I would question the durability of such a design.
Then any stress on the back is passed not thru the tubing but across it's surface, and only under the clamps themselves. Eventually it'll probably either crush the tubing or cause stress fractures, but you'd have to test it to find out.

Designing the clamps so you don't get any side-to-side waggle is another problem to conquer....

This is essentially teh problem I had with DayGlo Avenger's added-on cargo rack/pod, and what eventually cracked the seatstay.
 
Back
Top