How bad is my split hub rim? Can I still ride on it for a wh

ClintBX

1 kW
Joined
Mar 6, 2014
Messages
419
Hi EPFMs,

I have a dilemma on my hands. Today, I was having this weird prominent jarring with my back brakes. When I looked at it, I found that one of the brake clamps had a broken spring. Had to ride home without back brakes.

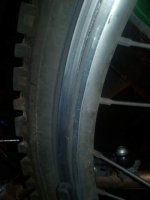
When I came home and swapped my clamps with one's I have from my other bike, I discovered something far more alarming. I found a 5 cm long split in my hub motor's rim.

I want to know, how bad is it to ride on this type of split until I can get it repaired or replaced? I need my bike for my work and I may not be able to afford to get this fixed immediately. I don't exactly have a spare rim or hub motor for this.

Here's a photo of the damage.

Any suggestion of what I can do in the mean time would be appreciated.
 

Attachments

  • IMG_20170425_035123__1493064846_49.196.14.51.jpg
    IMG_20170425_035123__1493064846_49.196.14.51.jpg
    14.6 KB · Views: 1,537
Yeah, you probably can ride on it for a while, but it's best to replace it. Keep in mind it could fail unexpectedly at any time and manage your speed accordingly.

I'm just giving you realistic advice as most members will probably tell you to replace it immediately and not ride on it again. You do need to replace it asap.
 
I have a spare bike wheel. Could I use the rim of that? Even though its not the same ad thhe hub rim?
 
Or, if I could get a bike store to lace it into a new rim for me, would they be able to or is lacing a hub totally different. I'm in perth WA and not many LBS specialize in ebike repair and maintenance.

Also, how much would this cost?
 
Clint, I would take this opportunity to lace it myself, using your extra rim and reusing the existing spokes. Look up "bicycle wheel lacing", Sheldon Brown is a good source. When I first started using hub motors I started lacing my own with no hands on instruction and they all turned out just fine with just a few learning curve errors.

If your rims are way different, i.e. one is single wall and the other is double wall, the old spokes may not be the correct length for the new wheel.

If you do decide to do it yourself be sure to study the lacing pattern of the existing wheel before you take it apart. Make a few notes so you know which hub holes go with which rim holes, etc. Getting the valve stem hole in an open spot to make filling the tube easier is helpful, although some of my installed hub motors that I purchased did not come this way. :D

Good luck with it whatever you decide to do.
 
Im tempted to try lacing it myself but I think, as you said, the hub rim is double wall. How p ong does it take to do this?
 
Forgive me for asking this so late in the thread, but is the rim on a hub motor? If not, just get a used wheel and replace the whole assembly. It will be cheaper and way easier than lacing a new rim.
 
Im tempted to try lacing it myself but I think, as you said, the hub rim is double wall. How p ong does it take to do this?

You will probably need at least 2 hours to do this. Your spokes will be a little short for the single wall rim, but that just makes the job easier. I would say just do it for the experience and to stay on the road and in the meantime order a new double wall rim (and spokes?) and you will be all ready to fix it properly. Several of my first hub motors came laced into single wall rims and were okay. Don't "over tighten" the spokes.

One of your other questions, a few years ago I had a LBS get a rim and spokes and then lace a Nexus8 I already had into the 26" rim for a bike I was preparing for my sister. The total came to about $150 (usd), and I could have obtained the parts myself for less than half the amount, but didn't have a pattern to work from, might not have gotten the right length spokes, etc. so figured it was worth it.

Edit: After you get all the spokes started, set your bike upside down and use it for a wheel stand as you tighten the spokes and true the wheel.
 
Don't go lacing it if you can't afford a replacement rim. Then, a rim can be found very cheap. I suggest in the meantime, fix the crack with mesh tape and epoxy, and ride moderately. When you have a rim with the same ERD, undo the old one and repeat the pattern using the same spoke with new nipples. Then you can ask the bike shop to true the wheel, it won't cost you much.
 
it's probably usable for a while, depending on the stress it sees.

Mine lasted a little while:

https://endless-sphere.com/forums/viewtopic.php?f=2&t=12500&start=1100#p1205150
file.php


https://endless-sphere.com/forums/viewtopic.php?f=2&t=12500&p=1229244&hilit=split#p1229244
file.php


https://endless-sphere.com/forums/viewtopic.php?f=2&t=12500&p=1229244&hilit=split#p1230333
file.php


file.php
 
Assuming a new rim is a similar profile so the spokes work, it's easy to lace on a new rim. You don't have to disassemble the whole thing . You just tape the new rim on to the wheel with the valve home in the same spot, loosen up all the spokes, then move them to the new rim one at a time, so it's doesn't need to be unlaced.
 
I wouldn't use that wheel until you fix it, unless it doesn't matter to you when and where the rim sidewall breaks off​ and the tire blows out.

If you use an identical rim or one with an identical spoke nipple seat diameter, you can tape or zip tie the new rim to the old one, and transfer the spokes one at a time until it's laced up. At that point, the easiest thing is to take it to an experienced wheel builder, but the most gratifying thing is to read Sheldon Brown's or Jobst Brandt's instructions and do it yourself.

I try to use new spoke nipples when I reuse spokes. It makes the process easier and more consistent.

EDIT: Voltron posted it while I was writing it. So you know it must be good advice, right?
 
Alright. I've taken my hub wheel off and in trying to suss out how this going to go, I've run into a couple of snags.

I think the holes in the other rim are too small and in trying to get one of the nipples out to gauge just how small those holes are, I lost the niipple within the rim. How do I get it out?

And should spend anymore time if the other rim is only suitable for thinner spokes?
 
Alright, I managed to fish the nipple and I made the holes of the new rim bigger (using a phillip head. I didn't have anything better).

Now, my next problem is tgat there's a tight nipple (that sounds weird) and I can't loosen it. I think the slot is worn down. I can't get my screw driver to grab it. And I tried loosening it from the other end with the smallest adjustable I have . It won't budge.

I'm trying to loosen the others from the other side in hopes that will help.

Any suggestions?
 
Ok. Got it out. I had to use my biggest adjustable spanner and remove a neighboring spoke for more turning range.

Now, theres a spoke that wont reach.
 
You're going to have to buy a spoke wrench to tighten those spokes quickly and properly. Penetrating oil and the wrench would have taken them off easier too. Also makes it infinitely easier for trueing, Take a nipple to a bike shop and get the right wrench. They're only like a dollar or two on ebay, but you have to wait a month for shipping.

Making do here with a crescent wench is something an evil prison would set up a a cruel joke in a concentration camps.
 
Thanks Doc. I'll keep tha tin mind for the next time.

I got through it. I managed to lace lace the other rim but I'm not happy about the outcome.

I tried to zip tie the new rim to the old and transfer the spokes over but I kept coming into spokes that were too short.

So I ended up takijg the wheel apart and lace the new rim crom scrtch. Ven foloowing the tutorial, I kept getting spokes that were too short. I had to alter the configuration slightly to make it work. But now, the wheel is quite wobbly.

I'm about to try a test ride on it. Is a wobly hub wheel likely to collapse or give way? I'm a little worried.
 
That doesn't sound good.... The key point in all that advice was that the rim should be as similar as possible. By using the one you had around you might have changed things enough that it will take a pro to put back.
 
ClintBX said:
So I ended up takijg the wheel apart and lace the new rim crom scrtch. Ven foloowing the tutorial, I kept getting spokes that were too short. I had to alter the configuration slightly to make it work. But now, the wheel is quite wobbly.
It would help if you would post pics of what you do; it's always harder to help when you don't do that.

If you mean that you changed the lacing pattern, that changes the tension distribution and the centering of the hub in the wheel if it's not symmetrical.

If the lacing pattern is not symmetrical, then the wobbliness is also probably not fixable, and neither is the tension in the spokes/rim, meaning that the wheel is not built properly and won't likely handle normal loads like it should, or be as strong as it needs to be.

You can test for tension by tapping or plucking the spokes--if they just plonk and don't make a semi-musical tone, they are probably not tensioned correctly. if they all make extremely different sounds, they are also probably not tensioned correctly, with some too tight and some too loose. (Normally only a badly bent rim would need to be tensioned that way to fix the bend well enough to ride home).


Based solely on your descriptions, I would guess the new wheel is less safe than the split rim, but no way to know without seeing it from various angles/positions.


Another possible problem for the future is that the screwdriver-enlarged holes could be damaged/cracked, depending on how you did the enlargement. If they are cracked, you may not be able to see that until they get bigger, after riding on the wheel for a while. So I'd keep an eye on that.


Lots of wheelbuilding / lacing info in various threads by those names around the forum; I'd definitely recommend reading up on some of them. Lacing is not hard but it does take some practice, and it's a lot easier with the right tools. At minimum, a good spoke wrench that fits your spoke nipples correctly. The single size tools are probably best--I use a multi-size ring tool that costs about $10, there are cheap ones and good ones for that price or less, but the cheap ones don't fit right and damage nipples, and it's possible even with the good ones to accidentally damage nipples iwth the wrong size slot. It's much easier to use just the single-size tools, because there is no worry about accidentally using the wrong spot on the ring and damaging a nipple from poor fit, and they fit easier between the spokes.
 
:roll:

Yeah. Doesn't sound good to me either. Same or almost the same size is a must if you want to re-use the spokes. With a rim that is not a match, you should have calculated the new length and laced it with readily available 14 ga SS quality spokes, instead of sabotage the spoke holes with a screwdriver. I build the wheels of my very high power bikes with DT Swiss 14 ga. 12 ga is only necessary when the spokes are Chinese crap.
 
Too late! ... ?
Easiest rim replacement ...

Small spool of insulated copper wire, 22ga works nicely.
Make a continuous circuit, wrap around at each spoke intersection, Spokes should be firmly held in position.
Remove all nipples.
Slide hub-spokes out of rim.
Slip into new rim.
Replace nipples.
Tighten nipples evenly.
Mount and final truing.
 
This clearly a temporary rim I'm using and I'll need a proper double wall rim.

I'm trying my best with what I've got for now. I still don't understand why some spokes are too short to reach when lacing. The rim is the same size 26 inch. Same 36 holes.

I'm about to try again but this time with the wheel mounted in the frame. There's a technique that seems faster I saw on youtube.
 
ClintBX said:
I still don't understand why some spokes are too short to reach when lacing. The rim is the same size 26 inch. Same 36 holes.
Not every rim is the same; there is a term called ERD which is used to determine spoke length; it also makes a difference how far off the centerline the spoke holes in the rim are, and how wide the rim is. It's part of why I recommended looking up and reading the various wheelbuilding/lacing threads, which will explain this and other things that are really helpful to know before starting.


There's a technique that seems faster I saw on youtube.
Perhaps you could show us what technique that is, so we can advise you whether it is a good idea or not, or if it might help you, or hinder you instead.

If you would post pics of what you are doing it would also help us help you.
 
It sounds to me like all your spokes are​ a bit too​short, and by forcing the rim over for some of them to reach, others are put out of range. Try loosening the spokes that have adequate insertion, and tightening the spokes that are showing too much thread.

Rims have a measurement called ERD, short for effective rim diameter, that represents the diameter of the spoke nipple seats, plus a value for the thickness of the spoke nipple heads. If the ERD of your old rim isn't pretty close to that of your new rim-- 2mm difference is usually safe-- then you can run into trouble when transferring old spokes onto the new rim.

It's customary when lacing a wheel to take the spokes up all the same amount, but to a degree that does not tighten them. Then you turn them all up a little at a time until they all have tension on them. At that point, you alternate between truing the wheel and adding tension, until it's at the state you want.
 
Alternatively, some wheels, rear especially, use 2 different spoke lengths.
Shorter on the chain side. ... ?
 
Back
Top