Burnt Motor and Cooling Fins

Joined
Jan 3, 2022
Messages
514
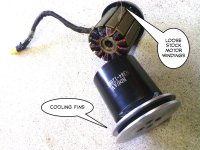
Burnt Motor.jpg

Was working great all morning. Rode it hard for three full battery recharge cycles.

Then it looks like a loose wire got free and started a chain reaction frying the motor.

Argh !!! Rewind time.

The point of the post was to introduce the COOLING FINS.

See how they are aluminium and attach to the shell? This dramatically increases cooling over not having them. I have some foam in between to soften the noise.

It's a neat little trick to increase performance. My regular power usage is at peak about 2700 watts on the input side as read though a meter using a standardized shunt.

So far I've done thousands of miles with this type of motor but this is I think the sixth motor I've blown.

At about three pounds if I get three horsepower out of it then it's a good deal. Reliability could be better.

And let me add that "some" of these motors can last for thousands of miles and show no signs of heating in terms of burnt wires. So this one was purely electrical.

My last motor literally threw a magnet which had become unglued from the shell.
 
To help prevent the "bad hair day" ;) you can use a few different things on these motors' stock windings to secure them. If there's space, you can push a chopstick or bamboo stick down into the stator teeth to secure the windings. It'll probably stay on it's own, but you can use a heat-resistant glue or epoxy to secure it if necessary.

Or you can use CoronaDope, usually used as a brushon liquid, which while liquid will also get down between all the windings, and stator teeth, etc., and insulate them at the same time as securing them in place as it hardens.

There are also high temperature red insulating varnishes that do basically the same thing, available as brushon, dips, or sprays. Just seal up the bearings so it can't get in there, if you don't use the brushon versions.


Regarding the fan, you can use a number of different ones for the same basic effect; old vacuum cleaner motor suction fans work well if the motor runs at a fast enough speed. Slower speeds may need different blade shapes; I used an old alternator fan on a treadmill motor for this purpose to suck air thru the motor.
 
I've tried to rewind these motors using what I realize now are wires that are too thick.

The curves are so sharp you need about a dozen of the 26 AWG to make the curves.

There are RC forums that go deeply into motor rewinding so I'm up to speed on all that.

Basically I've been lazy and just ridden the motors until they broke and then bought new ones.

At one time you could get them for $54... so I bought three.

But I do want to use a lower KV wind next because I'm running too many volts for the ERPM.

Stock is 11 Turns so I'm thinking either 12 or 14... 14 can give a 4% increase in copper fill.

And yes... I absolutely LOVE the Grin Simulator and use it a lot.
 
https://www.ebay.com/itm/FEICHAO-6384-Sensory-Brushless-High-Power-Motor-for-Remote-Control-Skateboard/224586307734?hash=item344a631896:g:WNAAAOSwtKNhIMpQ&pageci=63bfaeae-58ce-45e8-bba4-207904e0aca6&redirect=mobile

So for $60 I can get a new one.

But at this point I own something like six of them and have the spool of 26 AWG wire to rewind them already.

Does one go the lazy easy path? Or does one claim ownership of the problem and (hopefully) fix it?

I can say I have tried to rewind them and failed more than once, but with the thin guage wire I'm optimistic.

And I do want to try a lower KV to better match my situation so there is the idea of making forward progress.
 
amberwolf said:
There are also high temperature red insulating varnishes that do basically the same thing, available as brushon, dips, or sprays. Just seal up the bearings so it can't get in there, if you don't use the brushon versions.

I have used fiberglass resin and the problem is if you apply too much it cracks. Then you have chunks flying out all the time. I did this with the very first motor.

The problem really is that I'm dealing with a mass produced product from China. Sometimes it's good, sometimes it's bad. It's kind of whether the worker was any good at their job.

The magnet wire itself can work perfectly if it's wound perfectly. That's really the issue.

If you ever look at the RC forums there are guys there who are the "Gods of Rewinding" and I'm going to have to climb that mountain if I am going to do this. So far it has been a complete bust.

When you try to fill in with resin it's okay for low performance situations but I'm pushing these motors to their extremes at roughly one horsepower per pound. Think of the mass of a hub motor relative to it's performance. I'm used to this kind of performance and would not settle for less.
 
SafeDiscDancing said:
amberwolf said:
There are also high temperature red insulating varnishes that do basically the same thing, available as brushon, dips, or sprays. Just seal up the bearings so it can't get in there, if you don't use the brushon versions.

I have used fiberglass resin and the problem is if you apply too much it cracks. Then you have chunks flying out all the time. I did this with the very first motor.
The stuff I'm talking about (especially the first choice other than the chopsticks/bamboo, Coronadope) doesn't do that, it is not like fiberglass resin or other epoxies.

It is pretty low-viscosity, and runs down into the windings and effectively glues them together while insulating them from each other. Doesn't take much.

The bamboo sticks or chopsticks are also very lightweight, and will stay in place if they are a press-in tight fit. If they're a loose fit, you'd have to glue them in, which adds weight, so a tight fit is better.

Unless it is a brushed motor, then the stator doesn't spin anyway, so as long as the windings never get shaken out of the slots by vibrations (which the varnishes or Coronadope will prevent if properly applied), they can't get flung out by rotation.

If it is a brushed motor, then that is definitely a problem that happens (my first bad-hair-day motor was an old B&D lawnmower) with unsecured windings, and the higher the RPM the worse the problem is (and the harder it is to rebalance the motor after doing it).


The problem really is that I'm dealing with a mass produced product from China. Sometimes it's good, sometimes it's bad. It's kind of whether the worker was any good at their job.
Mostly, yes. ;)

If it was perfect then there's no worries, but unless you do it yourself and can verify that, it can just be easier to assume it isn't and do one of the various methods of securing the windings.


When you try to fill in with resin it's okay for low performance situations
Which is one reason I didn't recommend doing that. ;)
 
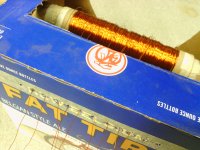
Spool.jpg

Step One : Figure the length then spool everything so it "hopefully" won't become a tangled mess.

I'm going to try a 14 turn 9 strand "regular" DLRK DELTA wind with the user friendly termination which brings it to only three locations but I plan to exit the motor with the individual separation just in case I want WYE later on. If I were to try an insanely high voltage some day the WYE is a lower kV.

Just getting to here was five hours of effort.

I figured 70 feet per strand... hopefully that's correct.
 
That seems like a good deal vs hobbyking sk8 your FEICHAO 6384 motor linked spins the shaft not the shell out runner how would you attach chain gears to that motor. I am making a stand up scooter and 3280w and 150a is nice and the stock wheel uses #25 chain.

SafeDiscDancing said:
https://www.ebay.com/itm/FEICHAO-6384-Sensory-Brushless-High-Power-Motor-for-Remote-Control-Skateboard/224586307734?hash=item344a631896:g:WNAAAOSwtKNhIMpQ&pageci=63bfaeae-58ce-45e8-bba4-207904e0aca6&redirect=mobile

So for $60 I can get a new one.

But at this point I own something like six of them and have the spool of 26 AWG wire to rewind them already.

Does one go the lazy easy path? Or does one claim ownership of the problem and (hopefully) fix it?

I can say I have tried to rewind them and failed more than once, but with the thin guage wire I'm optimistic.

And I do want to try a lower KV to better match my situation so there is the idea of making forward progress.
 
Use a #219 chain... the go kart chain.

The pitch is about the same but reliability is 10x better.

I have literally "over" 10,000 miles on a #219 chain and the 11 tooth motor sprocket is worn, but otherwise it's still pretty good.

And that's running about two horsepower most of the time.

Plus... the skateboard motor... 6384 has a 10mm shaft so it's just stronger. Most RC stuff is 8mm.

The sealed bearings are good but I took it to another level and added an additional roller bearing near the chain side which makes the whole thing unbreakable.

Oh... I must confess... the 11 tooth was HAND GROUND down from a #35 sprocket I bought for like $5 from China. Very difficult.

So judge your skill level first. Being able to create the custom sprocket is a huge limitation.

:warn: :warn: :warn: Warning :warn: :warn: :warn:

The designers really screwed up with the sensors on this motor. It was done wrong as the middle sensor should have been inverted when doing a 60 degree configuration. So realize you are buying something that cannot properly run in Sensored mode.

It's part of why they are so cheap at $60.

I am used to running a Sinusoidal Controller without Sensors but if you want a Sensored experience you need to consider that it fails in that in it's stock configuration. You would need to fix the 60 degree problem or go to 120 degrees.

Just be aware there is a big error in this motor.
 
Thank you for the warning about the motor.
I am liking your ebay motor more and more with the 10mm shaft https://www.ebay.com/itm/FEICHAO-6384-Sensory-Brushless-High-Power-Motor-for-Remote-Control-Skateboard/224586307734?hash=item344a631896:g:WNAAAOSwtKNhIMpQ&pageci=63bfaeae-58ce-45e8-bba4-207904e0aca6&redirect=mobile but that is out runner or in runner the ad doesnt specify. Hobby king does not specify either but always mentions its a skateboard motor so what are skateboard motors?

SafeDiscDancing said:
Use a #219 chain... the go kart chain.

The pitch is about the same but reliability is 10x better.

I have literally "over" 10,000 miles on a #219 chain and the 11 tooth motor sprocket is worn, but otherwise it's still pretty good.

And that's running about two horsepower most of the time.

Plus... the skateboard motor... 6384 has a 10mm shaft so it's just stronger. Most RC stuff is 8mm.

The sealed bearings are good but I took it to another level and added an additional roller bearing near the chain side which makes the whole thing unbreakable.

Oh... I must confess... the 11 tooth was HAND GROUND down from a #35 sprocket I bought for like $5 from China. Very difficult.

So judge your skill level first. Being able to create the custom sprocket is a huge limitation.

:warn: :warn: :warn: Warning :warn: :warn: :warn:

The designers really screwed up with the sensors on this motor. It was done wrong as the middle sensor should have been inverted when doing a 60 degree configuration. So realize you are buying something that cannot properly run in Sensored mode.

It's part of why they are so cheap at $60.

I am used to running a Sinusoidal Controller without Sensors but if you want a Sensored experience you need to consider that it fails in that in it's stock configuration. You would need to fix the 60 degree problem or go to 120 degrees.

Just be aware there is a big error in this motor.
 
It's classified as a skateboard motor because it is more durable with a thick 10mm axle and very sturdy larger sealed bearings.

As an ebike motor it is good with great power to weight... but the big glitch is that they screwed up with the sensors and failed to invert the middle sensor.

By definition an "Outrunner" has the stator (copper) on the inside and the magnets on the outside.

You can see in the pictures.

In the process of rebuilding this motor from scratch there is the potential to fix this, but going Sensorless for my situation has not been a huge issue.

My big problem is the Chinese controller I use cannot spin this motor past about 4000 rpm.

But there are exotic solutions that can fix that too... Endless-Sphere has lot's of "high ERPM" controller threads.

This link explains HOW they screwed up the sensors:

http://mitrocketscience.blogspot.com/2011/08/hall-effect-sensor-placement-for.html
 
SafeDiscDancing said:
Spool.jpg

Step One : Figure the length then spool everything so it "hopefully" won't become a tangled mess.

Instant Fail :shock:

The wires got hopelessly tangled. Oh heck. That $60 is looking good.

This stuff is insanely difficult.
 
It is more difficult then figuring the total length of winding wire because you need to figure out the gap spacing and figure out what gauge of winding wire that will neatly fit around each wrap and each notch there is probably a technical guide out there with all the formula's, kind of like a spoke calculator but for winding a motor.
 
calab said:
It is more difficult then figuring the total length of winding wire because...

Well I spent most of the day untangling the mess from that spool.

Then I decided that trying to be a "pro" and do it all in one wind might be stretching my skills beyond my true ability so I broke the wires into the three phases.

Rather than 70 feet it's a third of that. And I then spooled up that set of 9 Strands on the same Spool.

I managed to got one phase done today and it was correct as far as length.

Anyone thinking of rewinding these micro motors need to realize it is really difficult because everything is at the low edge of visibility.

Tolerances are very tight too. And I'm probably making a mistake going for the 104% upgrade on the copper fill given my amateur capabilities but the first phase went in with no problems.

Even if this one blows up quickly it's "practice" for later. This is a skill to master if you need to have the best performance.

The Stock motors do work fine, but the sloppy quick windings tends to be the root of failure.
 
https://www.ebay.com/itm/6384-Sensored-BLDC-Belt-Motor-4000W-12S-for-Electric-Skateboard-Vesc-or-ESC/265341916557?pageci=7f2ece2d-03db-4afa-a9c4-5b94d10a3499&redirect=mobile

Basically "ebike porn".

That is the Flipsky motor but it looks under a "generic" name.

Max Power: 4.000W
Max Current: 100A
Max Volt: 12S LiPo
Max Torque: 9Nm
Pole number: 14
Motor Resistance: 0.05Ohm
Recommend ESC: 3-12S 100A
Recommended VESC: VESC-4 or VESC-6
Shaft diameter: 10mm with keyway slot or 8mm shaft with keyway
Motor Wires: 130mm silicone 12AWG wire with 4.0mm Gold Bullet Connector Male
Internal PCB with 120 Degree Hall Effect Sensors
Stator: 0.2mm thickness lamination japan steel
Magnet: N42SH high temp curve magnet
Sensor Wire: Standard RC Sensor Wire JST-ZH 6pin 1.5mm pitch
Wire configuration: Blue = A, Black = B, Yellow = C
Dimensions: 84*63mm
Weight: 1Kg

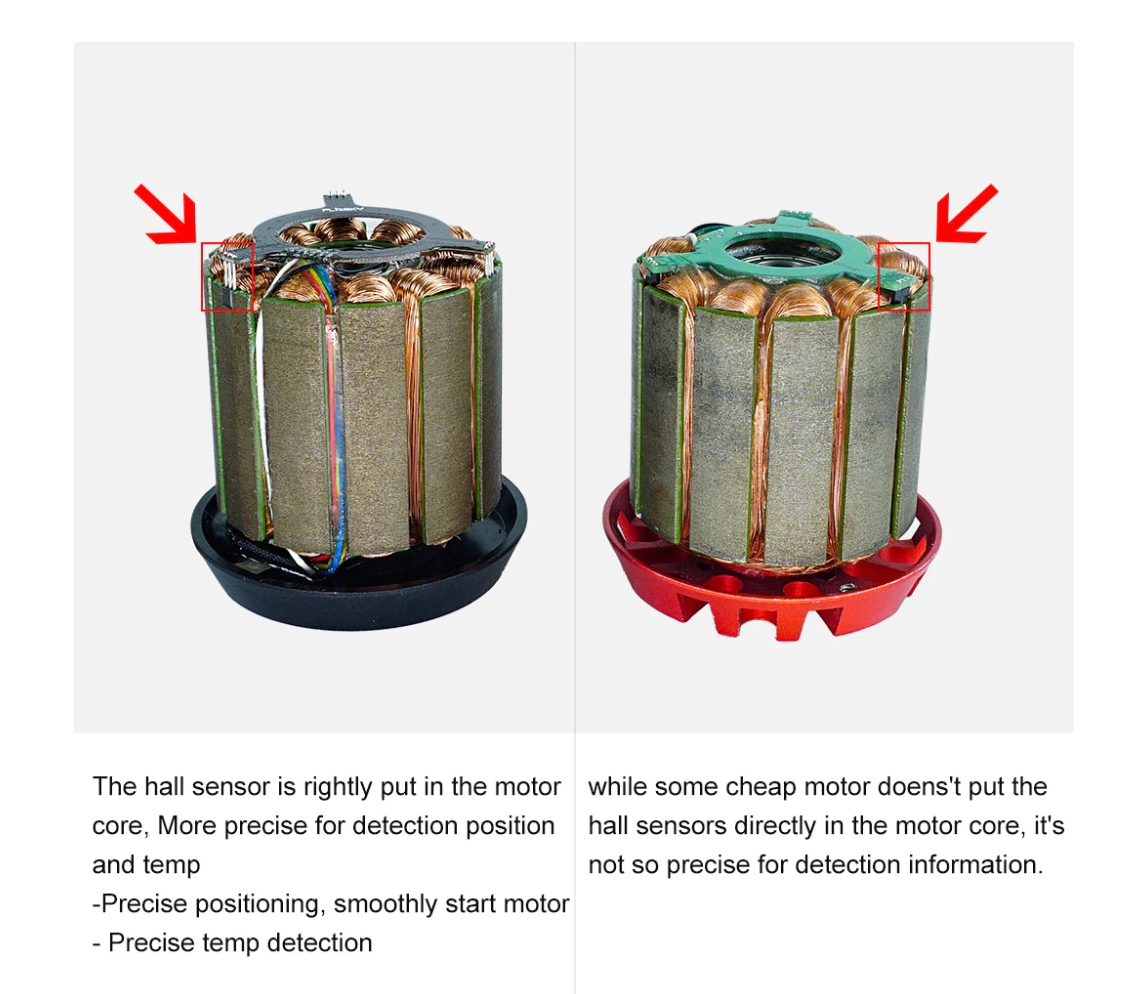
s-l1600.png


Notice this is flipped the other way and uses 120 degrees vs the 60 degrees (which are an error) in the cheap $60 version. And they even went the last step and centered the hall sensors.

This basically fixes every problem but costs twice as much and it will take weeks to deliver, so I might as well try my best to fix my existing motors because I'm without a ride for a long time if I order and wait.

Realize that's 4000 watts (5.3 hp) for just 1kg (2.54 lbs) so a pretty crazy 2 hp per pound. :shock:

Options of 80 kV, 120 kV, 150 kV, 170 kV and 190 kV.
 
First Rewind Attempt

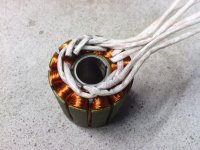
Rewound Motor First Try.jpg

Added a little bit of fiberglass resin but not too much. Just enough to hold the wires in place.

Untested. The winding wasn't that bad once I figured out how to handle the preparation. (spooling)
 
If you didnt spill the beans no one would know good job are the magnets in good health because to much heat damages magnets
 
calab said:
If you didnt spill the beans no one would know good job are the magnets in good health because to much heat damages magnets

Well I just installed the motor and rode it up a hill and it's working great, but you need to really test the motor for several rides before you really know.

When the wire malfunctioned I "knew" immediately something serious had happened so it didn't have much time to do damage. And it was at the beginning of the ride with less than 50wh used before "pop".

Time will tell.

But at least I know what my little routine will be so I can repeat this over and over.

I have six motors to rewind.

:bigthumb: SUCCESS. I does feel really good because I failed with 18AWG and 20AWG before.

26AWG is easy on the hands.

This is a 104% copper fill rewind too so it will be interesting if I spot efficiency improvements when riding.
 
:D :D :D :D :D THE REPORT :D :D :D :D :D

It turned out great. No mistakes and held up to the most abusive test hill cases.

By lowering the kV from 120kV to 94kV it really "tames" the motor and prevents it from spinning faster than the maximum ERPM for the Controller. (12S Li-ion)

One of these days a higher ERPM Controller is going to materialize at a price near the cheap $35 Chinese stuff I'm using now.

There are many threads on Endless-Sphere where people are actively discussing these ideas. Mostly the Flipsky folks.

-------------------

Some odd things....

It seems like the lower kV causes more "Regen" which for me is negative because I have a direct motor to rear wheel setup. This means on a downhill I get more drag.

Also, since I run Sensorless the timing to get going is different so I'm going to need to adjust for that in pedaling at startup.

----------------------

Hill climbing ability is much better. My estimate on the Grin simulator is I was peaking at 300 watts heat on my worst hill (10%) and now that's down to more like 250 watts.

Overall the motor runs cooler and is very strong.

Extra Copper (104%) helps.

It's a Win... after a bad start.
 
HEAVY TESTING TODAY

Okay, so I started at about 9am with a temperature of about 45 degrees outside so the first ride and charge were to simply get the battery warmed up. Over the course of the day (until 3 pm) it was ride then charge, ride then charge.... By the end it was about 60 degrees outside and I was getting full capability from the battery. I forget how many rides but about five or six at least and always pushing it as hard as I could.

First. As the Grin simulator suggested this motor at 14 turns compared to the Stock 11 turns and with a 104% Copper Fill Factor relatively (actual is more like 50%) runs REALLY COOL. So normally I'd end each ride and the motor would be quite hot and I'd put a fan next to the Cooling Fins to cool it off. Now after a hard 20 minutes flat out (pumping up to 2700 watts into it at peak) the motor remains very mild and half the time I didn't even use the fan.

Second. The motor is strong. Hills that I previously just barely got up are now pretty easy. Since it's a lower kV and I calculated very precisely where the optimum peak would be when under a 10% slope it simply hits that peak and does not want to bog down. The motor sounds very crisp and I'm not over revving past the ERPM limit anymore.

In conclusion... it's a big upgrade and worthwhile if your motor's kV is way off.
 
SafeDiscDancing said:
In conclusion... it's a big upgrade and worthwhile if your motor's kV is way off.

Well done and great result :thumb:

Any chance you can post a photo of how the motor is mounted to your bike?
 
SlowCo said:
Any chance you can post a photo of how the motor is mounted to your bike?

I'll describe it.

The motor bolts directly onto another aluminum plate which increases the cooling capabilities on that side.

So basically both sides of the motor have big aluminum heat sinks.

Beyond that it's just mounting and alignment which is bolts and nuts.

One of these days I'll do a full reveal of my ebike and introduce my next mad creation which is an ebike dedicated to hill climbing.

And I rode another four times today and it's really nice. It sounds better because the power is peaking within the ERPM limit so no more distorted over revving which used to waste energy massively.
 
The difficulty getting going from a standing start WITHOUT having sensors (remember this motor is defective from the start so I've gone sensorless) is made worse the higher the battery current setting.

In my case the "setting" is a cheat wire soldered across the shunts and by changing it's length I can adjust the battery amps.

Today I have dropped the limit from 55 amps to 37 amps and it did cure the problem, but the power is so far off what it was so right now I'm going to test around 42 amps.

Hopefully this is a good compromise. Recharging right now.


---- UPDATE ----

So that turned out closer to 41 amps. Starts were great... no hiccups... but power is below 2000 watts input.

I'm going to have to incrementally try to shorten my cheat wire to see how far I can go before problems come back.

My hope is an input of about 2000 watts so at 12S Li-ion that's going to need about 45 amps.


**** The Unanswered Question ****

Why did the difficulties with starting up get WORSE with a lower kV wound motor?

You would think that a lower kV motor would create a more clear signal to the controller of what it was doing... at least that was what I expected. What happened was more extreme roughness in the transition to full power.

All I can think of is that maybe somehow the extra turns might be accelerating the motor at a different rate so the controller is getting confused about what was going on. At the 55 amp level the bike was almost unrideable at startup. But, of course, once you managed to get up to higher rpm the motor was very strong.

If this was a sensored motor (done correctly) then I could imagine cranking the amps way up.

=== Final Verdict ===

50 amps works fine.

And the motor is strong and runs cool.

So for now my motor is officially usable and it seems like it might last... but you never know.

For a little while I tested at 60 amps which was fun, but was nearly impossible to get started.

*** SOLID ***

After dozens of full recharge cycles it's working great.

Seems like the controller has gradually honed in on the new settings and so overall it's having fewer glitches.

Glad I finally did it. Still have a bunch of other motors to rewind.
 
Back
Top