smeagol222
100 W
I recently got a QS motor and want to install the CA 3 thermistor temperature sensor in it.
https://www.ebikes.ca/ca3-therm.html
I've never taken apart a hub motor before and after a while to get the hub motor open I thought putting the 2 wires all the way through the axle is going to be a super pain in the ass.
Wiring
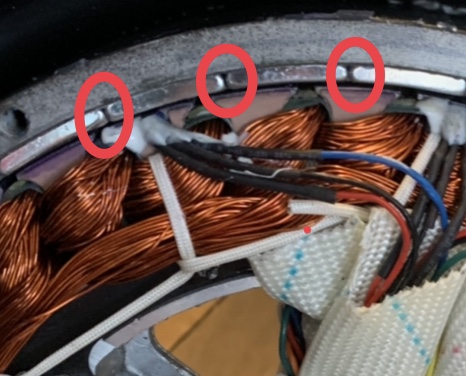
The motor comes with dual hall sensors (in case one of them fails)- providing the original hall sensor holds up, I was thinking a super quick way would be to use a couple of the wires for the spare hall sensor. Obviously I'd have to change all this if the original hall sensor fails.
For example I could use the orange and purple wires from the unused hall sensor. I'll cut the zip tie to make sure they aren't connected to anything, if they are make sure to use heatshrink after I install the temperature sensor etc. all properly
Location
I found this blog https://sites.google.com/site/shelbyelectro/motors/mods/installing-a-temp-sensor-in-a-hub-motor
and saw the guy used some heat proof epoxy to put the sensor on the windings
So I plan to use the same technique and this epoxy its rated up to 232C continuous.
https://www.amazon.ca/gp/product/B007PP26RI/ref=ppx_od_dt_b_asin_title_s00?ie=UTF8&psc=1
While motor is open
While I have the motor open, is there anything else I should add? Perhaps I should add a cheap 12v LED temperature monitor? (does up to 125℃)
https://www.amazon.ca/DROK/dp/B00D7AEKMO/ref=sr_1_2?crid=39YVREHUO8XO2&keywords=12v+temperature+led&qid=1554312046&refinements=p_85%3A5690392011&rnid=5690384011&rps=1&s=gateway&sprefix=12v+temper%2Caps%2C144&sr=8-2
Re-assemble
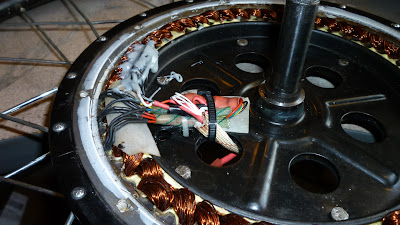
When opening the motor up I noticed nuts for the plates had some blue stuff on them (lock tight?). Also around the edges of the plates on both sides some silicone. Should I be adding some silicone and locktight back when I re-assemble?
View attachment 7
View attachment 6
View attachment 5
View attachment 4
View attachment 3

View attachment 1
https://www.ebikes.ca/ca3-therm.html
I've never taken apart a hub motor before and after a while to get the hub motor open I thought putting the 2 wires all the way through the axle is going to be a super pain in the ass.
Wiring
The motor comes with dual hall sensors (in case one of them fails)- providing the original hall sensor holds up, I was thinking a super quick way would be to use a couple of the wires for the spare hall sensor. Obviously I'd have to change all this if the original hall sensor fails.
For example I could use the orange and purple wires from the unused hall sensor. I'll cut the zip tie to make sure they aren't connected to anything, if they are make sure to use heatshrink after I install the temperature sensor etc. all properly
Location
I found this blog https://sites.google.com/site/shelbyelectro/motors/mods/installing-a-temp-sensor-in-a-hub-motor
and saw the guy used some heat proof epoxy to put the sensor on the windings
So I plan to use the same technique and this epoxy its rated up to 232C continuous.
https://www.amazon.ca/gp/product/B007PP26RI/ref=ppx_od_dt_b_asin_title_s00?ie=UTF8&psc=1
While motor is open
While I have the motor open, is there anything else I should add? Perhaps I should add a cheap 12v LED temperature monitor? (does up to 125℃)
https://www.amazon.ca/DROK/dp/B00D7AEKMO/ref=sr_1_2?crid=39YVREHUO8XO2&keywords=12v+temperature+led&qid=1554312046&refinements=p_85%3A5690392011&rnid=5690384011&rps=1&s=gateway&sprefix=12v+temper%2Caps%2C144&sr=8-2
Re-assemble
When opening the motor up I noticed nuts for the plates had some blue stuff on them (lock tight?). Also around the edges of the plates on both sides some silicone. Should I be adding some silicone and locktight back when I re-assemble?
View attachment 7
View attachment 6
View attachment 5
View attachment 4
View attachment 3
View attachment 1
 ).
).