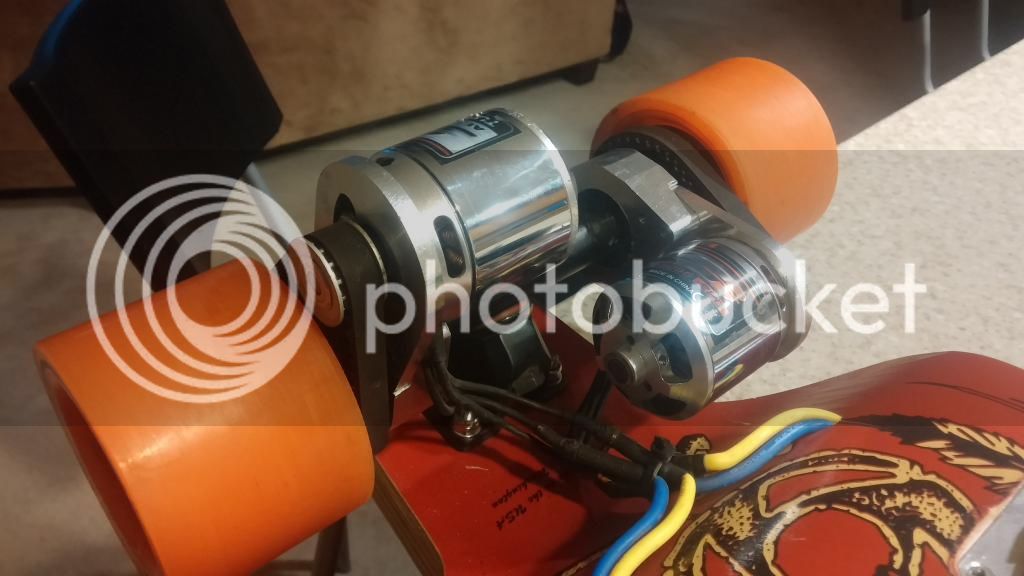
rs4race's E-longboard

rs4race

100 W
Joined
Aug 4, 2014
Messages
126
I thought I would share my E-board. It started off as a mechanical engineering senior project. It has come quite a ways since then but a lot of the fundamentals are the same. Some of the most significant are the drive train layout and a built in charging port. I design and manufacture all the parts except the obvious (trucks, wheels, bearings etc.) and a friend designed/built the deck. If there is interest in certain parts from this build or you need some custom stuff but cant cut it out I may be able to help, just PM me.

Specs
6s2p lipo 10ah
Hobbyking 150a esc
Sk3 5055 280kv motors
Orangatang wheels
HTD 5M 36t/13t

Guestimated performance numbers
Top speed: 21mph
Range: 15miles (all power, 15mph avg, hilly)
Weight: 20lbs
Acceleration: careful with that trigger
Max grade: steep
Funness: 10/10


You may have mentioned it before on another thread but I have a few questions:
What Voltage are you running? Did you wire individual cells in strings to make it fit?
Are you going to sell battery packs?
What ESC's are you running? No ventilation aside from the motor wires?
How much are you selling your decks for? Can you cut them for drop through mounting?

You're build is up there with the nicest I've seen.
 
Well those mounts didn't last long. I have similar mounts on my original board. I made some small changes around where the failures are. Its some combination of shock from expansion joints, changes to model and the green abs(seems more brittle than my other materials).

I have some black nylon I am trying to use. I printed out a part last night but it warped slightly. Gonna try another tonight with some different settings.


I did try printing everything. The motor bracket is a bit thin and not rigid enough. Plus the motors can get warm and this is a thermoplastic so there might be issues with it warping over time.

I originally printed the parts to test fit. I then cut them out of aluminum and those have worked great. I was curious how well the would work so I thought I would try them. They have been working great on my other board. I have a couple hundred miles on them already.

I will most likely just cut a new set of aluminum ones out for this board since the mounts work great through the range of motion. I'm still interested in some plastic and aluminum ones though. Its a significant cost and time savings.
 
I'm experimenting with print bed treatments with no success. I've tried painters tape for nylon, glue spray, etc. I will be trying some polycarbonate sheet, and also etched glass surface. The only thing I've gotten to work consistently is Elmers extreme glue stick.

So now that plus bumping the extruder up to 240C and dropping the bed to 90C I got a real good quality print. ABS again of the hangar clamp with problem areas fixed. The other side is in progress also. Should have a new set tomorrow and will be able to finish off the batteries to find the range.

 
Well I finished off this charge. 14miles pretty much all powered. Mixed flat and hilly with a bunch of full speed hill climbs. Average speed was 15mph.

I put on some old mounts printed with transparent abs, since I fudged up one of the dimensions 1mm too small. The new parts came out really nice though. Waiting for some new parts to pop out.
 
How about another pic?
My original board (the black one) has wider trucks, 320kv motors, and 11.6ah(total) 6s packs. Geared 12/36 with all aluminum pulleys and also sporting printed hangar clamps. You can really see the difference in width.

 
UW? Nice. Ever longboard in Shoreline or Ballard or Magnolia? And you never answered my question about the cost of one of your decks?
 
Yep UW. Sorry forgot to ask my buddy about the decks. I will pm you when I find out if they are for sale or not.

I never been long boarding any of those places, but want to get out on the interurban in Seattle sometime soon. I've only been to interurban up by Everett, down in Kent, around my neighborhood, and cedar river trail. Are you in the Seattle area?
 
I've been in SoCal for about 9 years now..Miss Seattle though. You can hike to the top of Magnolia and board all the way to the beach below the cliffs. It's all low traffic neighborhood streets with a good mix of fast steeps and 20mph cruising. You should map it and check it out.
 
I finally got some friends on the Chief (red board) throttle limit set to 50%. They had a lot of fun. The printed mounts though on the Chief are kinda iffy and seem to come loose. So I cut out some aluminum ones. Gonna refine them a little bit but they are pretty solid. Oh did I mention they are clockable?


Any problems with warping or drafts using ABS on your open-style printer? (MakerFarm i3?)

Also, somewhat unrelated: how's UW? Working on college apps right now, no idea where to apply haha...
 
UW was great. Great professors, peers, research opportunities, lots of clubs that are fun that can really help get a job too.

Sometimes i have problems with parts peeling up. Usually due to a bad first layer. With 235C extruder, 90C bed and elmers extreme gluestick i havent had anything peel up. I printed out some nylon at 245C extruder and 70C print bed and have had excellent adhesion there also. I need to dry that filament though.

Oh it is a makerfarm i3 8". Im working on an enclosure for the build space right now. It really seems thats a big deal.
 
Working on some new mounts. Same as the ones pictured above, but bigger clamping range, and some grippier clamping surfaces. I have material for a few extras and planning to cut them out once I fix my cnc program. Sometimes it does some retarded stuff that takes forever to finish...

 
The two work great. I have a few RC cars and they all use this method. Its where I got the idea. I have had them come loose before, but blue locktite helps that.
 
Looks like 3D printed plastic of a sort. The clamp when tightened will cause relatively even inwards pressure in on the outside of the plastic insert which will compress it (also relatively evenly) around the hanger, as well as resulting in a major frictional force locking it against the inside of the clamp. So if it's tight enough and the materials are suitable, it probably won't bend or rotate. I'd imagine you'd need quite a high friction plastic, medium to high density, for best results. But cool ideas! I'm going to try and add the rotating belt tension thing to my design. Very efficient and easy to adjust!
 
makepeace is right. The insert is printed in nylon, which is a really tough material, strong, no delamination, but is kinda slippery. The previous set I did a smooth bore on the clamps and it holds in place, no significant bending or rotation. I put a pattern of "teeth" on the new clamp's bore and increased the gap for the clamp bolts. I may do an aluminum insert and it wouldn't be hard but I like the nylon as it preserves the paint and doesn't cold work the hangar (compress the hangar where the clamp was).

I have to tweak the dimensions for the inserts. I did one for caliber trucks which fits on the hangar really nice, but is a bit tight on the clamp bore. If you slide it on just a little bit you can rotate it, but once slide further on the hanger where it should be the teeth really grab on and you will probably break something before you get it to turn. I did another for the precision hangars and they were a little loose on the hangar, but can rotate it fine, and clamp down really snug. I want them to be a good slip fit on the hangar, rotate easily and then clamp down tight. I adjusted the models and will print some more after work.

Careful with that style of belt tensioning/ motor mount. It can limit your selection of motor pulleys. With my 50mm motors I am limited to 12 tooth flanged pulleys (htd 5m) as its hard to reach the motor screws. This might not be a problem with bigger motors. Lucky me this gearing seems to be just right.

I was messing with my CAM program last night and generated some new toolpaths I may give a try tonight and see if I can cut down the machine time. When I did the 6 sets of prototype mounts I edited a lot of code on the original clamps and I beleive it cut the time down to 45mins a set vs hours. We'll see how that goes.
 
Hi !

Really nice mount.
I'm about to mill myself a bracket for the same trucks and motors.
I have one question about the way you mount the pulley on the shaft. It looks like you are using a kind of locking hub.. What did you exactly used for this? I can't find any locking hub that fits the width of a 15mm belt pulley.
They all are 10mm long to fit a 6mm shaft.
It looks like in the sk3 motor package, there's a kind of locking hub for the shaft. Is it right?
Thanks for your help.

Ben.
 
Awesome build! Looking to do something very similar (highest form of flattery...)

Can you show the internals under those covers?

Your original UW Project deck is much wider stance - spacers or regular Calibers? What width are your atlas trucks on your new deck?

All-up weight?

Likely pretty busy - but what's the latest and any updates?

Thx!!
 
Hi rs4race, nice to meet you .

Love your E longboard build !

Can i ask where you got the motor gear ? Are the set screw(s) under the belt section??

Thank you ?
 
Back
Top