Loaded Dervish/dual6355-190/dualVESC/90mmFlywheels/nunchuck

Trbt555

10 W
Joined
Oct 25, 2015
Messages
77
Hi Guys,

I would like some advice.
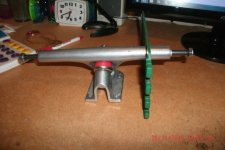
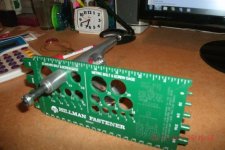
I've started my first build a build using Torqueboard's' V1 mounts on 195mm Paris trucks, for a dual rear drive.
When I tighten the clamp screws, I notice the ends of the mounts move outwards, probably because the hanger shaft of the trucks is not completely cylindrical.
This will lead to the motor axle not being 100% parallel to the truck axle.
cc297333-6d16-42eb-97c6-30e8e49ce94e.jpg


How much should I worry about parallelism between the motor and truck axles ? What is your experience ?

Of course I could grind the hanger shaft down slightly to compensate, but I'd like to avoid if unnecessary.

Thanks for your help,
Tom

EDIT
I decided to make this thread my build thread after some of you put me on the right track with my question above.

Board: Loaded Dervish
Trucks: Randall R2 baseplates / Paris 165mm hangers
Wheels: 90mm Flywheels

I'm planning a dual rear drive with Enertion R-spec 6355 190kV motors, I also have two VESC's on order.
I'll need to sort out batteries soon, but I'll go with Lipo's because I already own 2 chargers/balancers.
 
Had the exact same problem you're encountering. You can run it like that but you'll find that the belts won't last. It's crucial that you have proper alignment. Sorry to say but the hangar needs to be filed down a bit. The easiest way is to find a washer that has a 3/4" hole and use that as a guide when filing the hangar down. You'll find that the hangar starts to taper about 1 1/4" in from the end.
 

Attachments

  • GEDC0107 (640x428) (640x428).jpg
    GEDC0107 (640x428) (640x428).jpg
    105.4 KB · Views: 6,578
  • GEDC0108 (640x428).jpg
    GEDC0108 (640x428).jpg
    116.1 KB · Views: 6,578
On my setup the hubs on truck adapters can also face inward into the wheel and it's hidden inside the wheel.

I also use any device or object to make sure the two trucks are in equal sizing. Find a 1/2" block or so and rest the motor mount on the 1/2" block and clamp on it then repeat for the opposite side.
 
If I were you I'd try to use aluminum can as shim stock, before cutting anything.

http://youtu.be/JWUJtmgh55M 0:30 for how to prepare the shim stock. Sharp scissors will cut it well. You could try leaving the paint and epoxy inner coating on if you need slightly thicker.

If you cut a small strip, you can wind it around the thin part of the truck, when you tighten your clamps, the aluminum will slightly deform and probably wont shift if you get the shape close enuff.
 
Thanks guys, I went to work with your tips.
@cdn - your tip was particularly useful, I used a 3/4" washer, I probably wouldn't have thought of that myself.

I decided to modify the hangers. I wish I had access to a lathe but I made do with what I have.
I put the hanger into a drill press and added a wheel at the bottom to stabilize the whole thing. Weird, even new hangers have bent axles.
IMG_7769.jpg


I then carefully filed away ath the rotating hanger until my washer (you can see it on the wheel) went all the way over.
After some light polishing this is the end result:
IMG_7772.jpg


Now I'm at it, I think I'll make this thread my build thread.
I transplanted the Paris hangers to the Randall baseplates on my Dervish and I kept the conical Randall bushings, which I really like. No noticable difference in handling with the slightly wider hangers.
I left the baseplates on because I'm too lazy to remove them, I had already countersunk them, and they've acquired a very nice patina over the years:
IMG_7776.jpg


With the modified hangers the motor mount flange is now perfectly perpendicular to the axle:
IMG_7774.jpg


Contrary to some folks I'm really not interested in the aesthetics, as long as the board shreds. This is my trusty Dervish, I can say we've both been around the block a few times.
IMG_7777.jpg


I'm waiting for motors, and then I'll decide if I'll keep them inboard or go outboard to the back. The dropthrough deck doesn't allow that much clearance so I think out to the back will be my best bet.
 
Today was battery day.
Considering the fact that I want to use 'fragile' Lipo's and the Dervish is quite flexy, I spent some time jumping up and down on the board in my garage this afternoon.
35mm thickness would be the absolute max and in that case I would need an enclosure capable of withstanding scraping the pavement when I max the board out, which I WILL do when carving, I'm not the lightest of riders. 25mm max would be ideal.

Voltage:
I think going with 12S makes the most sense as the current will be lower and the resistive heat losses will be considerably less.
With 12S, the 190kv motor, 90m wheels and a 15/36 reduction the calculated theoretical top speed would probably be too much for me but if I'm not mistaken the VESC will let me limit the motor RPM's to a comfortable level. Am I right ?

So I went onto the Hobbyking battery selector and it turns out only 4 x 3S would allow me to keep the thickness under 25mm.
At least 5000mAh should get me far enough.
Theoretically a dual R-spec 6355-190 setup would be 4800W installed power. At 44,4V the corresponding max total current would be 108A but I'm guessing that would be peak so I think continuous discharge rate for the 5Ah Lipo's should be in the 10 to 20C range, not higher. AND I can limit the battery current in the VESC anyway right ?

This query returns 5 options for the EU warehouse:
25mm.jpg


1. Multistar High Capacity 3S 5200mAh Multi-Rotor Lipo Pack
Cheap, light and compact. What's not to like about these ?
Only 10C but if I read @okp's Vanguard thread correctly I could get away with these.

The next three are very similarly priced, have 25C rating and have more or less the same dimensions.

2. ZIPPY Flightmax 5000mAh 3S1P 20C

3. Turnigy 5000mAh 3S 25C Lipo Pack

4. ZIPPY Flightmax 5000mAh 3S1P 25C

Finally there's this one, which I don't really see the advantage of using, its expensive but it can be charged ad 5C, which my chargers won't do.

5. Turnigy nano-tech 5000mah 3S 25~50C Lipo Pack

To conclude, I think I'll risk ordering 4 of those cheap Multistars, unless any experienced users here on the forum have other recommendations ?
 
get theses

http://www.hobbyking.com/hobbyking/store/__26672__Turnigy_5000mAh_3S_20C_Lipo_Pack_UK_Warehouse_.html?strSearch=3S%205000

they perform perfectly on my 12S setups. With 90mm to 80mm you will get no more than 28 amps peak (I weight 72kg).

make it a 12S 5AH. Check my builds.
 
I made some progress today.
This week I happened upon these lunchboxes which turned out to be perfect for my build. They're flat (33mm), they have rubber seals and reliable latches and they're quite strong.
I temporarily mounted them on rubber bushings using M5 bolts through the deck. I drilled all holes slightly bigger to have some play to account for the board flex.
I pushed a few times around the block and took a few descents carving, the mounting seems te be rock-solid.

IMG_7801.jpg

IMG_7799.jpg

IMG_7795.jpg


I also made a cutout for the anti-spark loop key:
IMG_7807.jpg


I'm currently waiting for my fuse to arrive, after which I'll be able to mount & wire the batteries into the box.
I did go for the Multistar batteries after all, we'll have to see how they hold up once I get the motors & VESCS.
 
Today I put the power meter in the drive-side box.
I like easy access so I didn't mount it to the lid but mounted it to the bottom of the box on a riser to bring the display up to the right level.
I wasn't happy with the look of the display in the cutout so I transplanted the original bezel:
IMG_7810.jpg


This week I'll be receivng my fuse and then I'll mount the boxes and wire them up.
Then comes the countdown to the November batch of Vesc from Enertion...
 
Finally wired up the battery box.
Now waiting for the VESC's and motors...
IMG_7813.jpg
 
a lot of chargers charge at 6s, you might want to have the ability to charge at 6s. Just in case you want a small charger at work or in the bag.
 
You're right, my chargers go up to 6s so I could charge 2 packs in series in half the time.
But how do I connect the balancing leads ?
 
This is going to be a really impressive setup. Those boxes looks great, are you going to paint it ?
 
No I'm not going to paint anything, I'm not really that concerned with appearance or aesthetics.
Besides, it would look like I painted it.
I'll probably bling up the boxes with some cool skate-related stickers and that's all.
I'll keep y'all posted.
 
Trbt555 said:
You're right, my chargers go up to 6s so I could charge 2 packs in series in half the time.
But how do I connect the balancing leads ?

Oh i thought you were going to charge at 12s.

Probably best if you think of your setup as 6s + 6S.... currently you have it wired as series to get 12s for operation. Rewire your 3s balance cables for 6s on each 6s bank.

http://www.buddyrc.com/power-system/paraboard-parallel-charge-board.html or homemade parallel adapters, will make a 6s parallel bank. Obvs, you need a diy xt60 plug adapter to switch back to 12s as well.
 
I didn't let having only one VESC stop me from doing my first test ride today.
I left the unused motor on the board but removed the belt.
I was quite surprised to find only one motor was sufficient to drag my 90kg ass up some hills.
I can't wait to find out what 2 motors will do !

I added a tie-wrap around my battery box to make sure I wouldn't spill my cells on the pavement on my first ride:
90a5d1b7d6551688c676ab469329cff4249690b3_1_500x500.jpg


Weather was great for the time of year, and carving on the 90mm flywheels was buttery soft:
[youtube]vC15-rRvIT0[/youtube]

Some stats:
Distance covered: 10.8km
Average speed: 18.23kph
Max speed: 39kph (I had the ERPM limited, this was downhill)

Peak current: 23.27 A
Peak power: 1114.6W
Battery charge used: 2139mAh

Start voltage: 49,87V
End voltage: 46,11V

I'm not happy with the range of these Multistar 5200mAh batteries, it appears their capacity spec is inflated, I have only been able to draw rougly half the charge of what was specified.
Towards the end of my ride I could clearly feel the batteries increasingly not being able to cope with the hills, which was a bit of a disappointment. I might go for a second set of Zippy Flightmax cells after all.

I was very pleased with the Nunchuck connection, no dropouts at all. Pretty impressive range too. At one point I had my youngest daughter riding the board with me on the stick and at about 10-12m distance I would typically lose the connection.
 
Second test ride today.
This time on flat ground (23m total climb) and pretty steady speed using the cruise control

Distance: 9.36km
Avg speed: 18.3kph
Peak power: 1035W
Peak current: 22,5A
Charge used: 2019mAh
End voltage: 45,9V

Max speed on this run was 30,5kph, which corresponds nicely to the theoretical speed I calculated using a max ERPM of 30000 (which corresponds to approx. 4286 mechanical rpm on a 14pole motor) I had set in the VESC to protect me from myself :smile:

[strike]The batteries suck, they should be giving me double this range. It was only 12°C but I don't think it's the temperature. I think I got what I paid for.[/strike]
EDIT: I have my voltage cutoff way too high and I'm leaving half the battery capacity unused. I'm a dumbass. /EDIT

No nunchuck dropouts.

I did manage to trip the VESC hard (ie not soft) twice, each time it happened when I tried to overtake a cyclist and accelerated hard.
I have no idea why this happened. Any ideas ?
 
Trbt555 said:
I did manage to trip the VESC hard (ie not soft) twice, each time it happened when I tried to overtake a cyclist and accelerated hard.
I have no idea why this happened. Any ideas ?

Can you reproduce on the bench while connected to the BLDC tool? in the monitor tab you can see errors and get more details in the terminal tab by typing "fault". It will give you some diagnostics and error codes that can help you figure out what settings you can adjust to troubleshoot the issue.

Can you better describe the "hard" trip vs "soft"? I had one voltage related error on the bench which gave me a couple beeps and flashing red lights - the VESC was unresponsive for 1-2 seconds and then worked again. Is that hard or soft?

Nice clean and functional setup Trbt555! Looks like you've kept the flex and fun of the dervish!

HTH - GL!
 
I didn't have this problem on my first run. It only happened today on my second run and I havent put the board on the bench yet.
i'll see what I can reproduce.

Hard is when the power just cuts off for 1-2 seconds that throws you off. Luckily I can run pretty fast :)
Soft would be a gradual reducton in power that doesn't throw you off.

Damn I feel stupid or not realizing my voltage cutoff was too high, perhaps these batteries ain't that bad a deal after all.
 
Trbt555 said:
I didn't have this problem on my first run. It only happened today on my second run and I havent put the board on the bench yet.
i'll see what I can reproduce.

Hard is when the power just cuts off for 1-2 seconds that throws you off. Luckily I can run pretty fast :)
Soft would be a gradual reducton in power that doesn't throw you off.

Damn I feel stupid or not realizing my voltage cutoff was too high, perhaps these batteries ain't that bad a deal after all.

Everything that I've read about those batteries indicates that Keeping the amp draw low will mean you keep decent performance... But just remember they probably are not overrated on capacity but they probably are overrated on amp draw.
 
OK, now this is getting seriously fun !

Third test today on flat terrain with these modified settings:
Batt max: 30A
Battery cutoff start: 39,6V
Battery cutoff end: 38,4V
Max ERPM: 40000

Stats:
Distance: 21,38km
Avg speed: 20,35kph
Top speed: 37,5kph
Charge used: 4850mAh

No more cut-offs when accelerating.
No nunchuck dropouts either.
Me happy :smile:

I tried hitting 40kph but got speed wobble because I had my trucks way too loose so I backed off.
I'm pretty sure that within a few rides 40kph will not feel fast at all.

Towards the end of my ride the VESC unexpectedly cut off the power twice but my wattmeter was still showing 44V by the time I turned the board over to look.
The wattmeter was also reading a peak power of 4125W, which is impossible.
I think it can't cope well with the regenerative braking. It may fail soon.
I was probably hitting the lower cutoff voltage so I kept off the stick and rode the last few hundred meters at snail pace. Because you know, pushing sucks ;)

So, the batteries ain't as bad as I first thought. I'd say acceptable for the price.
Anyways, my Zippy's arrived today so if the weather keeps up I'll give those a try later this week to see how they compare.

I hit a few rough patches with some loose gravel, the Flywheels just ate that gravel up.
The R-SPEC's on the other hand, got pummeled:
17cda6db9b285deb582574d61983af2ebc0b3215_1_500x500.JPG

But hey, a good tool wears signs of use well, rught ? ;)

I removed the unused motor though. No use dragging it around for nothing.
I hope my VESCs from @chaka come soon, dual drive will be insane.

I also started an offence against all rattle.
I found one of these dampening mats at the local hardware store and put some in my control box, to prevent wires rattling.
I also added some thin dampening material to keep the wattmeter from rattling against the lid:
1e8c3f7ea89d4b075ba2ecf8f530e4bbce0f7a11_1_666x500.JPG
 
Back
Top