1st Electric Mountainboard build

zblad

1 mW
Joined
Apr 18, 2016
Messages
15
Hello All,

I have decided to start building my first mountain board. I was hoping for any tips on things to do or not to do. So below is what I have done so far and plan to do.

I picked up a MBS board off craigslist that was practically brand new for $130.00
View attachment 4

I made a dual motor mount out of some steel. I made mine to bolt to the existing brake bolt holes on the truck the reason for this is I didn't want the motors hanging so far off the back. I haven't see anyone else really do this so I am starting to wonder if this wont work. so far I haven't hit the motor when I lean on it. I am using a 213kv motor.
Board2.jpg

My cousin had a hoverboard that he broke in half and said I could have for parts so my plan is to use the battery for testing purposes only. I don't know if I dare ride with this battery since so many have exploded. Was hoping to get some insight from you guys on here.
Board3.jpg

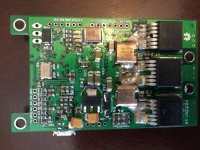
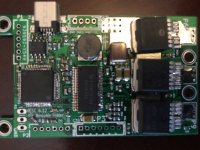
I plan on making my own VESC esc. I ordered the pcbs last night from dirtypcb and paid for a stencil. I built my own surface mount soldering oven and tested it out and it does work.
Board4.jpg

Testing the oven out.
Board5.jpg

For now I am going to use a single motor until I know everything works. I am wondering what programming card I should order and what remote I should use (Wii or hobbyking remote). I also went with a chain and sprocket instead of belt drive does anyone know the benefits of each. I had a heck of a time lining up the holes on the sprocket so it isn't perfectly centered but should work for now. Also I am wondering what batteries I should use I was think of doing 6s for now but I don't really understand all the C rating stuff with batteries.
 
Just ordered 2 zippy batteries rated 6s 30c 8000mah how long do you think these will run if I am geared to go roughly 15mph. Also I live in Thief River Falls MN where digikey is located and plan on ordering all my vesc parts from there. Here is the parts list I have compiled so far.
 

Attachments

  • VESC_BOM.xlsx
    15.3 KB · Views: 69
Hey.
I seen this kind of mounting the motors in this angle by boards from willowzboards. It will work :)

I would not use the VESC on 6S, especially if you use just a single drive.
Just took your batteries in series and correct your gearing to anything about 1:6 reduction.

If you located in the US you could use H25 chain, most guys in europe uses ISO-04 chains.

The HK Quanum 2.4GHZ Remote is a nice deal, only the batterys on this remote sucks. Have to change really often.

Maybe the miniremote on alibaba is an option... just ordered mine a few days ago... will report how it work.

Keep on building.
 
Hey I was actually going to do dual motors just haven't got around to ordering another one because I want to make sure everything will work. With that being said would one motor be enough on 12s should I go that route or use dual motors on 6s? Hobbyking didn't have my batteries in stock go figure second time I have ordered and paid and then they tell me its out of stock so now my money is tied up for a week GRRR... Does anyone have advice on buying or making my own batteries. Lipos aren't something to play around with so I don't know if I want to make my own or not.
 
Update so tomorrow i am going to finally try make my own VESC I have one major concern and that is I am not sure what components does the polarity matter on. Does anyone have a list or images that show what components to make sure are the right way or direction. Is there any other tricky things I should prepare for.
 
the segway batteries are really good actually powerfull little things :mrgreen:
 
Alright so i finished the board today but havent got to test it out yet i have a couple concerns....

when i put the board in my soldering oven some of the components move so i had to straighten them out with my regular soldering gun and i home i didnt over heat them or anything. Another issue is there is bridges all over the place in the small processor and motor driver. See images. also on the fets it looks like they might be shorted across the pins does anyone know if this will cause issues and can i try flash the firmware on it or will that mess it up?
 

Attachments

  • IMG_2595.JPG
    IMG_2595.JPG
    65.5 KB · Views: 2,955
  • IMG_2594.JPG
    IMG_2594.JPG
    56.2 KB · Views: 2,955
Just got some wick planning to do it tonight... So probably a dumb question but to flash the firmware onto this do i have to have a battery hooked up? I would assume you do but the usb could also be powering the processor...
 
zblad said:
Just got some wick planning to do it tonight... So probably a dumb question but to flash the firmware onto this do i have to have a battery hooked up? I would assume you do but the usb could also be powering the processor...

From what I know there's no need to connect battery for flashing firmware, only for programming with BLDC tool.
 
So the instant i hook up the stlink2 to my vesc all the light go off on the stlink2 and I cant see it under lsusb in ubuntu so im guessing something is shorted or not connected :( when i run make upload i get "This adapter doesn't support configurable speed". I also dont get any lights on the VESC.
 
zblad said:
also on the fets it looks like they might be shorted across the pins does anyone know if this will cause issues and can i try flash the firmware on it or will that mess it up?
as said before DON'T try to use it that way. only if you like to see white smoke ;)
all the little chips are completely messed up. you need to work very precisely with these little smd parts. sometime they have short even if they look ok. THESE look shorted on the photos already. no need to look closer :(
get the best solder wick you can and try your best. i doubt that it will work. there may be some solder "behind" the pins, so between the chip's body and the pcb. the wick won't be able to suck this out.
i personally would remove those parts and start all over. remove them, clean them with wick, clean the board and then use a my hot air station to reflow them. as you don't seem to have a hot air station take a very fine solder tip, generous portion of flux and solder by hand. then check EVERY pin against it's neighbor for shorts. if all this looks good THEN you are ready to apply power to the board.
 
Successfully made a VESC today and flashed it. Ordered the bullet connectors and wire today so now just waiting on that. I was wondering if a regular 12v battery would work for testing or should i try hook up the 10s hoverboard battery right away? Also i plan on using an rc remote for now but does anyone know if the VESC will power the remote controls receiver? Thanks
 
Problems i hooked power to my vesc today and i got a blue light only i couldnt get it to cennect and now the blue light went out and does nothing??? what the heck could be the issue.
 
zblad said:
Problems i hooked power to my vesc today and i got a blue light only i couldnt get it to cennect and now the blue light went out and does nothing??? what the heck could be the issue.

by looking at your previous job - there can be be anything. Electronics isnt like mechanics where you can run loose screws, friction, dirty joints etc and the machine will work somehow. In electronics there must be connection where it should be, and if it is in the wrong place (short) it will not work in the best case or will pop and burn in the worst.
With soldering like that its hit or miss, your vesc can work straight out the oven, but die once it cools down (cold solder joint) or it can work for a while and die later from vibration, and boy oh boy vibration on e-board is crazy...

If you are using oven you should apply precise amount of solder paste and without good stencil its impossible. I soldered my vesc by hand applying paste on each pcb trace and placing components one by one, then soldered them in small groups in 5 to 10 components with hot air, then moved to next group.

check for shorts, take schematics, check 3v rail, 5v rail, check grounds and so on...

Good luck!
 
Hey thanks for the reply... Yeah not quite sure what the issue was but I was able to remove the small process and reflow it back down and it flashed and connected right away while warm... Then didn't connect again so I got in patient and tried it again but I think I had my reflow too hot because the board started to discolor so I went around with my soldering gun and a couple pins fell off :( Sucks but o well its all a learning process. My next one I try I think I am going to go around with a q tip and wipe some of the solder off where the processor and the motor driver are just so there isn't so much solder because both times now I have had bridges. Either way I was pretty happy that one I got the board to atleast flash the firmware and 2 I was able to get it to connect to the laptop and I know now what lights to look for and know if its correct or not. I believe when you hook up power the red led is supposed to flash 3 times beings that's what it did the two times I got it to connect to my pc...
 
Finally got around to working on this again. Ordered a VESC the other night from diyelectricskateboard. I have decided to use two 4s batteries in series im just a little curious if anyone know if 8s will be enough for single motor or will i burn something up? The batteries i have are 20c if there is two of them hooked in series does that mean they become 40c or would it have to be hooked in parallel for that? Also is it ok to do the motor detection with only 4s? If anyone can give me the best advice of what settings to set first i would appreciate it. I have watched the diyelectricskateboard tutorial for setting up but they only set like 4 things and that doesnt seem like enough but maybe it is for just the motor detection.
 
Back
Top