Quadcopter Build

nechaus

100 kW
Joined
Oct 11, 2011
Messages
1,876
Location
Brisbane > AUSTRALIA
Hey guys, Thought id make this thread just in encase any of you were thinking about making a multirotor..
Hopefully this will help someone out and make it easier. (it's not that hard at all)

My goal from this build is to make a quadcopter X style, Beefy power... Fast speeds .. Acrobatic if I want.. or perfectly stable with long hovering times.
You would easily be able to mount a full size camera on this.
Low cost but pretty decent quality overall.


Component list.

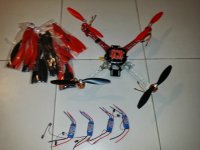
Frame, 450mm size from hobbyking, Its a DJI clone frame but this is the 3rd version.. seems quite robust.. great for a beginner or novice.
Link : http://hobbyking.com/hobbyking/store/__49725__Q450_V3_Glass_Fiber_Quadcopter_Frame_450mm_Integrated_PCB_Version.html


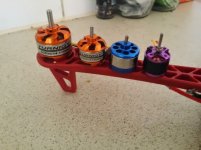
Motors , http://hobbyking.com/hobbyking/store/uh_viewItem.asp?idProduct=18225 $60 for x4

Okay these motors are the minimum you would want.. You can go smaller like 28xx size but They do tend to get hot and if your system is not balanced one or 2 motors might work harder and get warmer when you fly acro.. with the bigger ones you have more head room.

So I found the 3530 to be a great motor for this frame.
(you do need to drill two extra hole on each motor mount to mount the motor directly to the frame.. you do not need to use the aluminium mount that comes with the motor.


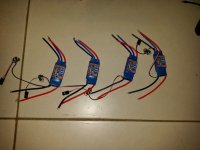
Esc- 30 amp, Cheapest is the hobbyking series.. They will work.. I would strongly recommend getting ESC's with a Simonk Flash.. they cost around $13 from hobbyking..
- What is the simonk firmware? Its firmware to basically increase the response time of the esc from the flight controller. ( more stable flight)

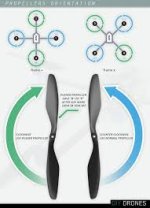
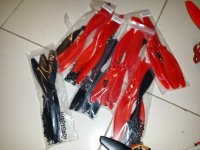
Props, 10x4.5 props. example http://hobbyking.com/hobbyking/store/uh_viewItem.asp?idProduct=25821 http://hobbyking.com/hobbyking/store/uh_viewItem.asp?idProduct=25824
These props work well. they are cheap.. they break if you crash.. start with these and then go to carbon ..
-$20

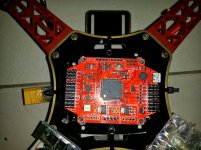
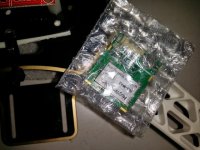
Flight controller. $70
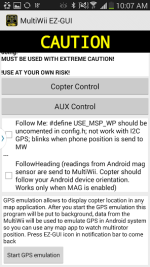
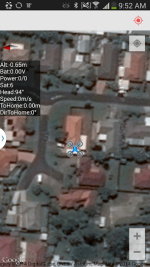
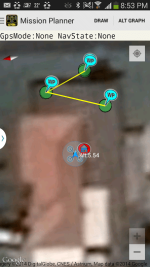
I have gone with the Multiwii pro, its cheap, comes with a gps.
http://hobbyking.com/hobbyking/store/uh_viewItem.asp?idProduct=39333

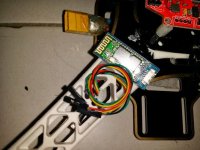
Bluetooth module - for close range pc/phone connectivity. $9
http://hobbyking.com/hobbyking/store/uh_viewItem.asp?idProduct=55126


All up total cost about $230-$240- ( if you did not want gps and just an acro quad, -$50)

You would also need to get a transmitter, you can go with a cheap hk 6 channel one for $30 or get a turnigy 9x for about $70..
you will get around 500 meters with the hk tx rx.. turnigy maybe 1km . but the turnigy can be upgrade for long range gear.


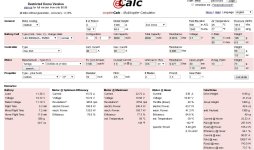
And finally the battery, you could fly with a 3ah battery for acro flight... lower weight.. you could use something the size of 8ah
Both need to be 3s, 4s will be to much for this propeller size..
1100kv + 3s + 10-4.5 props is a good combination. With 8ah you would get upto 15 mins hovering time which is not to bad for the power it has.
Keep in mind this quadcopter will be very powerful for acro flight as well...
 
This will be quite the work horse... you will be able to load it up with 1000 grams of stuff and it would still fly @ 72% throttle and hover for about 8 minutes with 8ah battery.. pretty good compared to ready to fly versions out there..walkera 350 ect..

I figure about 1400-1500 grams for the base weight (8ah battery) with the flight controller battery.. you can ad a gopro gimble for about 200 grams and the go pro itself.. you just have to play with the battery.
 

Attachments

  • ecalc.jpg
    ecalc.jpg
    104.6 KB · Views: 1,748
Some pictures of the frame. This is the 3rd version, top plate is not attached.
Pictures of the motors starting from smallest to biggest.. different kv's
the biggest is the lowest kv and is currently mounted on the frame..
Some prop sizes, the biggest being 10-4.5 and then 8-4.5 and then 50-30

I will post some pictures of the flight controller tomorrow and the final assembled machine.
If all goes smoothly I should be able to take some video footage of it in action and can compare the power from the smaller motor.


When I get the controller it will need to be wired up,
Arduino will be used to wipe the board and then upload a fresh sketch.
The arduino code is all completed you just need to select in the code how you want to setup the machine.
The code is sectioned out like this and takes about 2 mins .. first time you can spend your time going through all the features..

1 - BASIC SETUP - you must select an option in every block.
* this assumes you have 4 channels connected to your board with standard ESCs and servos.
* 2 - COPTER TYPE SPECIFIC OPTIONS - you likely want to check for options for your copter type
* 3 - RC SYSTEM SETUP
* 4 - ALTERNATE CPUs & BOARDS - if you have
* 5 - ALTERNATE SETUP - select alternate RX (SBUS, PPM, etc.), alternate ESC-range, etc. here
* 6 - OPTIONAL FEATURES - enable nice to have features here (FlightModes, LCD, telemetry, battery monitor etc.)
* 7 - TUNING & DEVELOPER - if you know what you are doing; you have been warned
* - (ESCs calibration, Dynamic Motor/Prop Balancing, Diagnostics,Memory savings.....)
* 8 - DEPRECATED - these features will be removed in some future release
 

Attachments

  • motors.jpg
    motors.jpg
    56.7 KB · Views: 7,067
Nice writeup. I bought stuff to put together a quad during the winter. I've been flying the toy versions and thought I'd get something that wouldn't get blown in the wind. My experience so far has been horrible. I got mine off Goodluckbuy a 450 size. Which wasn't good luck. The quad came with a kk blackboard controller. I came programmed in a plus mode - which I didn't realize for a while. Hard as hell to tell what motors are spinning and when. It would wobble ferociously when I did try to fly. Spent hours trying to figure it out. Broke about 10 props. After I googled and read for days, I tried flashing it for x config with Minsoo Kims firmware, but I could never tell if the settings took. I tried some more times, and broke more props. Kept changing the gains and such - I had no idea what I was doing. All the forums had completely opposite info. From motor numbering to which direction to turn the pots for the gains. Finally gave up after a motor shaft bent in half on a crash. Ran out of patience and props. In the meantime I did order the Hobbyking KK 2.1 flight controller. I never got it out of the box. After seeing your vids, I'm going to get it back out. I finally soldered up the replacement motor a few days back, so I'm almost ready. Just need to remember how everything plugs together. The newer flight controller has an lcd screen on board to show the settings which should help a ton. The thing is my toy Hubsan quads are a blast to fly and are fast. I don't ever have any issues with them, but they are so dang small.
Kind of wish I would have spent more and gotten a decent quad from HK that was already to fly. Tuning this has been my worst nightmare. The price of the newer flight control board and all the props wasn't worth the savings. The sk450 from Hk looks good, or even the smaller hex they have that streams vid to your phone would have been a better choice. I think both of those are brand new though.
1rtf(1).jpg

http://www.hobbyking.com/hobbyking/...adcopter_5X_Package_Mode_2_Ready_to_Fly_.html $189
47013(1).jpg
 
Im glad your getting back into it :)
its a new level of fun flying the proper stuff... they cut through the wind like butter
I think you were very close to getting it to work you know..

yeah the things you def need to check to make sure it will work

- Board direction, has the arrow on it.
-Make sure motors are connected to the correct pin, e.g. top right might be pin 13.. not 1234
- Multirotor style + x Y what ever... has to be selected..
- Prop orientation and motor direction needs to correspond to your settings
-acc calibration
- mag calibration
-esc calibration - set timming to hi, better yet flash it or buy pre flashed escs with simonk
I would not worry about the PIDS until you can get it to take off without fliping.. if it flips on take off there is something going on
if you see it can take off but is shaking/wobbling.. you can try low the P in pitch and roll but leave this to the very last step..

Always check without props off.. check the gyro by holding it in your hand and tilting it around.. you will hear and feel the motor spin up to correct itself...


oh man you will love it once you get it going..
its actually cheaper at the end of the day when you start breaking those RTF kits

will post pictures today and some videos... waiting for the delivery man now !!
 
the prop orientation is vital...

I have flown with mixxed motors mixxed escs.. you can still fly.. its pretty crap but it wont work unless props are around the right way and the motor is spinning in that corresponding direction
 

Attachments

  • propori.jpg
    propori.jpg
    8 KB · Views: 7,038
yeah the things you def need to check to make sure it will work

- Board direction, has the arrow on it.
-Make sure motors are connected to the correct pin, e.g. top right might be pin 13.. not 1234
- Multirotor style + x Y what ever... has to be selected..
- Prop orientation and motor direction needs to correspond to your settings
-acc calibration
- mag calibration
-esc calibration - set timming to hi, better yet flash it or buy pre flashed escs with simonk
I would not worry about the PIDS until you can get it to take off without fliping.. if it flips on take off there is something going on
if you see it can take off but is shaking/wobbling.. you can try low the P in pitch and roll but leave this to the very last step..

That's a long list and a bunch of things to go wrong.. The kit I got was the x525 not the 450, I mentioned earlier, couldn't remember. The chinglish manual had the motor config as 1-2-3-4, but was setup in a plus not x AFAIK. Even the forum threads on the firmware I flashed had three different motor sequences. One had 1-4-2-3, another had 1-2-3-4, the other had 1-3-4-2. Total nightmare for me. Crazy when you have this huge thing oscillating with 4 sharp blades spinning coming right at your and the remote controller inputs aren't working like they should. Thing about mowed me down a few times. I kept thinking of the RC heli pilot that died around that time.

Anyway, I've been flying the hubsan more lately. It is just way too small to see when you get it up high and the controller can cut out on you if you fly too far. I will try and get the new control board mounted and tried out tomorrow hopefully.
 
The first time you setup the quadcopter it will take time.. but once you do it.. its very easy.

why don't you get a multwii pro board? they are $70 and have a okay gps..
standard code features this
- altitude hold
-Mag mode/headsfree
-Stable mode
-Acro Mode
-Horizon mode ( stable mode mixed with acro mode)
-Gps hold, uses altitude hold ( moves upto a 2-3 meter radius depending on conditions)
-gps home. ( when it returns home it can be 2 or 3 meters off as well) still great for a super cheap gps

If you want to do missions you need to either load other code on the board, not hard to do... but load the multiwii code first.


Okay, all went well building this.. no hiccups.. gps took me about a day to figure out and ended up being a simple as code change.

I will take another video again to show you it return to home...
It's sketchy using it and testing it.. but now it works okay and im confident using it.. Love that feature

Id have to say a better gps would be good but the gps that comes with the multiwii pro is okay.. it will hold about a 2-3 meter radius

Here are some videos today of me using it with the new parts

Backyard video
[youtube]G_ORli13g7Q[/youtube]

at the park, gps was not working and barometer was not working well either.. but check it out
[youtube]BS4S6UAKKQE[/youtube]

1.5kg water lift..

[youtube]bZR8zPCOde0[/youtube]
 
Motors have never been to hot to touch just luke warm. lol could prop use upto 12 inch props, the escs have gotten slightly warm.
Im happy with the prop size, kv, speed and payload..

Now i just need to make legs and mount a good camera gimble + camera.
 
here are the pics of the parts
 

Attachments

  • bt.jpg
    bt.jpg
    63.6 KB · Views: 6,992
  • esc.jpg
    esc.jpg
    47.1 KB · Views: 6,992
  • flight controller.jpg
    flight controller.jpg
    93.7 KB · Views: 6,992
  • props.jpg
    props.jpg
    56.1 KB · Views: 6,992
  • gpsmodule.jpg
    gpsmodule.jpg
    54 KB · Views: 6,992
  • thelot.jpg
    thelot.jpg
    43.2 KB · Views: 6,992
I have been having a blast of fun flying this thing!!! it can handle alot of WOT
No paranoia of something overheating or burning motor copper!!

pretty much been flying it everyday.. day or night. just around the house.. neighbours would be loving it!! :lol:

I have had some problems with the barometer ... Still fine tuning the pids.. and its been soooo windy so i have been trying in the wind which makes it a little more difficult

The gps works well.. Most of the time it will stay within 2 meters X and Y axis with gps( can drift more sometimes).. altitude depends on how the barometer is feeling.. wind certainly is not good when you just have foam over it to protect it from strong winds, Really need to change it to a container.

Return to home works like a charm.. it basically turns its directions with the mag compass, flys back, and returns to the home orientation which is where you arm it...

Bluetooth makes tuning and mucking around with the settings a charm to use.. I was shocked I was getting about 30 meters for the bluetooth range but sometimes more..
 
I paid $5 for the app on my phone, the free version is still good. the paid version allows you to edit more settings which you will hardly touch anyway but when you first build it you will certainly use them if you don't have it the way you want in the arduino code.

Also allows you to use the nav features .. you have way points.. moveable home position, auto landing.. change altitude ect..

There is also experimental features like Follow me which uses your phone to constantly update the home position.. pretty cool but yet to test it.

I have not been able to test the waypoint feature properly but from what i have read it works really well..

Something else I thought was cool.. you can set a fence around the gps home position.. if you fly outside that fence it can return to home.
 
some screen shots of the multiwii phone app, good value when the bluetooth addon is like $9 and pc can be used also
 

Attachments

  • exp.png
    exp.png
    33 KB · Views: 7,016
  • gps.png
    gps.png
    95 KB · Views: 7,016
  • tele.png
    tele.png
    101.1 KB · Views: 1,977
  • tele1.png
    tele1.png
    46.6 KB · Views: 7,016
  • waypoint.png
    waypoint.png
    33.8 KB · Views: 7,016
  • waypoint1.png
    waypoint1.png
    54.5 KB · Views: 7,016
I found this on the multiwii forums for tuning the PID for alt hold. (barometer sensor)
I will do this tomorrow if there is not to much wind

Will take a few battery cycles to perfect it

PID settings for ALT works like this:

*P - means how much copter should relay on the baro sensor. Higher the value is, stronger the copter relays on the Baro reading.
*I - is used to compensate drift costed by battery voltage drop during the time. Higher the value is faster the copter will react to voltage drop ( or other factors ).
*D - means how strong the copter should react on data from the accelerator. It is used to react on small up and down movements. Higher the value is copter will react faster/stronger to the small altitude change.

Tuning:

We need to start from settings the Accelerometer.

1. So set the P and I to 0

2. Start to play with D value only. To high D may cause yoyo effect (up and down oscillations). With to low D copter will be not able to react strong/fast enough to hold altitude. Your goal here is to set D to the value when copter don't oscillate up and down and also holds altitude quite well for a not very long period of time. Copter will not hold altitude perfectly at this point during long periods. It will slowly drift up or down, but altitude should be quite stable in short periods.

3. Start to increase P to the point where copter holds altitude over long time period. If the value is to small the copter will drift slowly up and down. If the value is to high yoyo effect may appear. Goal here is to set it to the point where copter holds altitude for quite some time. Copter will still go slowly down due to battery voltage drop over time.

4. "I" is used to compensate the voltage drop. So start to increase the "I" value slowly until you get a perfect position hold during a very long time.
Now your altitude hold should be good enough.
 
Rodney64 said:
Sudscribed, I have a blade 180. Thanks for all the advise and build tips.


if you like the blade 180 you will love your own built machine...
once you tune it so its fairly stable, its a blast of fun to fly, I am using a cheap hobbyking 6ch transmitter, it does the job.. I can fly pretty dam far.


The other day I tested the transmitter, I left it inside my house, walked about 300 meters and it had 3 houses between the tx and rx it cut out at about that point.. so line of sight should be a fair bit better.
Although i would recommend getting the turnigy 9x, more channels.. tho the 6 channel works at it has 2 channels that are pots so you can switch 3 settings.

My next thing to do is get a camera gimble and run it off the flight controller.. also need to get a suitable camera.
 
yesterday I put some foam over the barometer and enclosed the entire flight controller with a plastic container.. used foam on all the holes where the wires run in. Just used the lid on the base and you can easily pop the top off.. I think a cd container would be better because of the lock action it has.

Altitude hold works quite well... It was hovering for quite along time and drifting up and down about 30 cm's id say at the most.. pretty happy with that result.
 
Just come back from our local park. The blade 180 is going well.At the stage I can hover, turn, forward and sideways movement with reasonable confidence. Depending on the weather tomorrow may post up some vid if that's ok.
 
nechaus said:
How much can you lift on the blade ?

I comes with a small camera which weights 25 gms so id say properly not much more than this.

Ill upgrade providing I am still flying it in a couple of months time. Its really easy to fly but doesn't like any wind and maybe I should of just went for something larger but this is really good for confidence and previously with a Blade CP that I had this shattered my confidence. Yes I learnt to fly it but at a cost.
 
I tested gps way points today.. works really well

Things to expect from the multiwii pro board..

Gps hold will hold xy within about 2 meters accuracy ... with stock gps pid settings..
Altitude hold is used with this mode.. works well.. if you put foam over the barometer and cover the flight controller in a container with vents.. altitude hold will work well.. 20-30 cm fluctuations using the on board barometer.. really happy with this now.. it was yo yoing.. but after simple pid tuning it works like a dream


Gps home works well.. seems to overshoot the home position by about 5 meters and then corrects it self. does not matter when its up hi..


Waypoints work well.. Tested it about 15 times now.. each time going further and further...
I keep forgetting to cut the power mid way point.. you can cut the transmitter power in gps hold and it wont effect it. so guessing its the same for a mission...


I tested follow me.. it works well.. but it drift upto the 5 meter mark....
Overall i am super happy with the $70 flight controller and $9 bluetooth...

Weird things that happen is the bluetooth range changes.. sometimes I can get 50 meters 100 meters range even.. and other times its like 5 meters.. I can only think that it's noise in the area... .. you can buy a beefy Bluetooth adaptor/booster... I am happy with the cheap one for changing settings and uploading mission.
 
Back
Top