Chaos upgrade - 72v 20ah LiMn

Ypedal

Moderator
Staff member
Joined
Dec 27, 2006
Messages
12,530
Location
Moncton NB, Canada
Alright.. FINALLY...

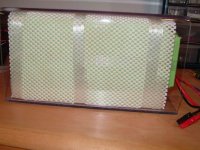
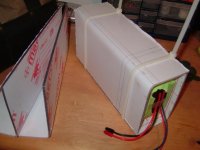
Took a few hours last night of trial and error... but we figured out how to bend Lexan.

This stuff is THICK.. 3/8"

Bent 2 x ' L ' shape sections to box the packs into, using 2 large pieces of angle iron, clamped the sheets into a bench vice, hit it with the heat gun at the seam of the clamp.. once hot, muscle down into shape and hold it while it cools, very strong stuff.

These Lithium Manganese packs do not get hot during use, or charge, so boxing them up is not a problem, actually better protection than metal boxes.
 

Attachments

  • 72v20ahLiMn-1.JPG
    72v20ahLiMn-1.JPG
    46.3 KB · Views: 5,559
I'm going to try dual seat post racks this time, I need to cut some blocks to fit between the 2 pipes, then clamp them together..

Then i need to locate a pipe with the OD the exact same size as the ID of the current seat post tube.. line the inside of the seat-post tube with double thickness basically.

Each rack is rated at 35 lbs, to that's 70 lbs together, the Lithium packs weigh 17 lbs each before the boxing/straps/etc..
 

Attachments

  • dualpost.JPG
    dualpost.JPG
    74.8 KB · Views: 5,555
New tube, Thickest one they had at the local bike shop, it's for a 1.75 tire, but will strech to fit my 2.10 !

2 days after cracking my previous rear rack, i found myself with a flat tire, :evil: :evil: :evil: ... Instead of dealing with removal of torque arms.. zip ties.. rubber wraps, soldered wires.. etc... i removed the tire from the rim while the wheel was still on the bike. :p 
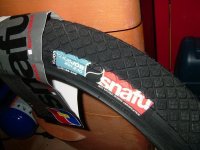
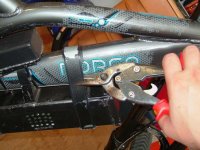
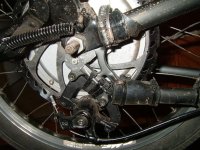
Patched the sucker, and put it back on..

PROBLEM - The damn valve is shreaded. .. . . :x So it's a total overhaul !
 

Attachments

  • ThickTube.JPG
    ThickTube.JPG
    56.8 KB · Views: 5,541
I"m removing the original backlit DB, and installing the new CycleAnalyst using the built in conector ( the 72v 20amp controller on the bike came from Justin ! so it's an easy fit ! )

I'm going to run this setup with the rear crystalyte 406/409 in 20" with disk brakes for a while, I wanted to replace it with a 408/4012 that i have on hand, but not yet.. i know this motor very well and want to run it on lithium for a while yet.

This setup is going to be my daily driver until winter hits... i'll keep updating the battery performance info as i go along !
 
"MAY EXCEED ISO9002 CERTIFICATION"

or it may not! :twisted:
Way to stand behind their product.
Hope you don't end up in the hospital in need of a fer real knob-job after singing the nutcracker, sweet. :)

Plastic is the way to go for a battery enclosure especially if you take a spill.
You don't have to worry about conductive metal making a bad situation worse.
With a little more practice you'll be working your way up to a single piece 3-bend wrap in no time.
 
Nice work. I'm not clear: did you put both 37v20ah LiMn packs together in one polycarbonate enclosure? If so, 34 lbs is a lot of weight to have on the back with the rear hubmotor back there too.
 
I like the dual rack struts. If you can triangulate them together (bolted with a plate or something), it should eliminate any bending that causes fatigue of the metal. All the stress will be on the seat post, which will now be the weak spot.

Double tubing will help, but if you can figure out a way to run a strut(s) from one of those empty holes above the forward shock mount to the upper rack clamp, it will be much stronger.
 
TUZ: The poly boxes will be great if they turn out looking the way i hope, I wrapped each pack in tool-box liner material, perforated white rubber mesh, with the bright Green battery packs underneath it looks cool to me !

Lowell: Thanks !

Xyster: Each pack will be wraped seperately, and both go on the rear rack, I"m going to space them enough to clear the rear tire when the suspension works, but they will be low below the seat, this is not ideal, but it's the only way i could make both packs fit securely.

The front of the bike is pretty heavy with the dual crown forks and it may turn this bike into a Wheelie-Machine :p But unless i rip into one of those packs to re-configure them, this is the only way.

I did ask Andy about opening and shaping the pack .. i got " Uhhhhhmm... :lol: ".. hehe.. so i'm going to run the rest of this season " As Is " .. then next summer if they are working as i expect them to i'll reconfig them to my personal ways.

Fechter: You mean run a strut from the V-Brake mounts on the swingarm? or to the seat post section of the frame? Going to the swingarm would require the right amount of preload/rebound to match my rear shock, if the rates are different it would make things weird i think ??? no ?

I plan to buy a longer rear shock with external reservoire, i've looked on Pinkbike.com many times over, but a heavier spring might also do it. I'll fix that in due time i guess..
 
Nice doings Gaston!

Tommorrow will be a month since I ordered my FalconEV LiMn packs... apparently a late order added to my order slowed down the works, and they are still being built... How long did yours take?

-JD
 
Timing was right on my packs, andy was in Taiwan for a trade show when i inquired, so my packs were shipped at the same time, still took a month and a few more days..

I am still waiting on my LiFe pack, i paid for both packs at the same time, it's been since april/may or so...


No turning back now !!!!
 

Attachments

  • outwithold.JPG
    outwithold.JPG
    74.6 KB · Views: 5,446
I double nut the axles with closed end M14 wheel nuts. As a bonus they keep gunk out of the threads, and double as frame sliders when the bike goes down.
 
Lowell said:
I double nut the axles with closed end M14 wheel nuts. As a bonus they keep gunk out of the threads, and double as frame sliders when the bike goes down.

I mark my drop-out/nuts with a line of permanent ink so I'll know if I need to screw them down hard again.
 
Lowell said:
I double nut the axles with closed end M14 wheel nuts. As a bonus they keep gunk out of the threads, and double as frame sliders when the bike goes down.

If i go to a nuts and bolts place, and request Nylock nuts, ( those things with a nylon washer built into the end of the nut.. ) what thread pitch do these axles use ? I have to read up on this stuff.. M?? x YY etc...
 
Solvent weld. I forget what it's called, but we used it in plastics class to glue sheets and edges together. Clear liquid like paint thinner and can be bought at a chain of stores appropriately named Industrial Plastics.

If the fit up is too loose for solvent welding, epoxy would be my next choice, just remember to scuff the surface to give it some 'tooth'.
 
I haven't had much success with gluing polycarbonate. Whenever possible, I cold bend the sheets to form boxes and use screws or rivets. Cold bending works on thin stuff, like 1/8" or less.

That "Perfect Glue" or "Gorilla Glue" polyurethane would probably work well, since it's flexible when cured. Sanding the surface first is a must. Don't expect a good bond to an edge. The surface area is too small. Use overlapping joints if possible.

I have seen special solvent glue made for polycarbonate, but I haven't tried it.

Keep in mind that contamination with many oils, like chain lube, or especially diesel fuel will instantly destroy polycarbonate. An exterior coat of paint might be a good idea.
 
Oy... so it sounds like bonding this stuff is not going to be as easy as i had hoped...

I know 2 part epoxy works awsome on glass.. but not plexy huh.. :(

I"m going to slice up some test strips right now for destructive testing... :twisted:

The boxes are going to be strapped to the bike rack with wide metal bands, but they will still flex and bend during use.. i want this to remain water tight somehow.. might need to bend some re-inforcement corners..
 
I've glued polycarb windows into race cars before, and if you drop by a glass shop you can probably get some urethane adhesive and primer.
 
Ypedal said:
Don't she look good in her new home ? :p

I use those rubber mesh kitchen cabinet mats for ebike stuff too. :D
 
Back
Top