[Help] My Bike stops working below 50V

Gary786

10 mW
Joined
Nov 11, 2021
Messages
20
Hi guys,

I'm new here. I have a 48v 250W bldc hub motor that stops working as soon as the voltage goes below 50V. If I charge my battery to full, it works perfectly alright ultill the battery reaches 50v or below. The battery power bars in the display starts fluctuating and the motor rarely gets any power.

I did check my charger voltage. Its isn't fluctuating nor my battery voltage is fluctuating. I did reset my BMS Too to see if this was a battery issue? But the issue remains the same.

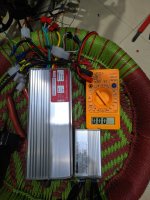
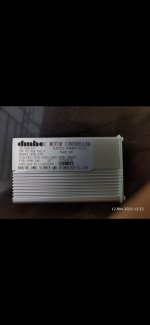
I have a DMHC controller with TC480 Display that allows me to change the 24/36/48V. When I switch to 36V the bike again works on very minimum power. If I use acceleration the bike gradually picks up with very less power.

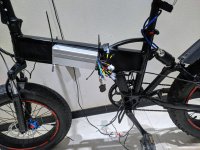
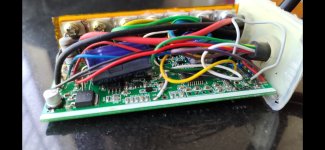
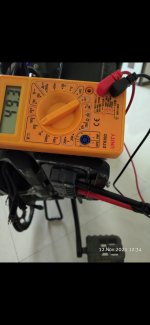
I'm totally clueless as to what is going on. I'm mostly assuming it's the controller which is at fault. The LVC ( Low voltage cutoff) for some reason has gone high suddenly. My bike was working fine untill last week when I tried to install a new ebike light but the 12V line had no power in it. The 12V line gets power only for 1 sec and them goes off. Can anyone help me with this. I'm attaching few photos for a better overview of the issue. Any help would be appreciated.

Thanks in advance
 

Attachments

  • Screenshot_20211112-131509537.jpg
    Screenshot_20211112-131509537.jpg
    651.6 KB · Views: 519
  • Screenshot_20211112-131454113.jpg
    Screenshot_20211112-131454113.jpg
    261.7 KB · Views: 519
  • Screenshot_20211112-131433483.jpg
    Screenshot_20211112-131433483.jpg
    451.1 KB · Views: 519
Without more details on what bike light was hooked up and how, I can make a guess:

If the light was a 12v light that draws more than a few mA (very likely) then it probably damaged the 12v converter inside the controller.

That is usually an LM7812 or equivalent, or it is a LM317 or equivalent, or it is a small SMPS (switched mode power supply) made of numerous small parts.

If it is either the 7812 or 317, simply replacing that part will likely fix it.

If it is a controller that uses a large resistor on the input to that 12v converter section to drop voltage from battery pack to whatever the converter can take, the resistor may be damaged (may look burned or darkened in the middle). You might have to replace those, too, if they don't read with a few percent of the resistance marked on them.


If the converter (or resistor) is damaged then they may not work correctly when the voltage drops below some point (which depends on the damage).


It's unlikely that the 5v converter that runs from the 12v was damaged, but if you still have problems after fixing the 12v, then you may have to replace the 5v converter too. It is usually an LM7805 or equivalent.
 
amberwolf said:
Without more details on what bike light was hooked up and how, I can make a guess:

If the light was a 12v light that draws more than a few mA (very likely) then it probably damaged the 12v converter inside the controller.

That is usually an LM7812 or equivalent, or it is a LM317 or equivalent, or it is a small SMPS (switched mode power supply) made of numerous small parts.

If it is either the 7812 or 317, simply replacing that part will likely fix it.

If it is a controller that uses a large resistor on the input to that 12v converter section to drop voltage from battery pack to whatever the converter can take, the resistor may be damaged (may look burned or darkened in the middle). You might have to replace those, too, if they don't read with a few percent of the resistance marked on them.


If the converter (or resistor) is damaged then they may not work correctly when the voltage drops below some point (which depends on the damage).


It's unlikely that the 5v converter that runs from the 12v was damaged, but if you still have problems after fixing the 12v, then you may have to replace the 5v converter too. It is usually an LM7805 or equivalent.

Thank you for your reply.

I was hooking up a 12v light and also tried to put up a 12v horn to it. Nothing worked! So i stopped using that line now.


I did check LM713, it's working fine untill 49V. As soon as I touch 49V the supply to LM317 shows 39V which i noticed yesterday! I think it's either 317 or some component before 317. Should i change lm317 and see if that helps?

I also checked the 78M05 for 5V line.. That is also working fine.

I did change the resistor and now I'm getting full 54v(fully charged battery) supply on my bike light wire(I don't use ebike light tho)

I tested all 5v and 12v line. All working perfectly alright.
 
Gary786 said:
I was hooking up a 12v light and also tried to put up a 12v horn to it. Nothing worked! So i stopped using that line now.
If you do need to use 12v stuff, I would use a 12v DC-DC that is rated for many times what the horn current requires. If it is an automotive horn, or one that operates the same way, it has a very very high startup current that can damage the 12v supply worst case, or just shut it down best case. If the 12v light is incandescent (halogen, etc., like a typical car or motorcycle light) it also has a very very high startup current. So even though it might be say a 50w light or 10w horn, your 12v converter or supply has to be able to handle potentially a few hundred watts or more for a momentary spike when turning on the light or horn.

If you don't have access to a regular DC-DC of the right size, sometimes you can use 12v DC output power supplies meant to plug in the wall, if they are rated for 100vAC on up per their labels. Ones for higher voltages don't usually work for this. If your battery voltage is always above 50-60vdc, then the power supply (PSU) may correctly start up and run fine. (some won't, many will). I've used a few different ones like this, including a large hefty Dell laptop PSU brick that makes both 5v and 12v at 20amps, and that one successfully ran a car headlight, but not a car horn. The horn shut it off and it had to be powered off and back on to restart it. The light was dimmer than normal because car 12v isn't really 12v, it's 13.6-15v. 12v on a car is pretty much a dead battery. ;)


I did check LM713, it's working fine untill 49V. As soon as I touch 49V the supply to LM317 shows 39V which i noticed yesterday! I think it's either 317 or some component before 317. Should i change lm317 and see if that helps?
If you actually put more than about 36v directly to most versions of the LM317, it will damage it. That's why it has the big resistor between it's input and the battery--to drop the battery voltage down to something the LM317 can handle.

There may be other parts between the 317 and battery voltage, but it is usually just that huge resistor. If you draw out the parts and wires between the battery and the 317, you can see the path, and make sure you test all the parts involved.

There are versions that handle up to 40v or even 60v
https://www.ti.com/product/LM317
and may be even higher voltage versions. So when you replace yours, make sure you either just get the highest voltage version you can, or get the exact version already in your controller. If you already have a higher voltage version and use a lower one, it may fail under normal use because of the controller's design needing a better one.
 
Finally I upgraded my controller to 48V 900W sine wave pedel rickshaw controller without display that costed me $25
I tested it, works better then previous controller. Gives better torque with no change in max speed. Only issue I am facing is with pedel assist sensor. My pedel assist sensor has 4 wires whereas the pedel assist wire in controller has only 3 wires. I'm confused. 👀

Any help would be appreciated. Thank you again
 

Attachments

  • IMG_20211118_191215.jpg
    IMG_20211118_191215.jpg
    1.4 MB · Views: 372
  • IMG_20211118_203542.jpg
    IMG_20211118_203542.jpg
    1.5 MB · Views: 372
Gary786 said:
Finally I upgraded my controller to 48V 900W sine wave pedel rickshaw controller without display that costed me $25
I tested it, works better then previous controller. Gives better torque with no change in max speed. Only issue I am facing is with pedel assist sensor. My pedel assist sensor has 4 wires whereas the pedel assist wire in controller has only 3 wires. I'm confused. 👀

Any help would be appreciated. Thank you again
There are several types of PAS sensor.

Many of them provide only a single signal, which is typically just a pulse whenever a magnet on a ring passes the sensor.

Some provide two separate signals which provide directional information, in various possible ways.

This page explains some of the versions of sensor operation, if you're curious
https://ebikes.ca/getting-started/pas-options.html

It is possible that you can still use a sensor that provides two signals to run a controller that only uses one. Depends on what the sensor outputs actually are. If they are just pulses, on and off, rather than a slowly changing signal, it's likely that using just one (either one) of them will work.

Since your original controller still turns on, then hook that up to your battery, and your PAS sensor. You don't need any other parts, just enough to provide power and ground to the sensor and let you measure the output from the sensor as you turn the pedals.

Set your voltmeter to 20VDC. Put the black lead on the battery negative wire (ground). Use the red lead on each of hte four sensor wires, and note down what each of them reads as you slowly move the pedals in a forward direction.

Two of the wires should have voltages that change. If they change from around 0v to around 5v, then you can try either of those on the signal wire of your new controller.

One of the wires should read steady 0v, and that is ground. The other wire should read steady 5v, and that is the 5v supply wire from the controller.


If you get a steadily changing voltage on the signal wires, they will probably not work with your new controller, and you may need a new sensor.
 
amberwolf said:
Gary786 said:
Finally I upgraded my controller to 48V 900W sine wave pedel rickshaw controller without display that costed me $25
I tested it, works better then previous controller. Gives better torque with no change in max speed. Only issue I am facing is with pedel assist sensor. My pedel assist sensor has 4 wires whereas the pedel assist wire in controller has only 3 wires. I'm confused. 👀

Any help would be appreciated. Thank you again
There are several types of PAS sensor.

Many of them provide only a single signal, which is typically just a pulse whenever a magnet on a ring passes the sensor.

Some provide two separate signals which provide directional information, in various possible ways.

This page explains some of the versions of sensor operation, if you're curious
https://ebikes.ca/getting-started/pas-options.html

It is possible that you can still use a sensor that provides two signals to run a controller that only uses one. Depends on what the sensor outputs actually are. If they are just pulses, on and off, rather than a slowly changing signal, it's likely that using just one (either one) of them will work.

Since your original controller still turns on, then hook that up to your battery, and your PAS sensor. You don't need any other parts, just enough to provide power and ground to the sensor and let you measure the output from the sensor as you turn the pedals.

Set your voltmeter to 20VDC. Put the black lead on the battery negative wire (ground). Use the red lead on each of hte four sensor wires, and note down what each of them reads as you slowly move the pedals in a forward direction.

Two of the wires should have voltages that change. If they change from around 0v to around 5v, then you can try either of those on the signal wire of your new controller.

One of the wires should read steady 0v, and that is ground. The other wire should read steady 5v, and that is the 5v supply wire from the controller.


If you get a steadily changing voltage on the signal wires, they will probably not work with your new controller, and you may need a new sensor.
Thank you so much for helping me out with this! You suggestion worked for me. PAS works fine now.

I also wanted to ask. Should i install a torque arm with this controller set up? Controller specs are 35A 900W and motor is 250W peak 750W.

I've notices after using the new set up, even if I loose the hub axle nuts, the tyre won't fall off. Post adjusting it with a tool it falls off. Am I doing anything wrong here? I'm a bit scared. Please suggest
 
Gary786 said:
I've notices after using the new set up, even if I loose the hub axle nuts, the tyre won't fall off. Post adjusting it with a tool it falls off. Am I doing anything wrong here? I'm a bit scared. Please suggest

Are you using torque arms or close fitting tabbed washers? If not, the motor axle is probably twisting and jamming in the axle slots. You should deal with this before the axle spins around and plucks out the motor wires.
 
Gary786 said:
I also wanted to ask. Should i install a torque arm with this controller set up?
Since you are having trouble with it then yes.
Assuming it's a front motor in teh front fork, then the Grin Tech v2, 3 or 4 arms should be able to fit on each side even with that dropout/fork design. The left side you can bolt the v2 arm
https://ebikes.ca/shop/electric-bicycle-parts/torque-arms/torqarm-v2.html
to the hole beneath your brake caliper. The right side you can do the same if there is one, if not then use the hose clamp to secure it to the round fork leg tube, with the v2 v3 or v4
https://ebikes.ca/torqarm-v4.html
https://ebikes.ca/shop/electric-bicycle-parts/torque-arms/torqarm-v3.html

If it's a rear hubmotor in the rear dropouts, then one of those arm types should still work with it, but you'll need to examine your dropouts and mounting points available for them to be sure you get the right ones to fit each side.

If you are using tabbed washers then when you install the torque arms you can probably just not use the tabbed washers anymore--they don't work very well in many applications unless installed just right, and once a problem starts it usually means things are damaged enough or poorly-fitting enough to not be able to work anymore.


There are clones of these torque arms available cheaper around the internet, but they are not generally as precisely made, so your axle may rock in the hole in the arm and eventually damage or loosen the fit over time and allow the axle to spin and damage your wires. It probably wont', but it could.

Ideally the arm will fit so tightly over the axle that you may need to gently tap it on there but most arms wont' fit that well because there is variation in the axles themselves.

Controller specs are 35A 900W and motor is 250W peak 750W.
Something to consider with that mismatch in power levels is that if you push it hard a lot, you could overheat the motor. Motors generally can take significant short bursts of more power than rated continuously for, but a lot of bursts or long ones can overheat them, espeically small geared hubs like yours. I'd just keep an eye on the temperature now and then when testing it out in your harshest conditions / rides by putting your hand on the motor casing every few minutes. if it never gets hot then you're ok, but if it gets too hot to keep your hand on there especially by the end of the ride, you may want to turn the amps (current) / watts (power) down on the controller.

I've notices after using the new set up, even if I loose the hub axle nuts, the tyre won't fall off. Post adjusting it with a tool it falls off. Am I doing anything wrong here? I'm a bit scared. Please suggest
I'm not sure if by "tyre" you mean "whole wheel", or just the tire itself.

If you mean the tire is coming off the rim, then it's either the wrong one for the rim, or it's not seated correctly or not inflated enough.

If you mean the whole wheel is coming off the fork at the axle, then see the recommendations at the top of this post.
 
Chalo said:
Gary786 said:
I've notices after using the new set up, even if I loose the hub axle nuts, the tyre won't fall off. Post adjusting it with a tool it falls off. Am I doing anything wrong here? I'm a bit scared. Please suggest

Are you using torque arms or close fitting tabbed washers? If not, the motor axle is probably twisting and jamming in the axle slots. You should deal with this before the axle spins around and plucks out the motor wires.
Currently using tab washers on both the sides. I have not faced any issues but I'm a bit scared of twisted hub axle. I've ordered a torque arm. Will update you guys once I install it. Hopefully till then nothing should go wrong.
 
Back
Top