Hey all, I thought I'd share my Townie conversion since you were helping me out with my questions.
A few weeks ago I tried one of the lime bikes and was completely enamored. I've had this townie for over 15 years and have hardly ridden it, everything is just too hilly around me. Immediately I wondered if there was a way to make it electric and realized that it was totally a thing one could do!
The TSDZ2 was recommended to me since I was aiming for a more natural bike feel that would automatically help rather than having to think about a throttle to switch on/off. I also liked the thought of less gears, as this was a 21-speed and I wasn't using all of them. I ordered a kit with 36V 350W motor, XH18 display (because I knew I would lose the left shifter anyway, so this fills that gap nicely), and lights. I ordered a smallish battery 36V 9ah. The goal was to make this bike specifically for grocery runs and other local errands, not for a lot of range. I bought a townie-specific cargo rack, and two more wire baskets (I already had the front basket).
Keep in mind, that I didn't even remember how to shift this thing it had been so long, let alone know how to take it all apart. But I'm fairly handy and youtube is a thing. I got a bike tool set and I was good to go.
The youtube videos made everything look so easy! haha! I could not get my original pedals off for the life of me, so I just left them and removed them with the cranks (also hard! but doable!) For the bottom bracket removal, I ended up using one of my wood clamps to hold the bracket wrench in the right position as I stood on it to loosen it. Spent 10 bucks on new pedals.
Because I was removing the front three gears, I needed to get rid of the front derailleur (again, I had no idea what this was even called not too long ago). But it was closed, so I needed to open up the chain to remove it. Another learning experience.
Then I needed to reroute the rear derailleur cable. On this Townie, this cable runs through a fixed loop/eyelet that is on the underside of the frame and is part of the frame. So I had to undo the cable just to get it out of there. Then of course my gears were all screwy so then more youtube videos to learn how to adjust those. I don't have a bike stand, so to help hold the bike as I adjusted the cable, I ended up using some rope to hang the bike from the ceiling in my garage.
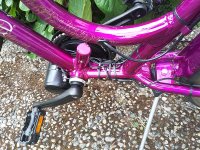
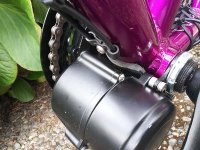
For the TSDZ2 motor, because I don't have a place to latch the anti-rotation bracket on this style of bike, I used the advice to just let it rotate up against the frame, and used a piece of rubber cut from a 1.5" pipe coupling as a cushion and that seems to work well.
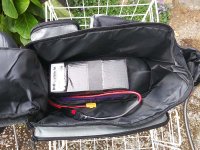
Battery is small, and actually just duct-taped to the cargo rack. Then I cut a hole in a rear pack and slipped it on top. I feel like this is more secure for the battery, it's not jostling around in the bag and the metal cargo rack will help dissipate heat. I would do it differently if I was planning on taking battery with me, but I'm just keeping it on the bike.
So far it's been so fun. I took it for an impromptu ~16mi round trip to test its range, and only lost 1/4 of the battery. The 350W seems pretty decent - I have to work a little bit on the steeper hills still, but they are way easier than before. If I was doing regular long commutes, I would recommend 500W, but the fact that I could do 16mi when I'm 50 and out of shape with little effort with a 350W is pretty good. I like that it's a bit stealthy and the little motor is the only thing giving it away as an ebike.
Issues so far. My speedometer/odometer stopped registering after a couple miles. It wasn't magnet alignment. My speed sensor has a y-splitter which also goes to power lights (supposedly). I connected the speed sensor to the other half of the y-splitter and that worked, so that's good again. But I still have no lights. I'm trying to work with pswpower.com on a resolution for this, but china.
With this motor, I have to remember to turn on the display before I put my feet on, or else it won't help me correctly. I'm glad I read about that here because that would have freaked me out that I got a bad motor.
I wish the motor had longer cables coming out of it. Because I have to rotate the motor forward, these get really short. It makes the connections difficult and right now I'm having to make some underneath the frame, when I'd like to have them all protected inside.
The motor came with bullet connectors, the battery came with anderson connectors. Electrifybike.com, where I got the battery, was helpful and sent me some extra anderson connectors already pigtailed along with some heat-splice thing-a-ma-bobs.
Anyhoo, this has been a fun project, and I am so in love with my bike now. This has been a great resource, and I hope you enjoyed my build story!
A few weeks ago I tried one of the lime bikes and was completely enamored. I've had this townie for over 15 years and have hardly ridden it, everything is just too hilly around me. Immediately I wondered if there was a way to make it electric and realized that it was totally a thing one could do!
The TSDZ2 was recommended to me since I was aiming for a more natural bike feel that would automatically help rather than having to think about a throttle to switch on/off. I also liked the thought of less gears, as this was a 21-speed and I wasn't using all of them. I ordered a kit with 36V 350W motor, XH18 display (because I knew I would lose the left shifter anyway, so this fills that gap nicely), and lights. I ordered a smallish battery 36V 9ah. The goal was to make this bike specifically for grocery runs and other local errands, not for a lot of range. I bought a townie-specific cargo rack, and two more wire baskets (I already had the front basket).
Keep in mind, that I didn't even remember how to shift this thing it had been so long, let alone know how to take it all apart. But I'm fairly handy and youtube is a thing. I got a bike tool set and I was good to go.
The youtube videos made everything look so easy! haha! I could not get my original pedals off for the life of me, so I just left them and removed them with the cranks (also hard! but doable!) For the bottom bracket removal, I ended up using one of my wood clamps to hold the bracket wrench in the right position as I stood on it to loosen it. Spent 10 bucks on new pedals.
Because I was removing the front three gears, I needed to get rid of the front derailleur (again, I had no idea what this was even called not too long ago). But it was closed, so I needed to open up the chain to remove it. Another learning experience.
Then I needed to reroute the rear derailleur cable. On this Townie, this cable runs through a fixed loop/eyelet that is on the underside of the frame and is part of the frame. So I had to undo the cable just to get it out of there. Then of course my gears were all screwy so then more youtube videos to learn how to adjust those. I don't have a bike stand, so to help hold the bike as I adjusted the cable, I ended up using some rope to hang the bike from the ceiling in my garage.
For the TSDZ2 motor, because I don't have a place to latch the anti-rotation bracket on this style of bike, I used the advice to just let it rotate up against the frame, and used a piece of rubber cut from a 1.5" pipe coupling as a cushion and that seems to work well.
Battery is small, and actually just duct-taped to the cargo rack. Then I cut a hole in a rear pack and slipped it on top. I feel like this is more secure for the battery, it's not jostling around in the bag and the metal cargo rack will help dissipate heat. I would do it differently if I was planning on taking battery with me, but I'm just keeping it on the bike.
So far it's been so fun. I took it for an impromptu ~16mi round trip to test its range, and only lost 1/4 of the battery. The 350W seems pretty decent - I have to work a little bit on the steeper hills still, but they are way easier than before. If I was doing regular long commutes, I would recommend 500W, but the fact that I could do 16mi when I'm 50 and out of shape with little effort with a 350W is pretty good. I like that it's a bit stealthy and the little motor is the only thing giving it away as an ebike.
Issues so far. My speedometer/odometer stopped registering after a couple miles. It wasn't magnet alignment. My speed sensor has a y-splitter which also goes to power lights (supposedly). I connected the speed sensor to the other half of the y-splitter and that worked, so that's good again. But I still have no lights. I'm trying to work with pswpower.com on a resolution for this, but china.
With this motor, I have to remember to turn on the display before I put my feet on, or else it won't help me correctly. I'm glad I read about that here because that would have freaked me out that I got a bad motor.
I wish the motor had longer cables coming out of it. Because I have to rotate the motor forward, these get really short. It makes the connections difficult and right now I'm having to make some underneath the frame, when I'd like to have them all protected inside.
The motor came with bullet connectors, the battery came with anderson connectors. Electrifybike.com, where I got the battery, was helpful and sent me some extra anderson connectors already pigtailed along with some heat-splice thing-a-ma-bobs.
Anyhoo, this has been a fun project, and I am so in love with my bike now. This has been a great resource, and I hope you enjoyed my build story!