First Build - Can't get LCD to power up

GuyP

100 µW
Joined
Mar 30, 2020
Messages
9
Hi, I'm in Covid 19 lock down here in New Zealand building an ebike. This is my first build so I'm I'm a total newbie. I've built a 4p13s 48v battery that seems to be charging ok.

I bought this kit on Amazon

https://www.amazon.com/JAXPETY-1000W-Electric-Bicycle-Conversion/dp/B07F1FLHC8/ref=cm_cr_arp_d_pl_foot_top?ie=UTF8&th=1

I then decided I would prefer a LCD readout so bought this controller / lcd kit:

https://aliexpress.ru/item/32616948234.html

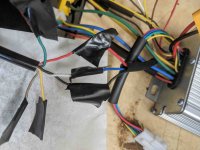
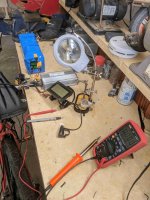
I have read Micah Toll's ebike book and found this helpful in putting the bits together. However when I completed all the connections and attached the battery I got no LCD startup (screen remains blank) and the throttle does nothing. I'm not quite sure what I've done wrong. Obviously I have had to re-solder connections from the original Contoller kit onto the new LCD controller.
Where might I start with trouble shooting? I'm not even sure my new controller and LCD are compatible with the Amazon rear hub motor.

LCDControler.png

At this stage I haven't installed the pas sensor since I don't have the tools to install yet. I'm Not sure if this is part of the problem?

Would really appreciate some help sorting this out.

Guy
 
the first thing to check to be sure there is power, is to make sure the battery itself is working. jsut because it is charging doesn't mean it's outputting voltage correctly. what voltage does it read at the bms (if any) main output wires, when not connected to the controller? what voltage does it read at the main output wires when it is connected to the controller and you try to switch the controller on?


next is to ensure that any "ignition / keyswitch / door lock / etc" wire, usually a thin red or orange wire, is connected to battery positive. that wire provides battery power to the controller's internal power supply for it's brain, and the lcd.

if there is a throttle with switches or displays or whatever on it, and you are connecting anything other than just the three throttle 5v/signal/ground wires to it, like battery voltage, any miswiring of this (even momentarily) can destroy the throttle *and* the controller/lcd, by connecting battery voltage to the low voltage stuff, etc.


also, i can't see the aliexpress page (everything is blank on it; happens sometimes where some people can't see some pages there), so i can't tell if the controller and lcd came together, as a known-working-combination of parts.

if they didn't, and came from separate places, it is likely they are not compatible, even wires mayh not be the same color or order, and the data is usually different formats, so they can't talk to each other even when the wiring is the same.
 
HI, I've edited the Aliexpress link above. Hopefully it works now.
 
The display / controller combo you have posted seems to be pretty average Kunteng stuff to me.
I've used those displays and controllers for a long time without issues. Usually you simply need to hook up your battery to the controller and connect the display as well. As soon as you push the middle button of the "satellite" the display should light up.
Otherwise controller or display might be damaged. At least given your battery works fine.

Combining Kuteng stuff with other hub motors is usually a no-brainer. Unless you have a geared hub motor with high internal speed or a real picky hub-motor such as a MAC pretty much anything will work with a KT.
 
Did it work with the original controller? If so, there is one obvious solution. If not, that would point to a different problem.

Original kit throttle has a voltage indicator, which does not appear to be provided for on the replacement controller. Provide detailed steps how you dealt with the difference in wiring, pictures showing this would be helpful.

Do you get ANY indications of power, ANYWHERE on the kit?

As already mentioned, test for power output of battery an essential step.

Personally I would most definitely advise avoiding a mix-and-match approach on your very first kit, also I would avoid making permanent soldered connections until the selection and modification process is fully complete.

These kits are not AT ALL standardized in the way most Westerners would expect.
 
Hi, really thankful for your help with this everyone. So I didn't wire the original controler in until after i'd tried to get the LCD controller to work. I now wish I had started with the original controller which would have given me a easier build.

Anyway, with the battery disconnected I get over 50v instantly. With the Battery connected to the controller I get a very slow increase in voltage from 3v up to over 40 over about 10 minutes. I then tried to switch the LCD on. It blinked momentarily and then went off again. When I retested the voltage I saw the voltage had returned to climbing from 3v.

I'll include some pictures of my setup below so you can see what things look like.. I've also included a picture of the throttle wiring. This was not my first shot at this I tried with the green wire instead of the white wire and when this didn't work I tried some other combinations and this may have wrecked the throttle. Another rooky mistake. wish I had talked to you guys earlier.

BigPicture (2).jpg

Battery (2).jpg
 

Attachments

  • ThrotleWiring (2).jpg
    ThrotleWiring (2).jpg
    334.2 KB · Views: 744
  • BenchSetup (3).jpg
    BenchSetup (3).jpg
    316.9 KB · Views: 744
GuyP said:
Anyway, with the battery disconnected I get over 50v instantly. With the Battery connected to the controller I get a very slow increase in voltage from 3v up to over 40 over about 10 minutes.

that means the battery is protecting itself by shutting it's output off. (it doesn't seem off because there is leakage, but it is off).

that means the system can't power on because it doesn't have any power from the battery.


so your problem is in the battery (there might be other problems in the system itself, but you have to fix the battery first).

the most common problem is an unbalanced battery, where some cells are lower in charge state (voltage) than others, and with a bms that protects based on this, the more full ones cause the bms to stop the charging process before the lower ones get full. and the lower ones cause the bms to stop the discharging process before the fuller ones are empty.


so...the first thing to do is simply leave the battery on the charger at least overnight. if it has a balancing bms, and it is unbalanced now, this will help it charge up more fully. if it is badly unbalanced, it may take days or weeks to fully fix and allow it to fully charge.

if it does not have a balancing bms, this will not fix an unbalanced battery problem, but it will at least let the cells get as full as they can, which might let the battery become operational enough to test the rest of your system.


so...if leavign it on the charger for as long as you can manage doesn't make it usable, we'll have to walk you thru disassembly and testing of it.
 
Ok, so my BMS is this one which I believe is a balancing BMS.

https://www.aliexpress.com/item/32738815803.html?spm=a2g0s.9042311.0.0.27424c4duinXR4

I bought the majority of my cells from the one source but I believe I bought 4 extra cells from a second source. I think I did this because transport costs were exorbitant for larger numbers of cells at the time (this was 18 months ago) I am now beginning to wonder if the 4 extras were not legit cells. They may be the ones causing the balance issues. I have put the battery back on the charger and will see what happens over the next few days. Is there an easy way to know if the battery has balanced and is now ready to use?
 
you could measure the voltages on each cell group. if they are all equal (within a few hundredths of a volt or less), then it's balanced.

if some are very different (tenths of a volt) then those groups have a problem of one kind or another. if you manually rebalance them with external loads (high cells) or chargers (low cells) or simply leave it on the charger long enough to let the bms fix the problems, until everything is the same voltage, then do a discharge / charge cycle, and the problems don't come back, then it was just cells not starting out at the same state of charge when you built it.

but if the problems come back, gradually or suddenly, then you have problematic cells or interconnects or wiring or bms channels, and you'll have to repair or replace parts once you determine which one(s) cause(s) the problem(s).


btw, its' also possible the four cells are legit but the rest are not. or that none are, or that all are.

unfortunatley it's difficult to tell without individual cell testing and classification and comparison to a known-good known-authentic cell under the same test conditions with the same test equipment whether or not any particular cell is genuine and new/unused, good, etc.

you can't really tell by looking at them, because wrappers, markings, etc., can all be faked just fine.
 
Oh, my.

Before I waste a bunch of both your time and mine, I need to know if you are one of those people who need a steady dose of lollipops, rainbows, and unicorns just to make it through the day, or would you rather have a straight shot of reality from someone who truly, deeply, just does not care if it makes you feel bad.

Because it will.
 
OK. I need to know how your battery is constructed, hopefully not soldered or a Vruzend kit.

The individual you mentioned learning from on the Internet has done a glowing review on, and endorsement for, the Vruzend kit, almost certainly for cash payment. That kit largely sucks and if you used one, high odds it is PART of your problem.

Now, someone you should look up here is DrkAngel, particularly his pack builds, and most especially his procedures for testing and matching cells. He is dealing with recycled, used cells, which are expected to be highly variable, unlike brand new cells. New cells, that is, all purchased in ONE BATCH from reputable sellers. You do not have that. At BEST, you have four cells likely to be at a different state from the rest, not to mention quality and formulation. You may have cans full of sawdust or just the crappiest four cells that they had laying around.

You gave some voltage measurements, "over 50" and "over 40". That is NOT GOOD ENOUGH. 54.6 is what full should be, 54.5 is not horrible, 54.7 could be a serious problem, 54.4 indicates a significant problem, 54.8 means GET IT OUT OF THE HOUSE, NOW. Put a fresh battery in your meter, get a better one if needed, because you need an accurate meter, yesterday.

You are going to tear your battery apart, probably completely, but for now to get at the BMS and measure the individual voltage strings. They will be additive, subtract previous reading from the next, ie. you will get 4.2, 8.4, 12.6, (in an ideal world), which would mean string voltages of 4.2, 4.2, 4.2. more likely will be corrected numbers like 4.1,3.8, 4.2. The 3.8 string is a problem, likely where one of the four oddball cells is, hopefully they are marked in some way, likely not, test all strings. Then you isolate the bad strings, either attempt to charge separately, or tear the string apart, isolate the bad or low cell, charge that one, let sit, test again, discharge, test, charge, test, repeat, throw away on failure. Read and study Drkangels procedure, there are other examples but his is pretty thorough. YOU MUST TEST UNDER LOAD.

It is quite likely that your battery will require a total teardown and rebuild. It IS possible that charging for a greatly extended period might solve the problem. Maybe. If this does happen, regular, detailed monitoring will be required for quite some time to make certain the battery will STAY that way, as questionable cells very often do not.

This is your primary, most time-consuming, and most expensive problem to solve. This is where the biggest mistake was made, possibly two depending on construction method used. If soldering or Vruzend kit was used I would recommend you strip it completely and start over from scratch using a viable connection method and hope you have not lost hundreds of dollars worth of damaged cells.

Throttle looks nice, with that voltage display. Throttle is near impossible to prevent water intrusion, not a huge problem as most throttles operate on only 5V. HOWEVER, with a voltage display, full pack voltage is now present in the single component MOST LIKELY to suffer water intrusion. 54.6 volts will do a LOT more damage than 5, also normally the battery, the most expensive component on the bike, does not usually have such a connection to the throttle. Likely to only fry the controller, and those are usually under $100, so not so horrible. But, SFAIK it does rain quite a bit in New Zealand, so your voltage display belongs someplace else.
 
Ok, sounds like I drank the kool aid, it's a Vruzend kit.

ProblemBattery (1).jpg

I pulled the shrink wrap off and measured the voltage strings with low voltage results on string 12 and 13


I then investigated why strings 12 and 13 had such different voltages and discovered that I had swapped the last two red BMS wires by mistake when I built the battery. I swapped them back and have put the battery back on the charger. Not sure if the damage has already been done. Here are the voltage string results after swapping the wires back and before charging. The battery has just gone on the charger now (545pm US time)

BMS Voltages - Google Sheets - docs.google.com.png
 
the last string has dropped so low in voltage that the cells may be damaged, and could be a risk of fire. i'd recommend replacing them and not charging them. they have essentially been completely shorted out for the whole time that the balance wires were swapped.

unfortunatley you wont' know if they were damaged in a way that could cause a fire until they do so, and it's a little late then.

(they may well appear to charge up normally and operate normally, but have hidden damage inside that you won't find out about until :flame: ) :(

also, if your bms allows the battery to charge with cells that low, then the bms itself is defective (or damaged), because it is there to protect against such things (overdischarge, overcharge, or charging cells that have gone outside the allowable range for safety).


so the charging process should not be working at all right now.


if it is, you should replace the bms at the same time as the cells, preferably with a different brand/model that does correctly protect against unsafe conditions.
 
Ok, taken the battery off the charger. It didn't seem to be charging. Still 48.65v after 2 hours. So where would you suggest I buy new cells from on AliExpress. Is there a seller that you trust?
 
someone else might; i myself wouldn't buy batteries there (i don't trust any of the ones iv'e seen so far because they often have obvious problems with the provided information, either obviously falsified or else questionable, or just plain copied from someone else's page somewhere else in it's entirety....kinda like ebay. )

there are a number of threads about trusted battery / cell sellers / vendors around the forum, if you want to read what others have used.

or someone else will probably be along to let you know who they buy from.


alternately, you could simply buy the same cells from the same place you got them before--then they will "match", at least as well as anything might that's not necessarily all from the same batch. that's assuming they still have the same kind.

if you get different cells (different brand, or model number, etc) than the ones you have, they won't have the same properties, and won't behave the same as the rest of the cells in the pack. that generally leads to problems over time with balance, etc.


not sure if any of these threads would be helpful, but these lists do have some relevant topics:

https://endless-sphere.com/forums/search.php?keywords=buy+cell*&terms=all&author=&sc=1&sf=titleonly&sr=topics&sk=t&sd=d&st=0&ch=300&t=0&submit=Search

https://endless-sphere.com/forums/search.php?keywords=buy+batt*&terms=all&author=&sc=1&sf=titleonly&sr=topics&sk=t&sd=d&st=0&ch=300&t=0&submit=Search

https://endless-sphere.com/forums/search.php?keywords=buy+18650*&terms=all&author=&sc=1&sf=titleonly&sr=topics&sk=t&sd=d&st=0&ch=300&t=0&submit=Search

there's also probably good info in people's battery build threads.


it's good that it wasnt' charging; it means the bms is probably still working, and that it does have protection against charging cells that low. :)
 
First, you have there a high-grade incendiary device with an undetectable "timer" of unknown mechanism. Get it into a fireplace or covered BBQ grill immediately.

Google lion battery fire, watch several. Be aware that MOST, but NOT ALL, such fires happen when charging cells, just like yours. Some happen apparently randomly. Lookup dogman dan's garage fire, on this site.

Now, if you happen to find yourself in a burning building, drop to the floor. Hot air and smoke will rise, there will be less smoke and more breathable air on the floor. Look around and hopefully you will see some light around a door or window. If your wife and/or children are sleeping upstairs, they are probably already dead. If you do not see any evidence of a door or window, well, I hear they do real nice funerals in kiwi land.

The Vruzend kit relies on a friction fit between two pieces of plastic. Bumps and vibration will loosen the connections, they will vary throughout the battery, charging, discharging, and balancing will be uncertain and uneven, over time re-creating the condition you have right now. At best they just do not work very well, especially under high amp draw, such as your kit will experience fairly frequently. Anything where recommended assembly involves whacking it repeatedly with a large wooden mallet should raise some questions.

Be immediately alert and highly suspicious whenever a supposedly "knowledgeable" individual recommends a specific commercial product, especially when this is not accompanied by thorough testing and multiple, long-term, real-world usage info. They got paid to lie to you.

Strongly recommend you get yourself one of the spotwelder kits available and described here, some good nickel strip, and start over. Also, you may notice that most commercially made batteries use different colored wires for each of the BMS balance connections, you are now acutely aware of just exactly why that is.

An alternative would be Agniusm's product, examine his engineering skills, previous work, and testing methodology for yourself. Do this more thoroughly than you checked out your current kit, I am pretty certain the creator does not pay anyone to lie to you.

DO NOT forget that after dealing with all these issues, you STILL have four cells that are suspect and AT BEST potentially unmatched, possibly severely so, to the rest of the cells in your pack. Which, over time, can recreate the aforementioned dangerous condition. Possible they are all in the dead string, sometimes you get lucky but I would not count on it. Seek out the testing methodology mentioned earlier and use it.
 
Rebuilt the battery replacing 4 new cells that I had fried. All working now and enjoying riding the bike. I've learnt some lessons the hard way on this project. Thanks for your help everyone.
 
Back
Top