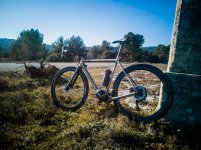
Hi everyone, here is my e-road bike build.
This project has taken almost a year from the beginning to finish, and I am quite happy with the result.
The aim of this build was to build an entire high-end electric bike from scratch while kipping the cost as low as possible.
The objectives were :
-14.5kg max
-3000€
-good amount of torque (most electric road bike develop 35 to 55N.m and I thought it was low at the time)
-100km of range (with 1500m of positive climbing+)
-hydraulic disc brake
-1x chainring with a big cassette
-neat look
Motor:
I first decided to go for the m500 because it could deliver up to 95N.m of torque and was not too heavy (even if not the lightest).
Frame:
Once the motor selected, I went to a bikeshop to do a shimano bikefiting study. This way I was able to design the "perfect" frame based on my measurements. I have designed the frame using BikeCadPro, which is an awesome software developed for bike builders. When I was happy with the design, I looked for a titanium bike builder in China and found one who did a fantastic job. It took around 3-4 months between the 1st contact and the frame delivery.
Battery:
My guideline for the design was "Neo-retro". I wanted a tubular frame as in the old days, but with profiled rim and disc brakes.
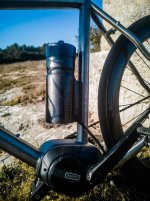
As I was using this kind of design, the problem was to integrate the battery nicely. For this reason I had the idea to hide the battery in a fake water bottle.
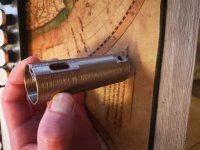
I looked online and could not find a battery with a decent capacity and an aesthetic design, so I decide to build my own. In fact, I bought a cylindrical 10s3p which was built with sanyo cells 18650GA on my request and rebuilt the casing and wiring system.
While waiting for the frame, battery and other components to arrive, I bought a 3D printer and started the design of this battery casing.
here is the result of the final product (The paint job has not been well executed but the system work perfectly.

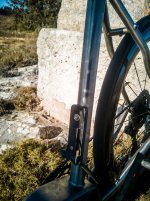
To install or remove the battery, you just need to slide it on or out of its support and there you go

There no apparent cable on the battery which I think is nice, the cables stays on the support and the connection between the battery and the wiring harness is made with bullets connectors.
Brakes and Shifters:
At first I went for some sensah 1x11 shifter which works flawlessly, however, the brakes were some semi hydraulic from aliexpress and I did not like the filling. The rear derailleur is a shimano GRX812 and it works great with the sensah shifters.
I then wanted to invest in shimano grx810 shifters but could not find them in stock during several month. After a pretty long wait, I have finally been able to find the 600 version (which is in my opinion identical), and bought them.
Wheels:
I went for some 50mm profile carbon wheels, I bought them from EliteWheels (aliexpress), I was scared at first but they are just awesome.
Derailleur and cassette:
The cassette is a 11-42 shimano slx and the derailleur is the GRX 812 from shimano

The cassette needs some cleaning but apart from that it is an awesome combination in my opinion.
Right now I have ridden the bike for 1500km and everything works like a charm. I live in near the Mont Ventoux (France) and its ascension was one of my first ride. This day I did 100km with 1500m of positive climbing and still have 15% in the battery.
The only thing I do not like about the bike is the motor itself, more precisely the esc. It cannot be configure and the assists modes that are present are too powerful for me. I understand that it is an mtb motor and thus it as been design for this application, nevertheless I would have like a feature to adjust the power of each modes (as you can find on the specialized eroad bikes).
final specs of the bike:
-15kg
-around 3500€
-120km 1500m positive climbing of range
-Grx600 brake calipers and shifters
-Grx812 derailleur
-11-42 cassette
-awesome look (in my opinion)
All in all, everything on this build went according to the plan, if I could change anything, it would be the motor, I would probably go for the m800 which would be better adapted for my use and would remove 1kg to this build.
I hope you will enjoy reading this post as I enjoyed building this bike !


